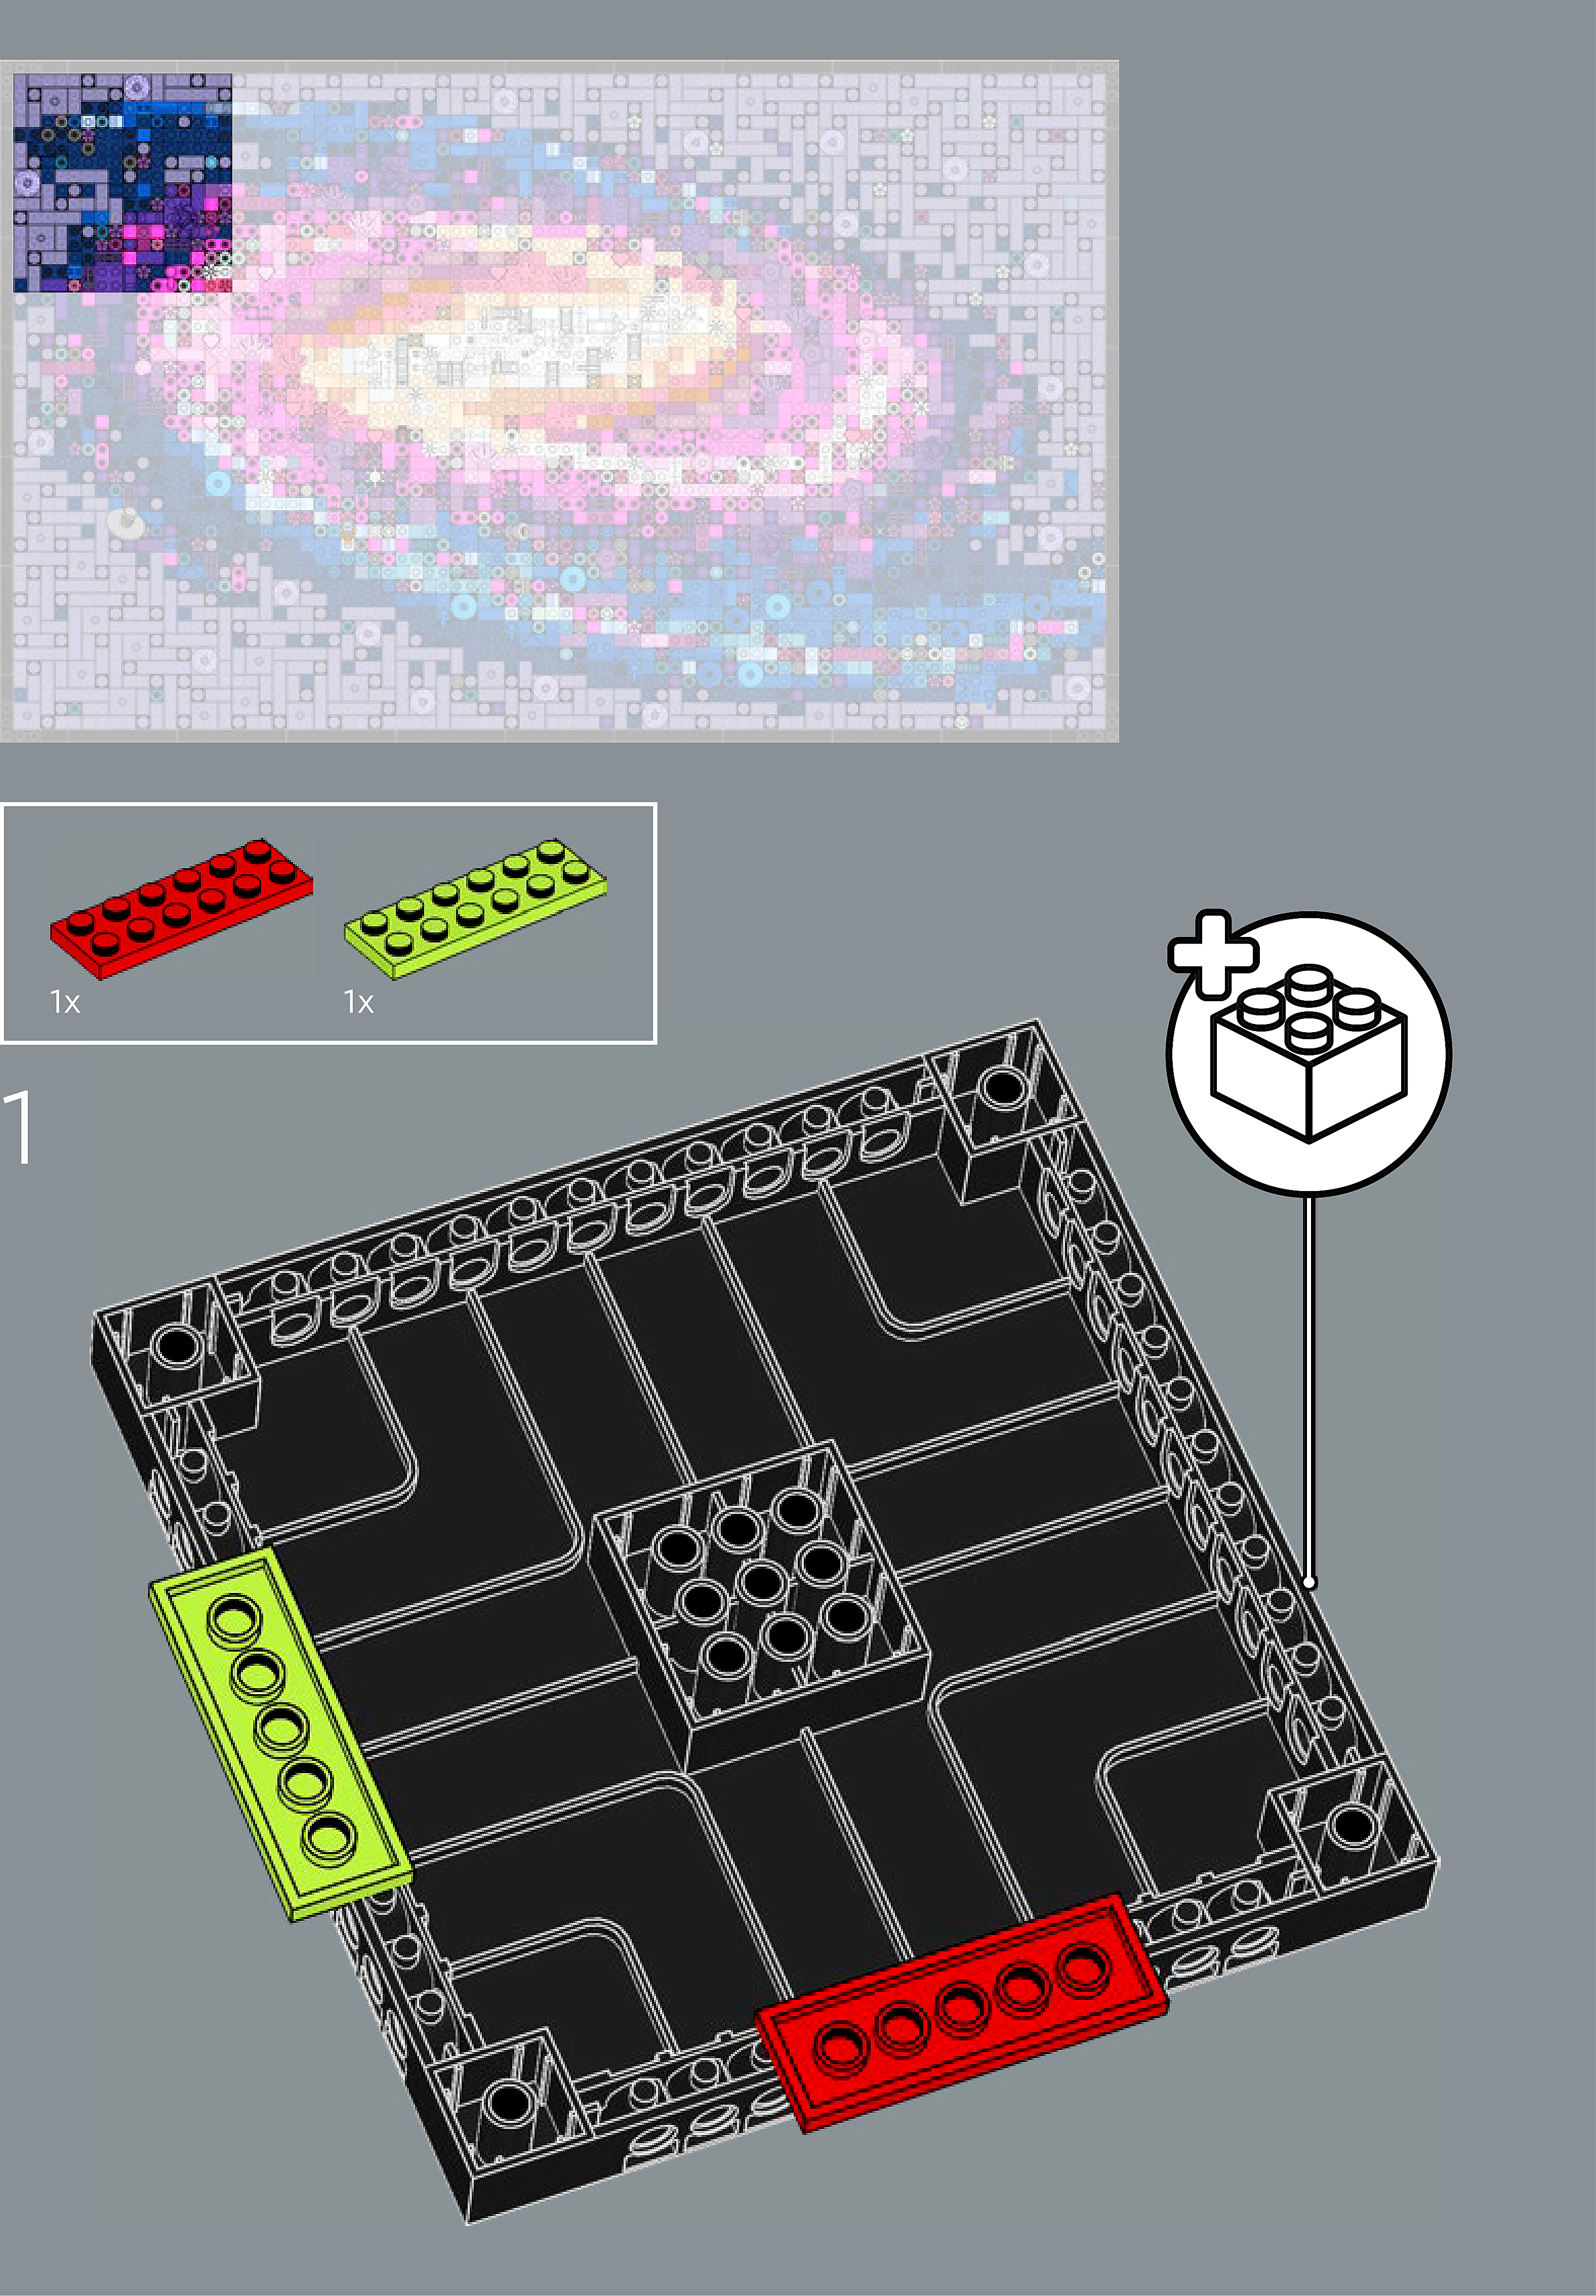
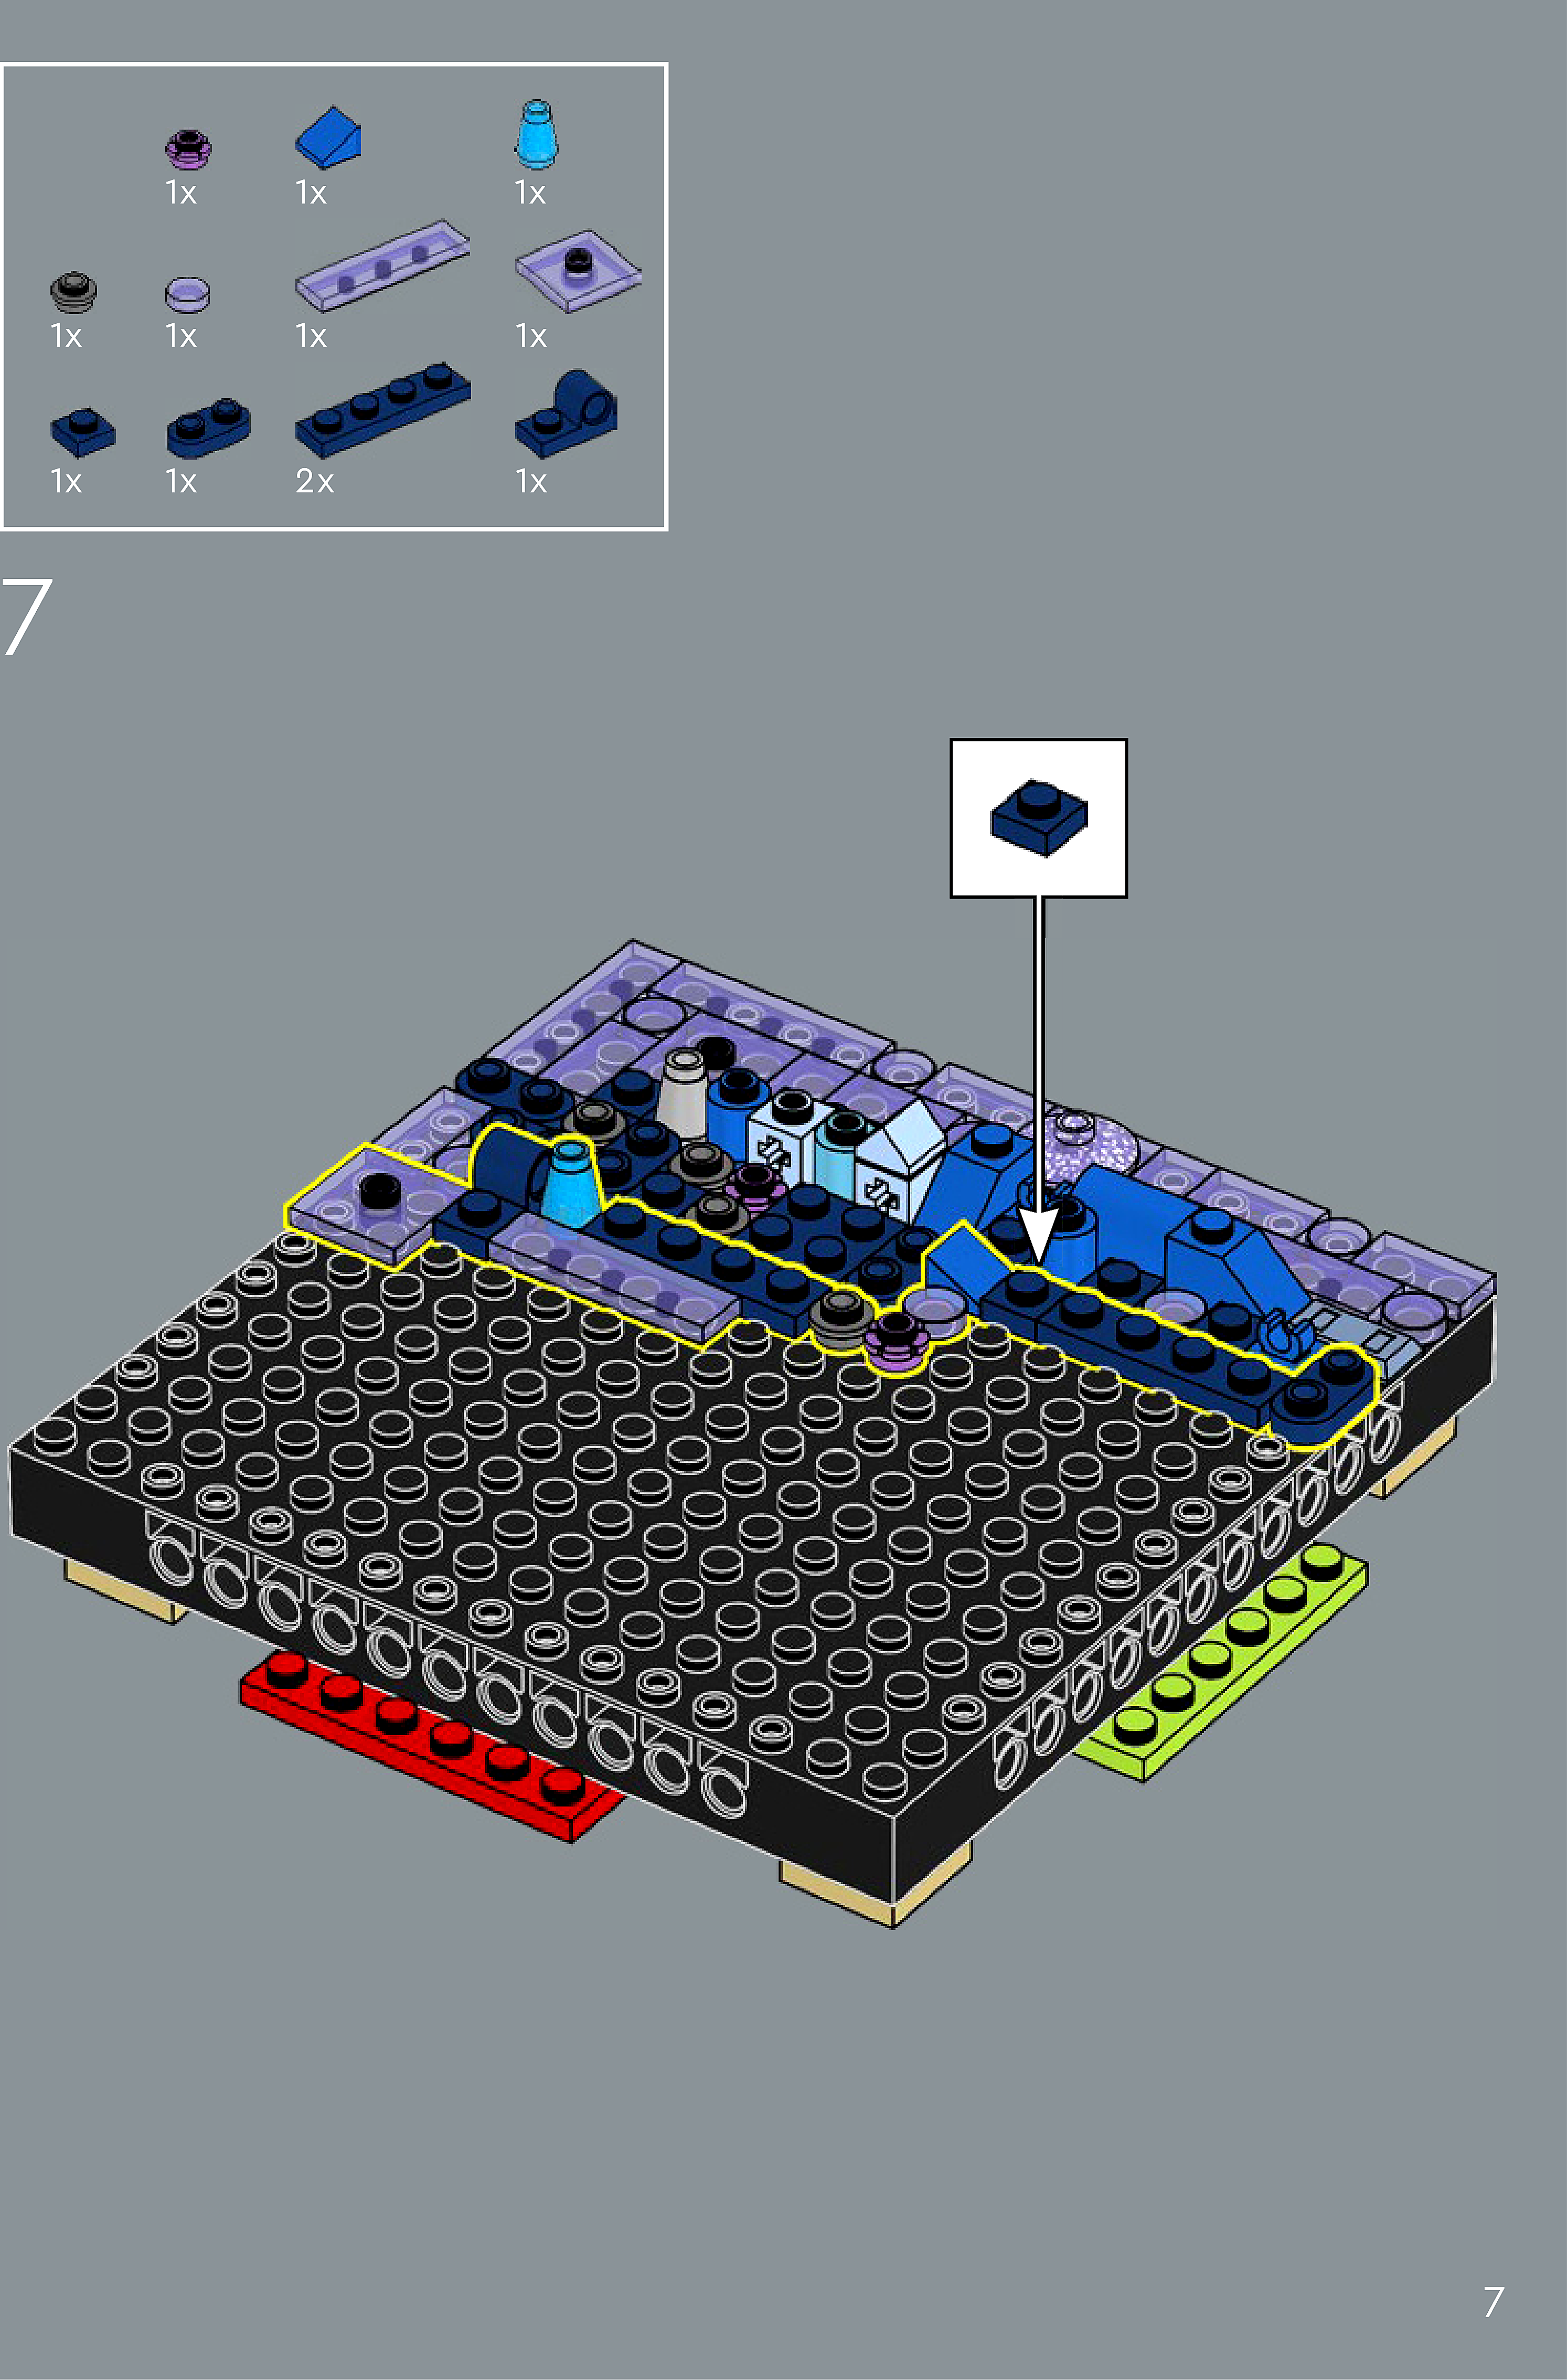
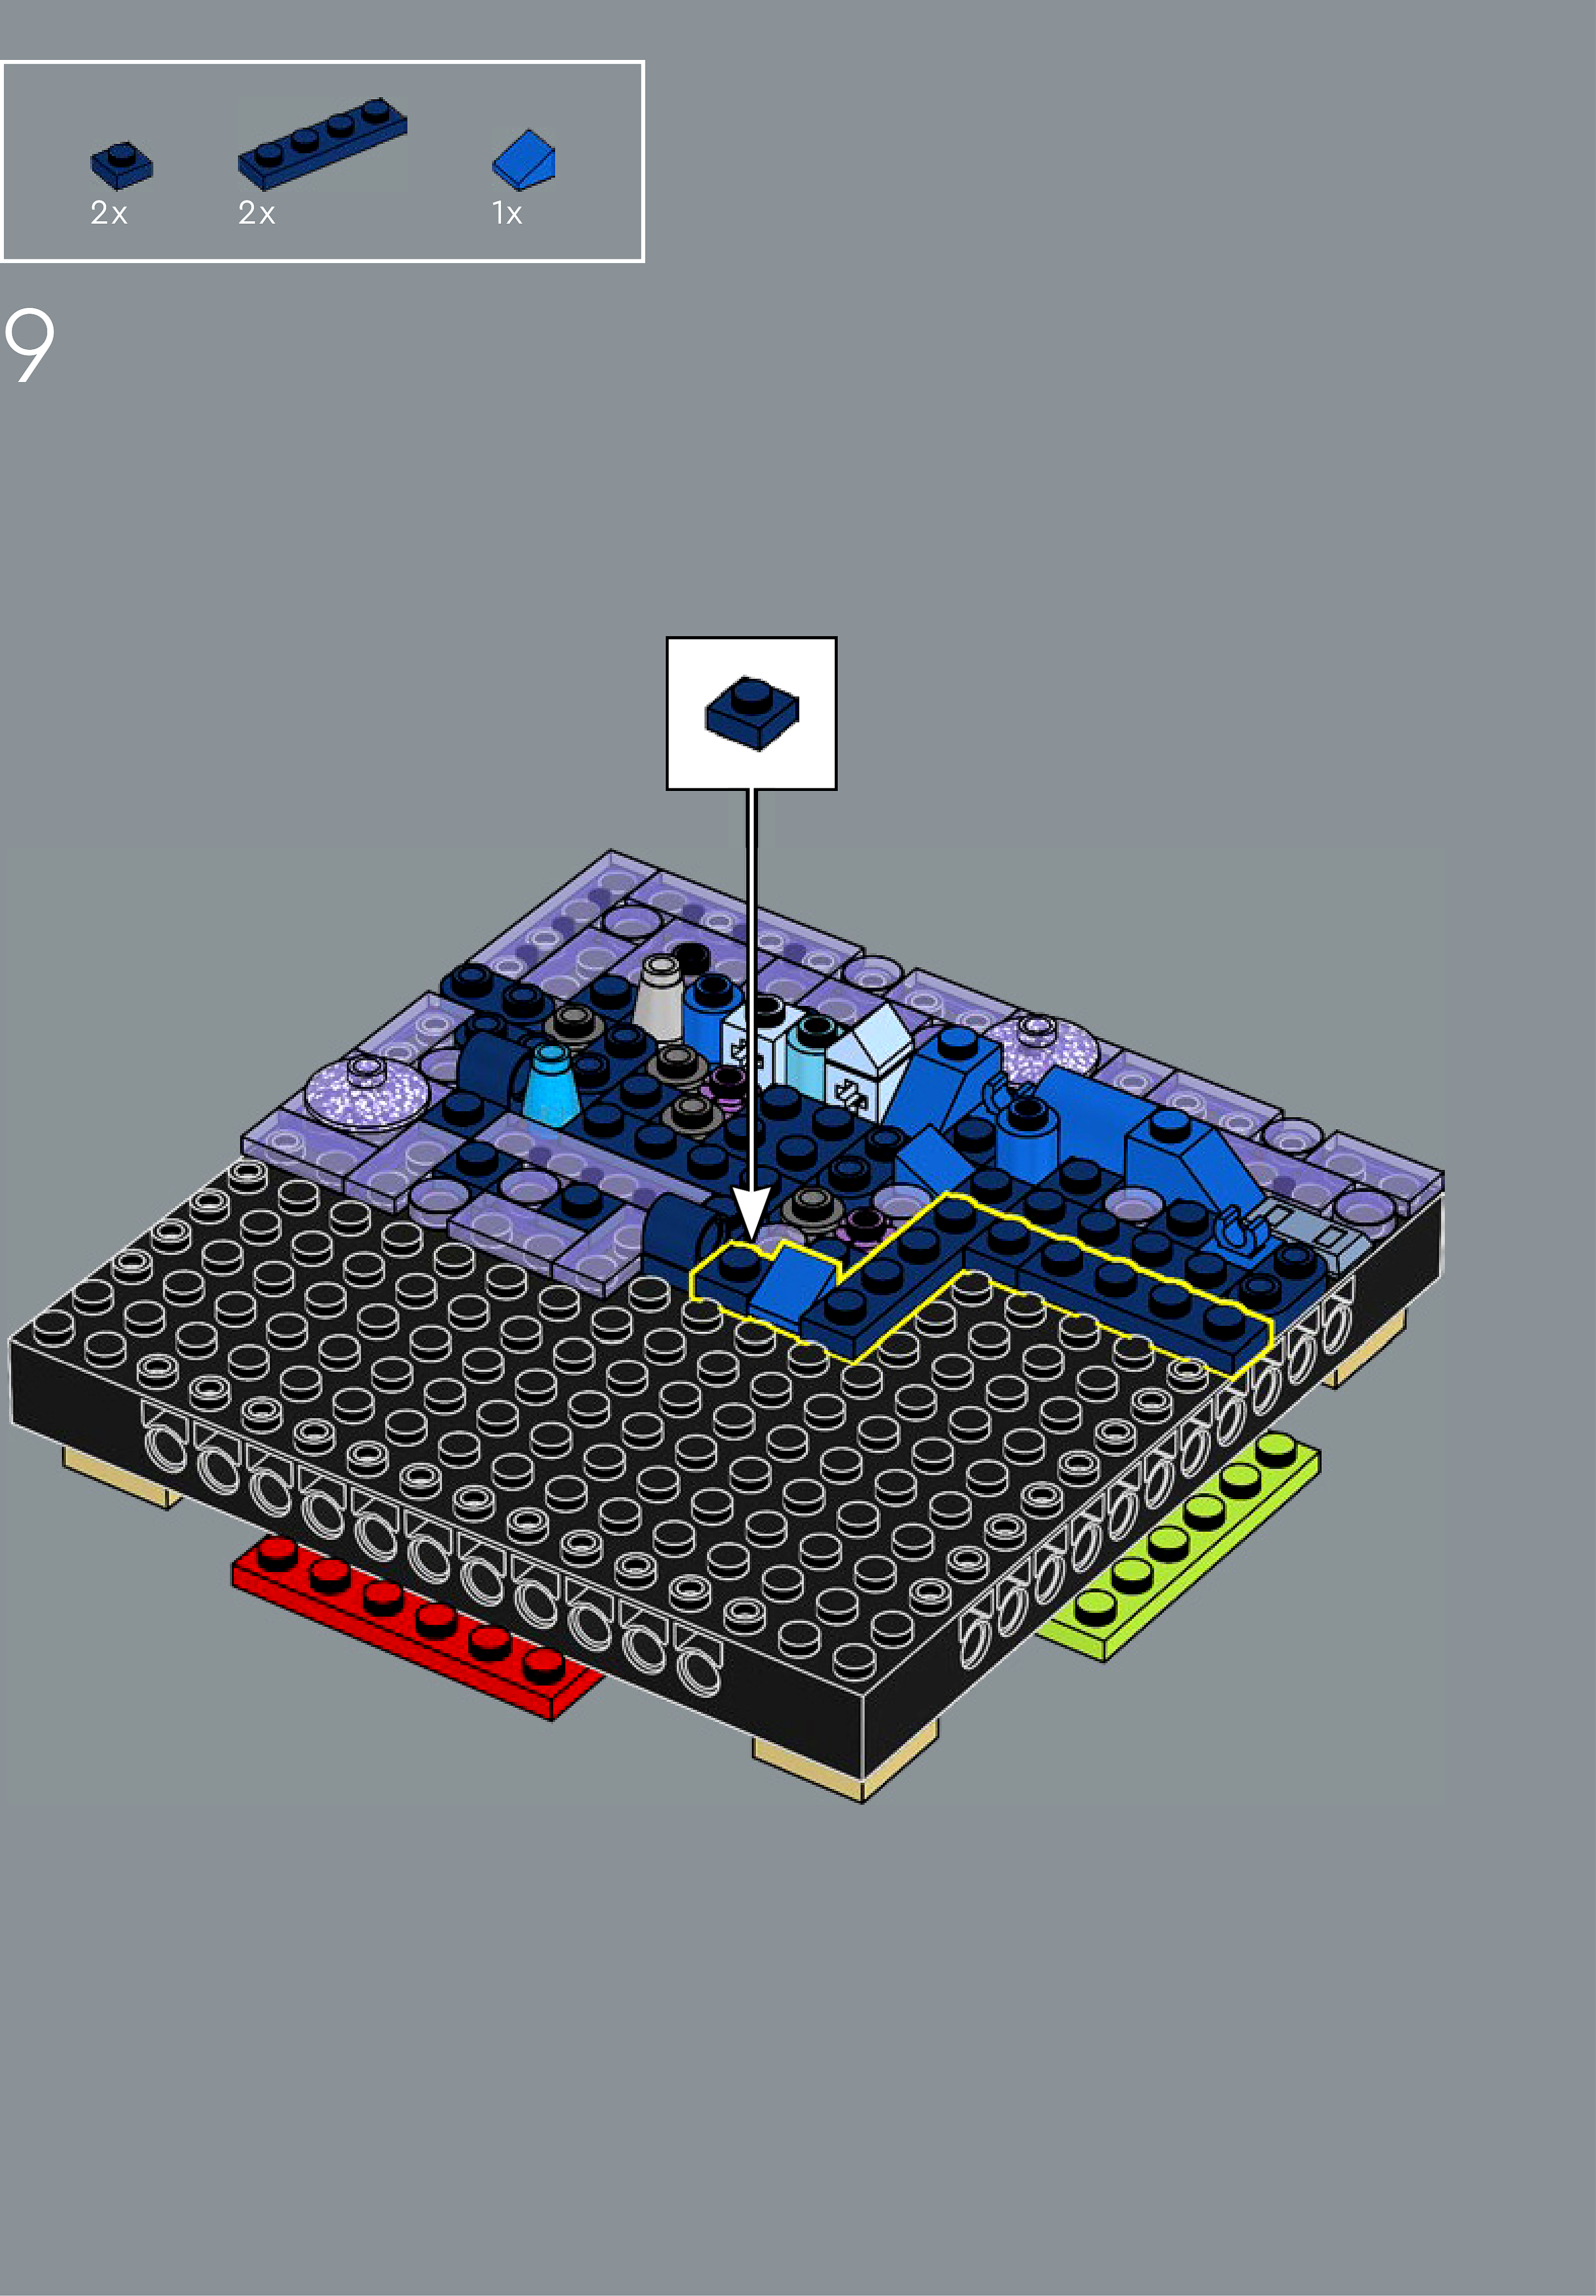
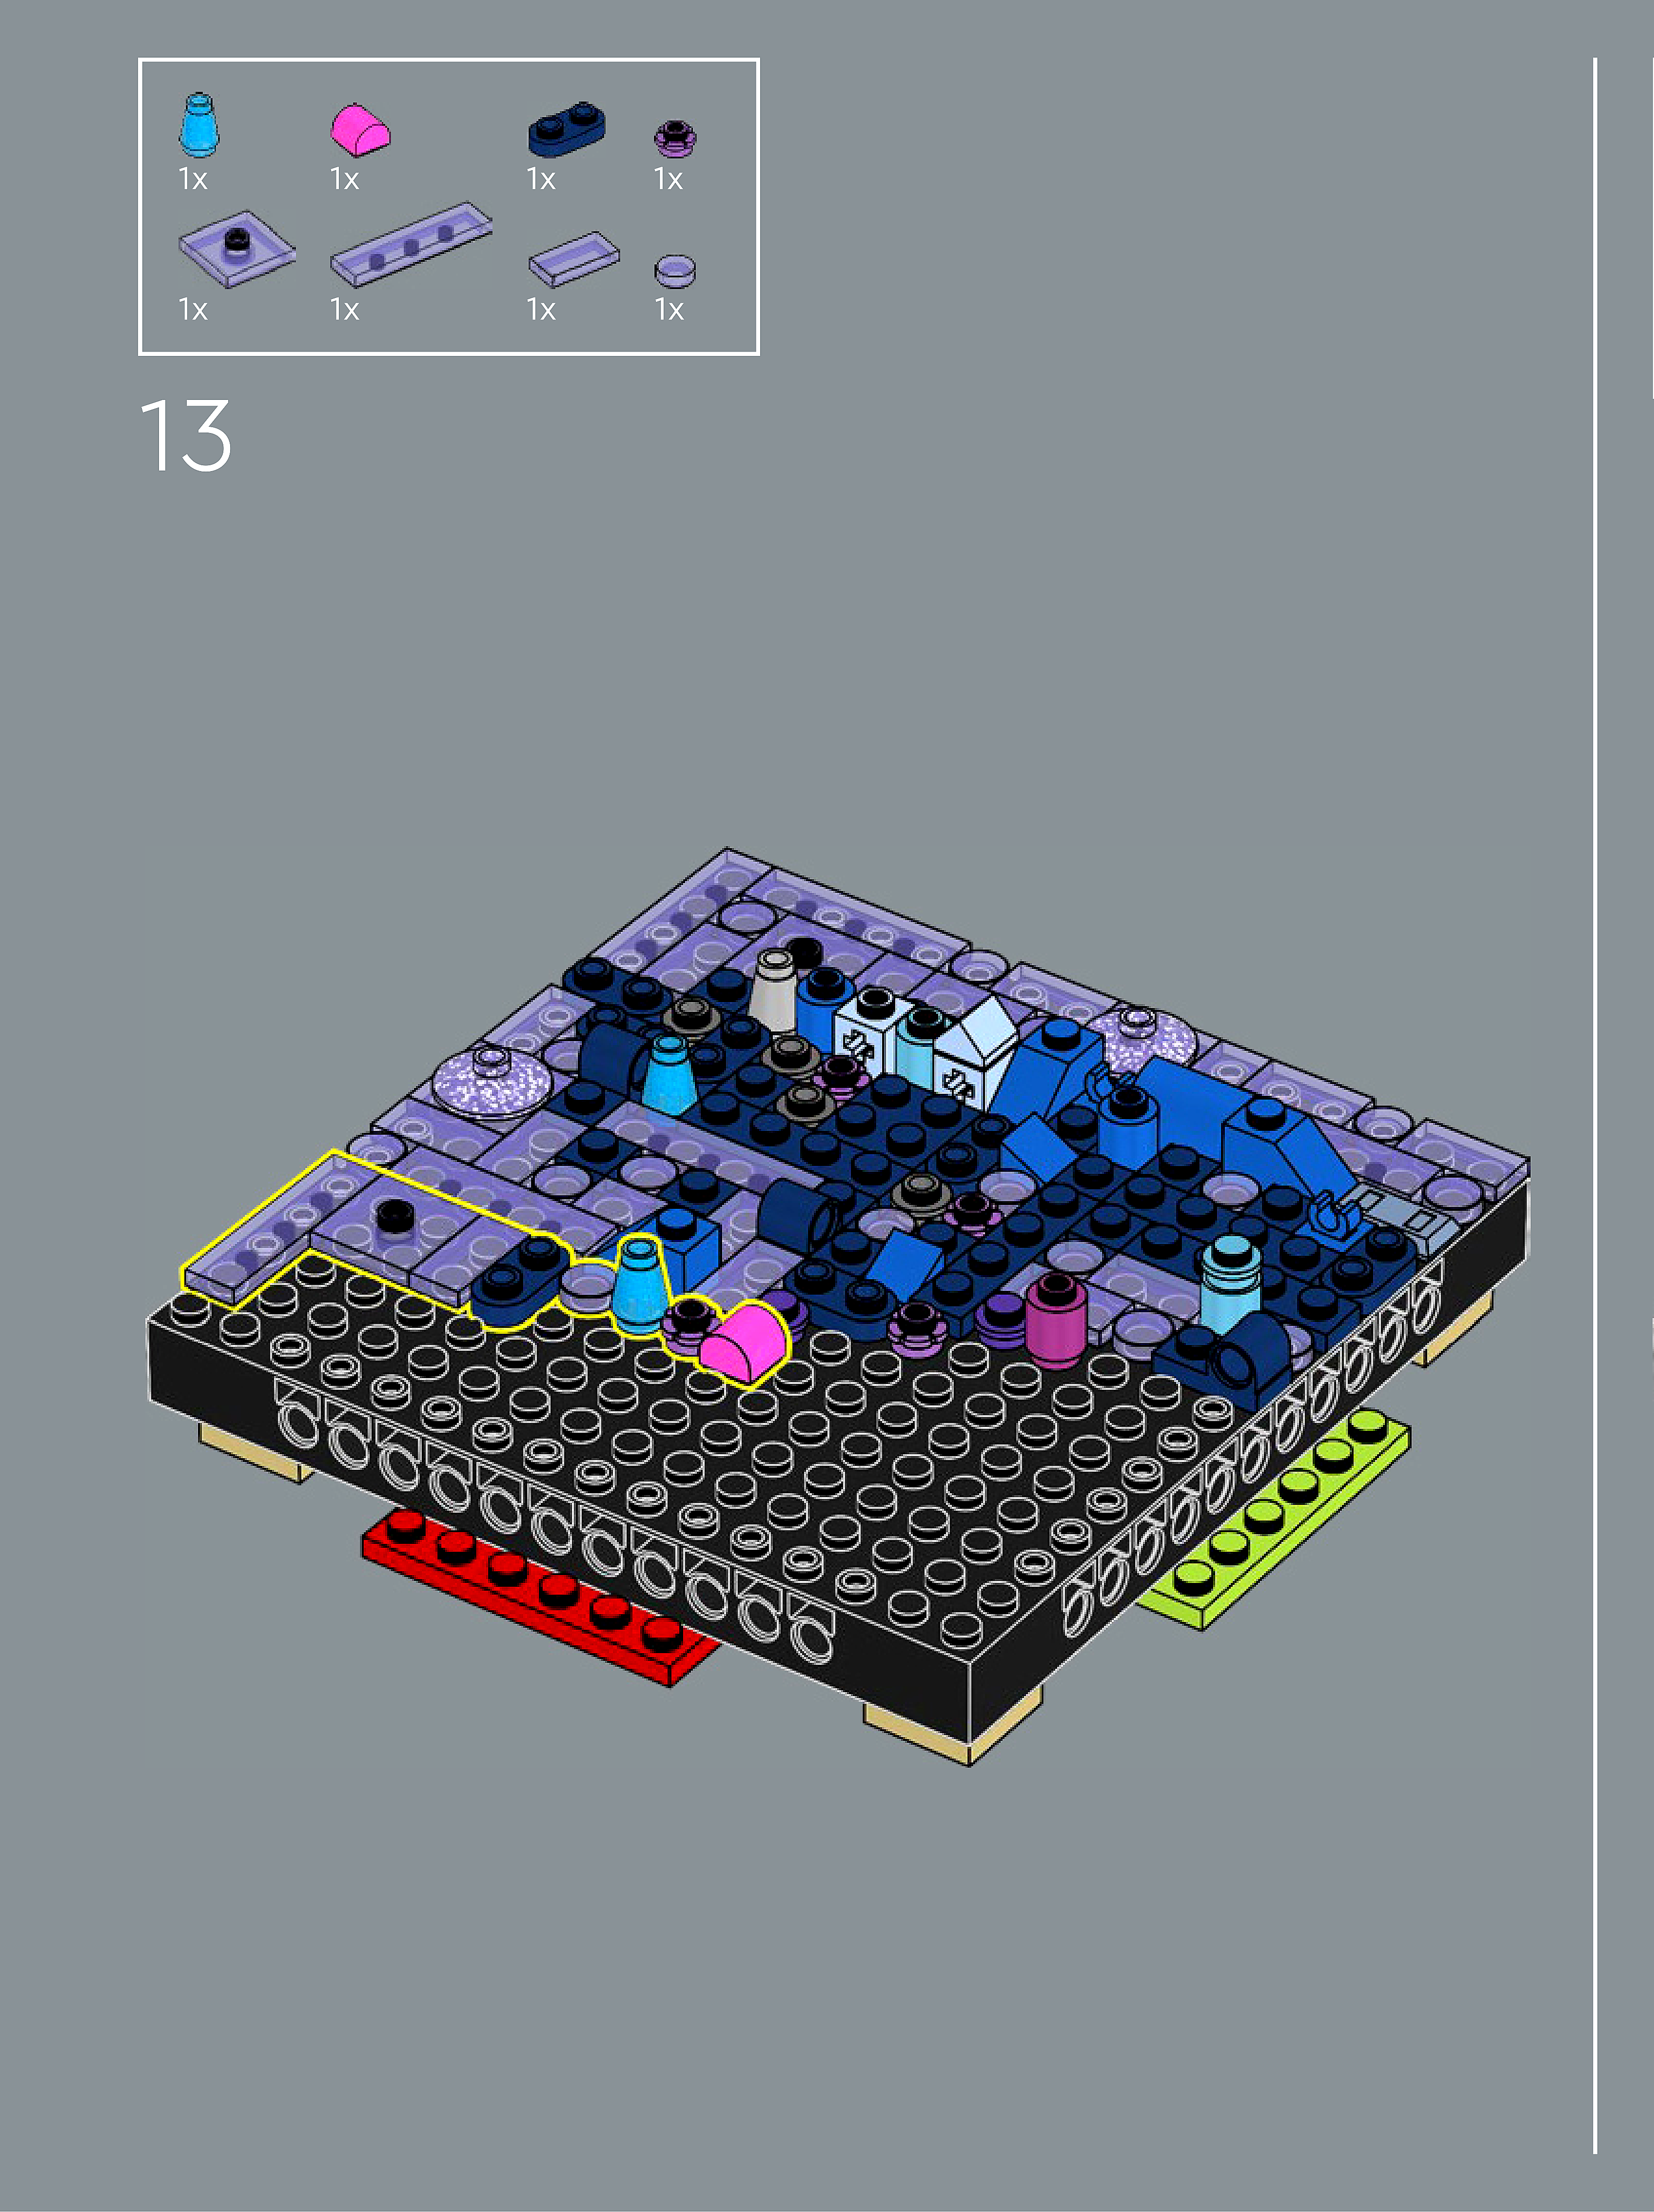
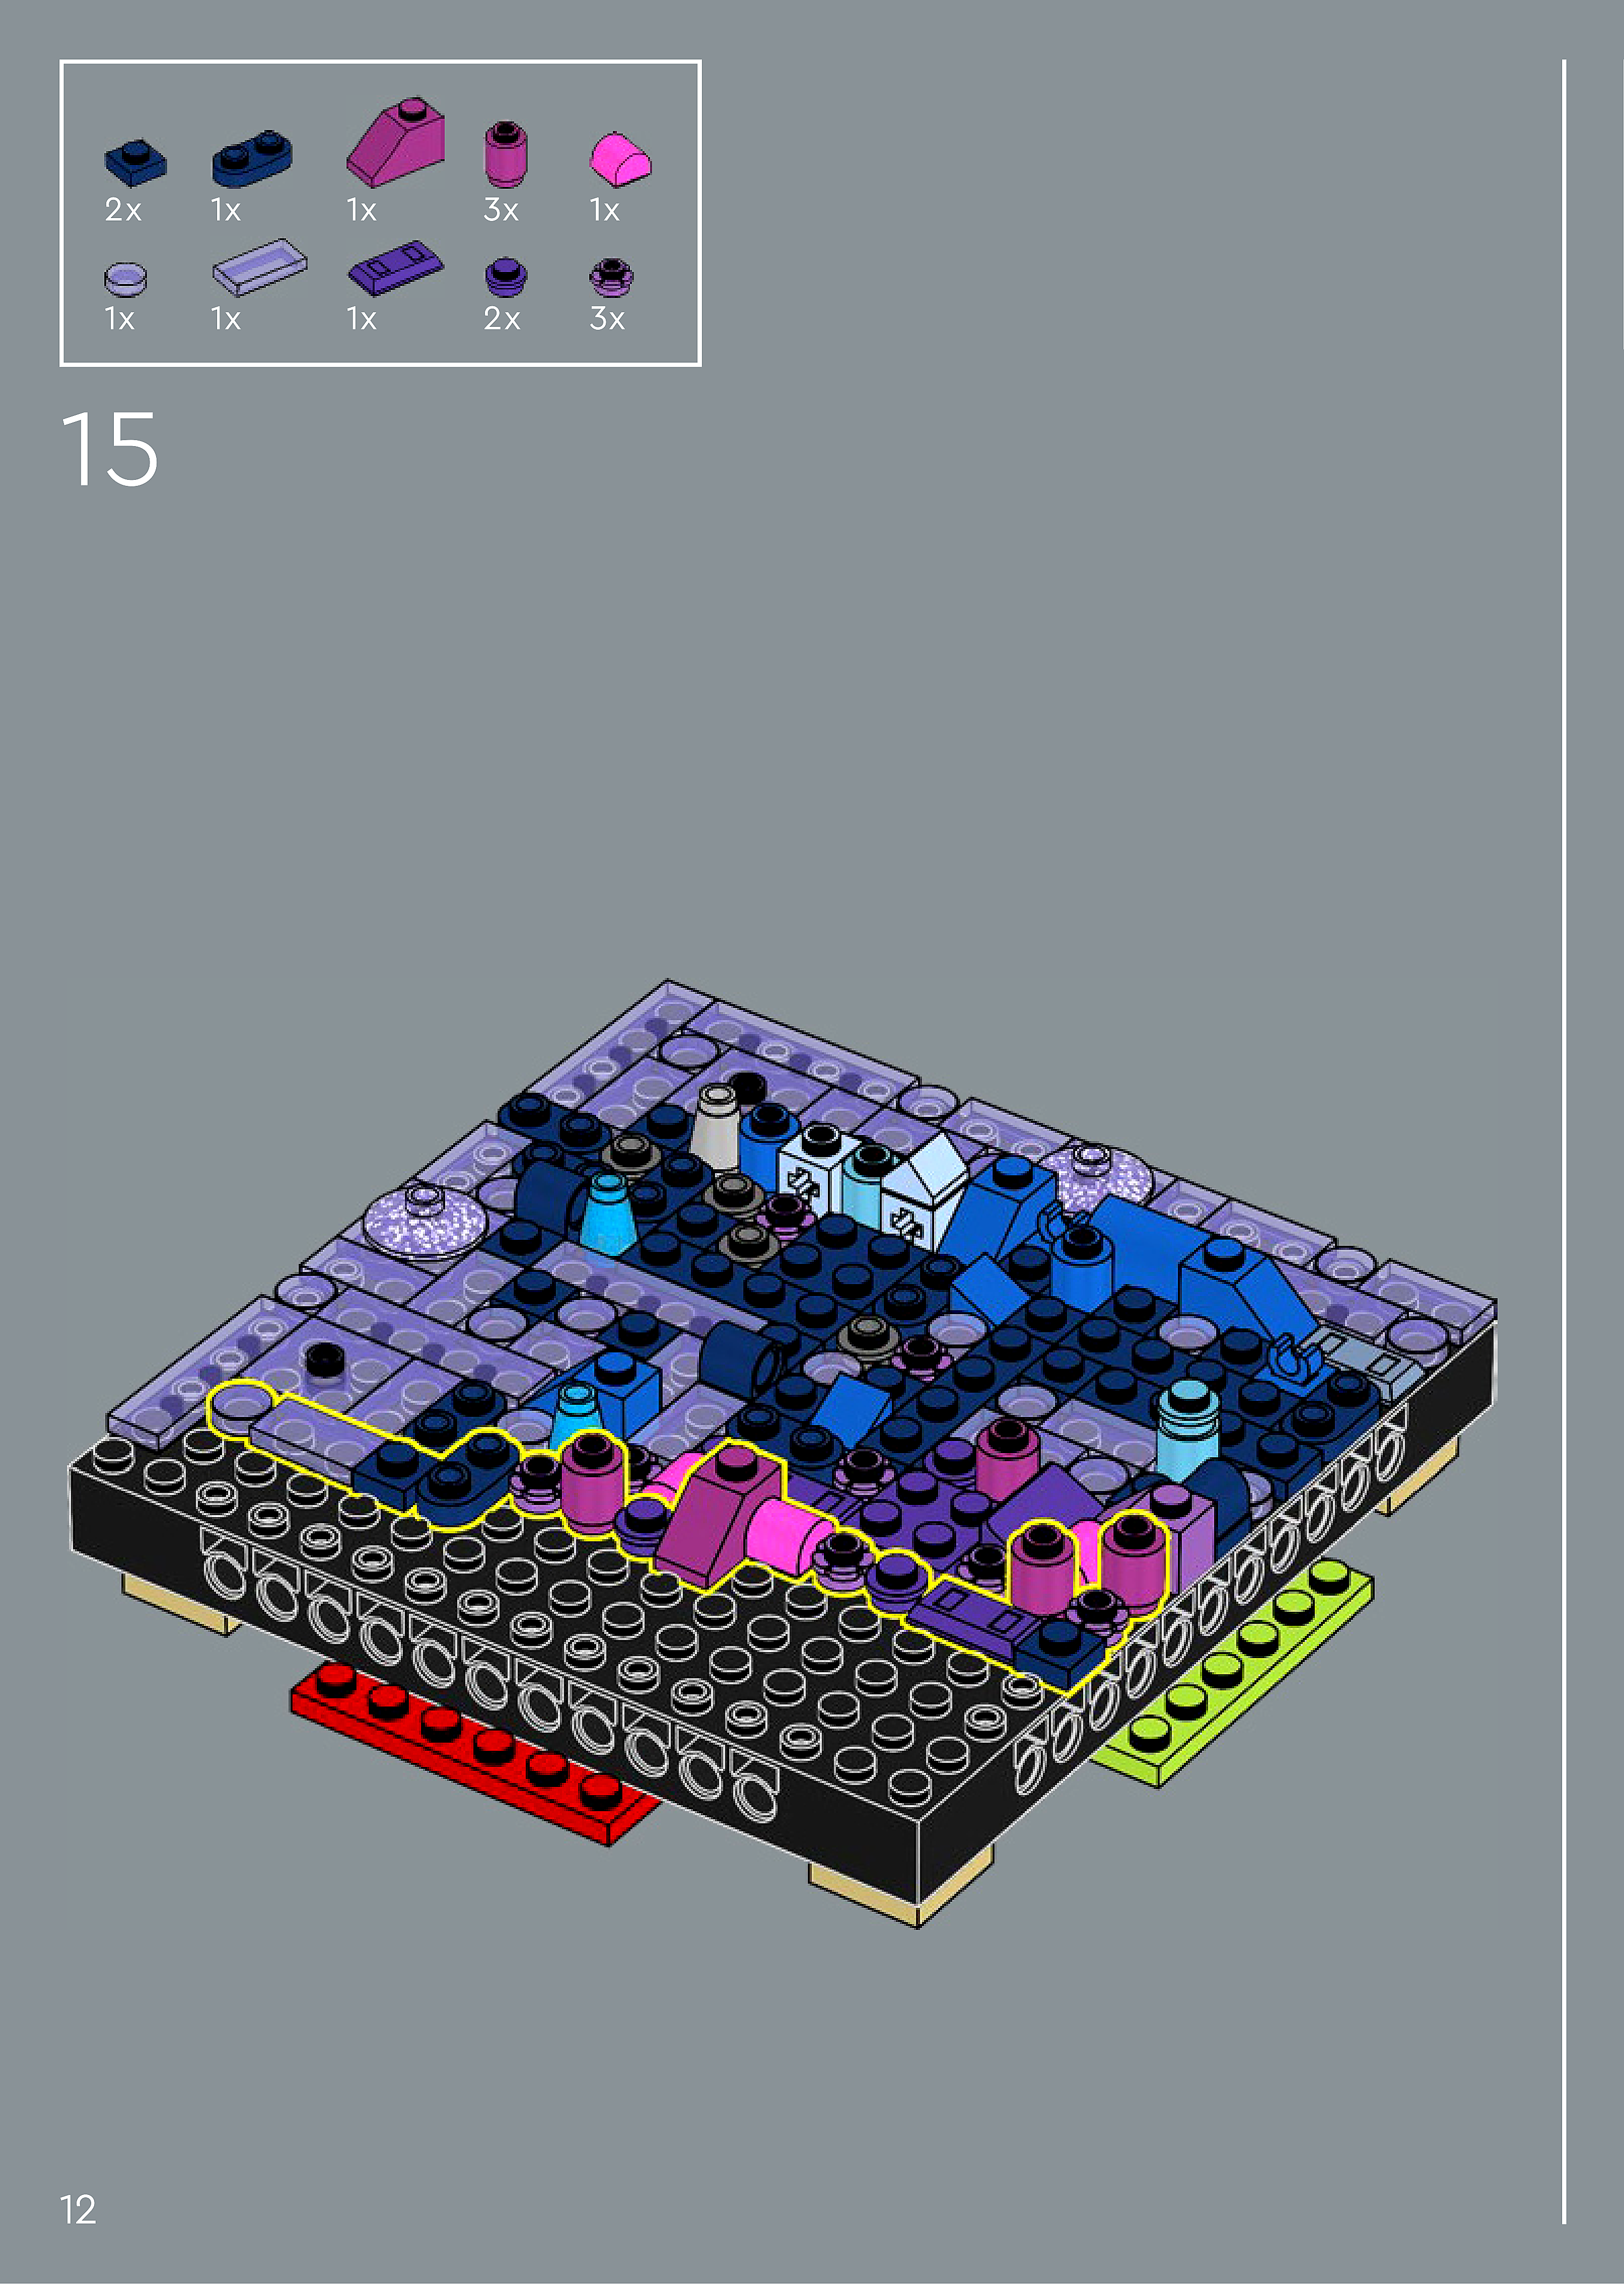
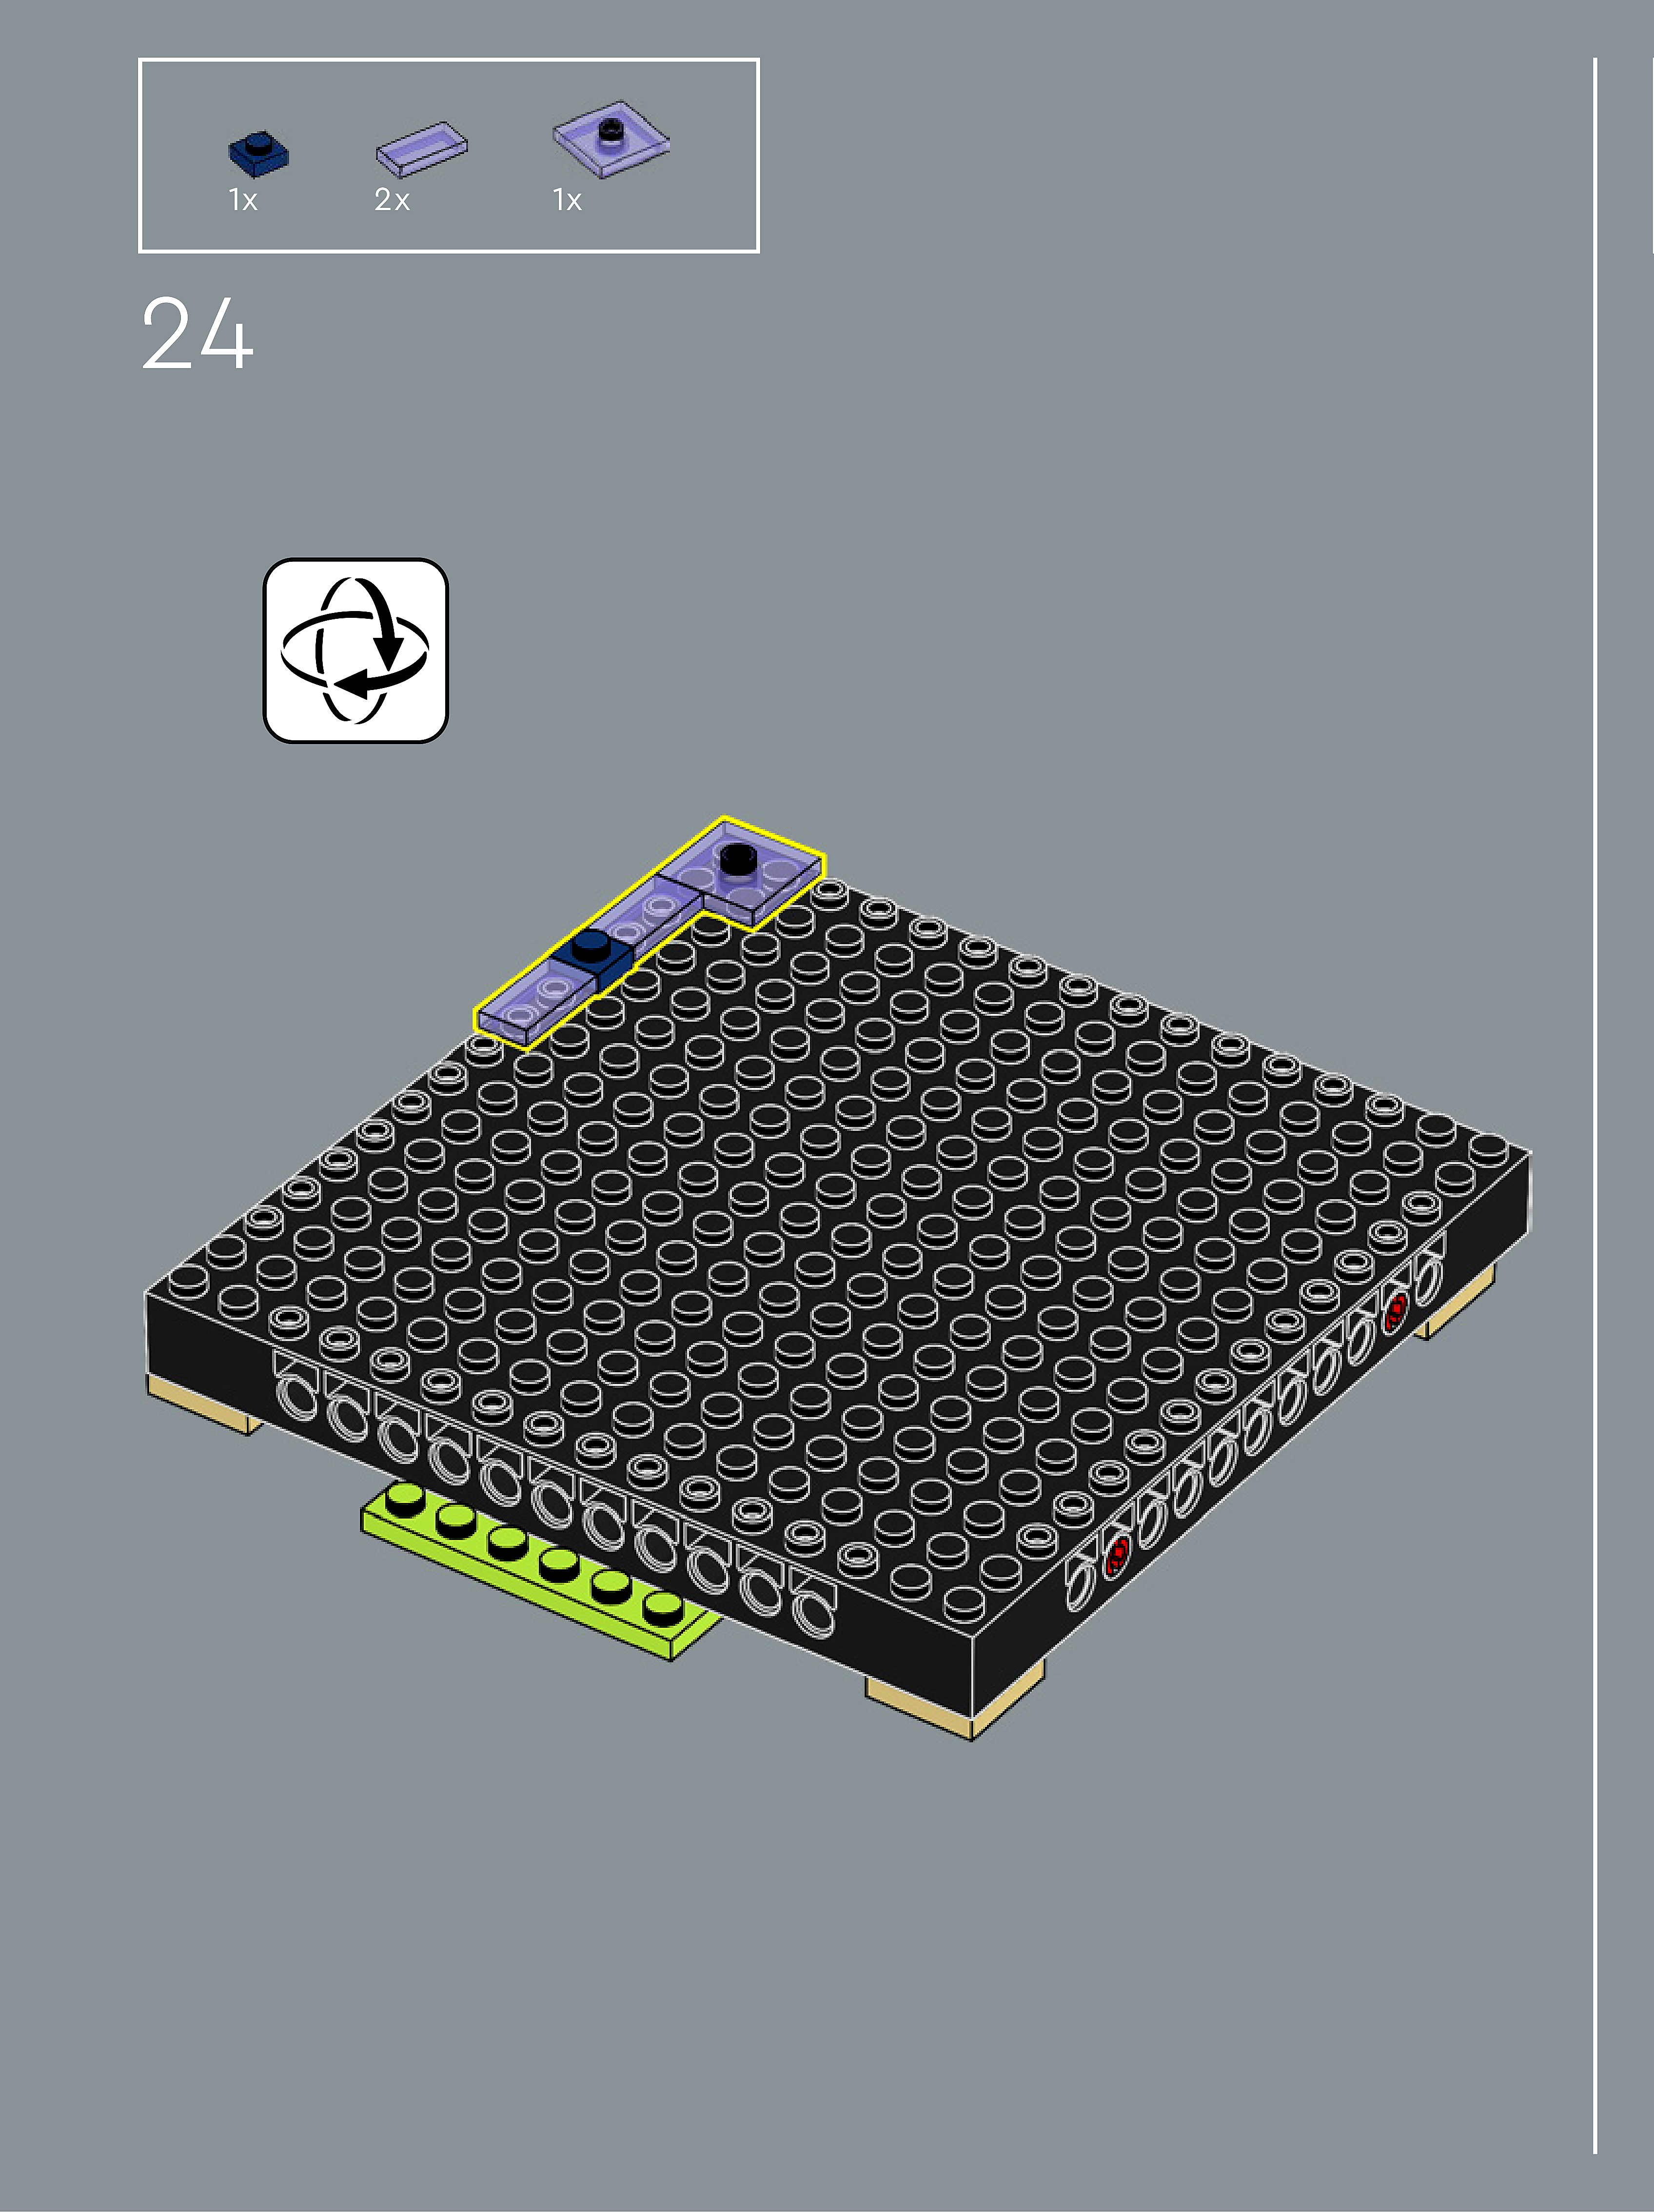
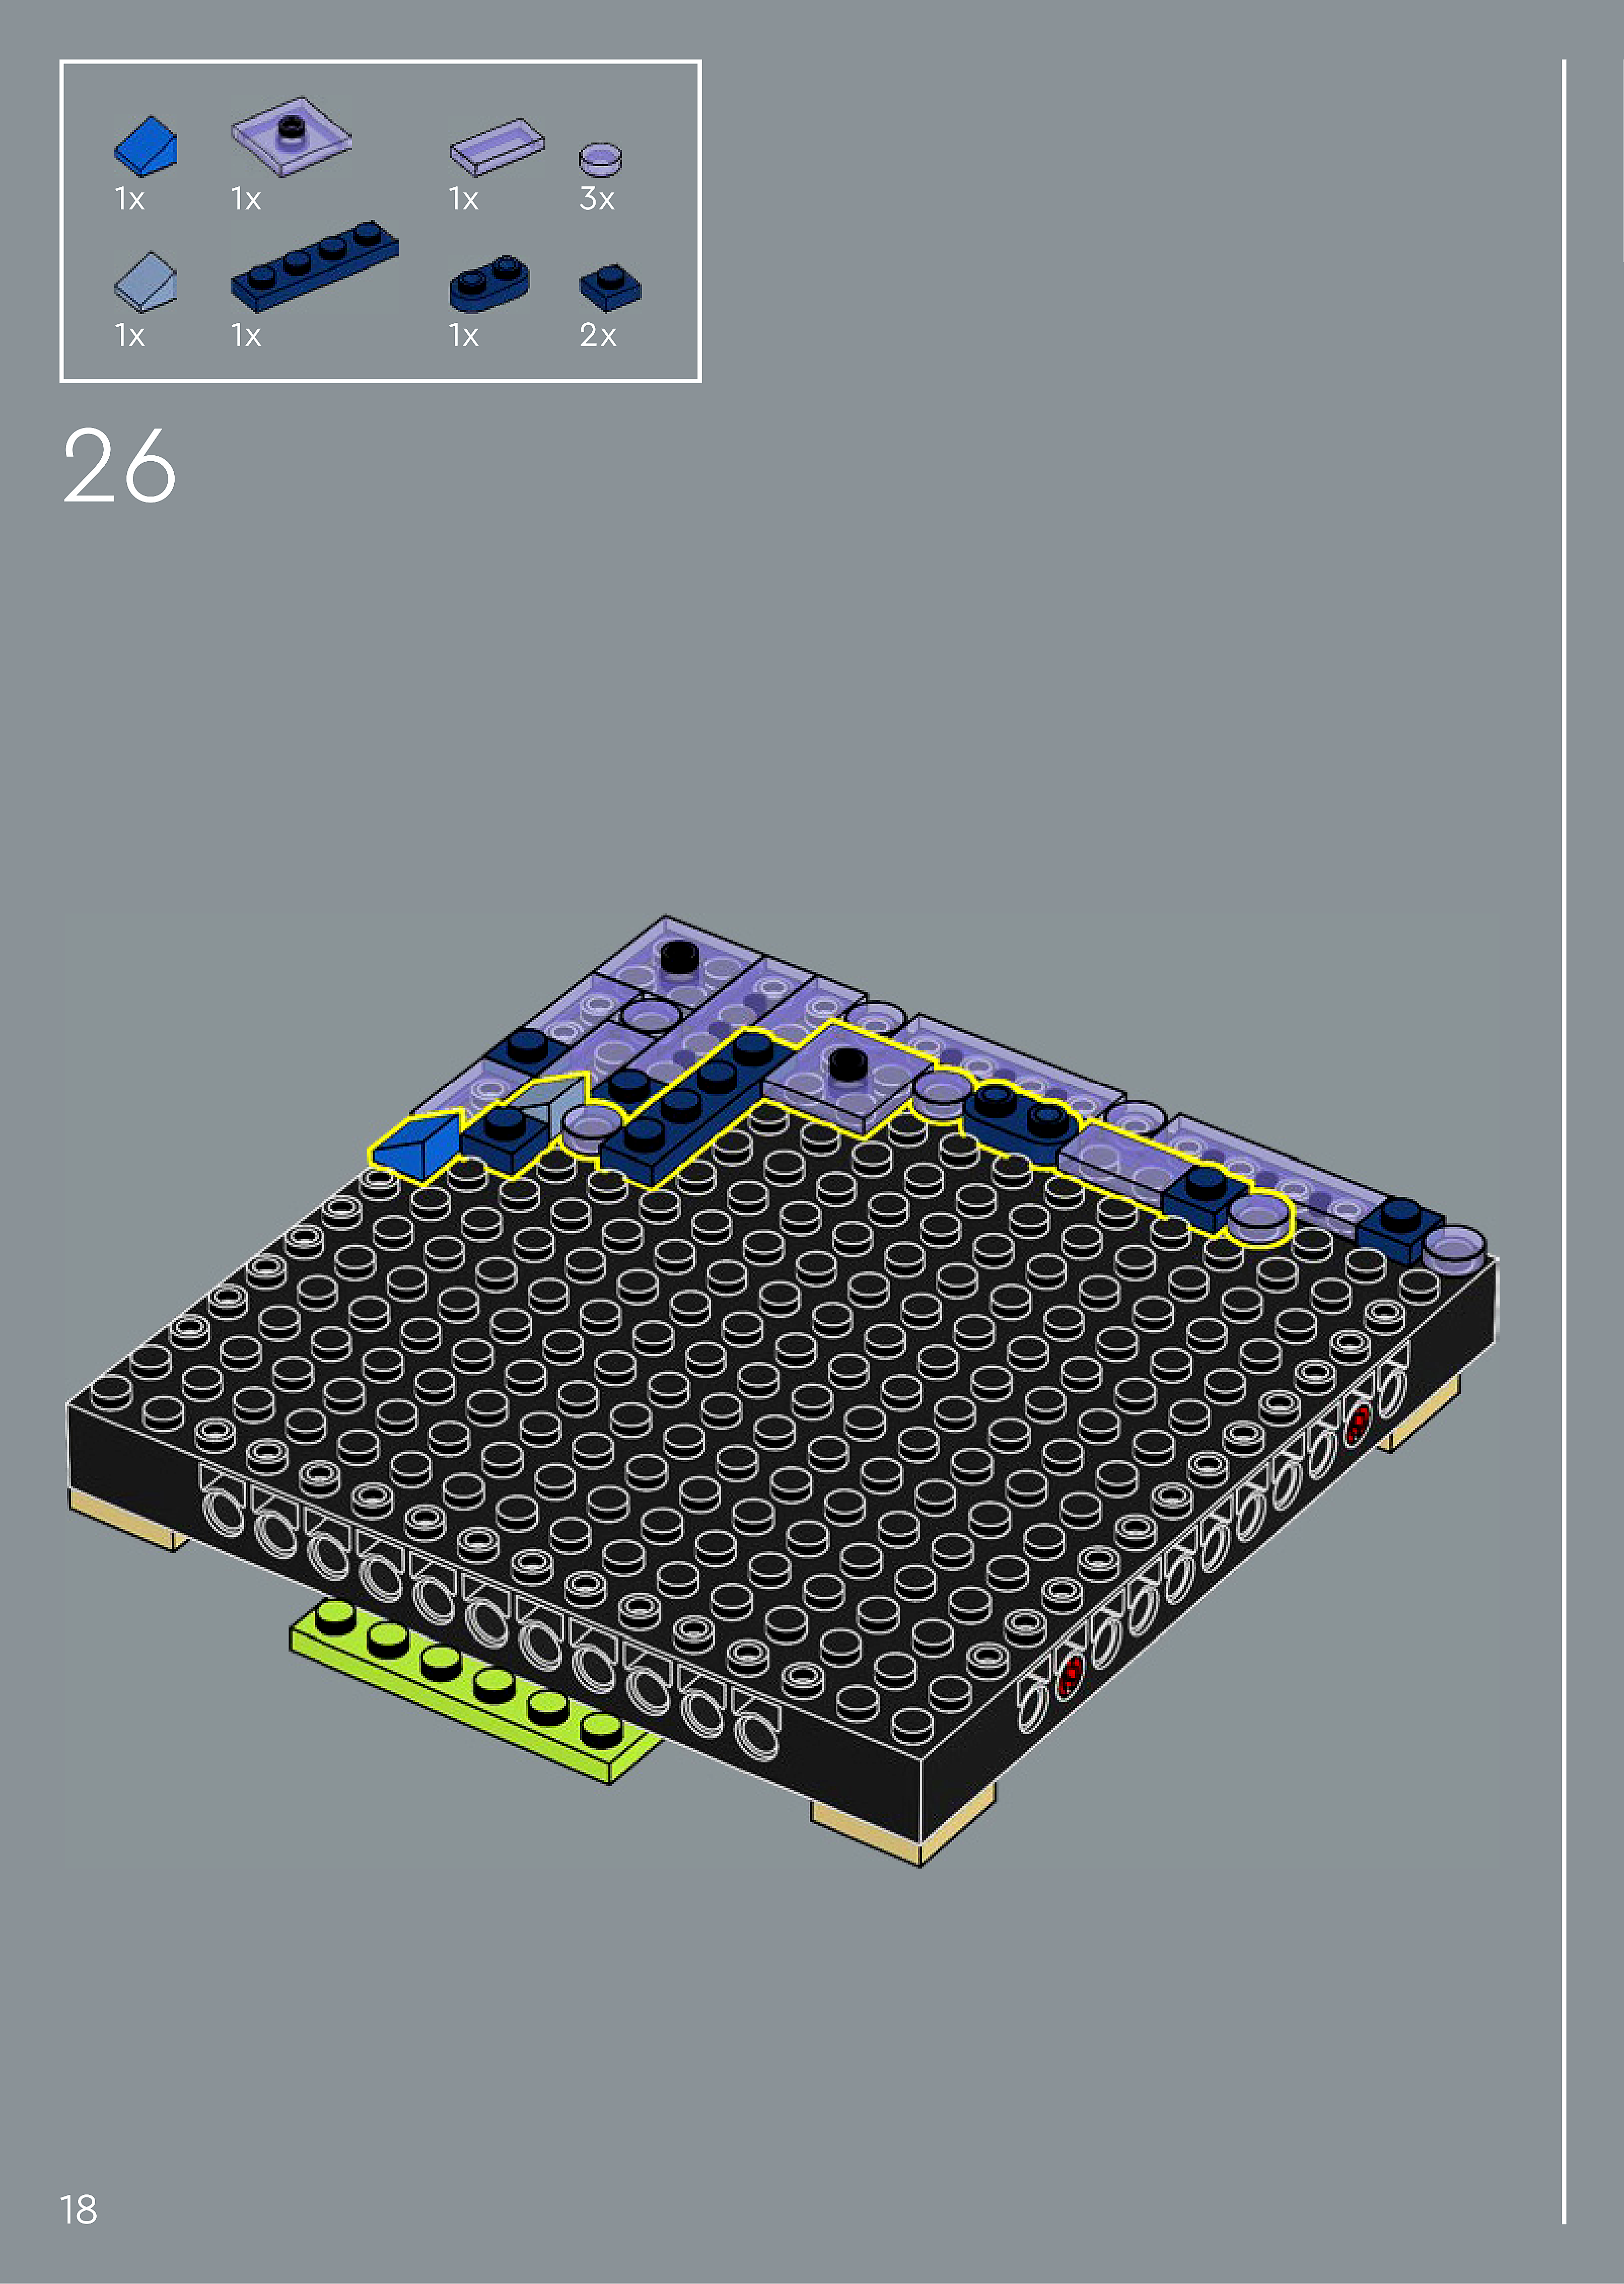
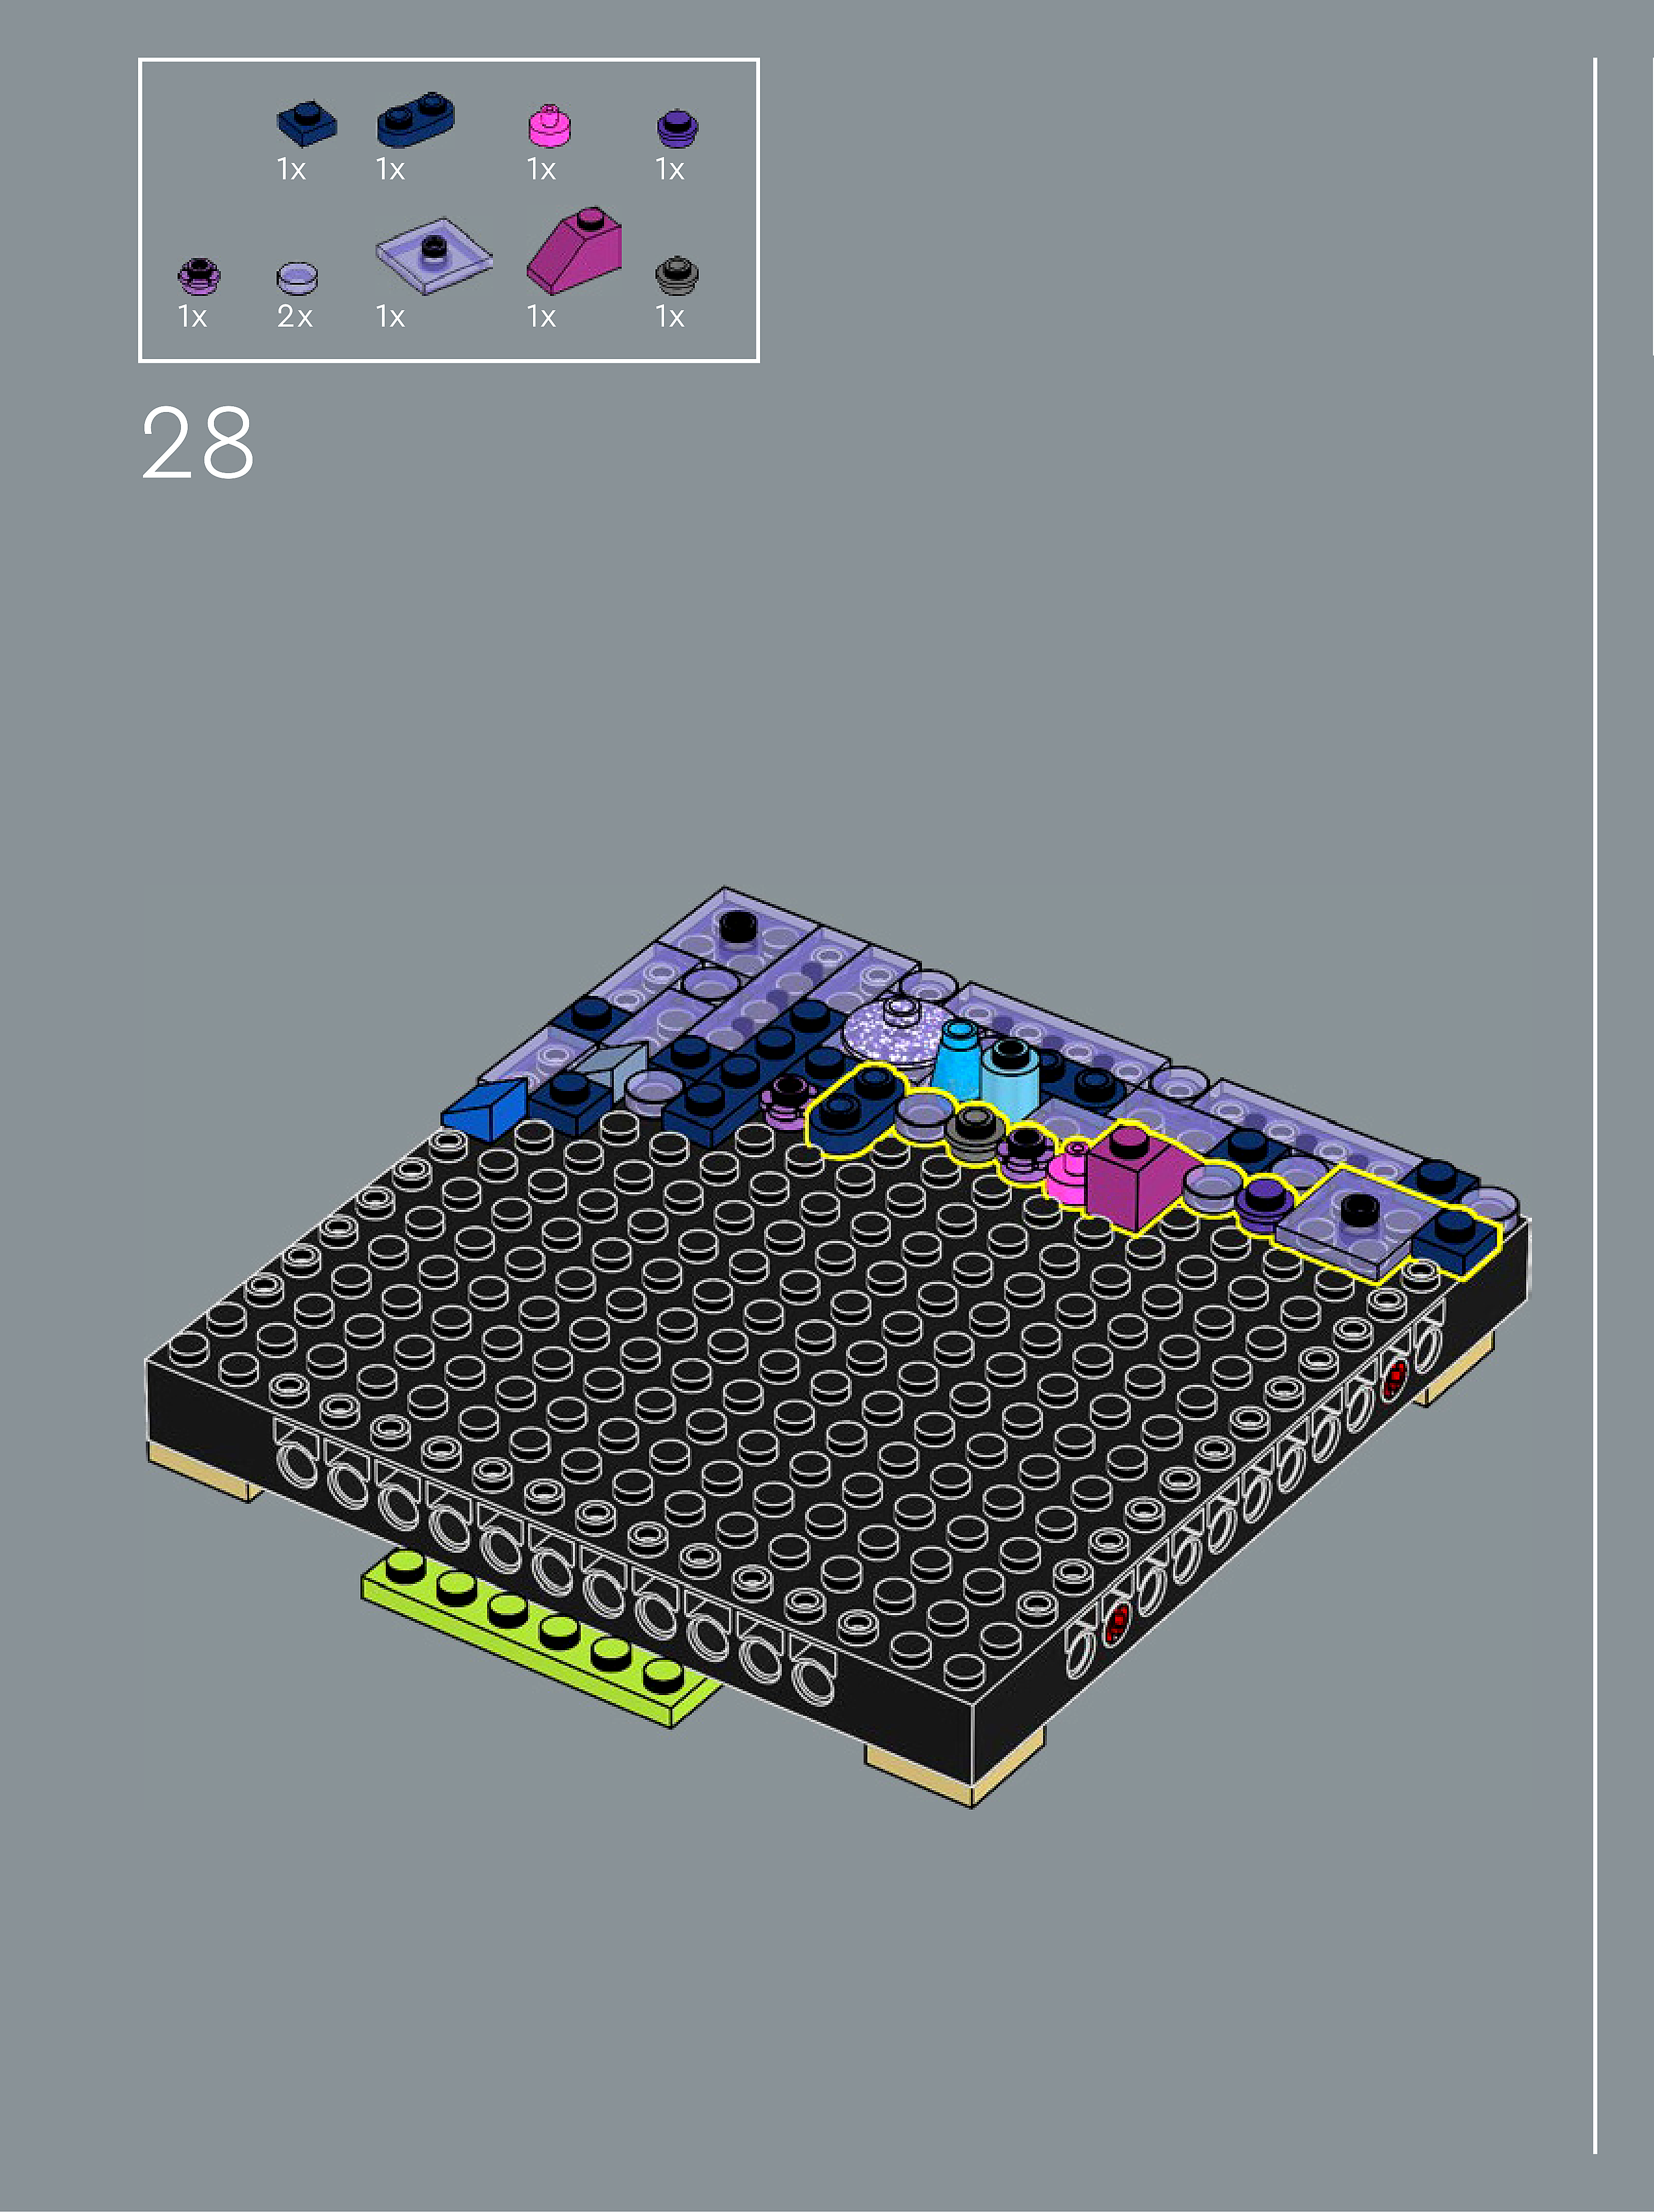
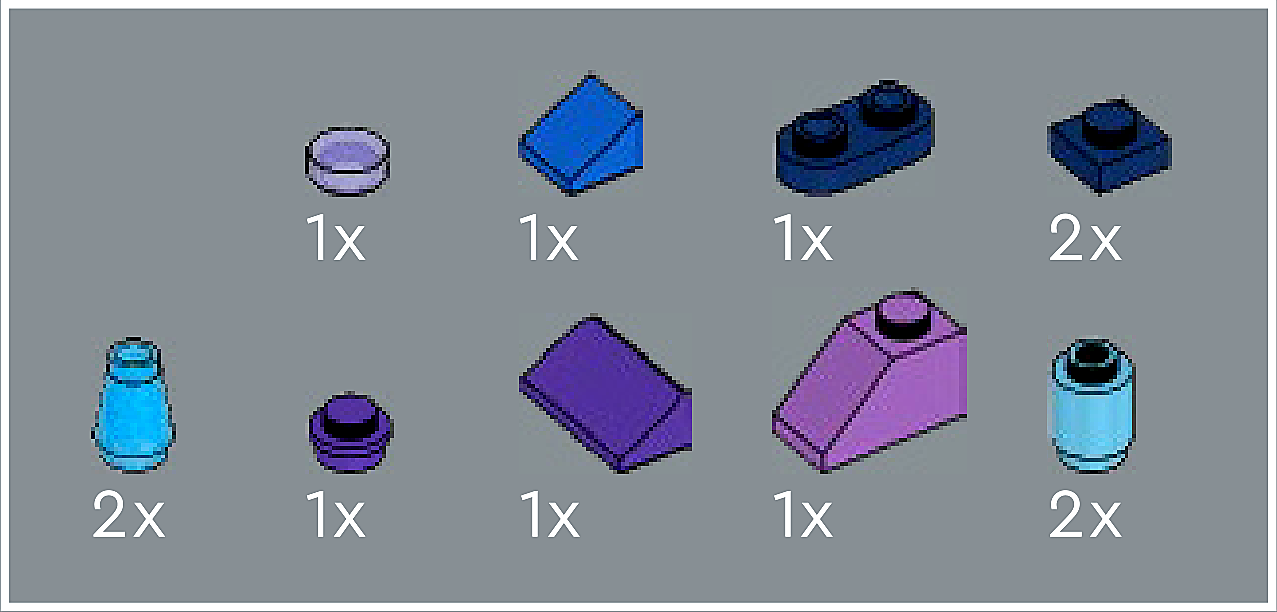
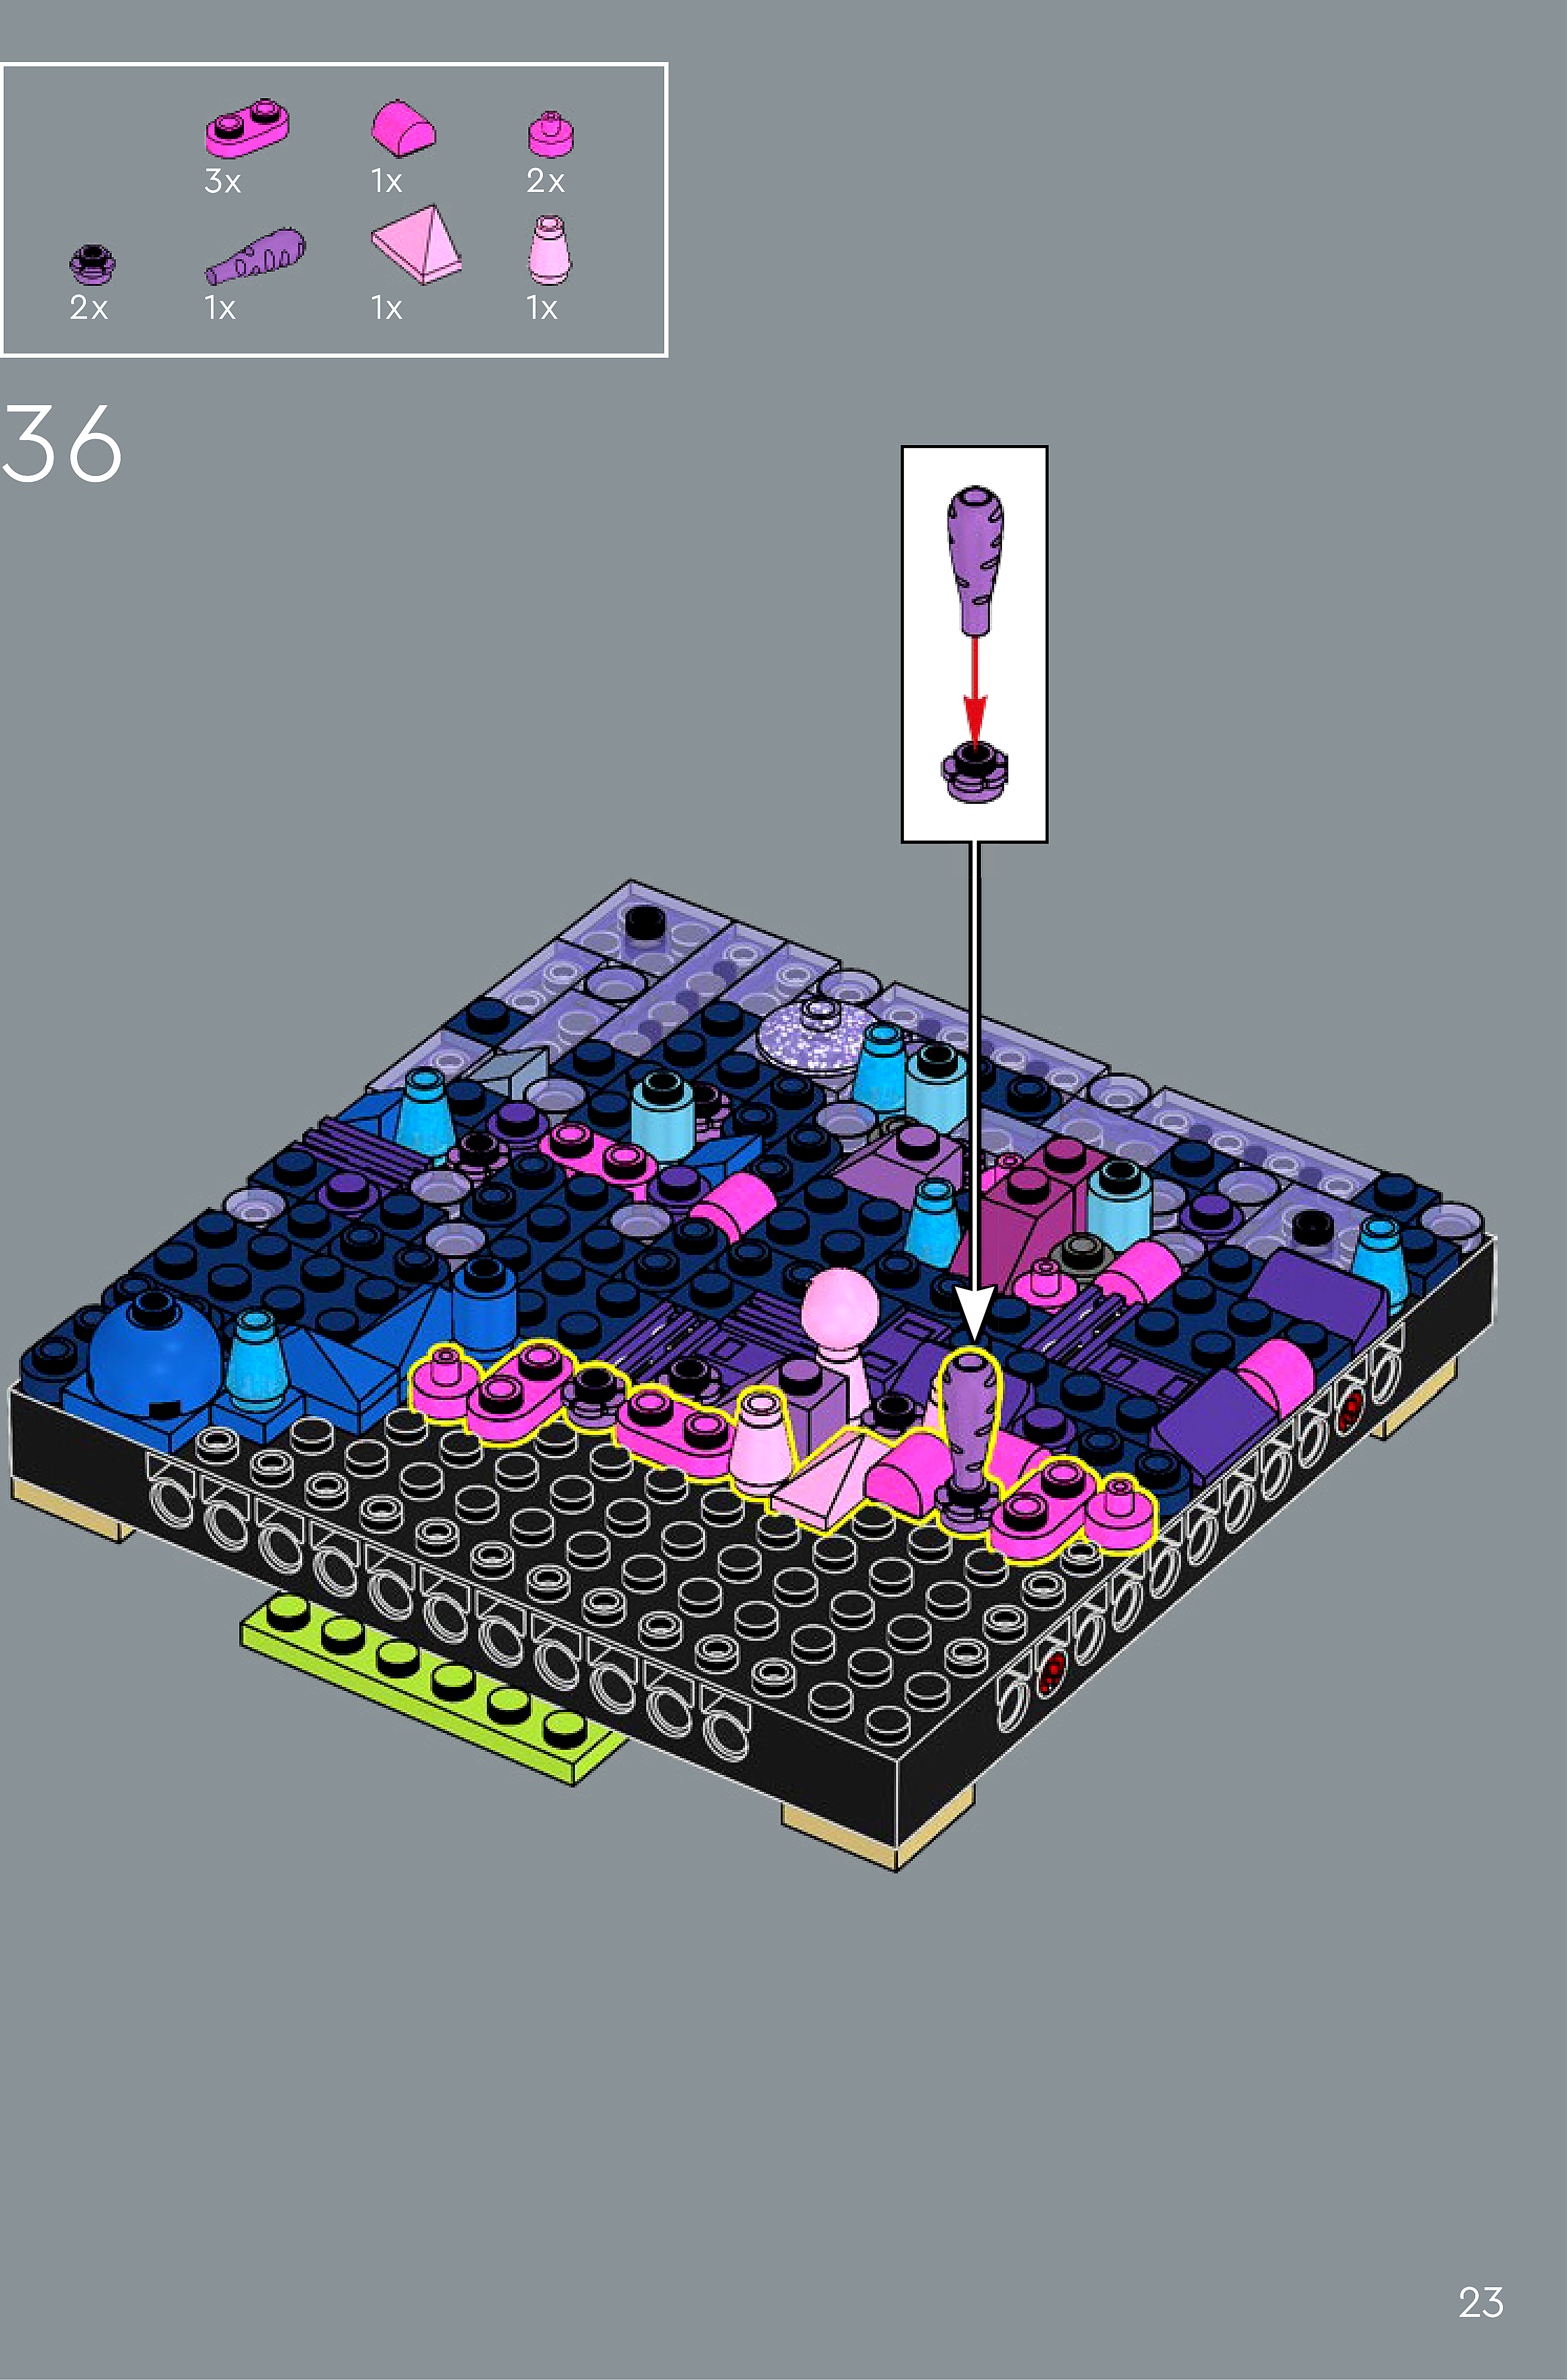
Main build
Step 2

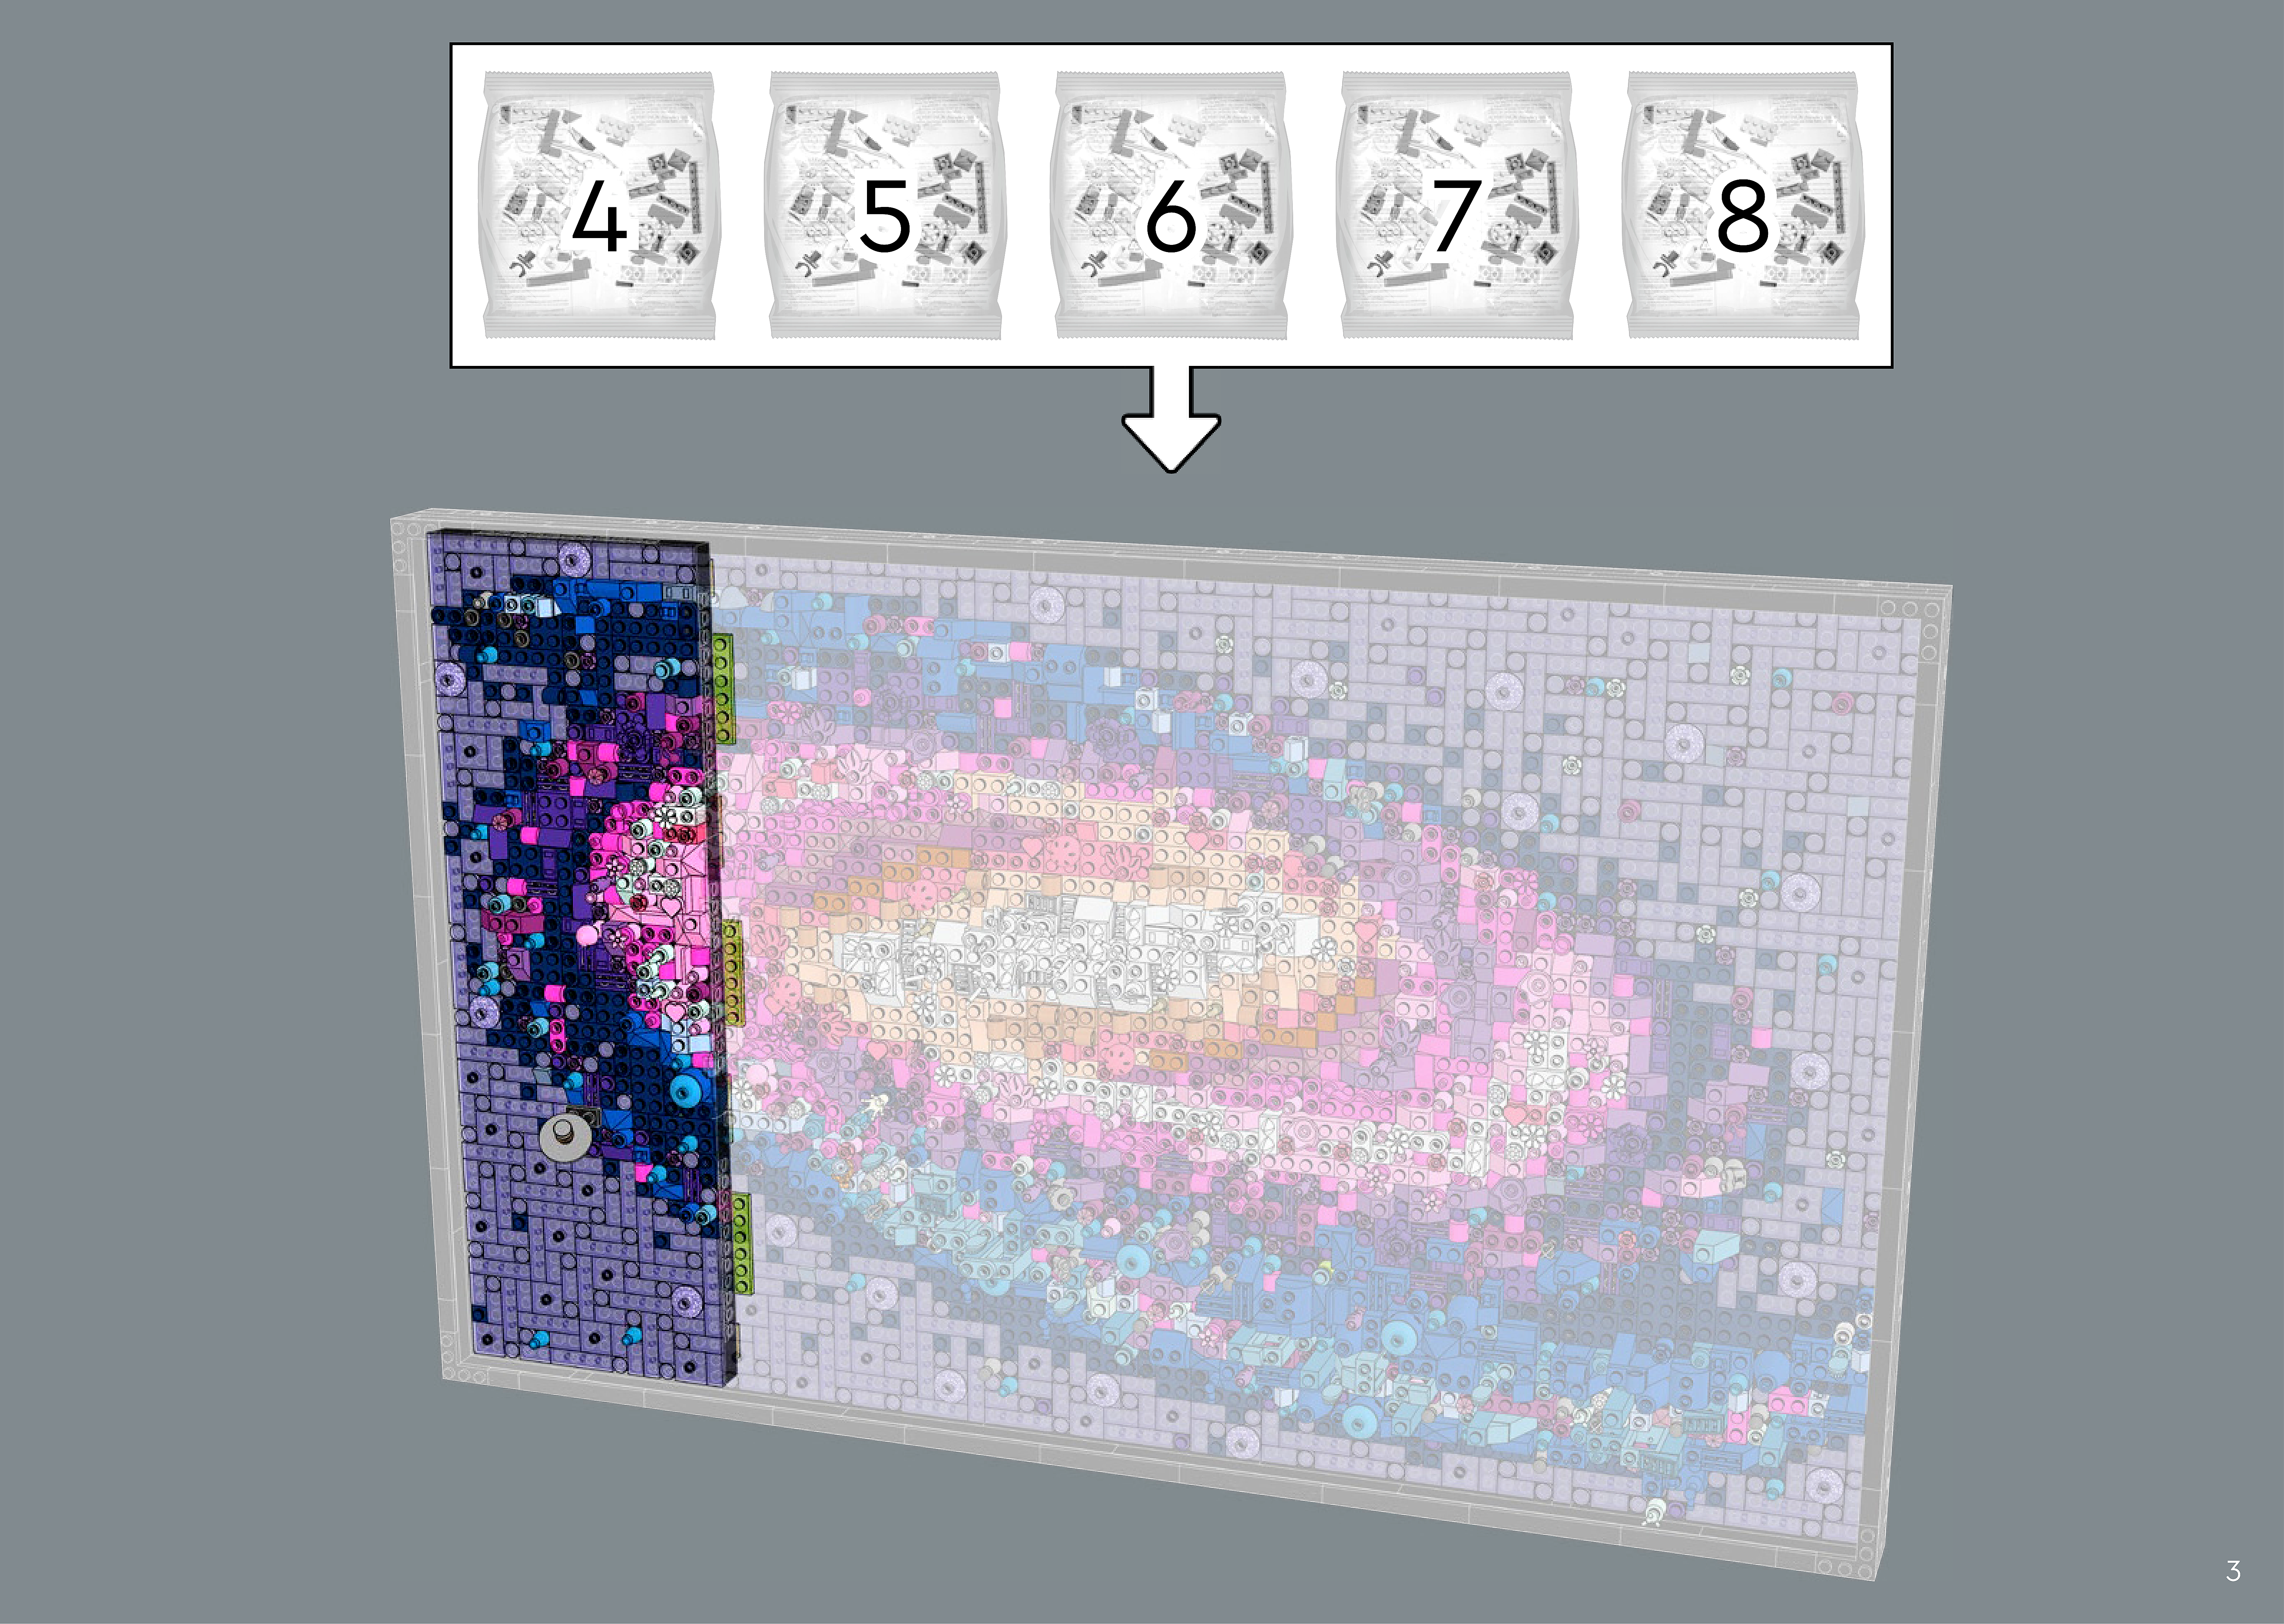
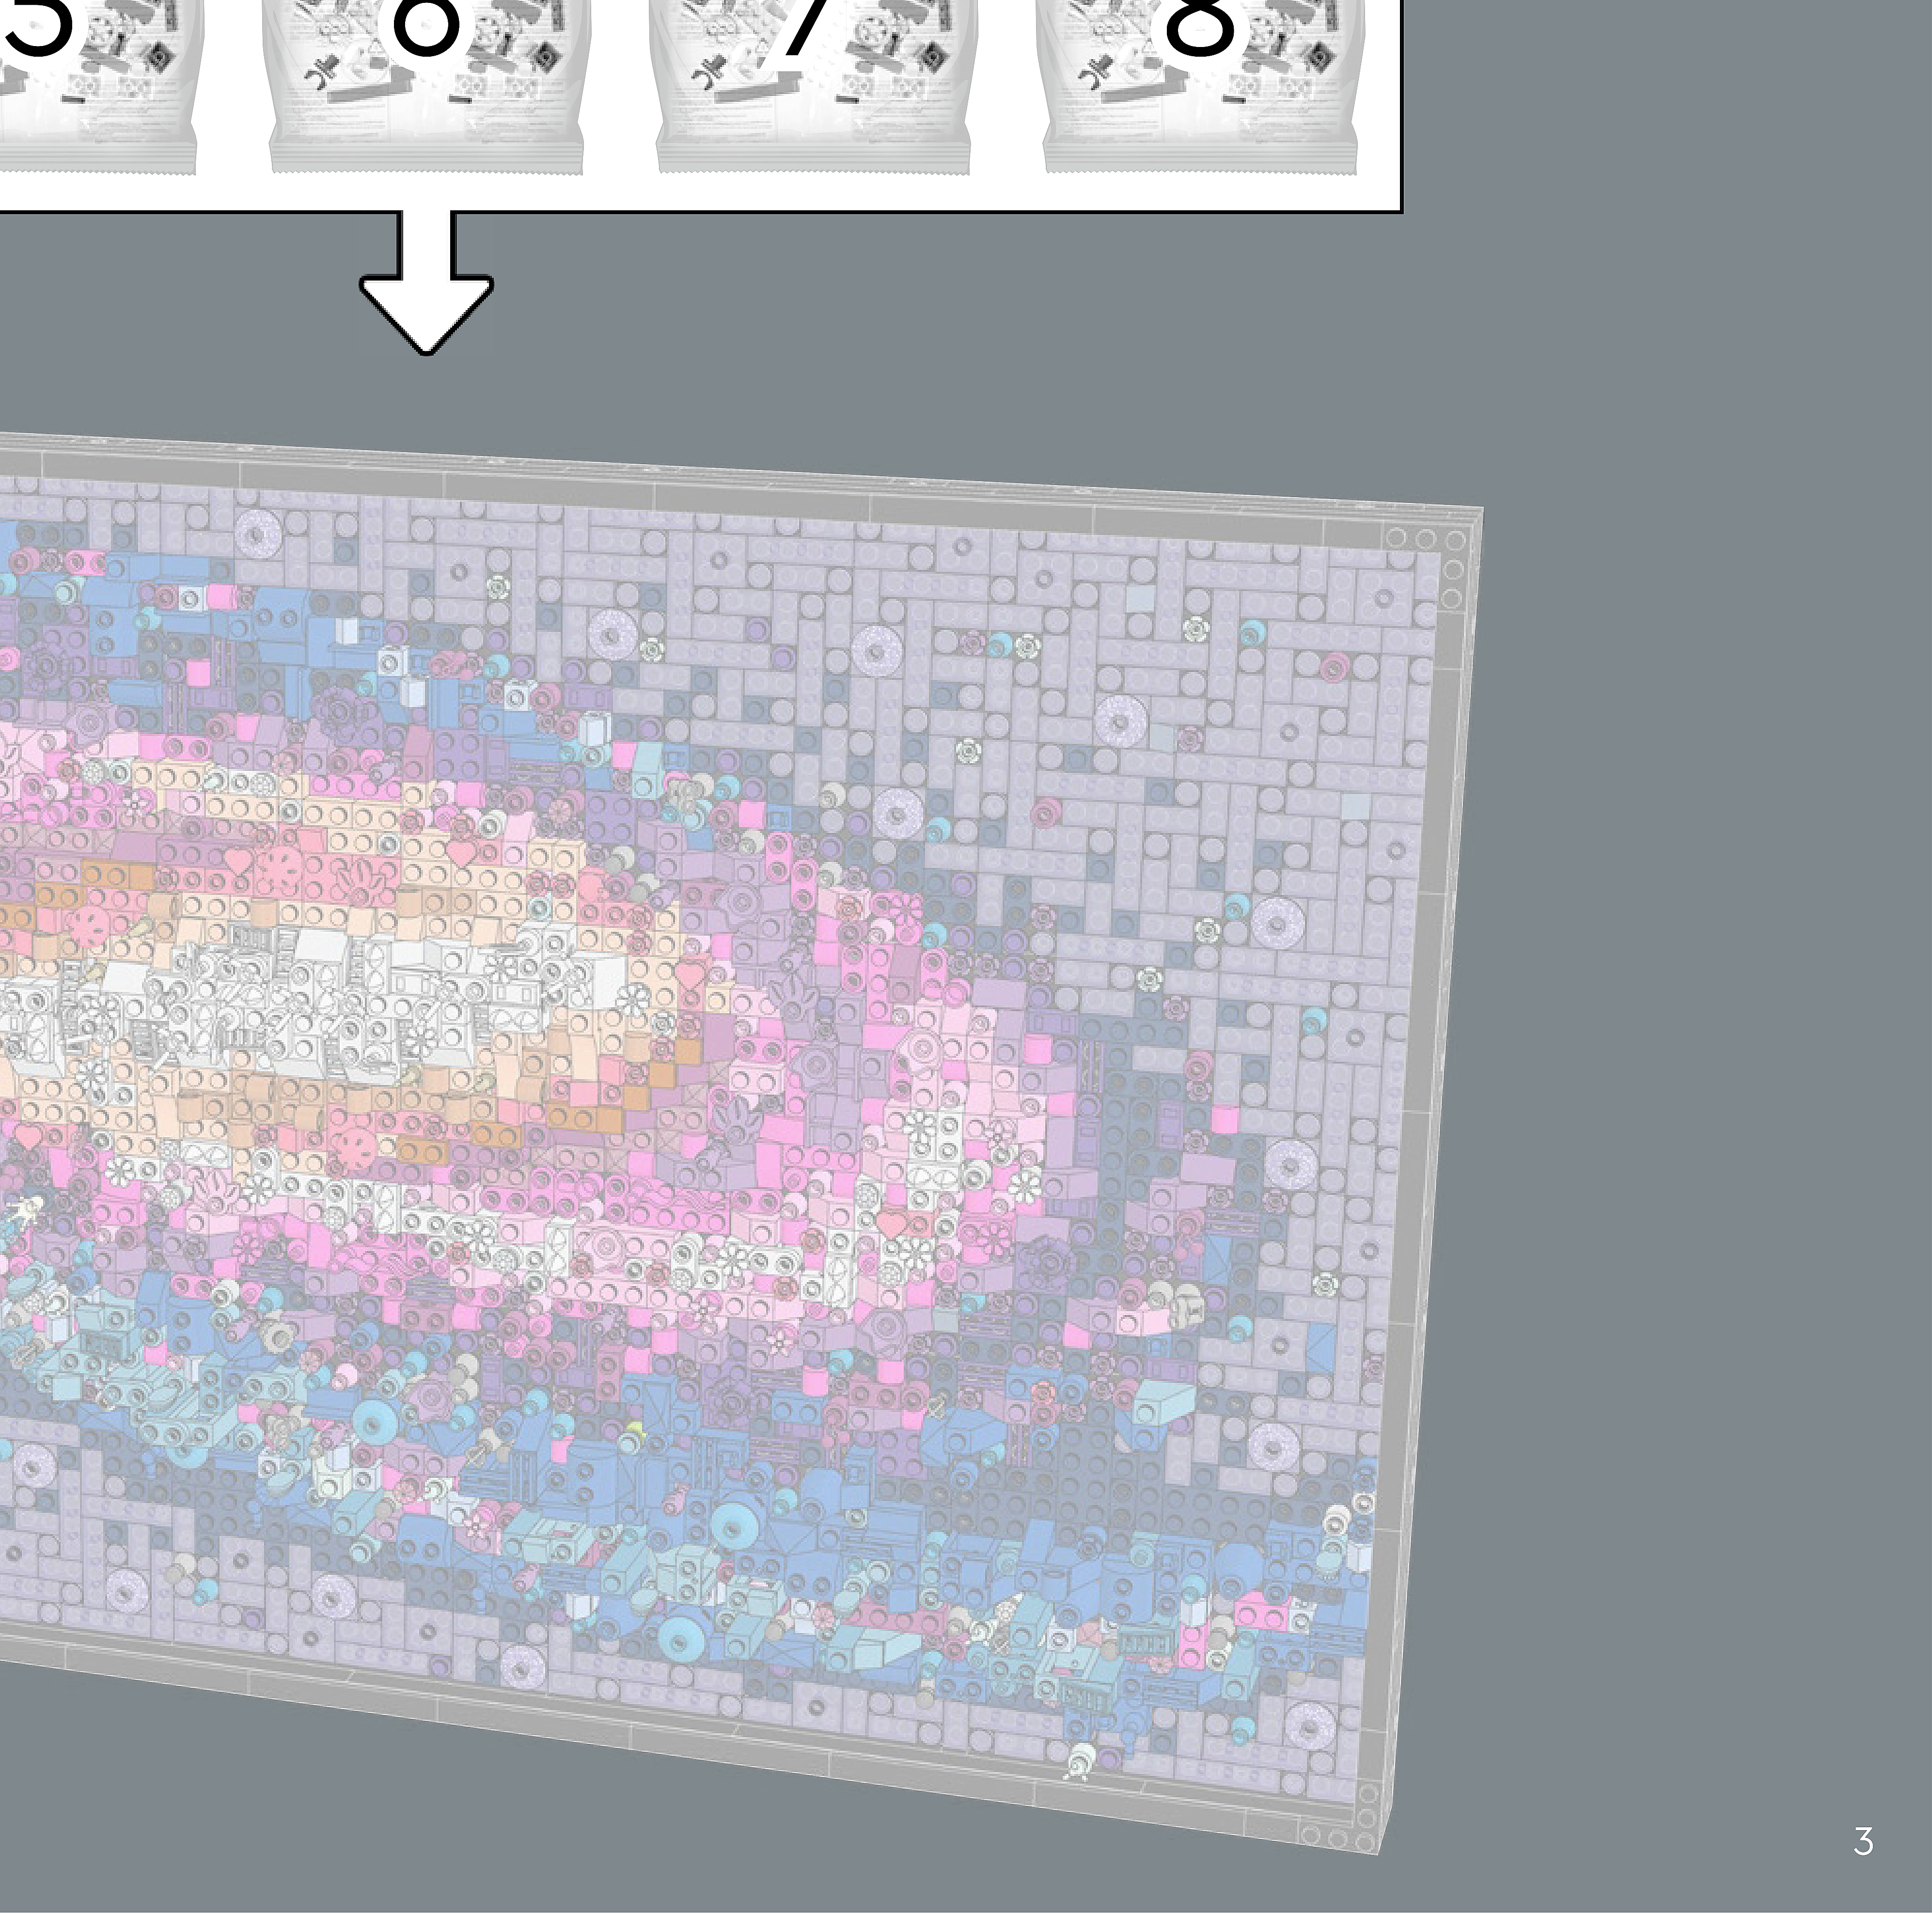
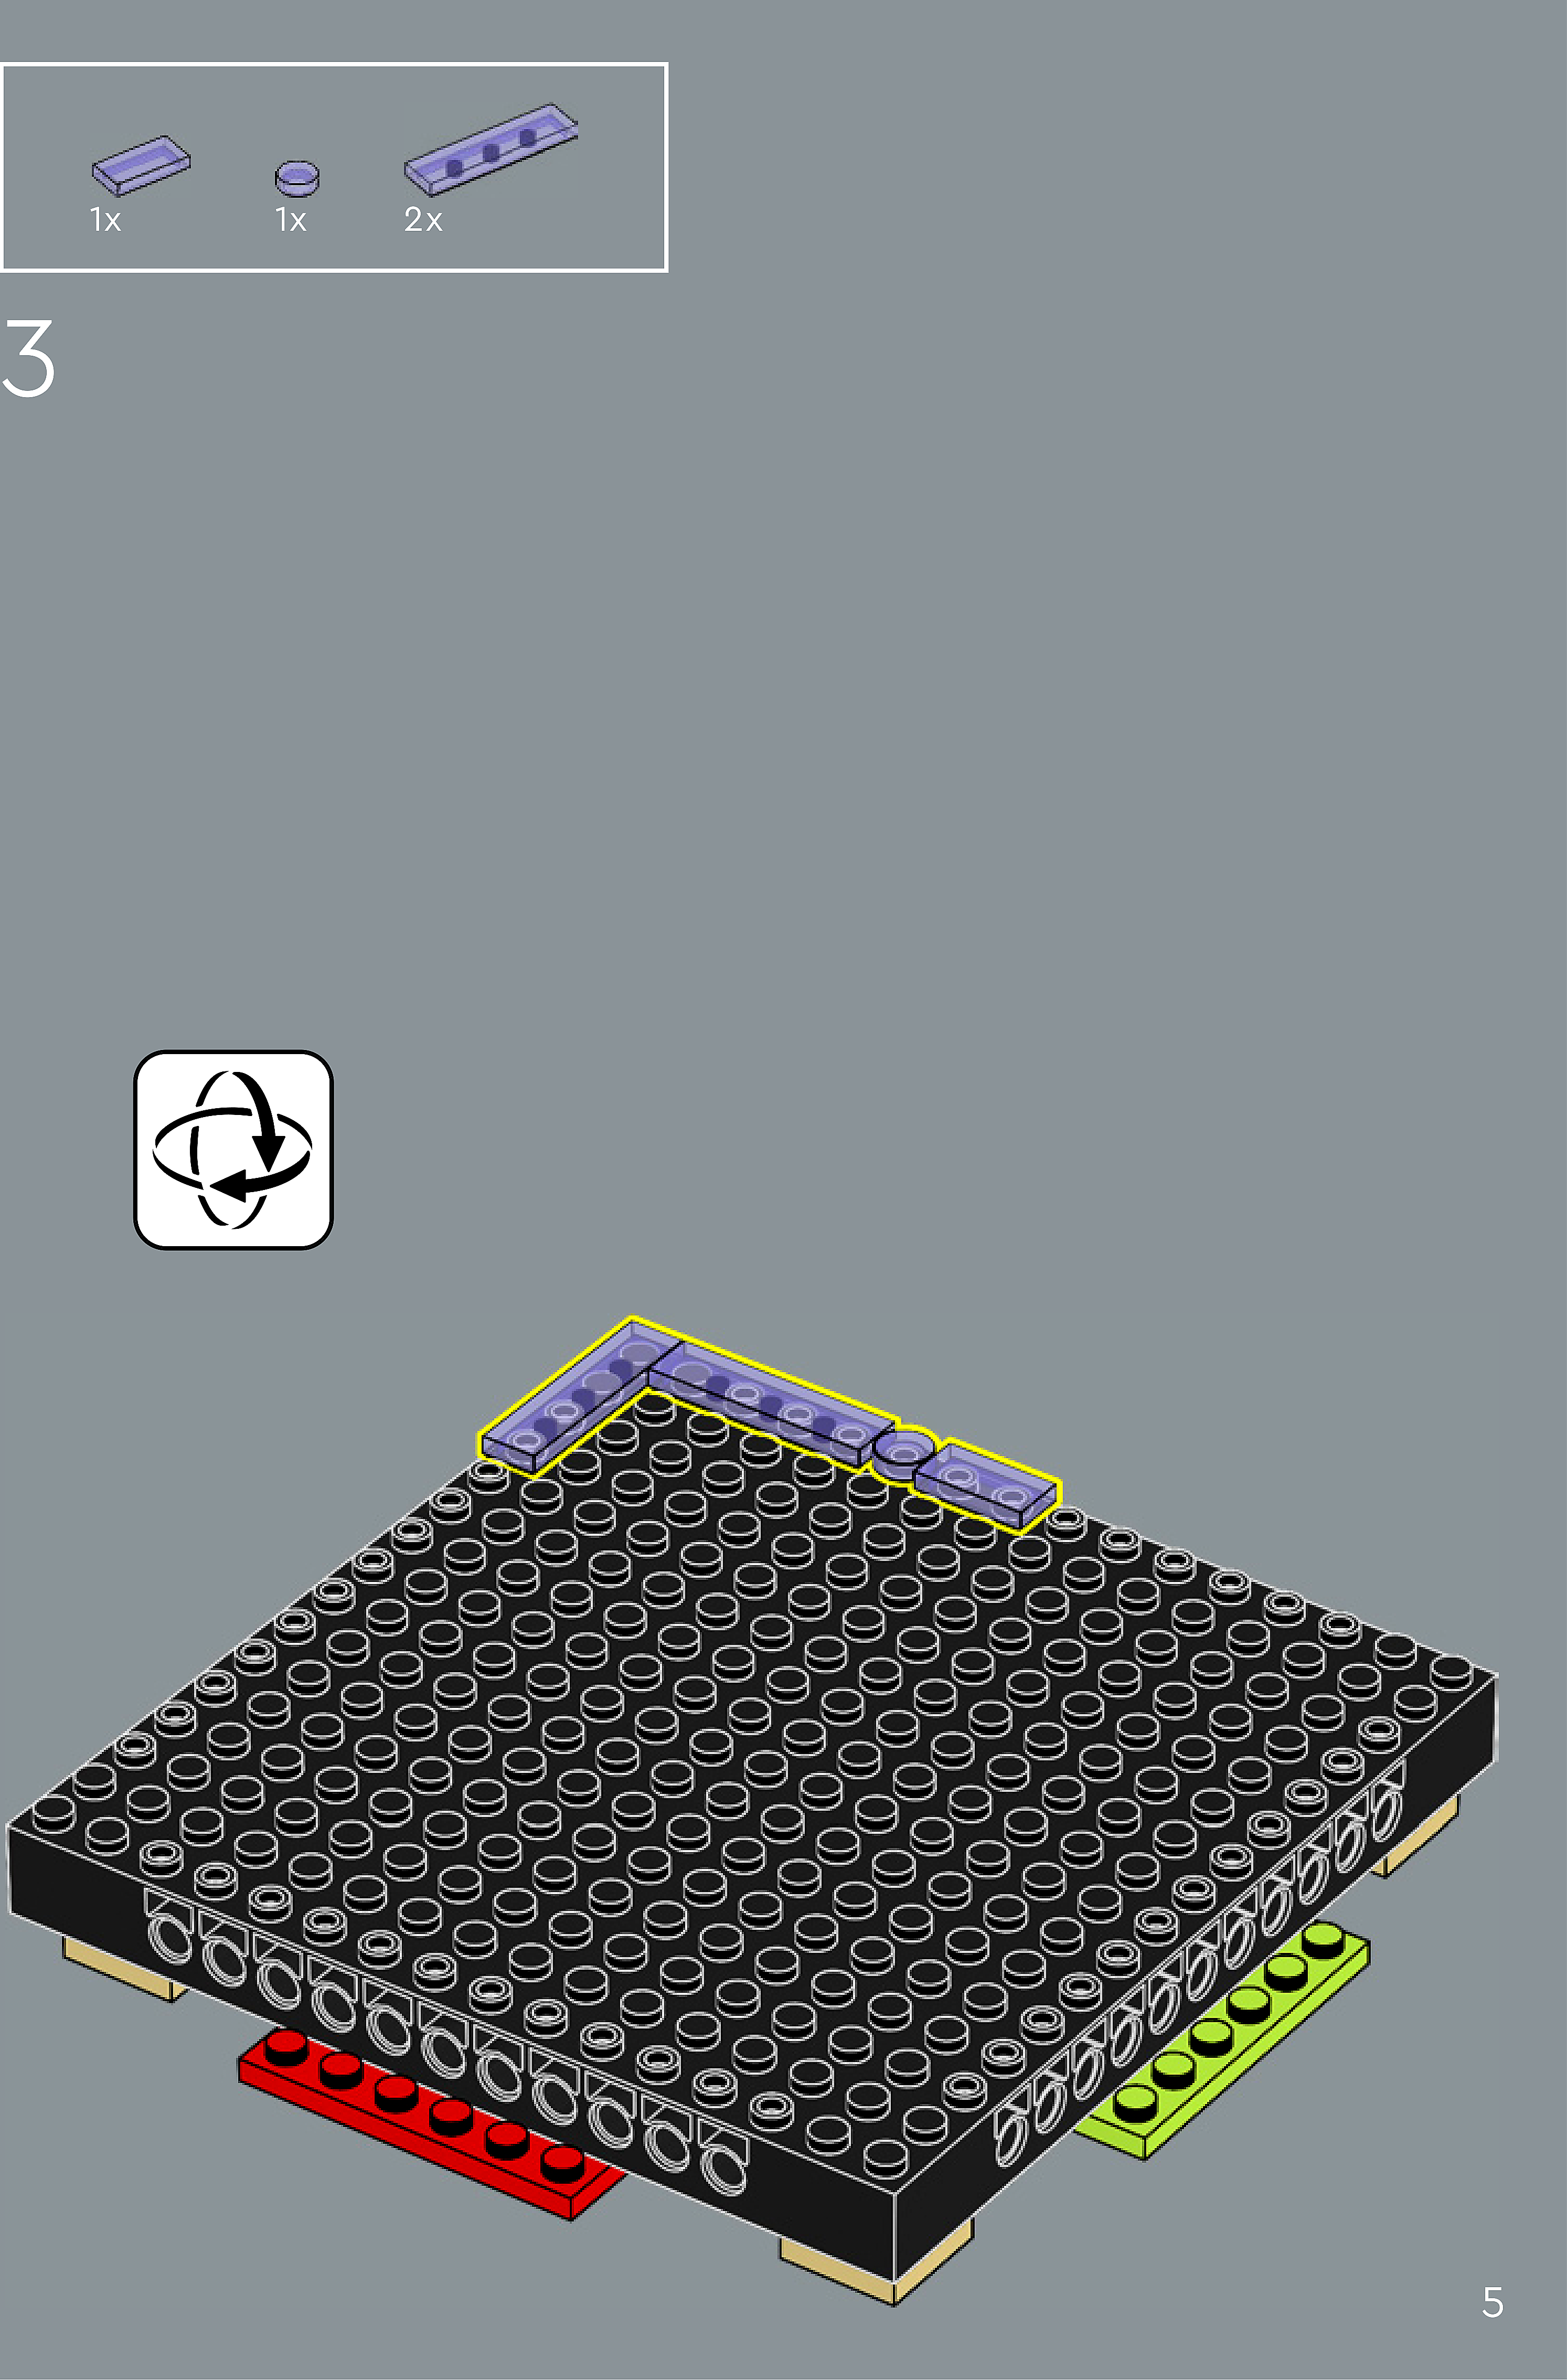
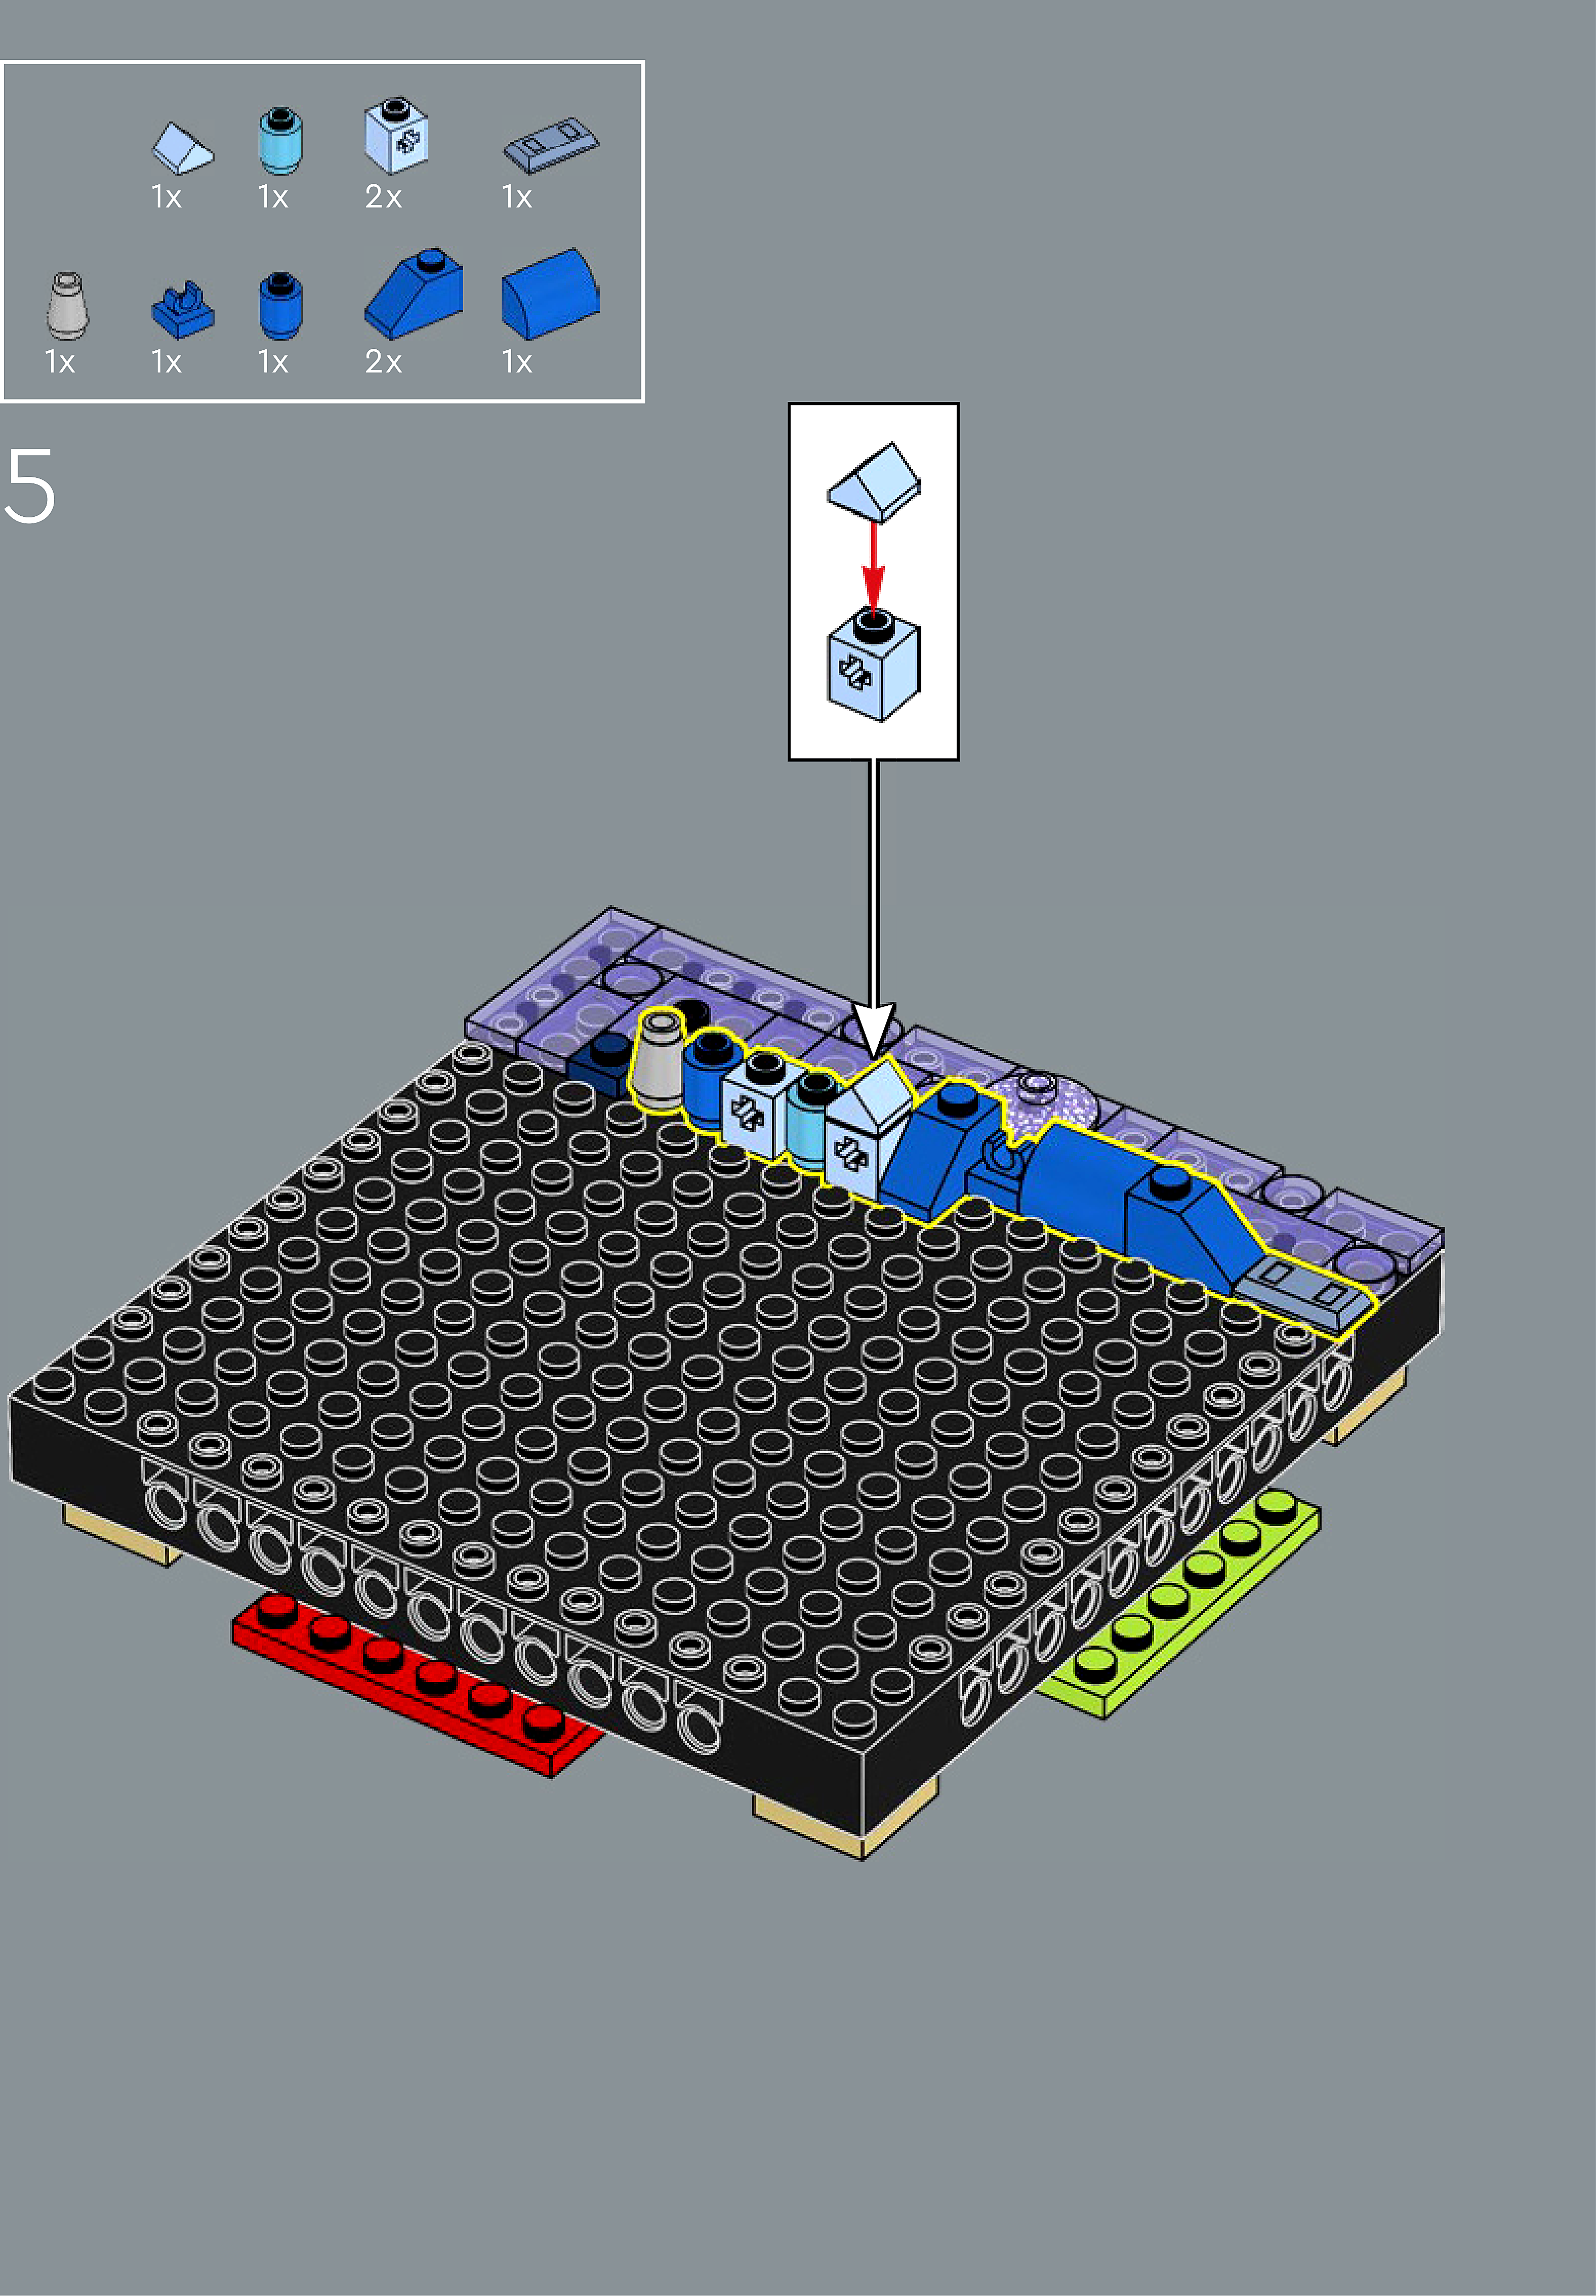
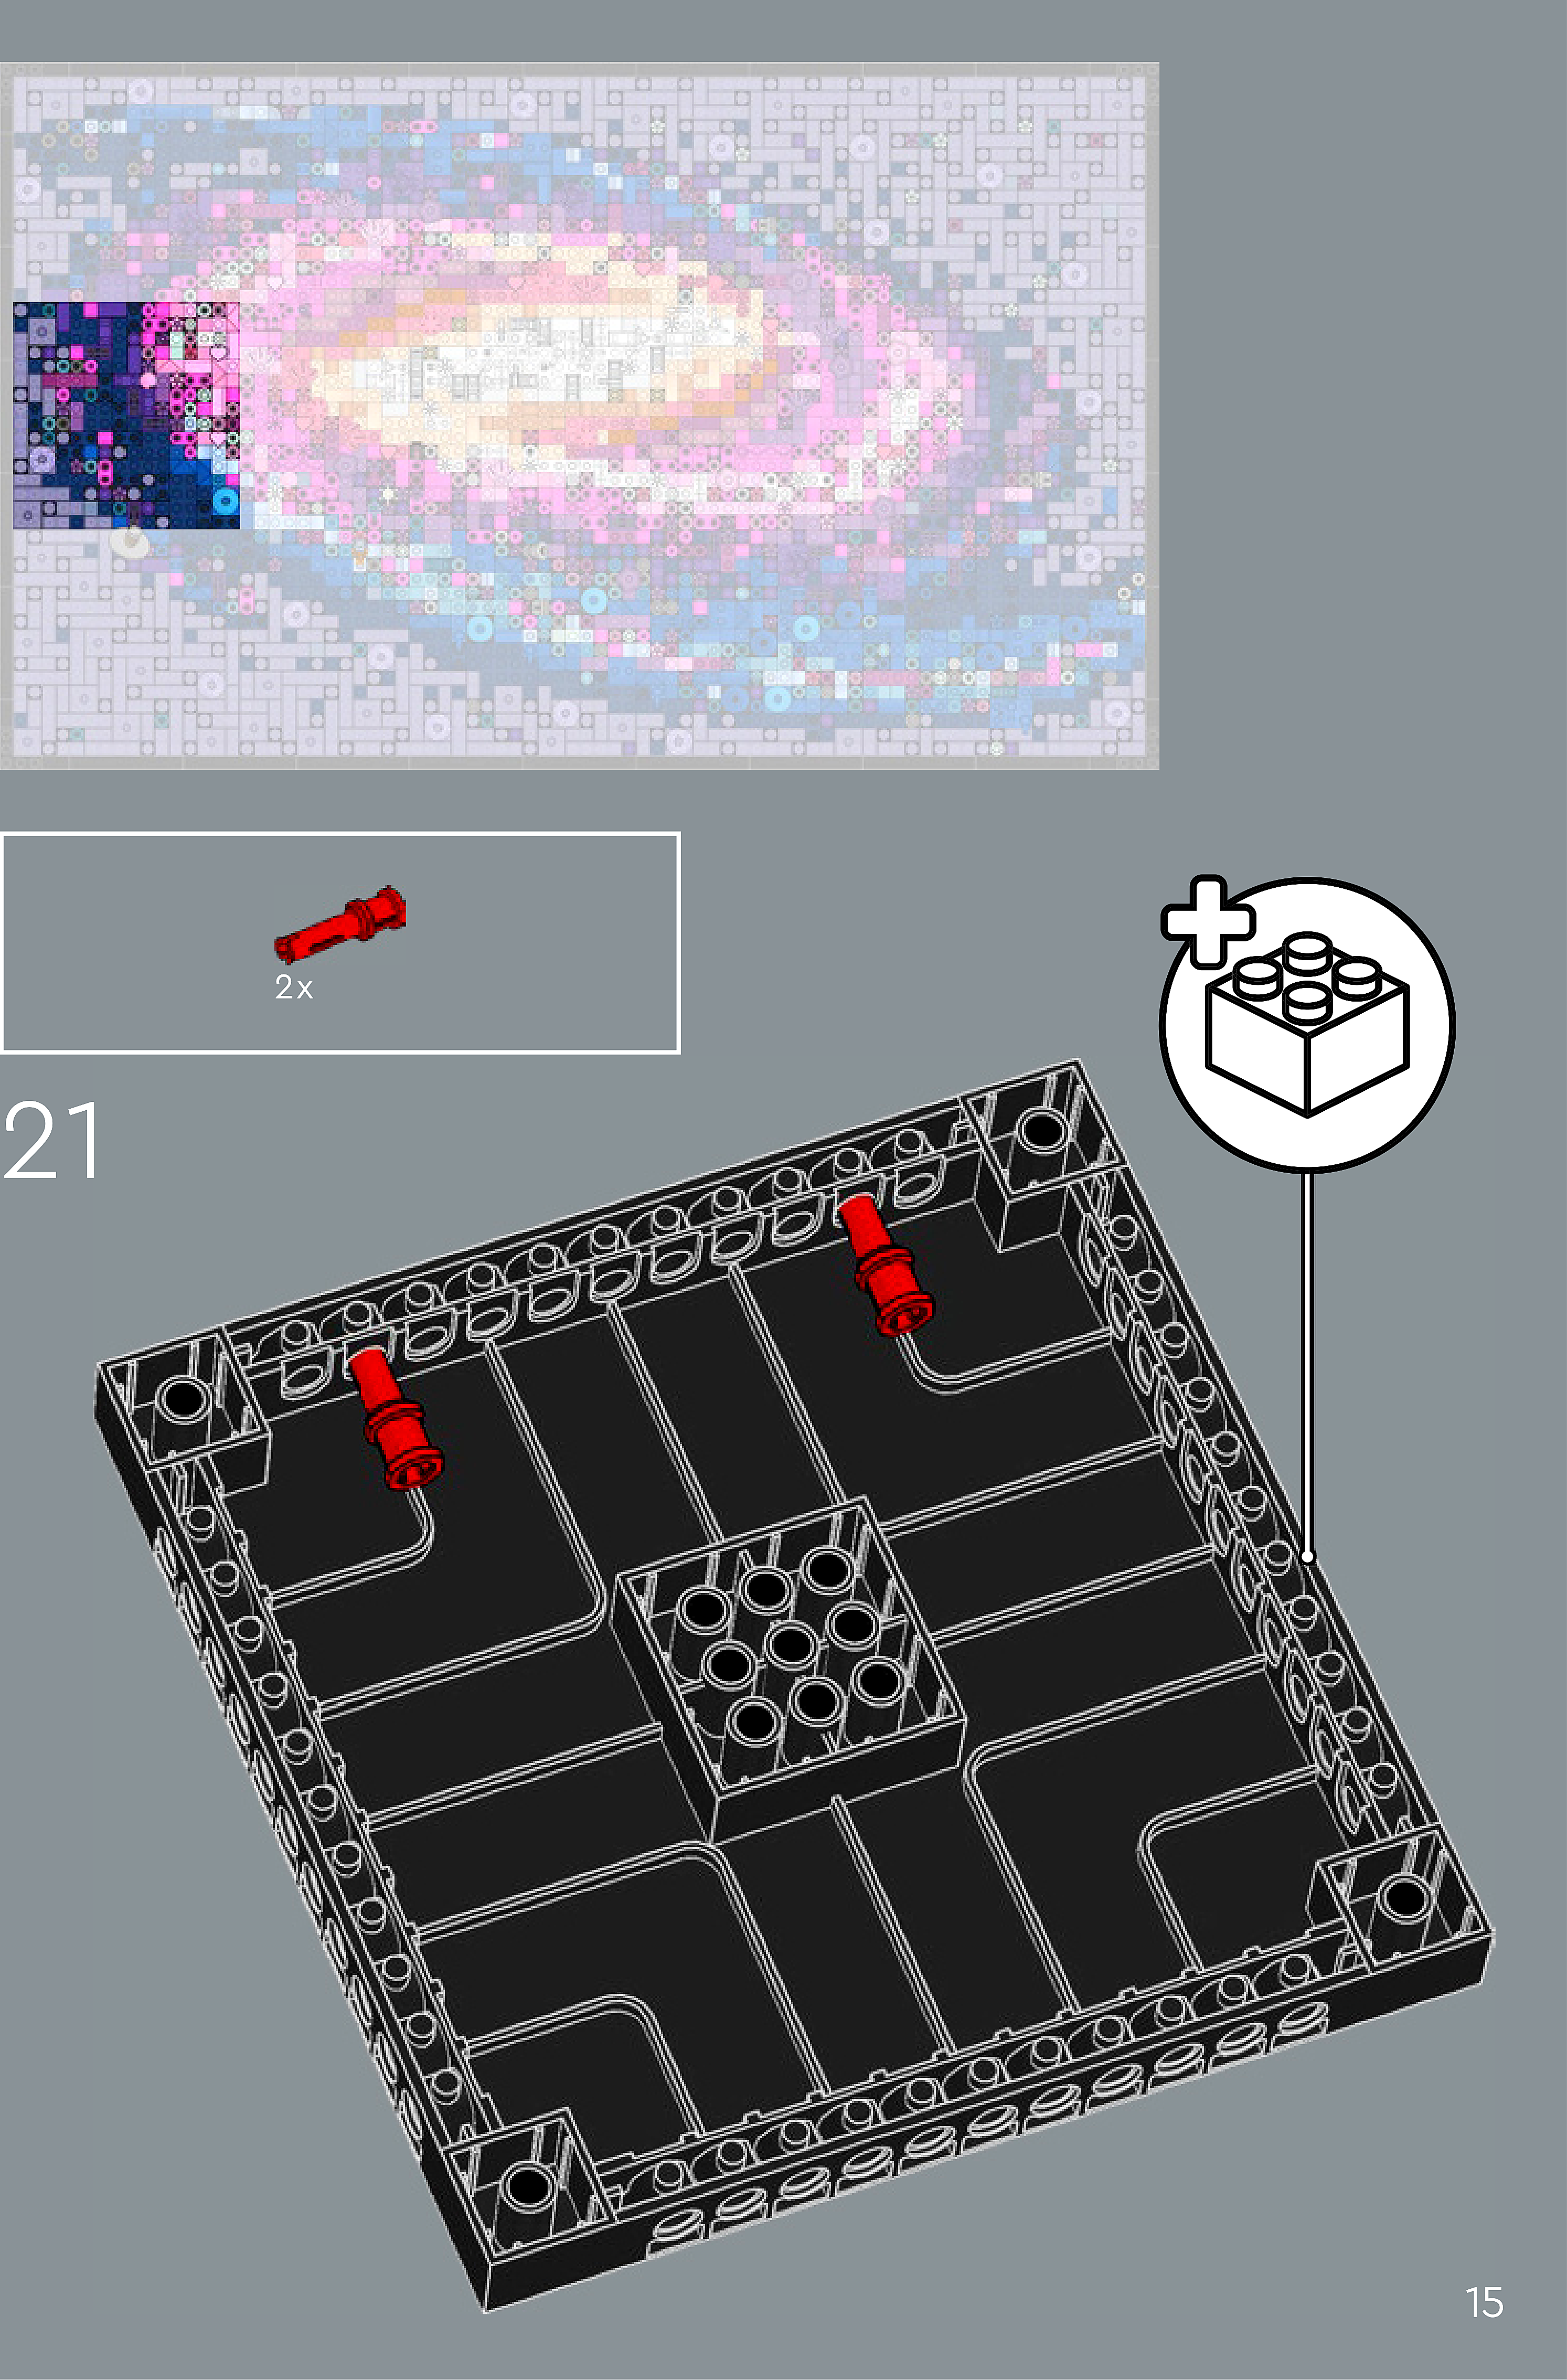
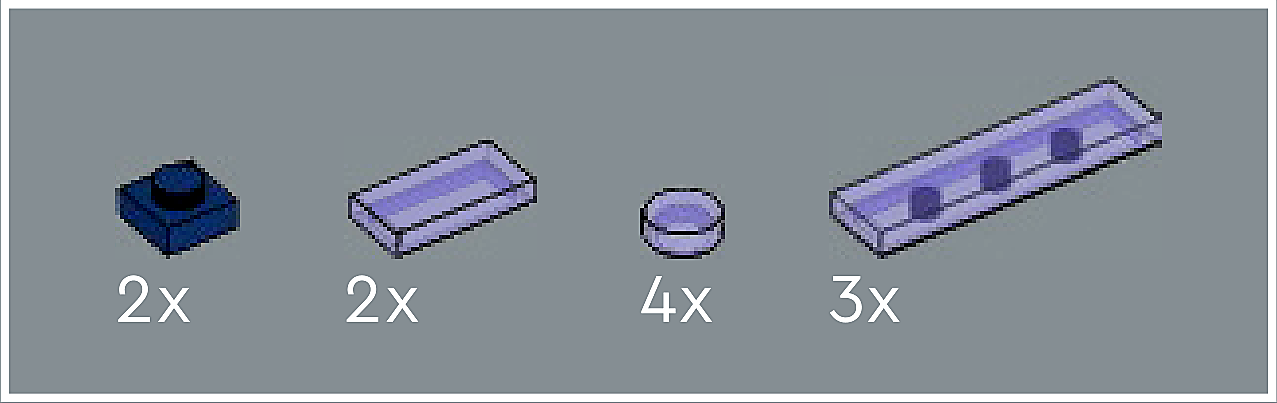
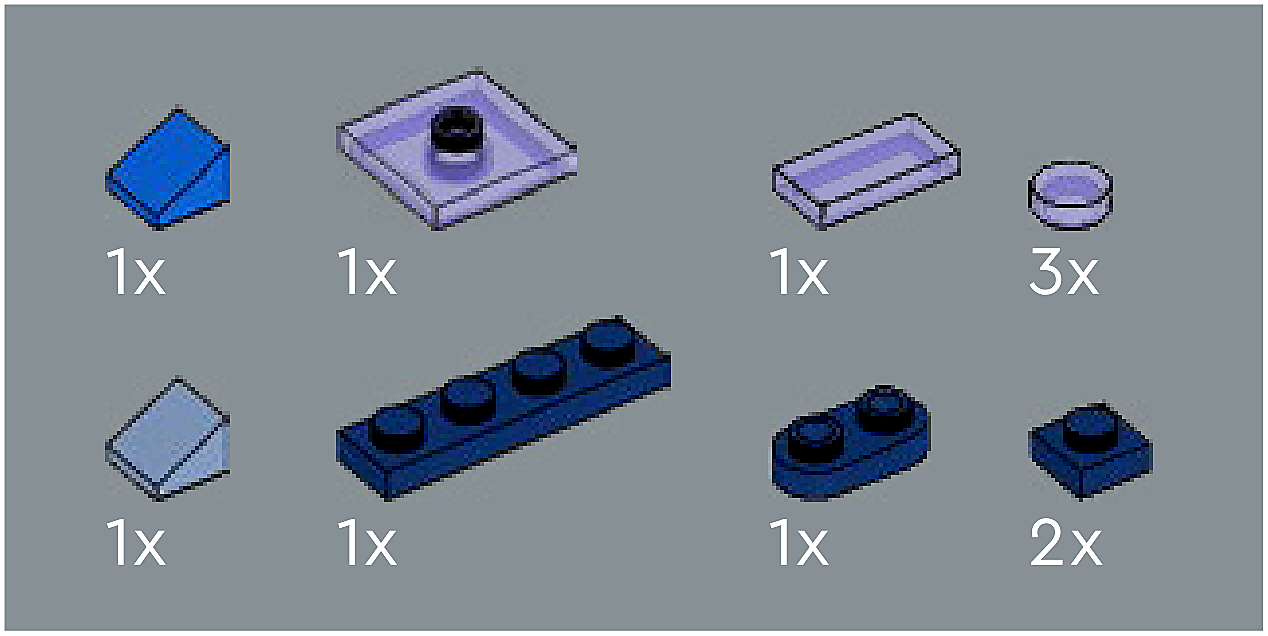
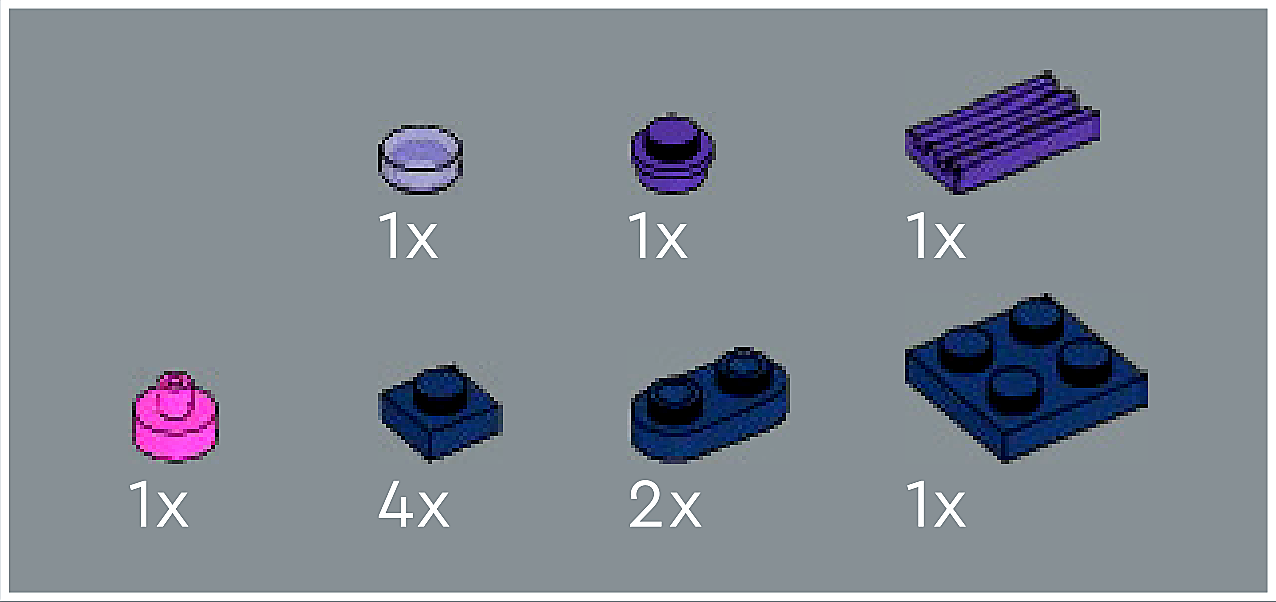
Assembly — page 1
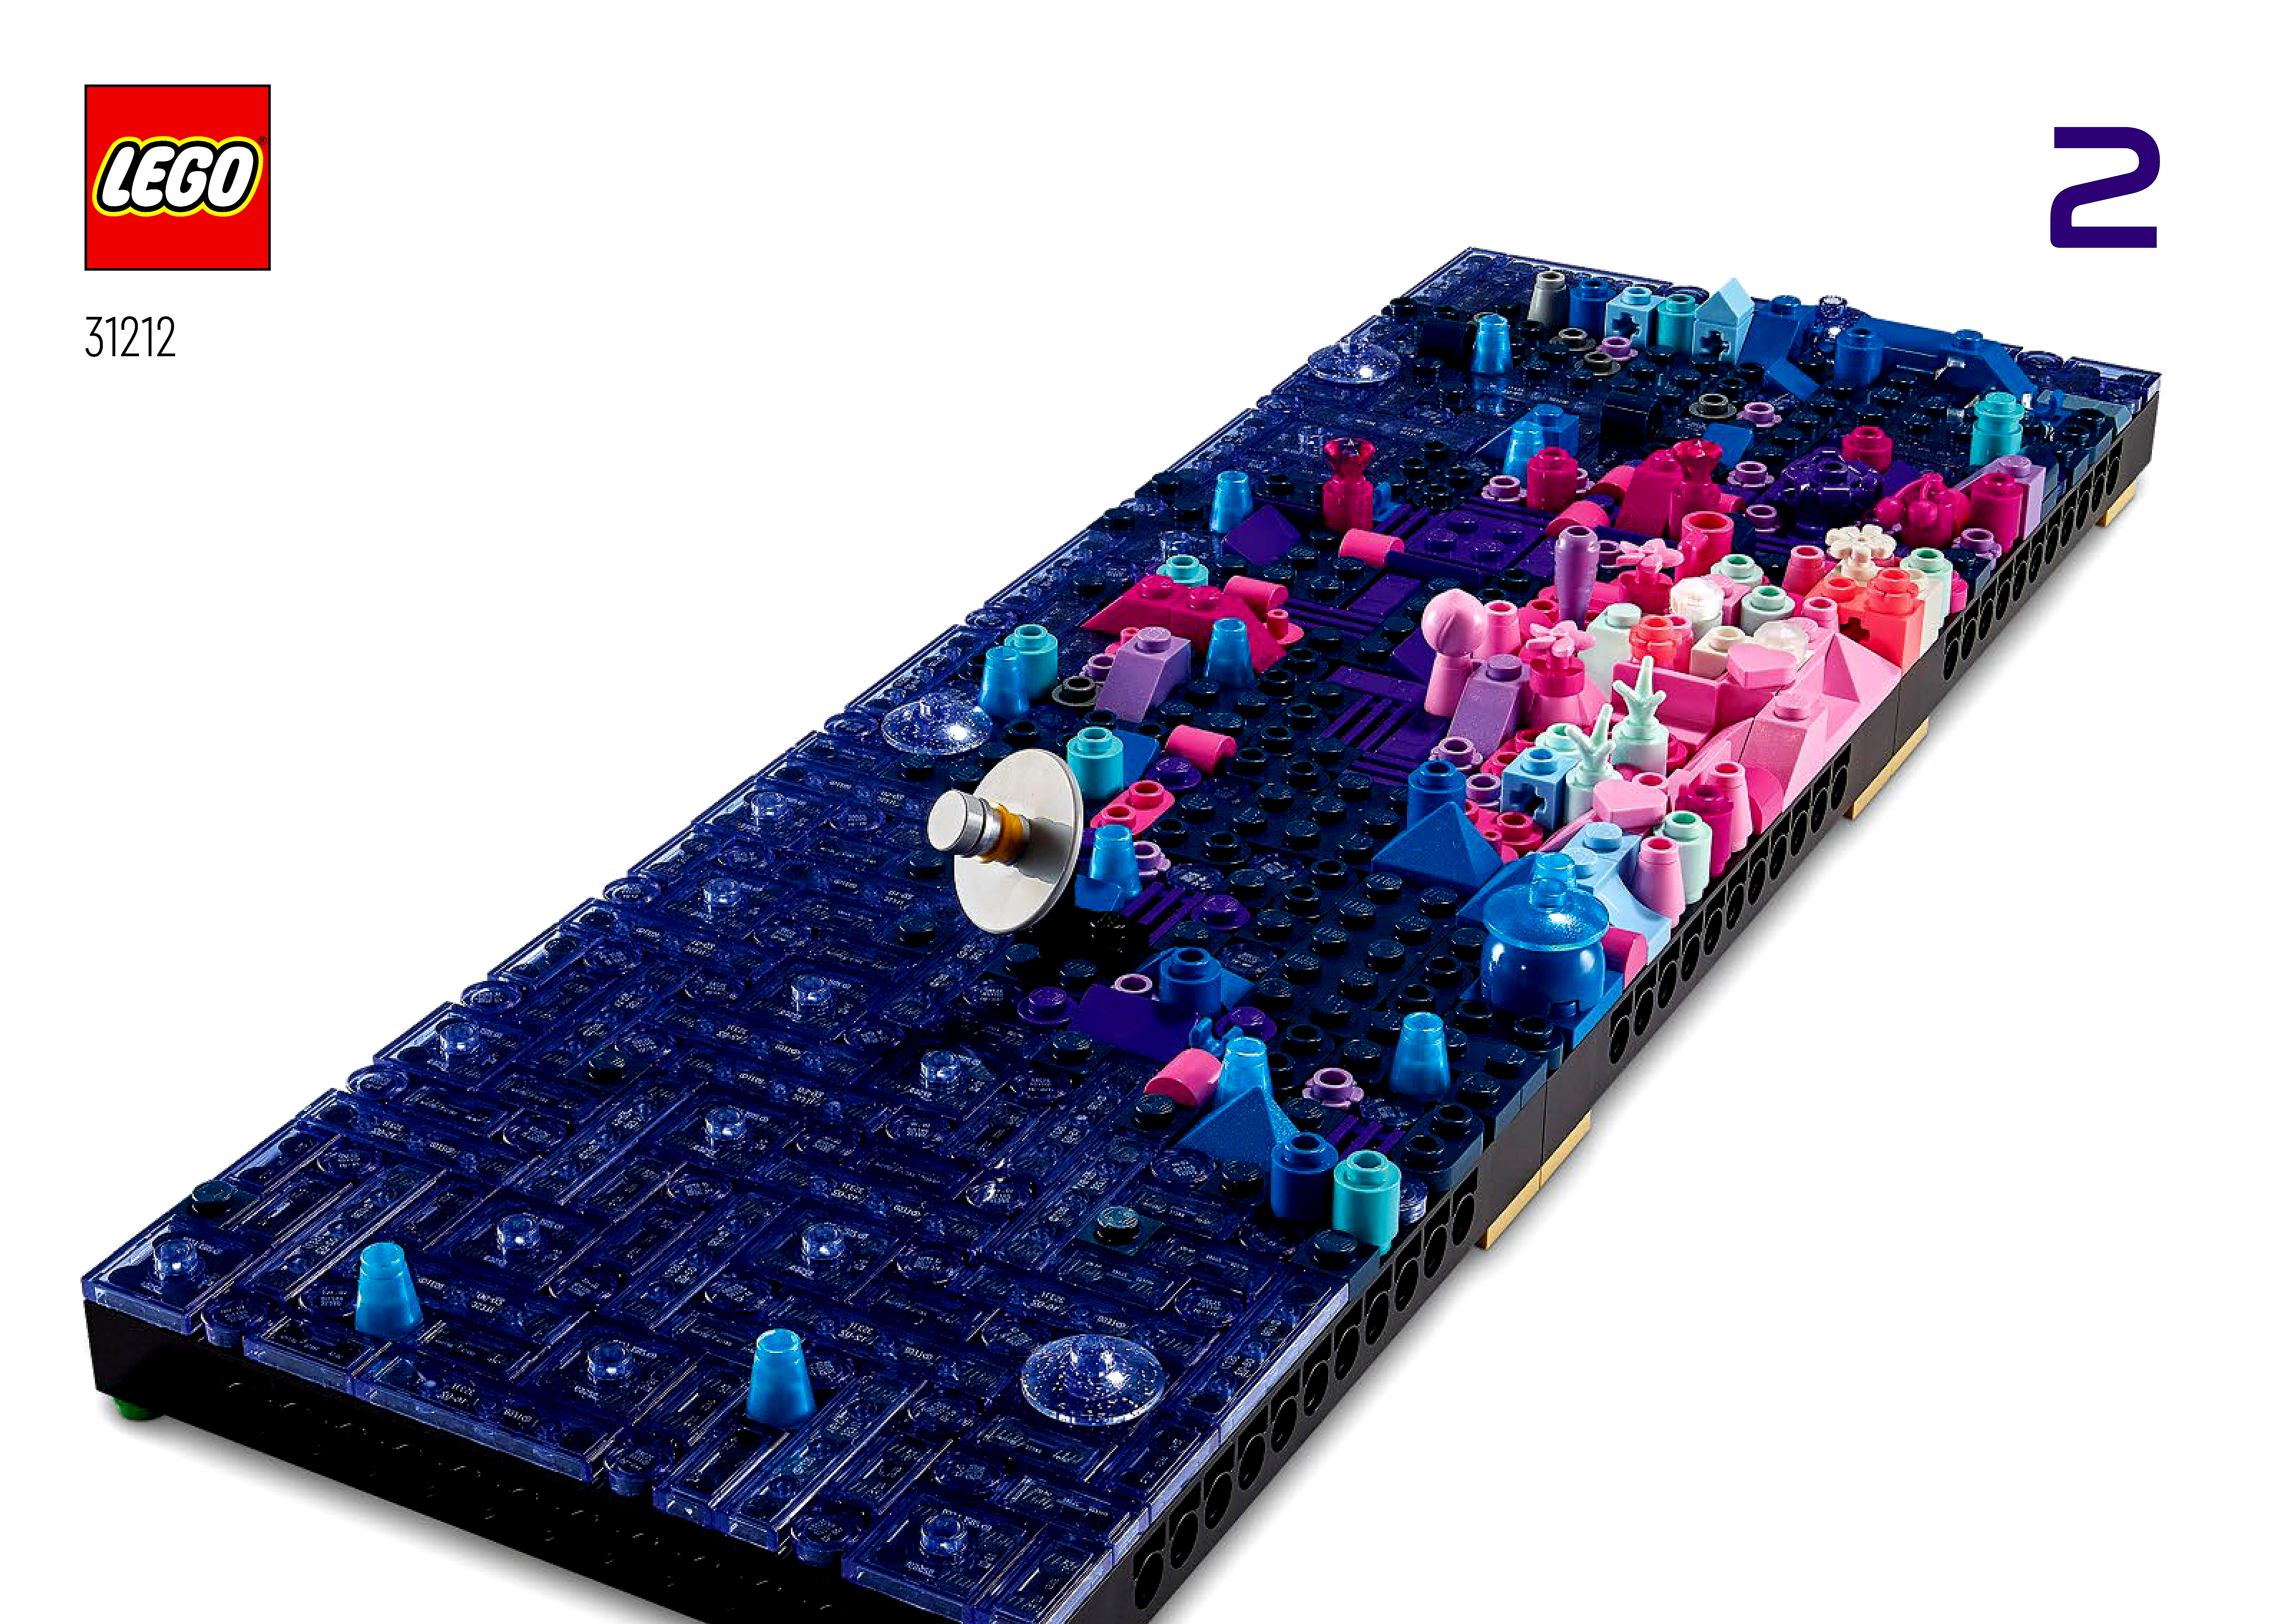
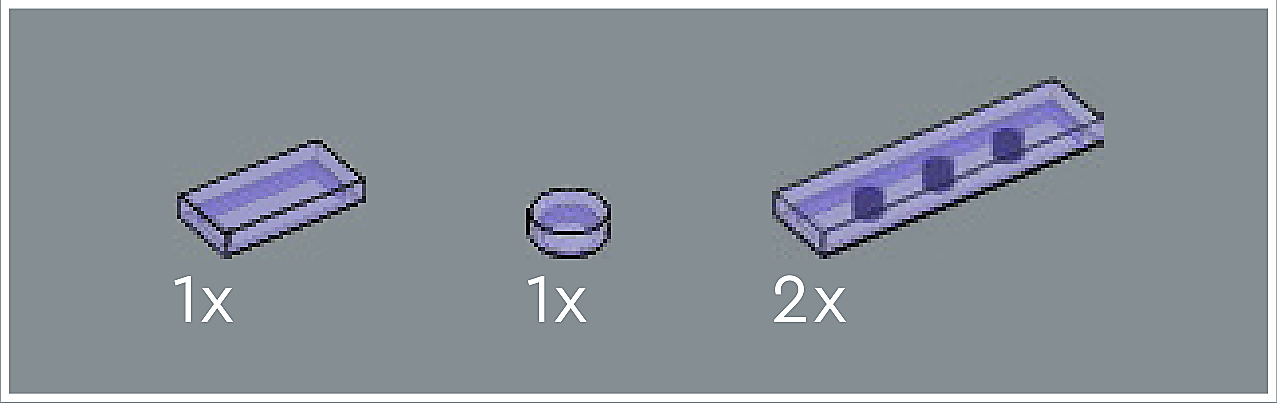
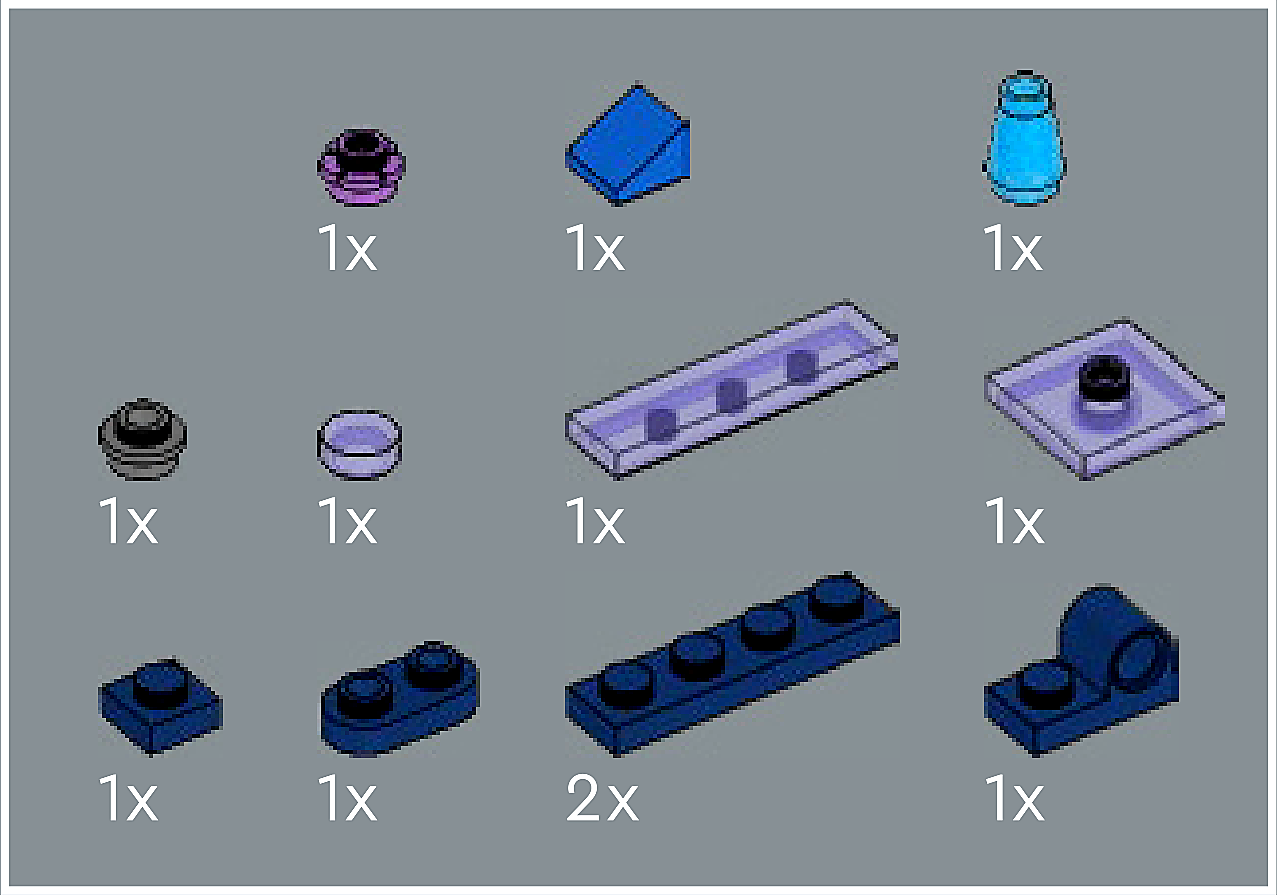
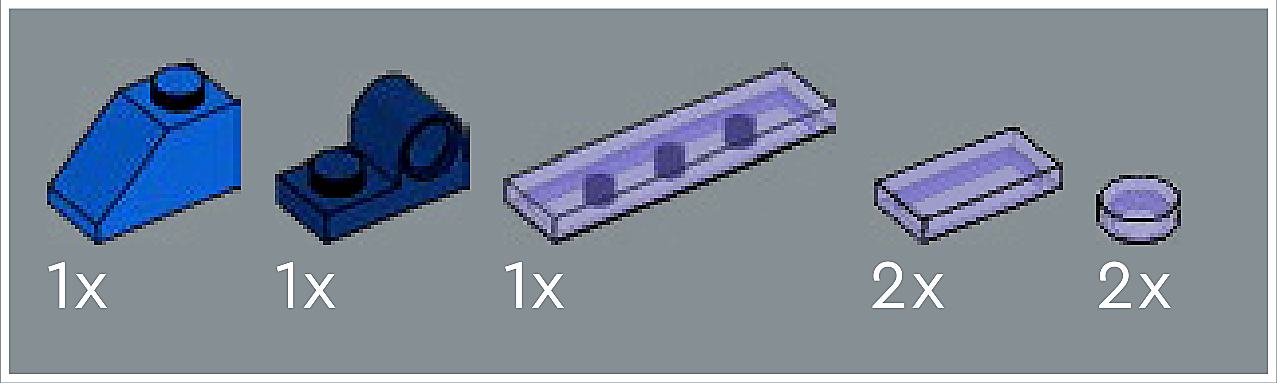
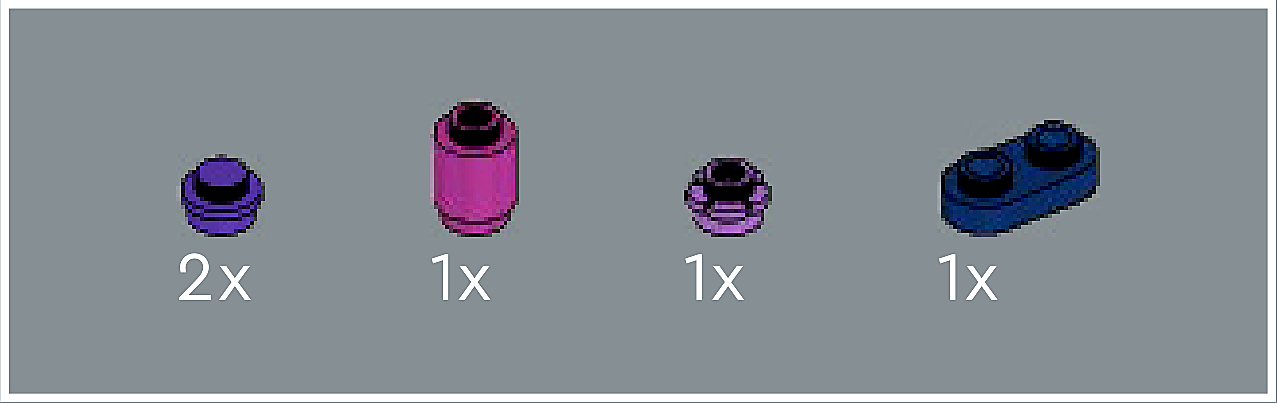
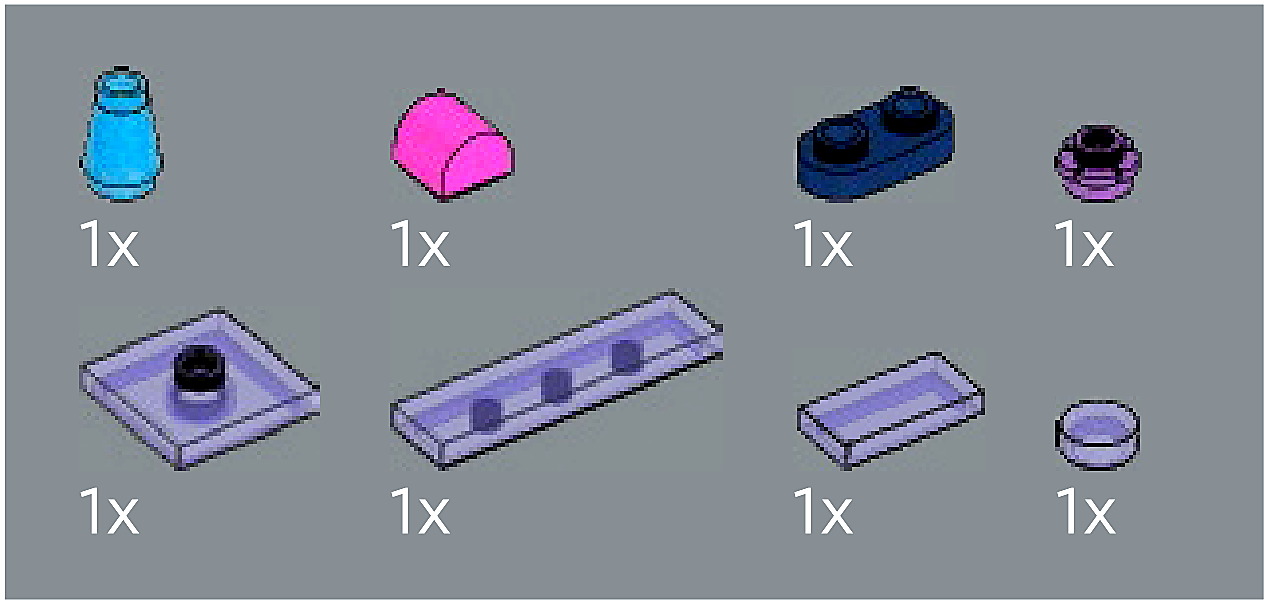
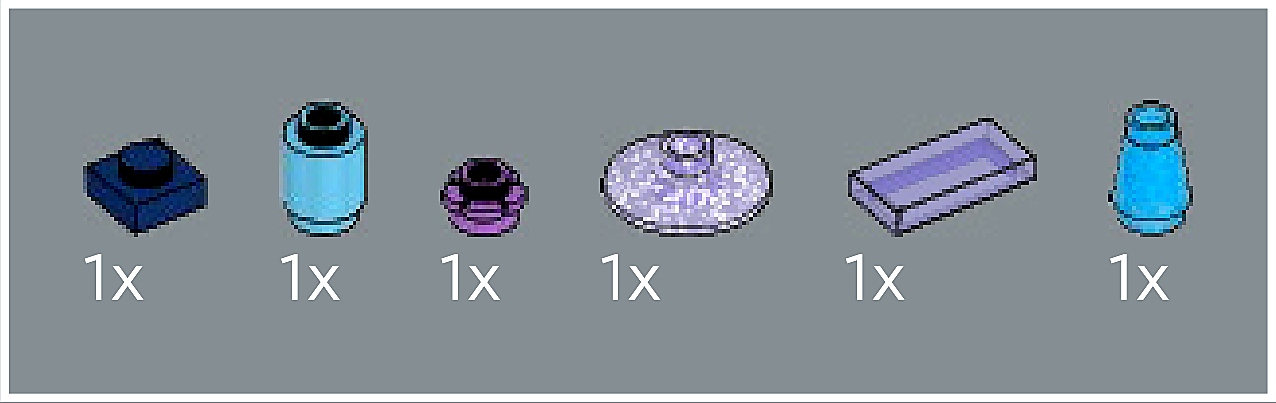
Inset — page 1
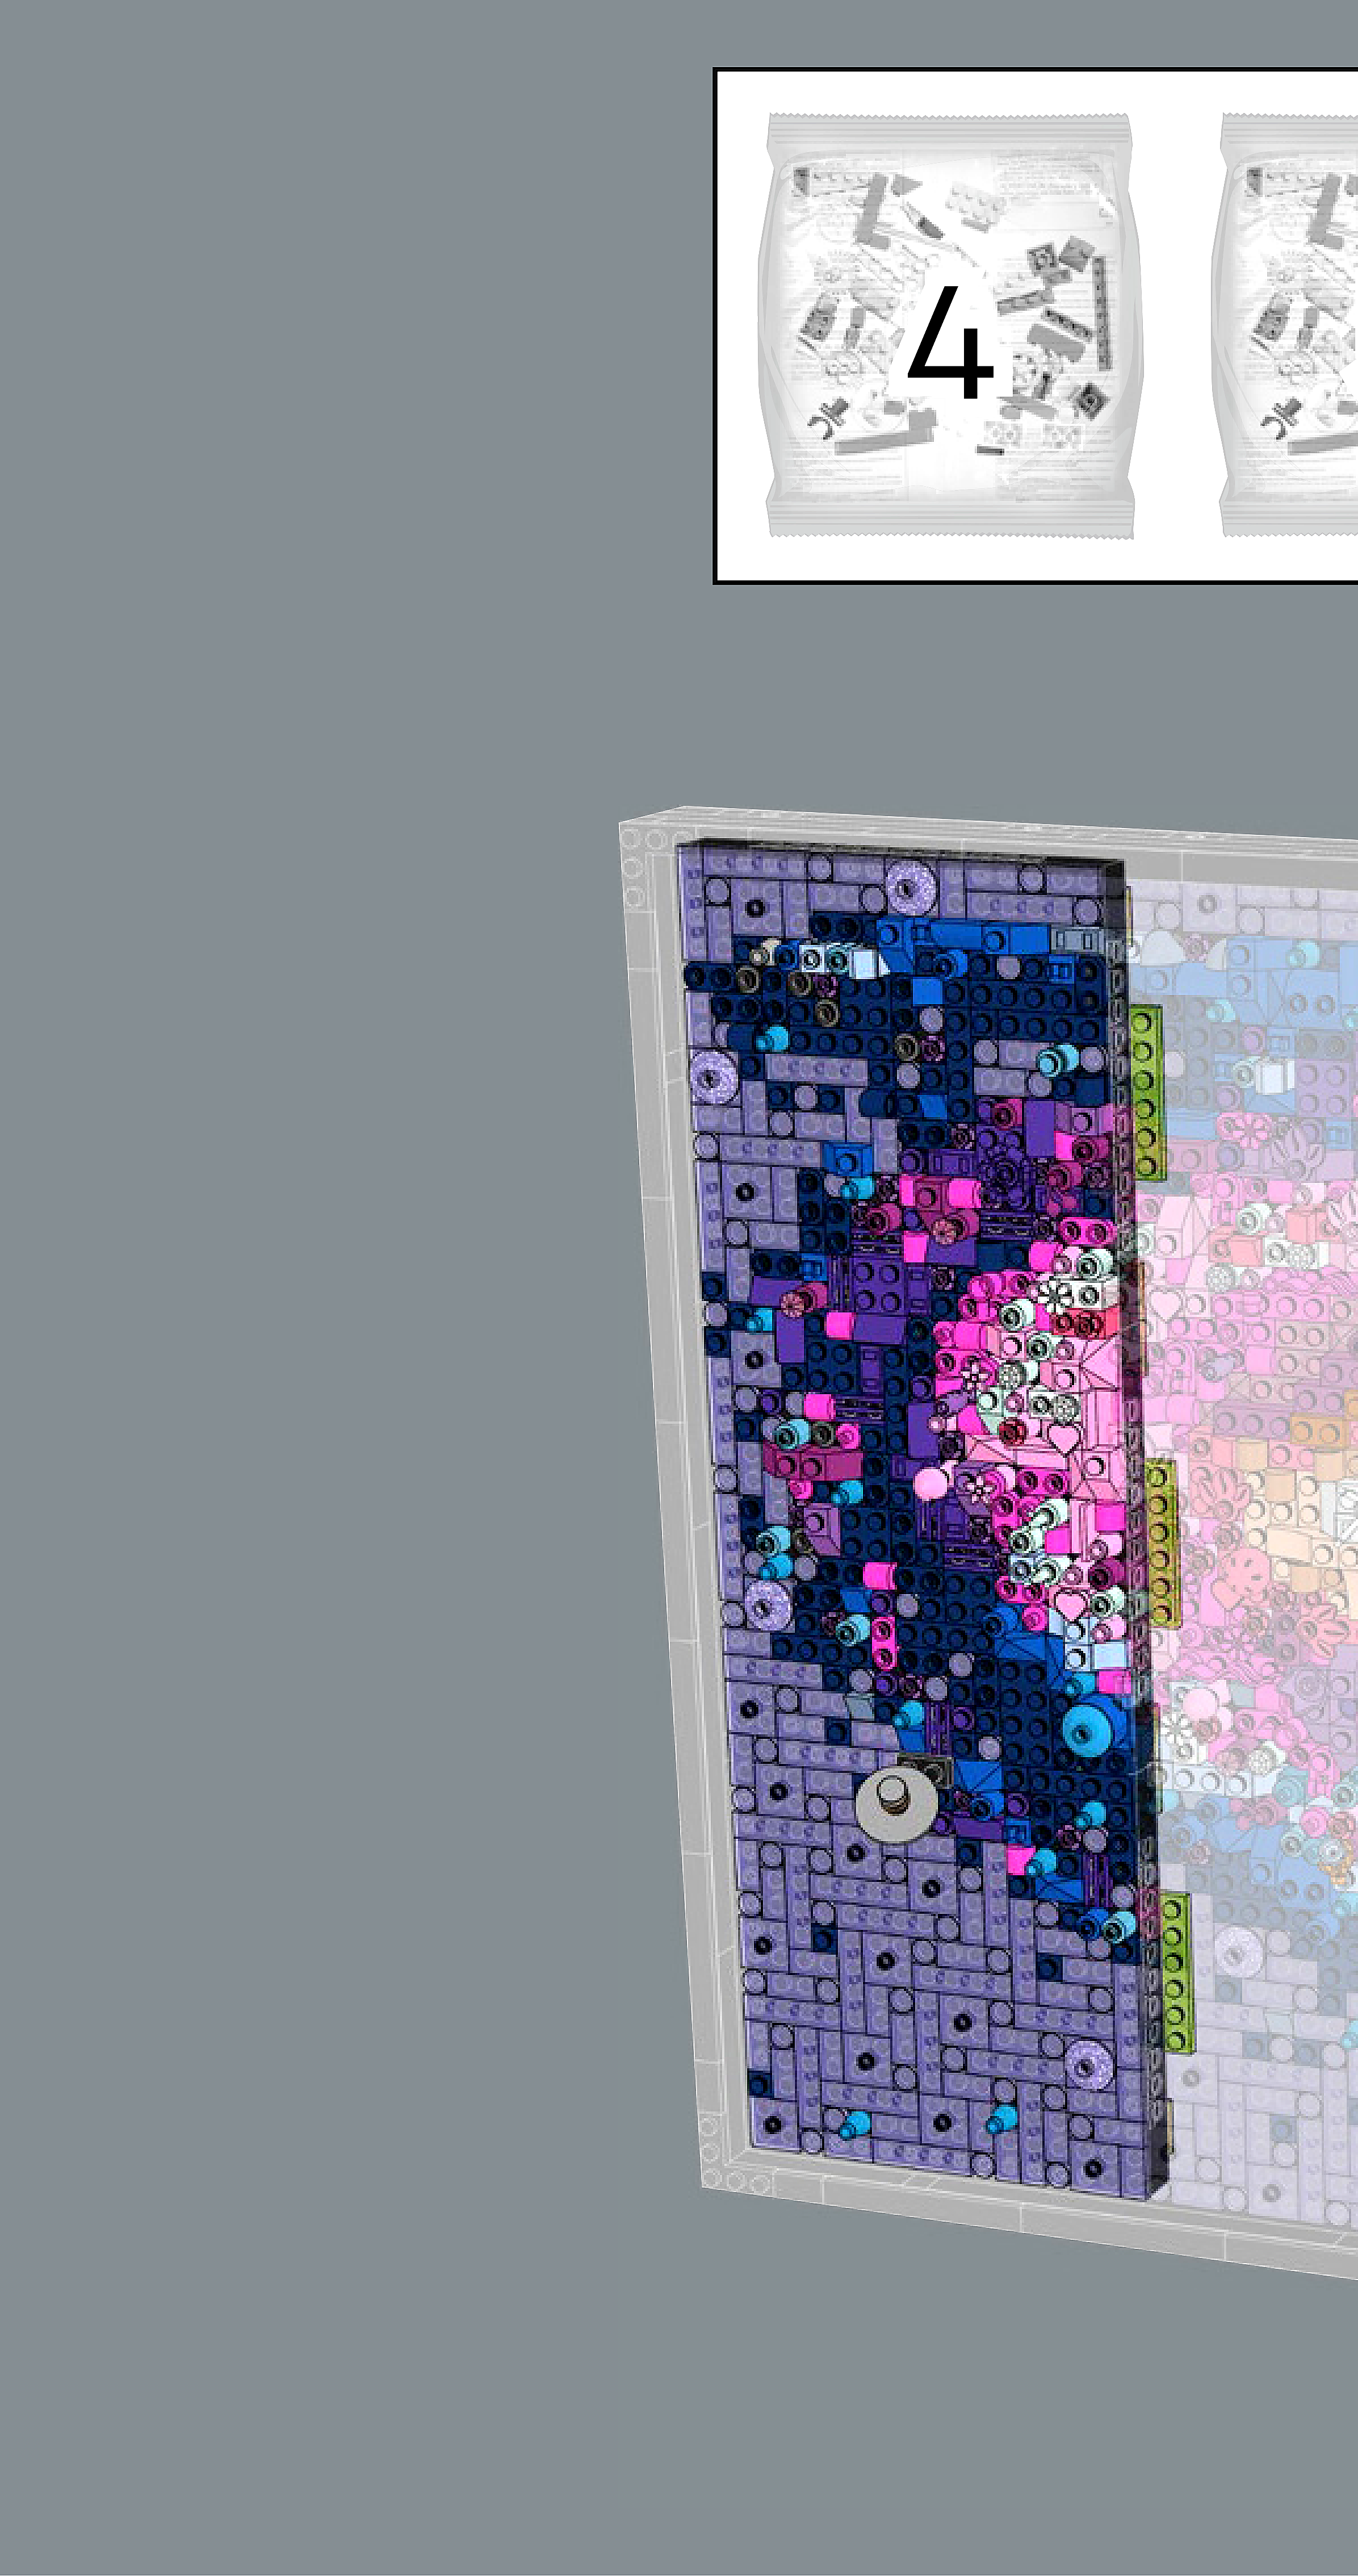
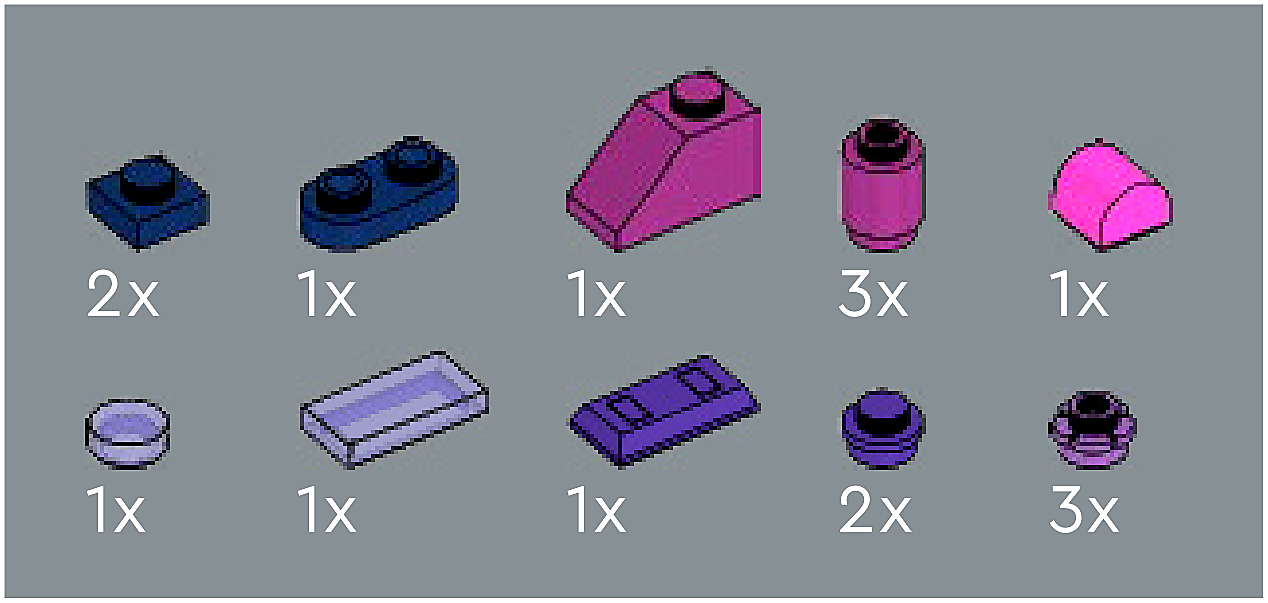
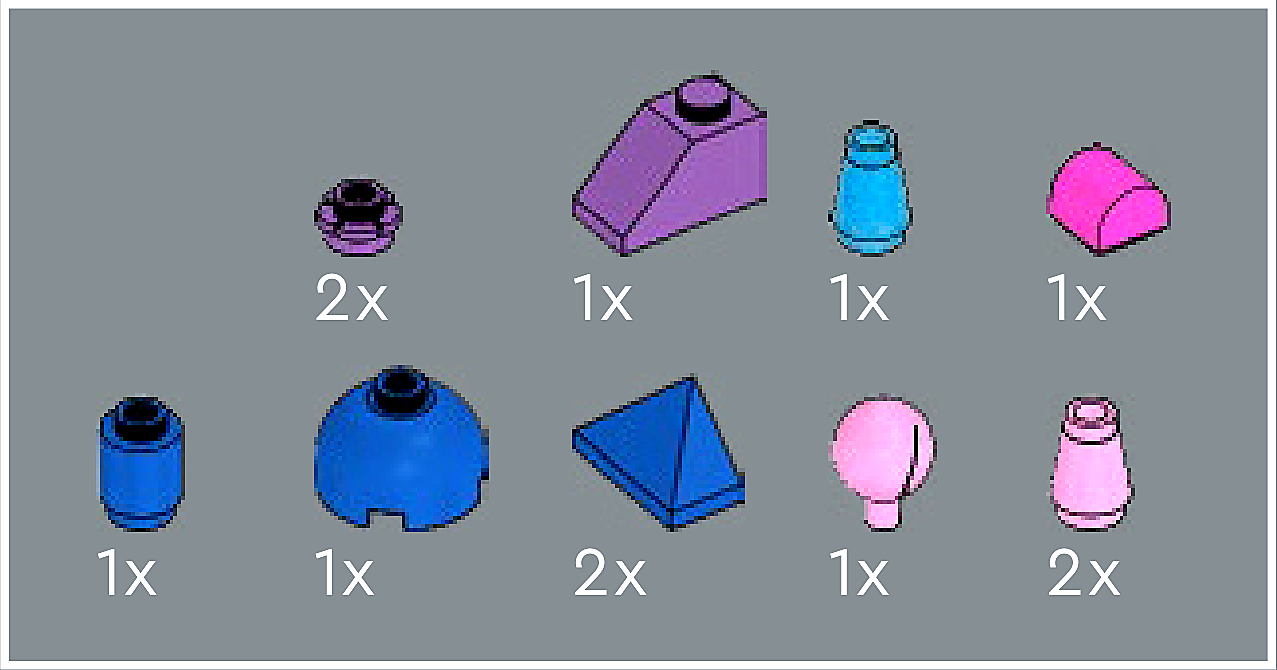
Phase 2 — Pieces
What do I do here?
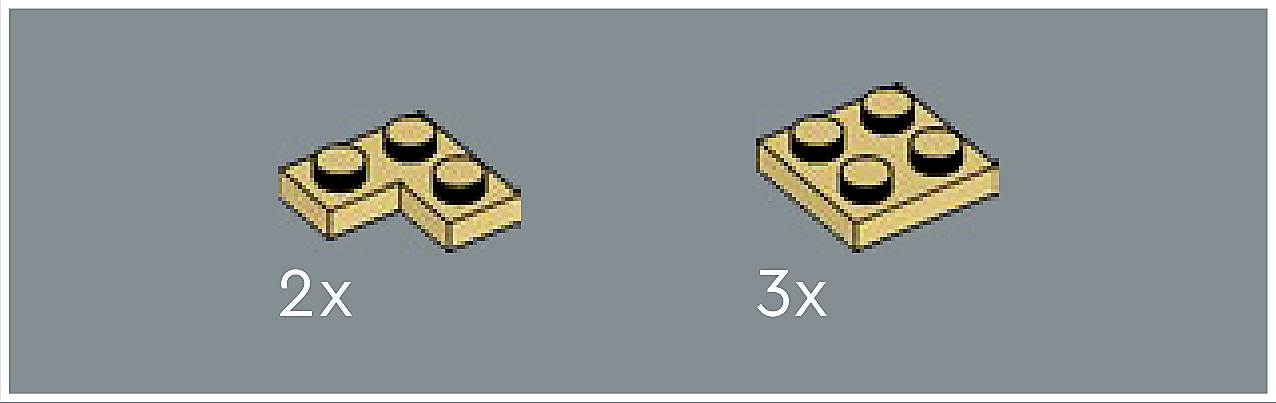
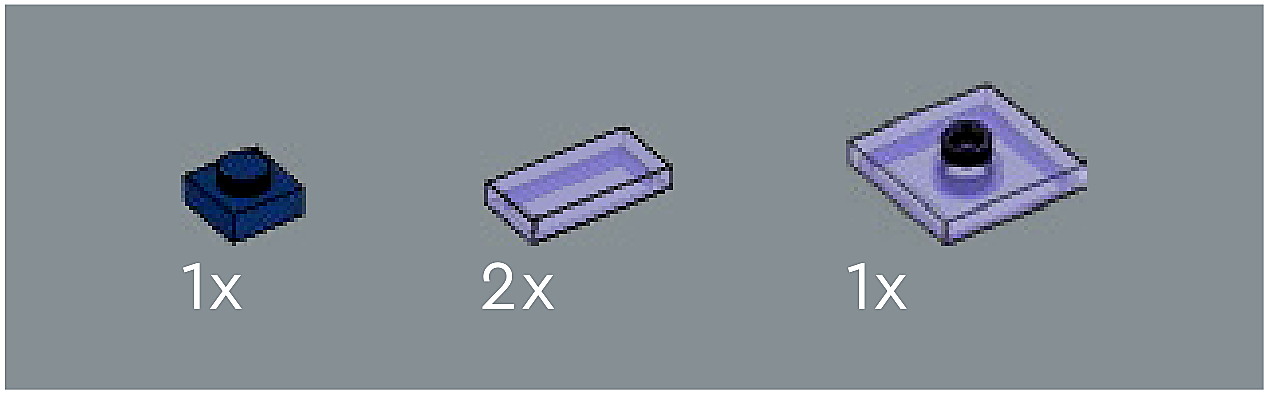
Look at the inset image above. Check that the AI has correctly identified each piece — colour, quantity, and part name. If anything is wrong, edit the table directly. Add any missing pieces using the + row button, or remove incorrect ones with ✕.
When you are satisfied that all pieces are correct, click Save Pieces. This enables Phase 3 to run for this step.
Error: Error code: 400 - {'type': 'error', 'error': {'type': 'invalid_request_error', 'message': 'messages.0.content.0.image.source.base64: image exceeds 10 MB maximum: 17011840 bytes > 10485760 bytes'}, 'request_id': 'req_011CbTXNZWWuhABGjKPf11qG'}
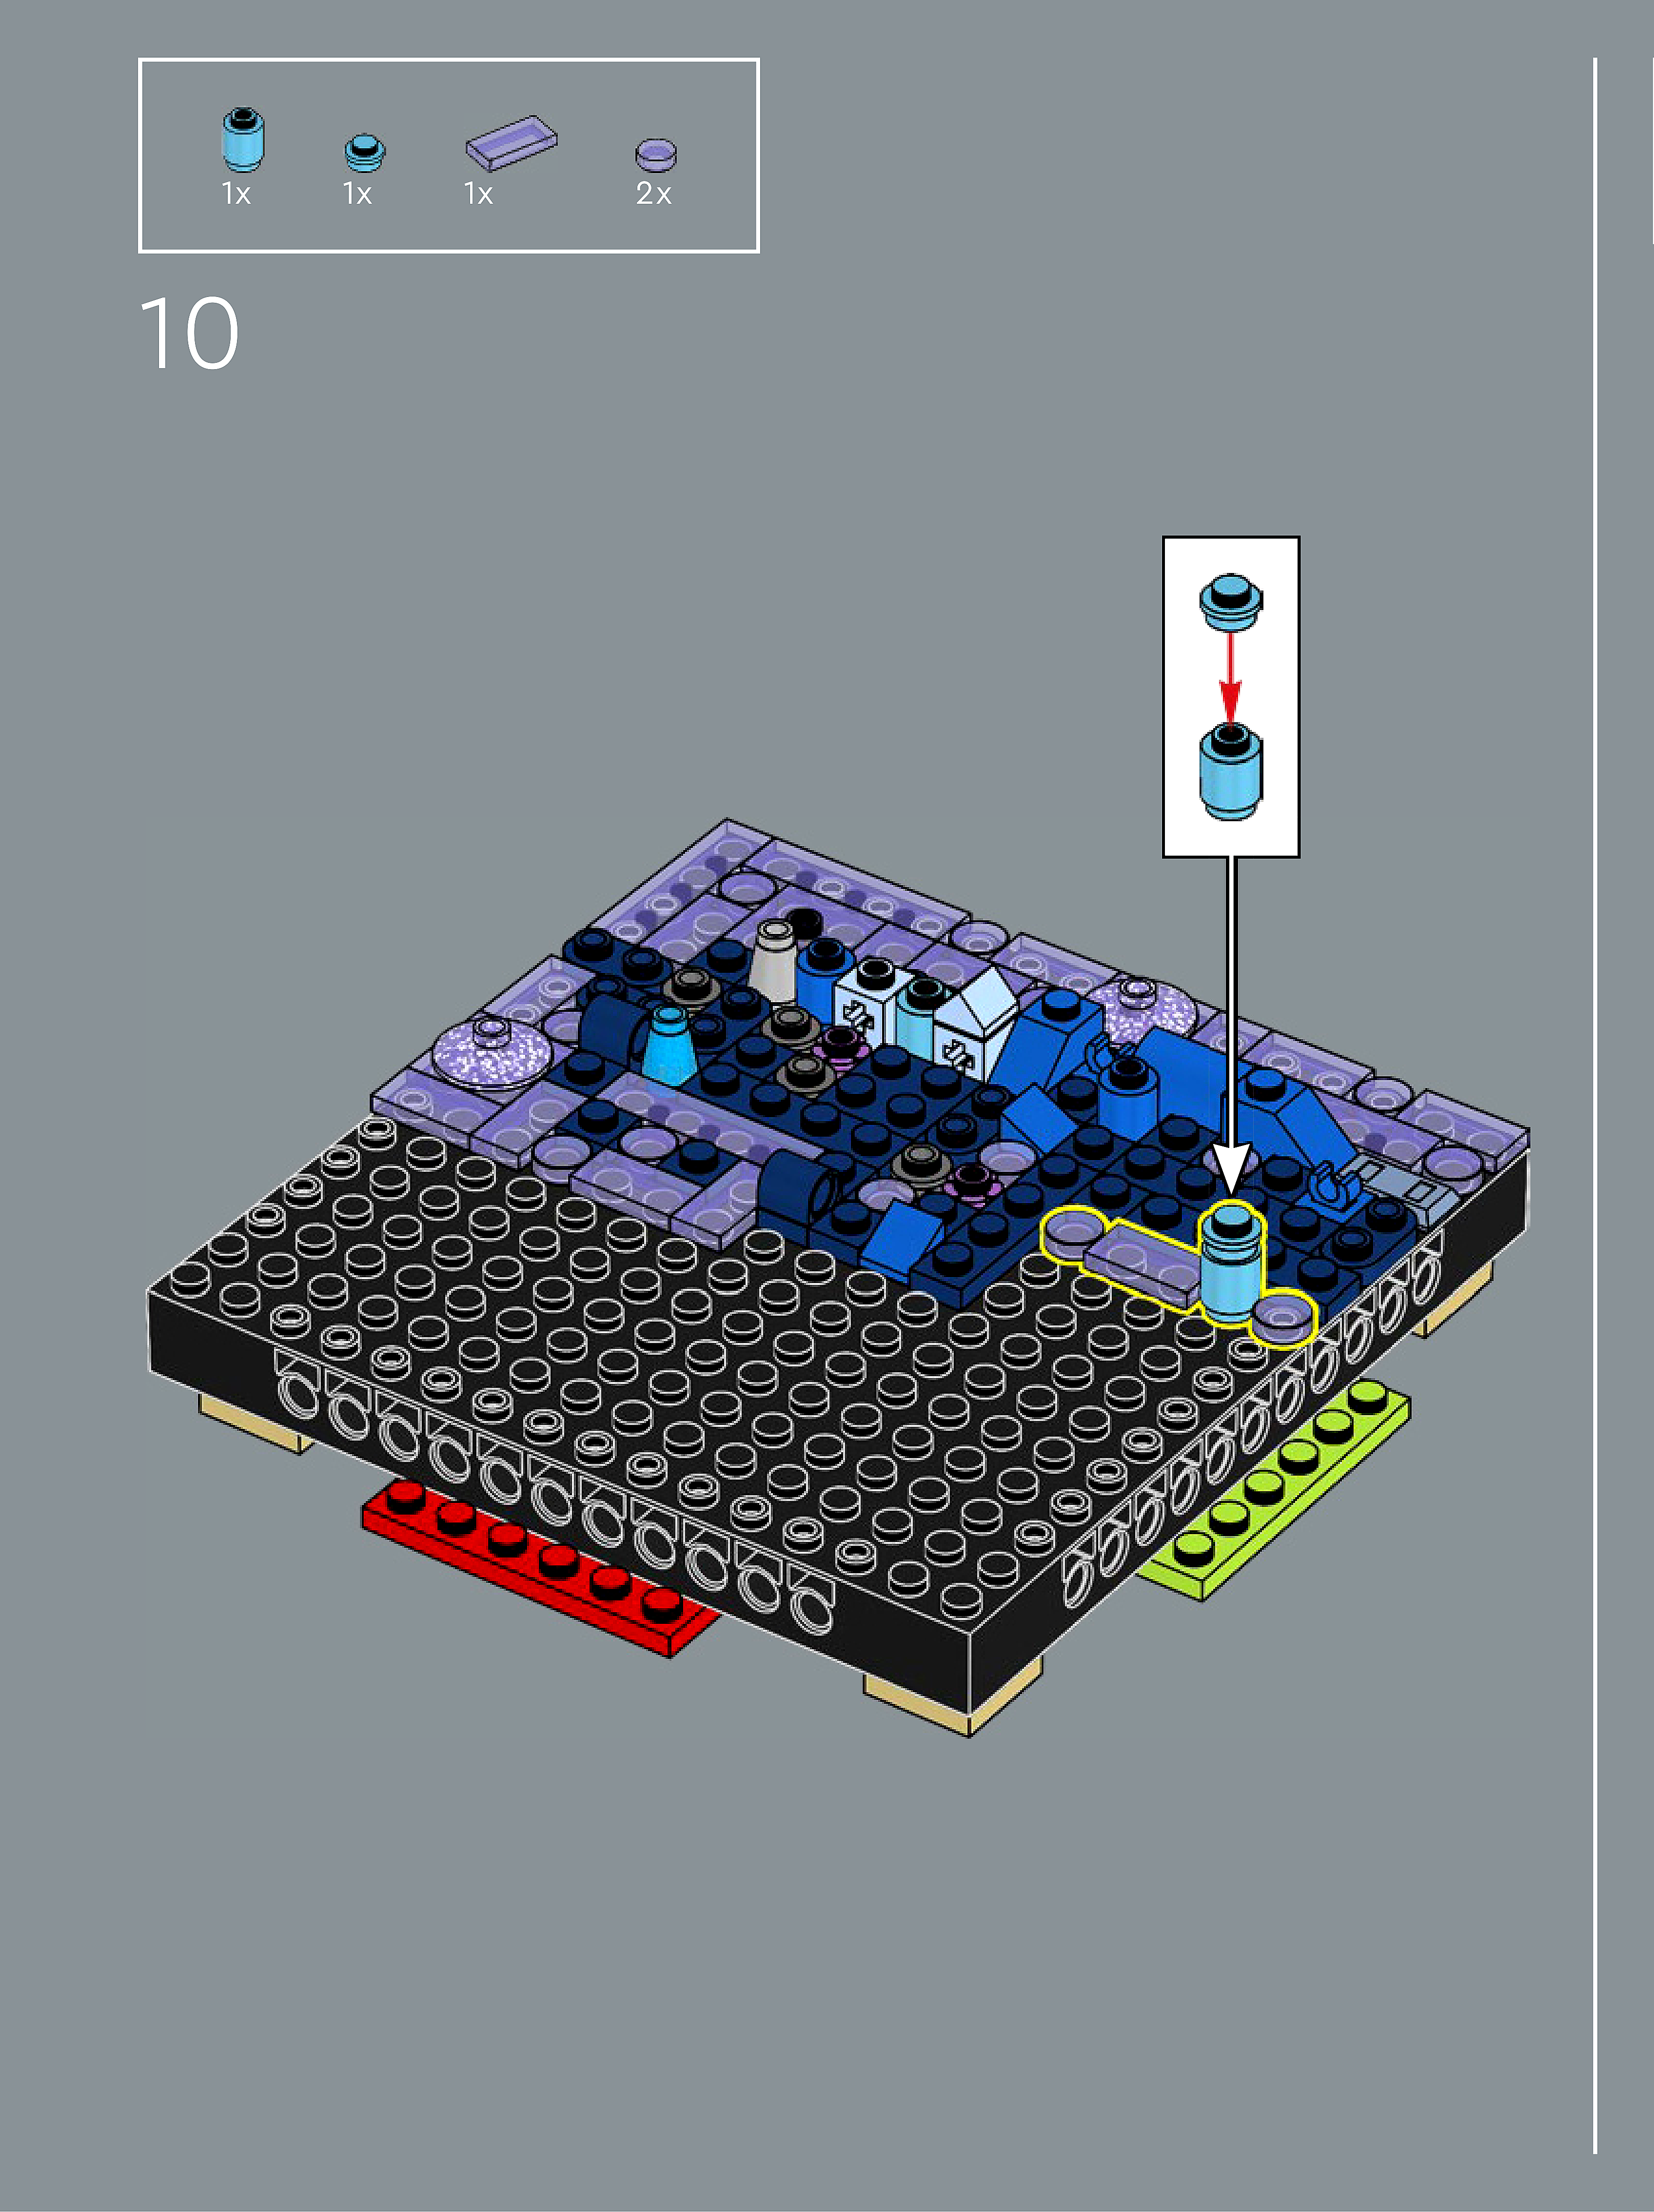
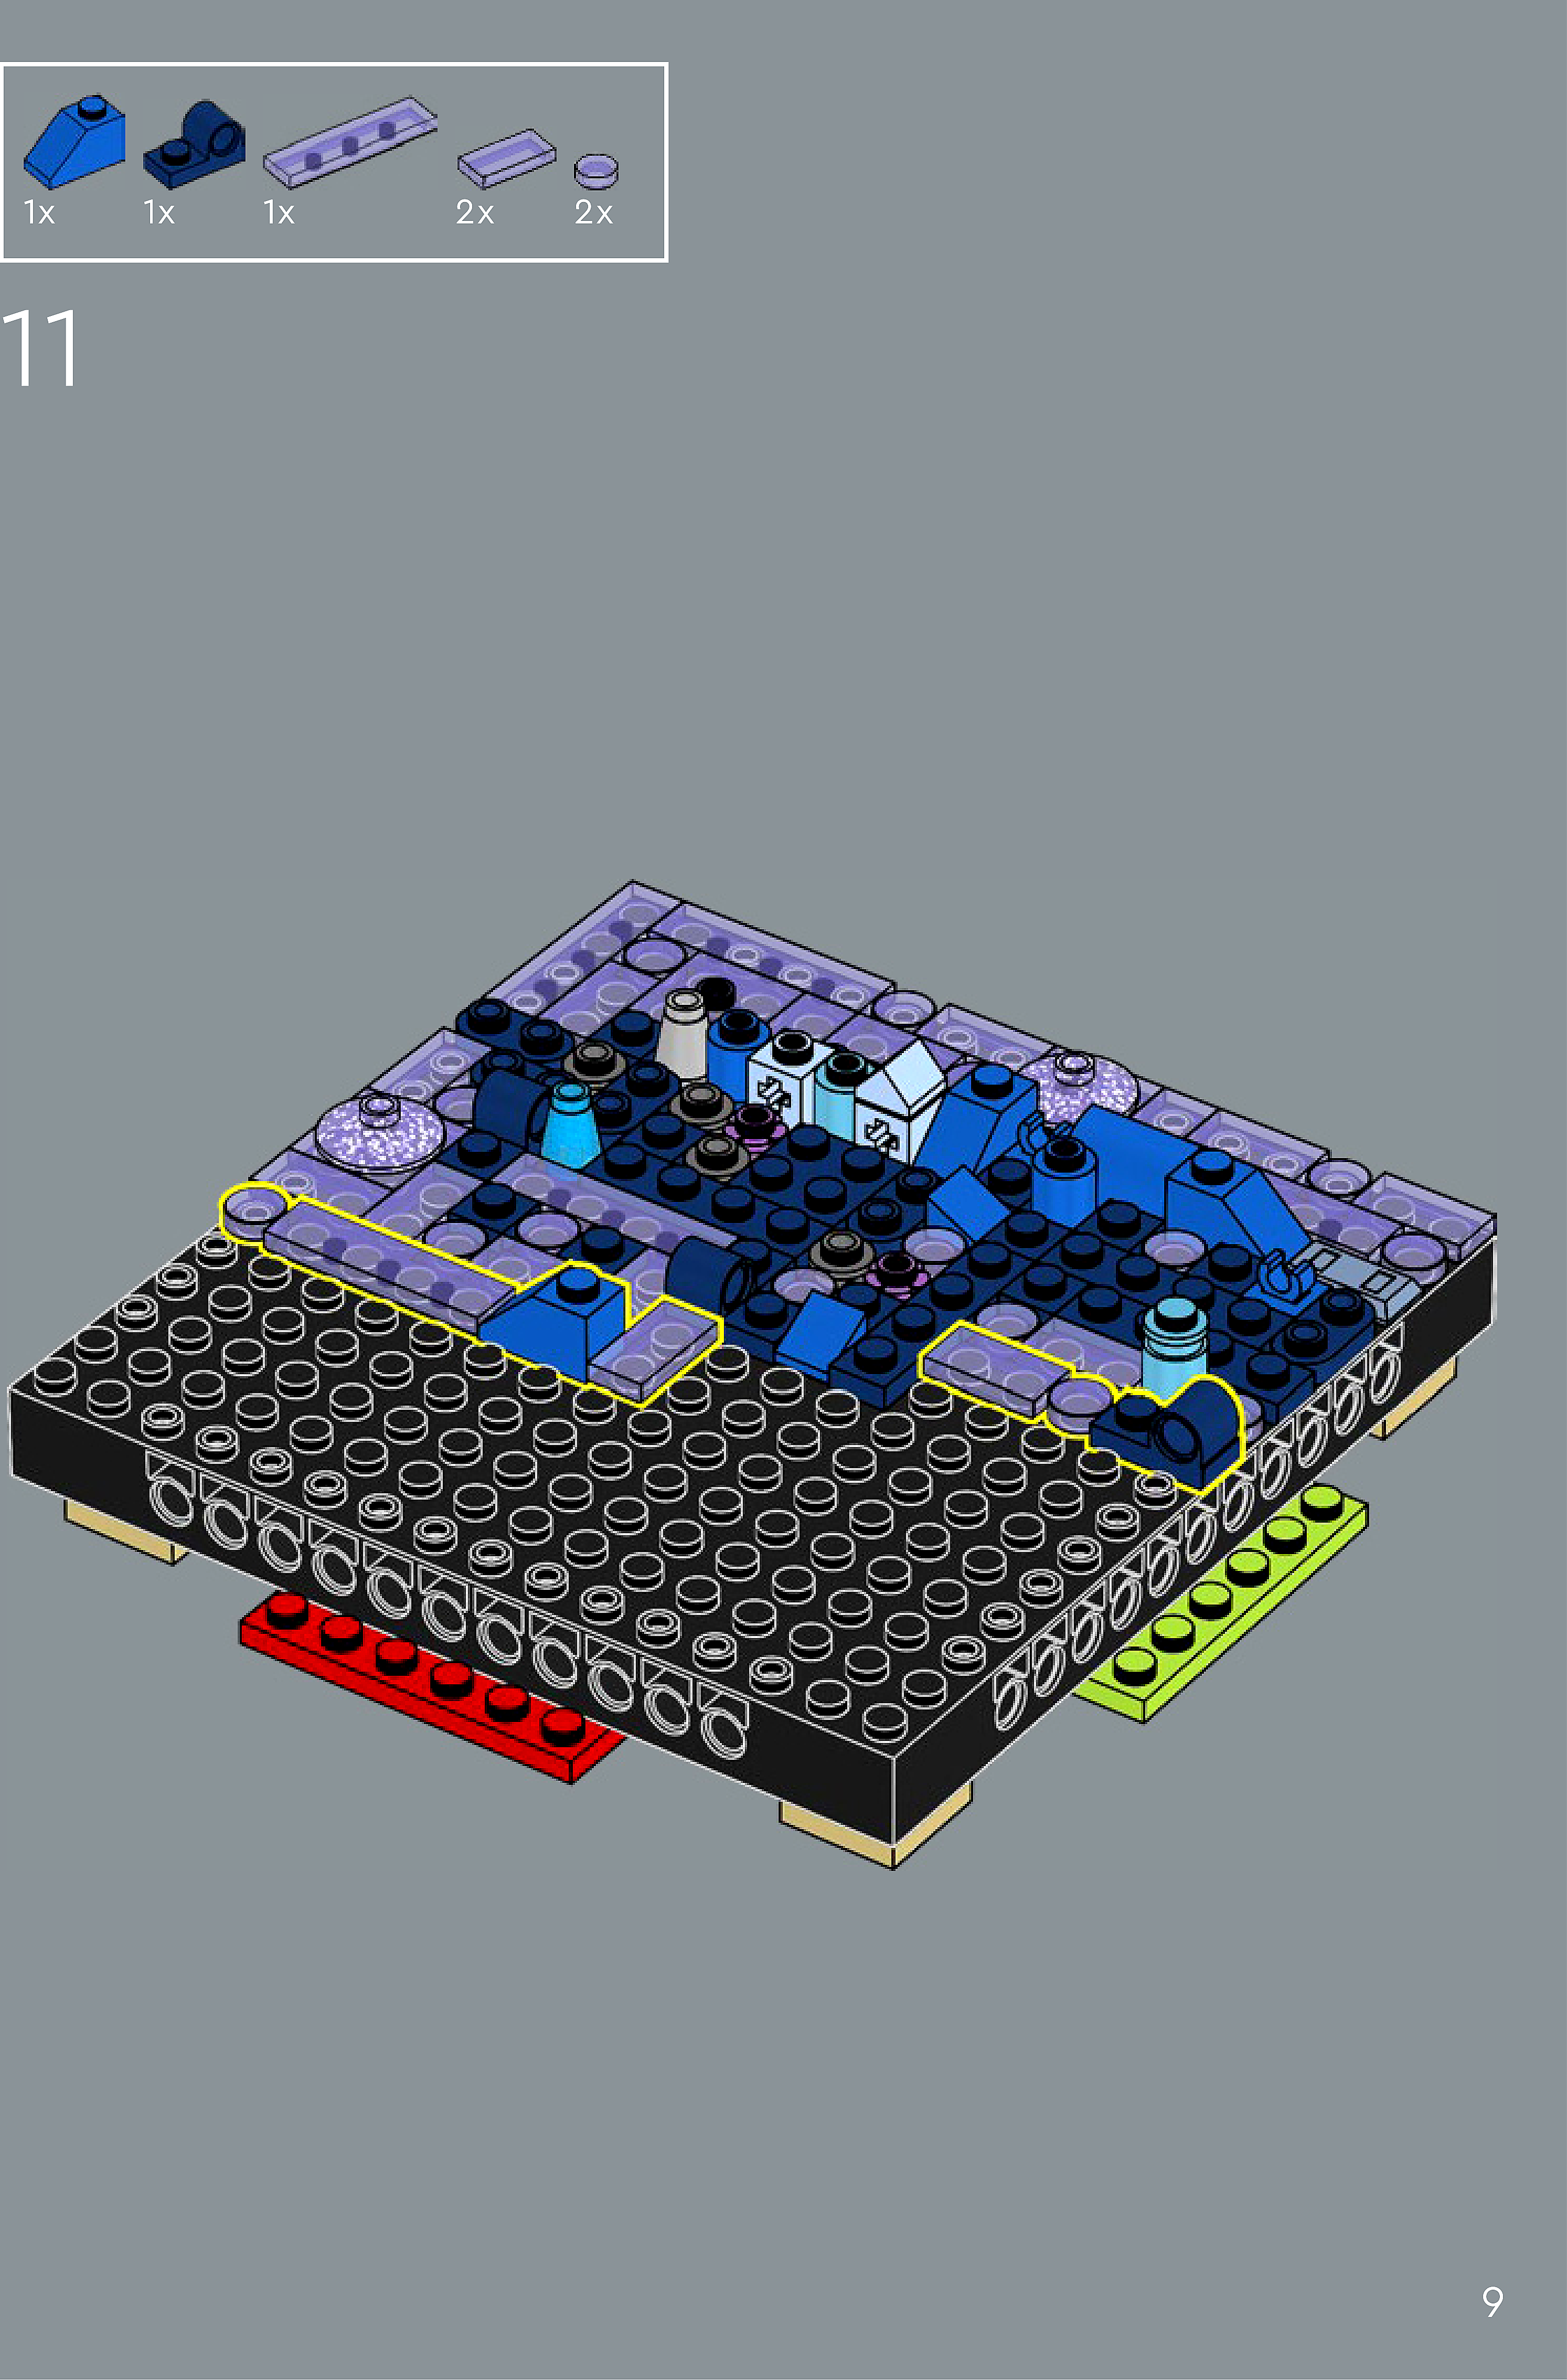
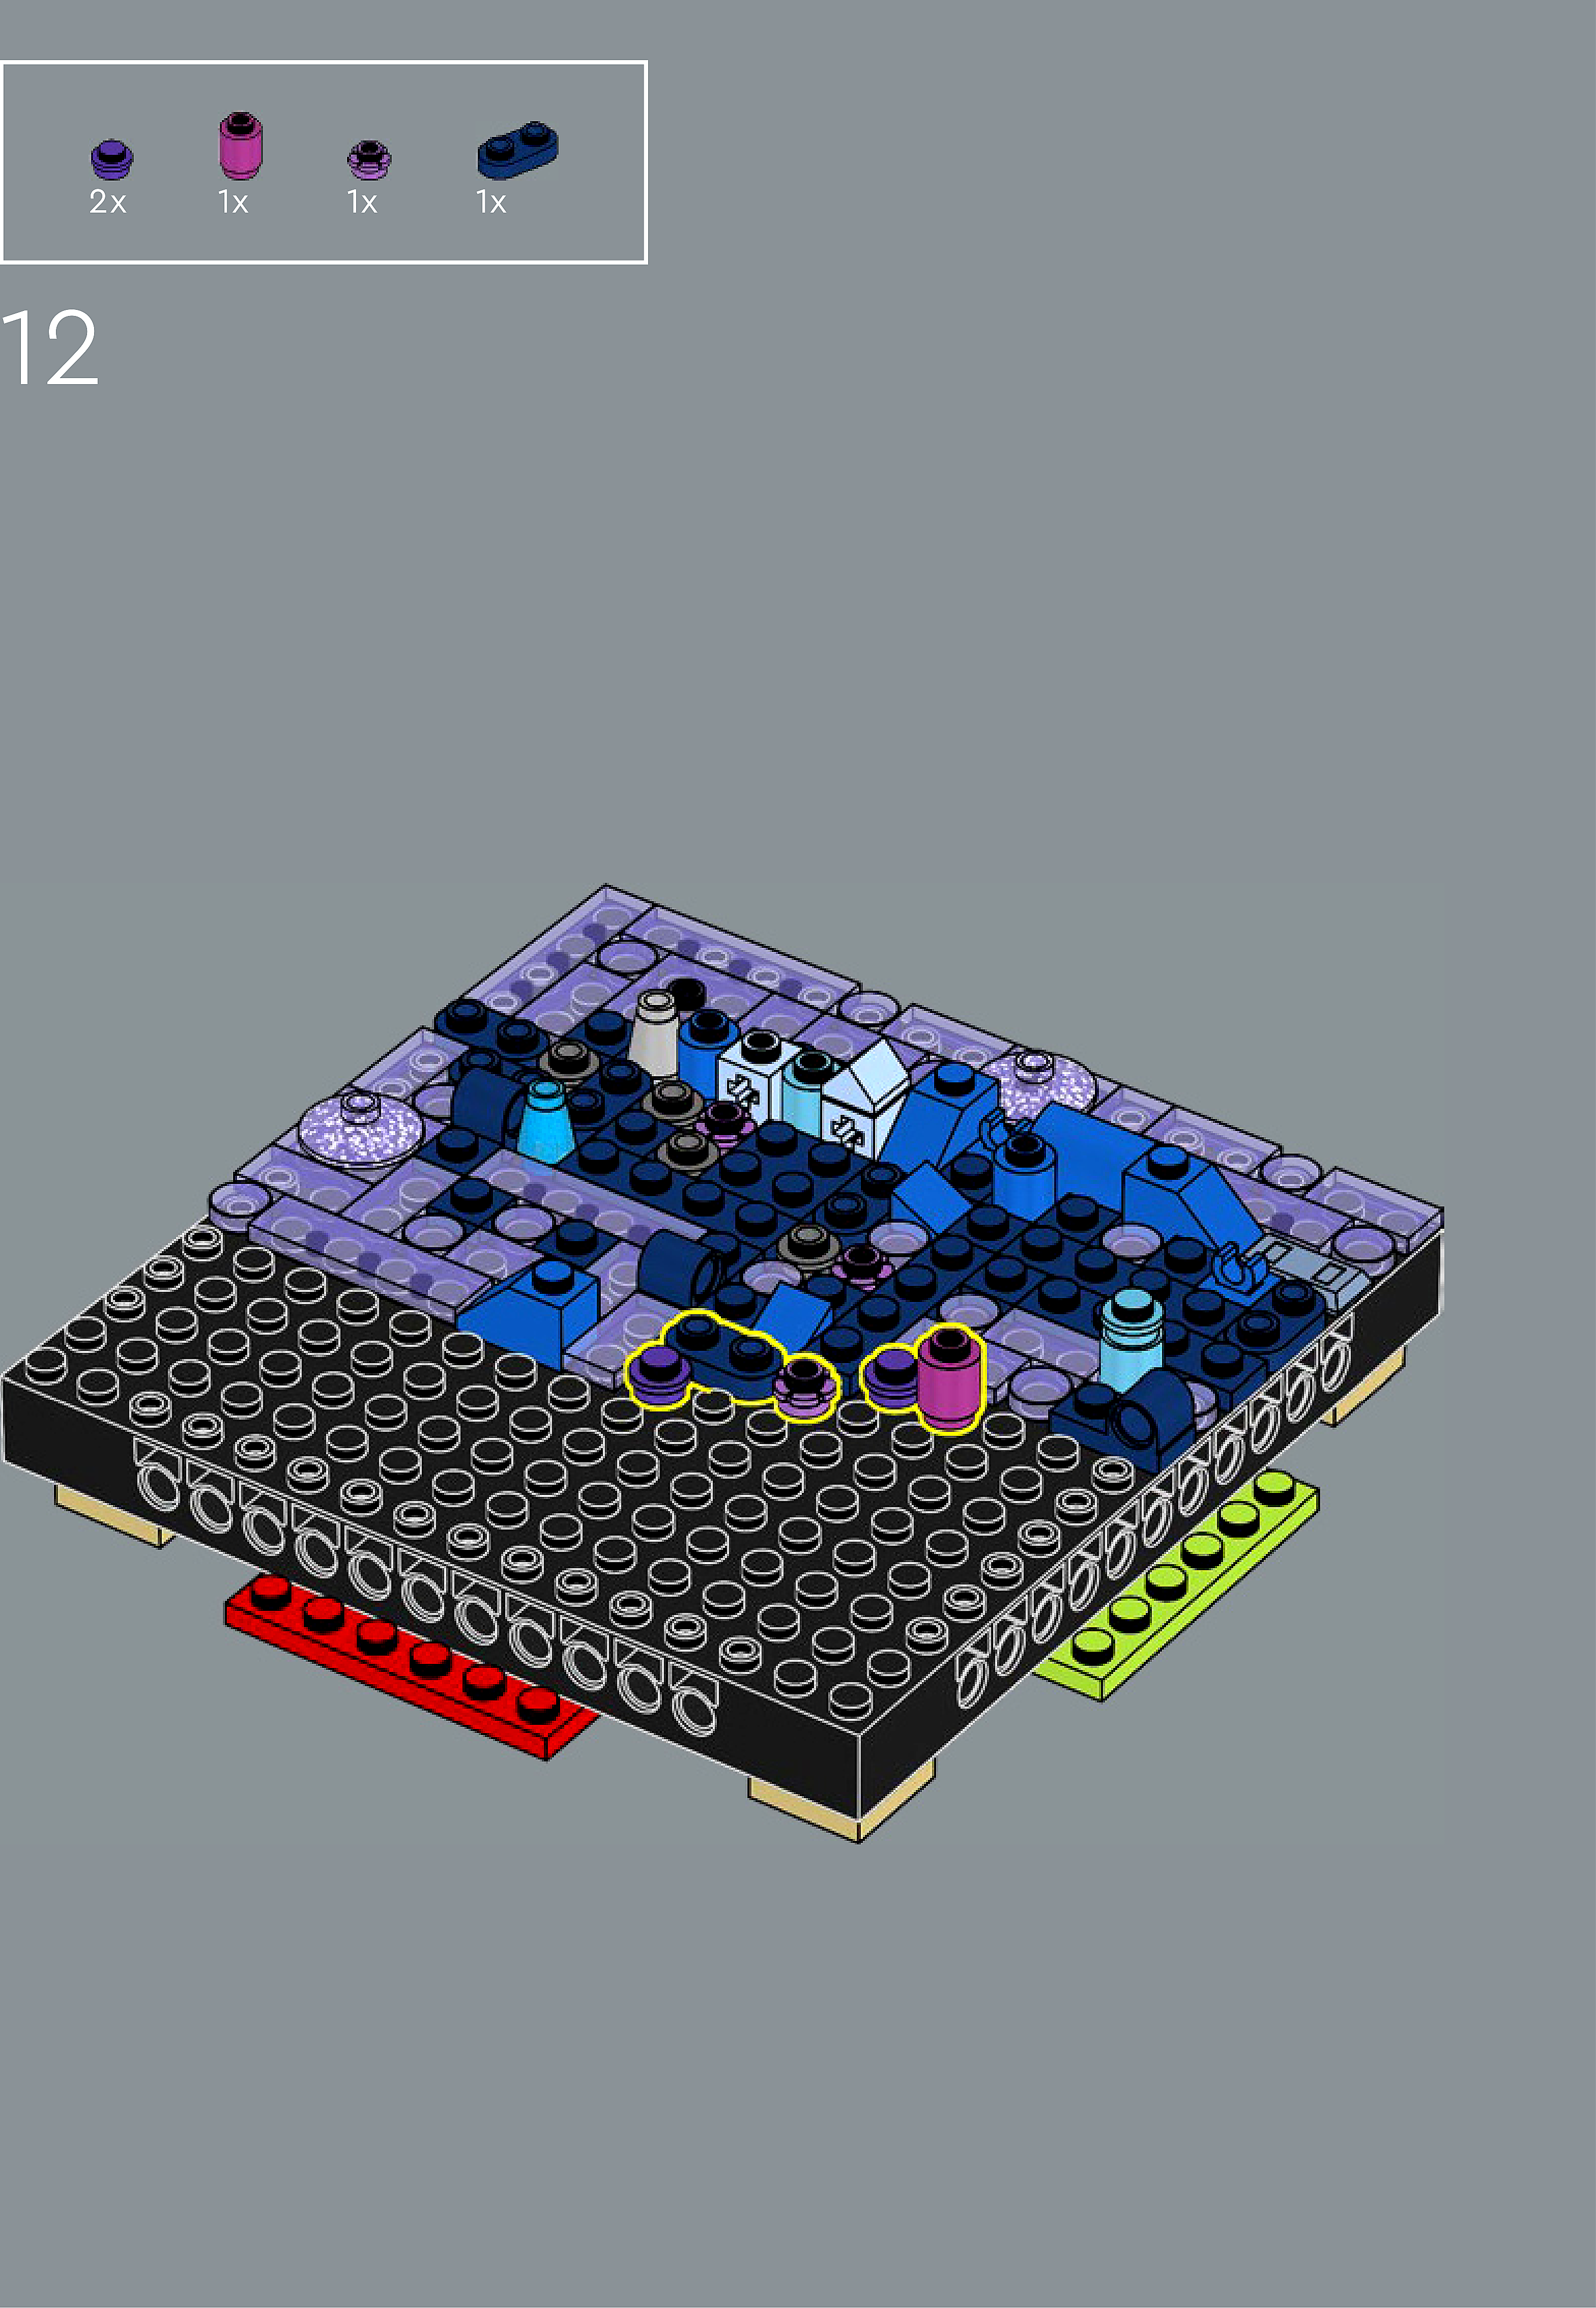
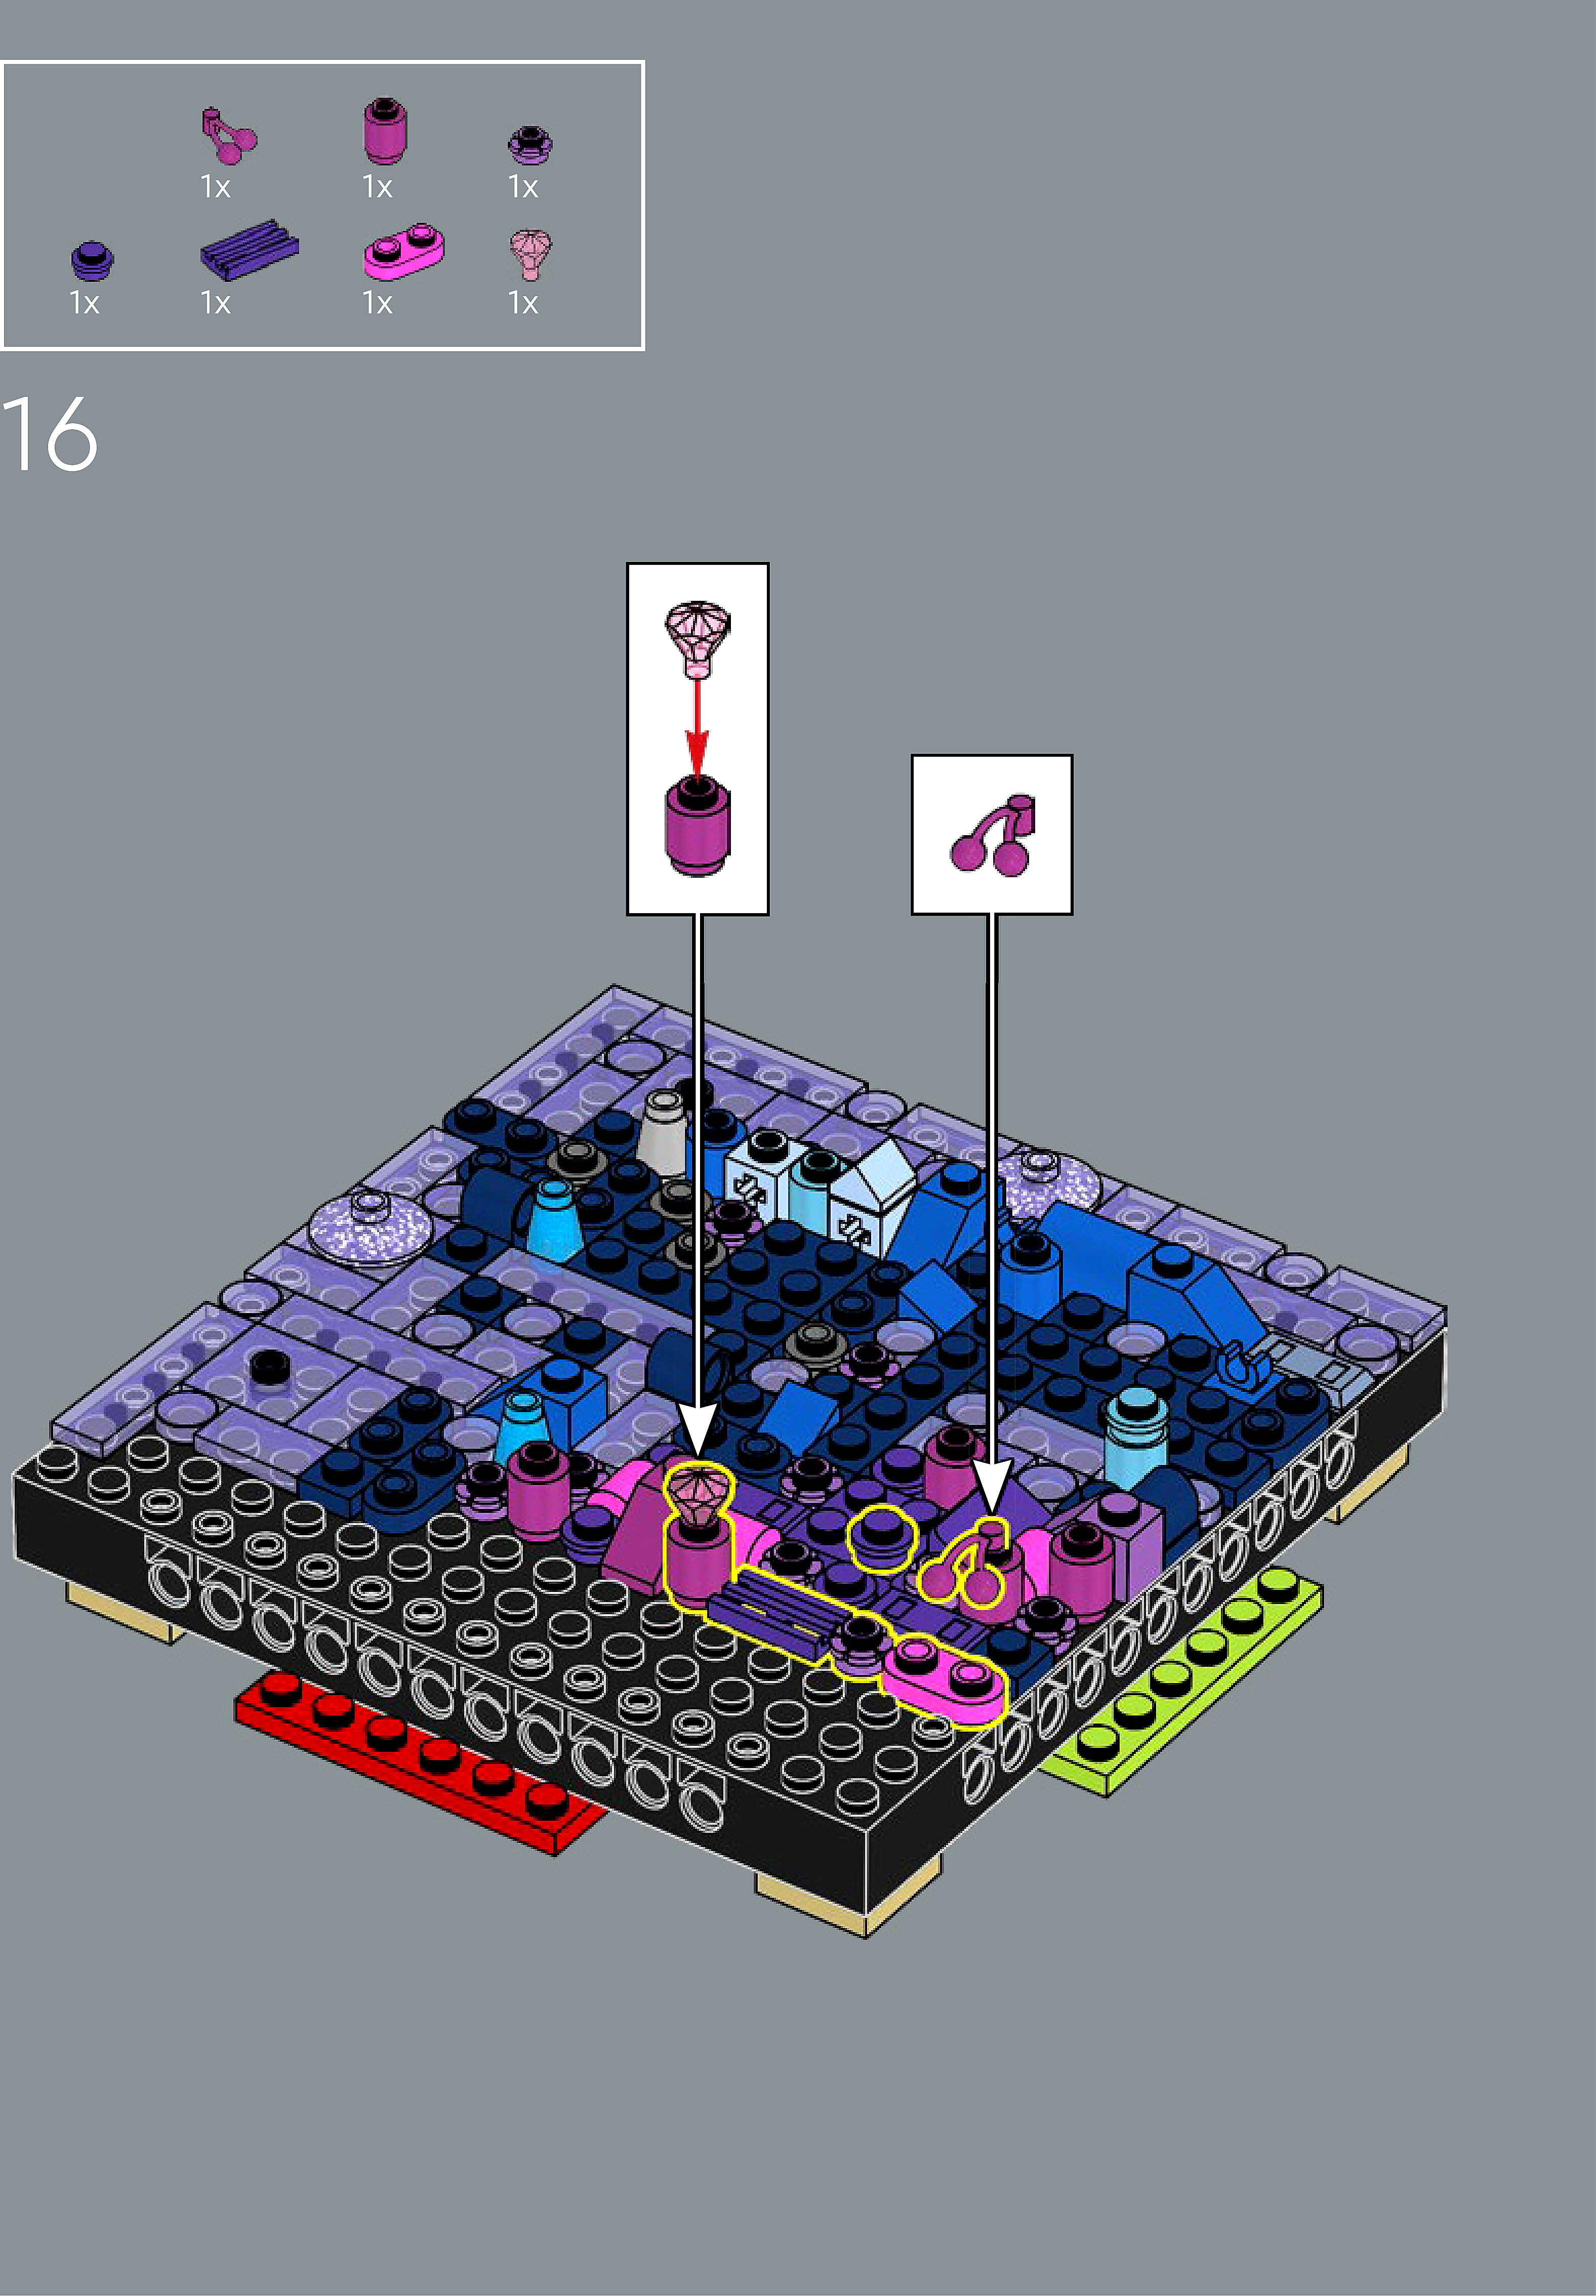
Phase 3 — Spatial placement
What do I do here?
The AI has described where each piece was placed by comparing the before and after images. Read every description carefully. Check that directions (left, right, front, back) are correct from the builder's perspective, and that stud counts are accurate.
If a description is vague, wrong, or uses the wrong direction — click Edit in that row and correct it. Once every placement description for this step is accurate, click Approve. Approval is required before the accessible prose can be generated.
This is the most important phase — a blind builder will follow these descriptions precisely.
Not yet extracted.
Phase 4 — Accessible prose
What do I do here?
This step is completed by the builder, not the sighted reviewer. The app generates an accessible prose paragraph from the approved Phase 3 descriptions. No action is needed from you here — your work is done once Phase 3 is approved.
Not yet generated. Complete Phase 3 and approve placement first.
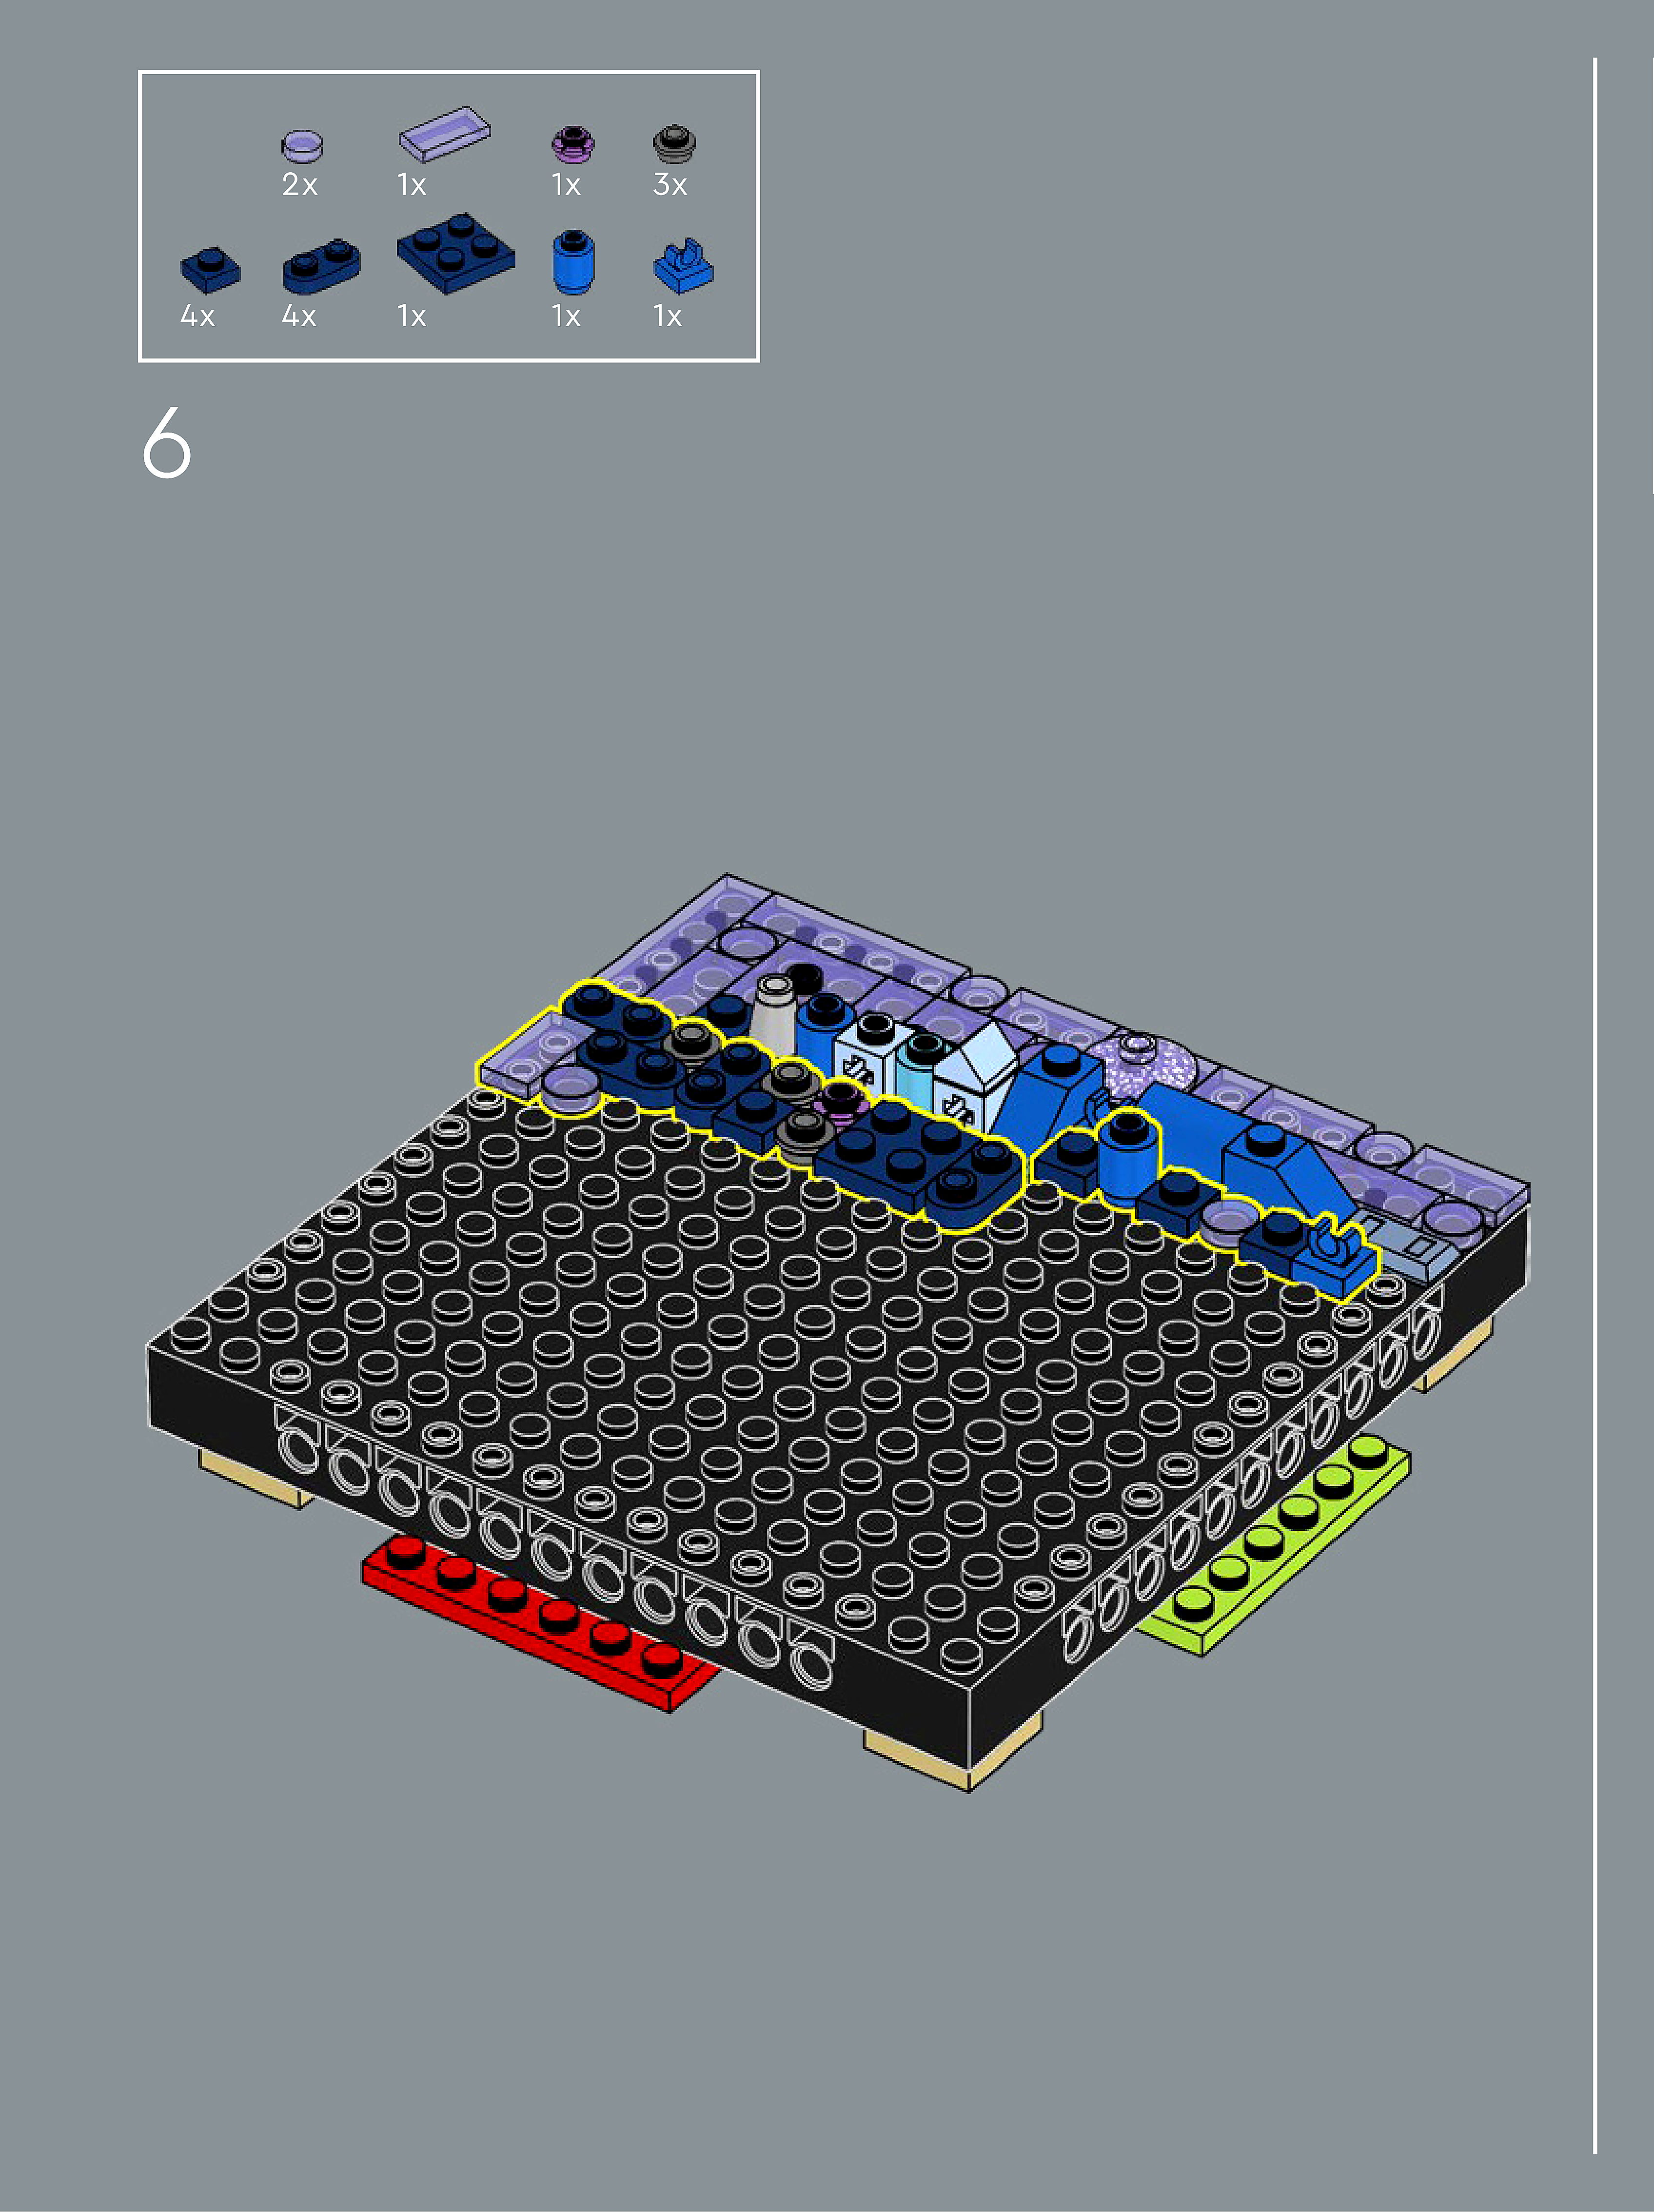
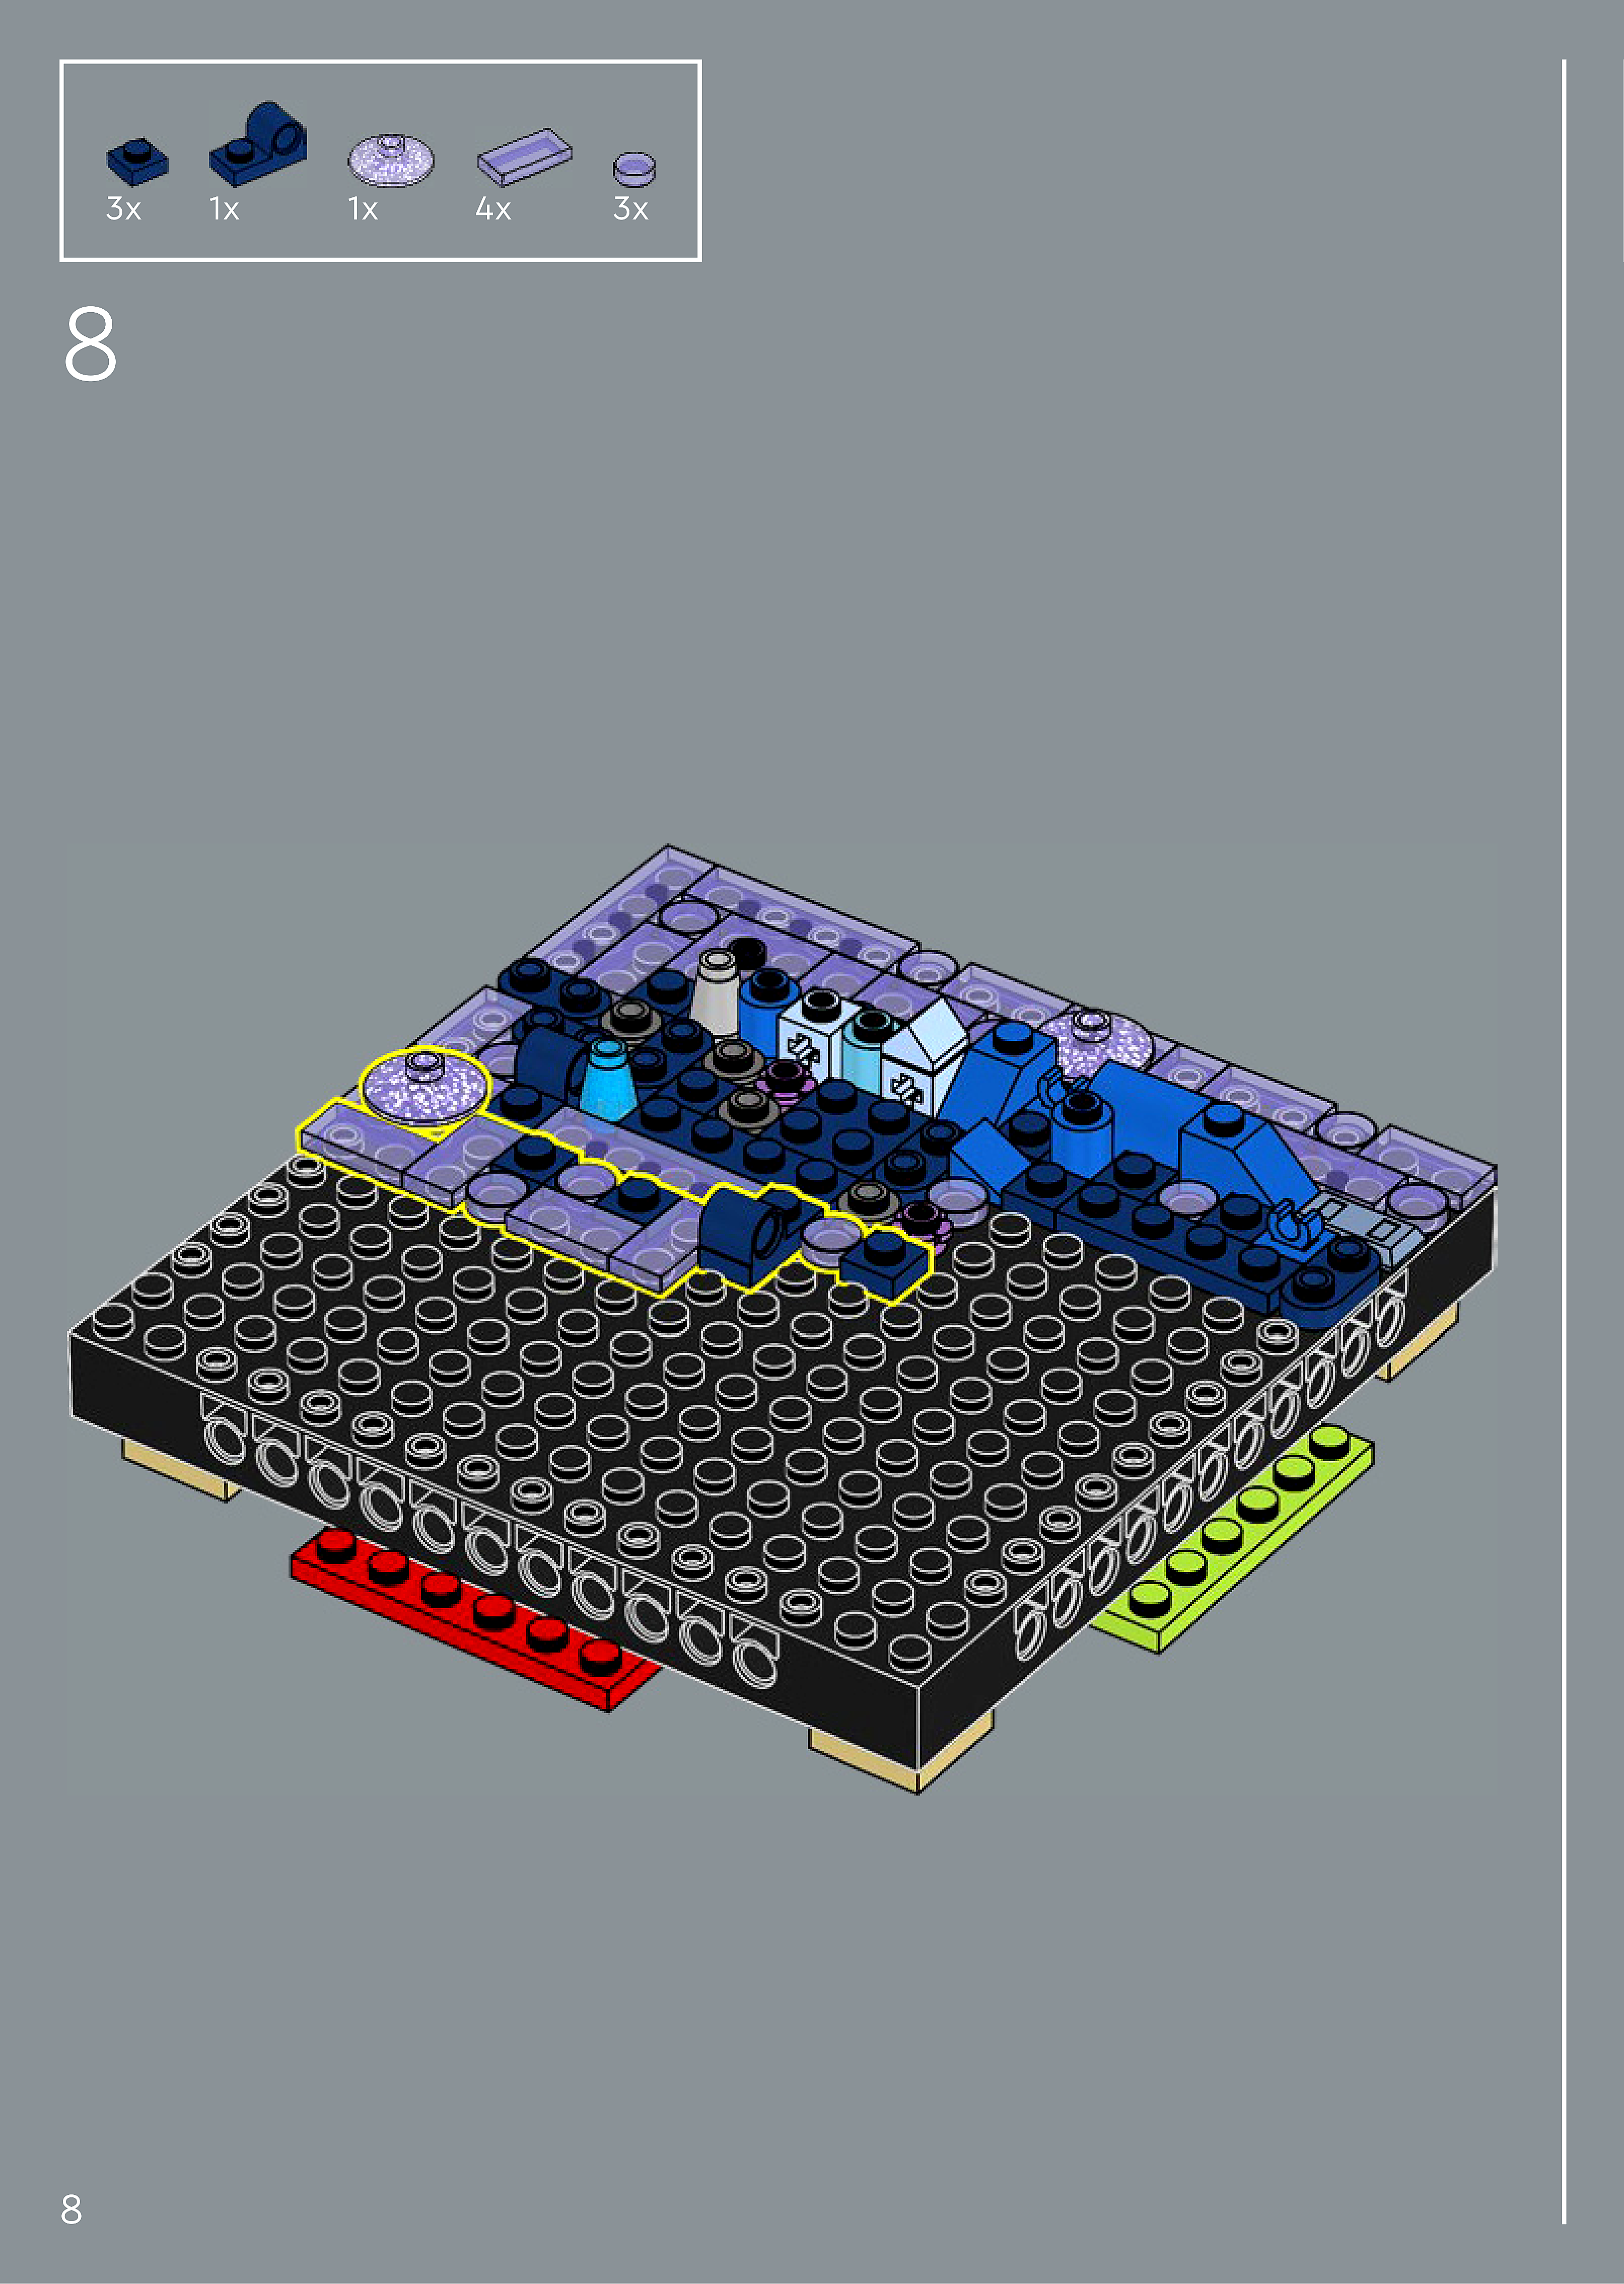
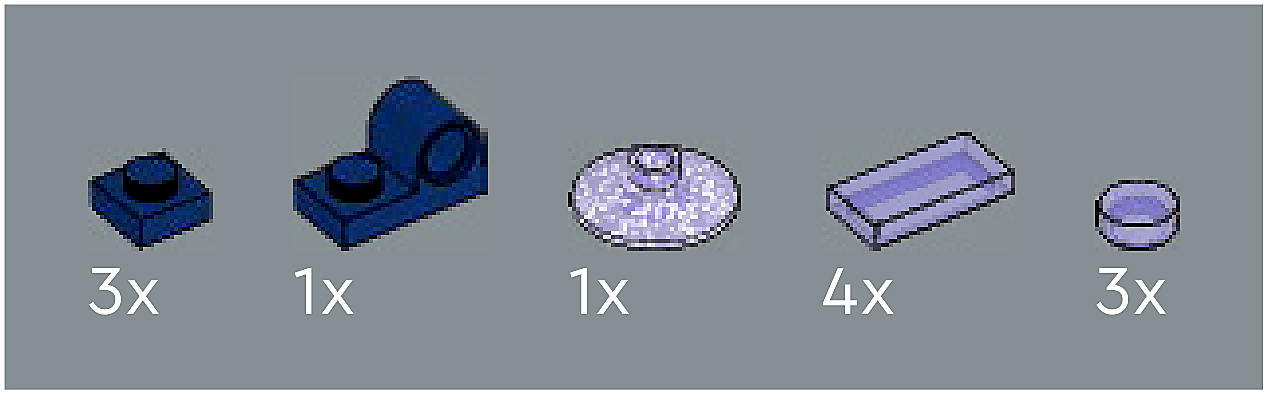
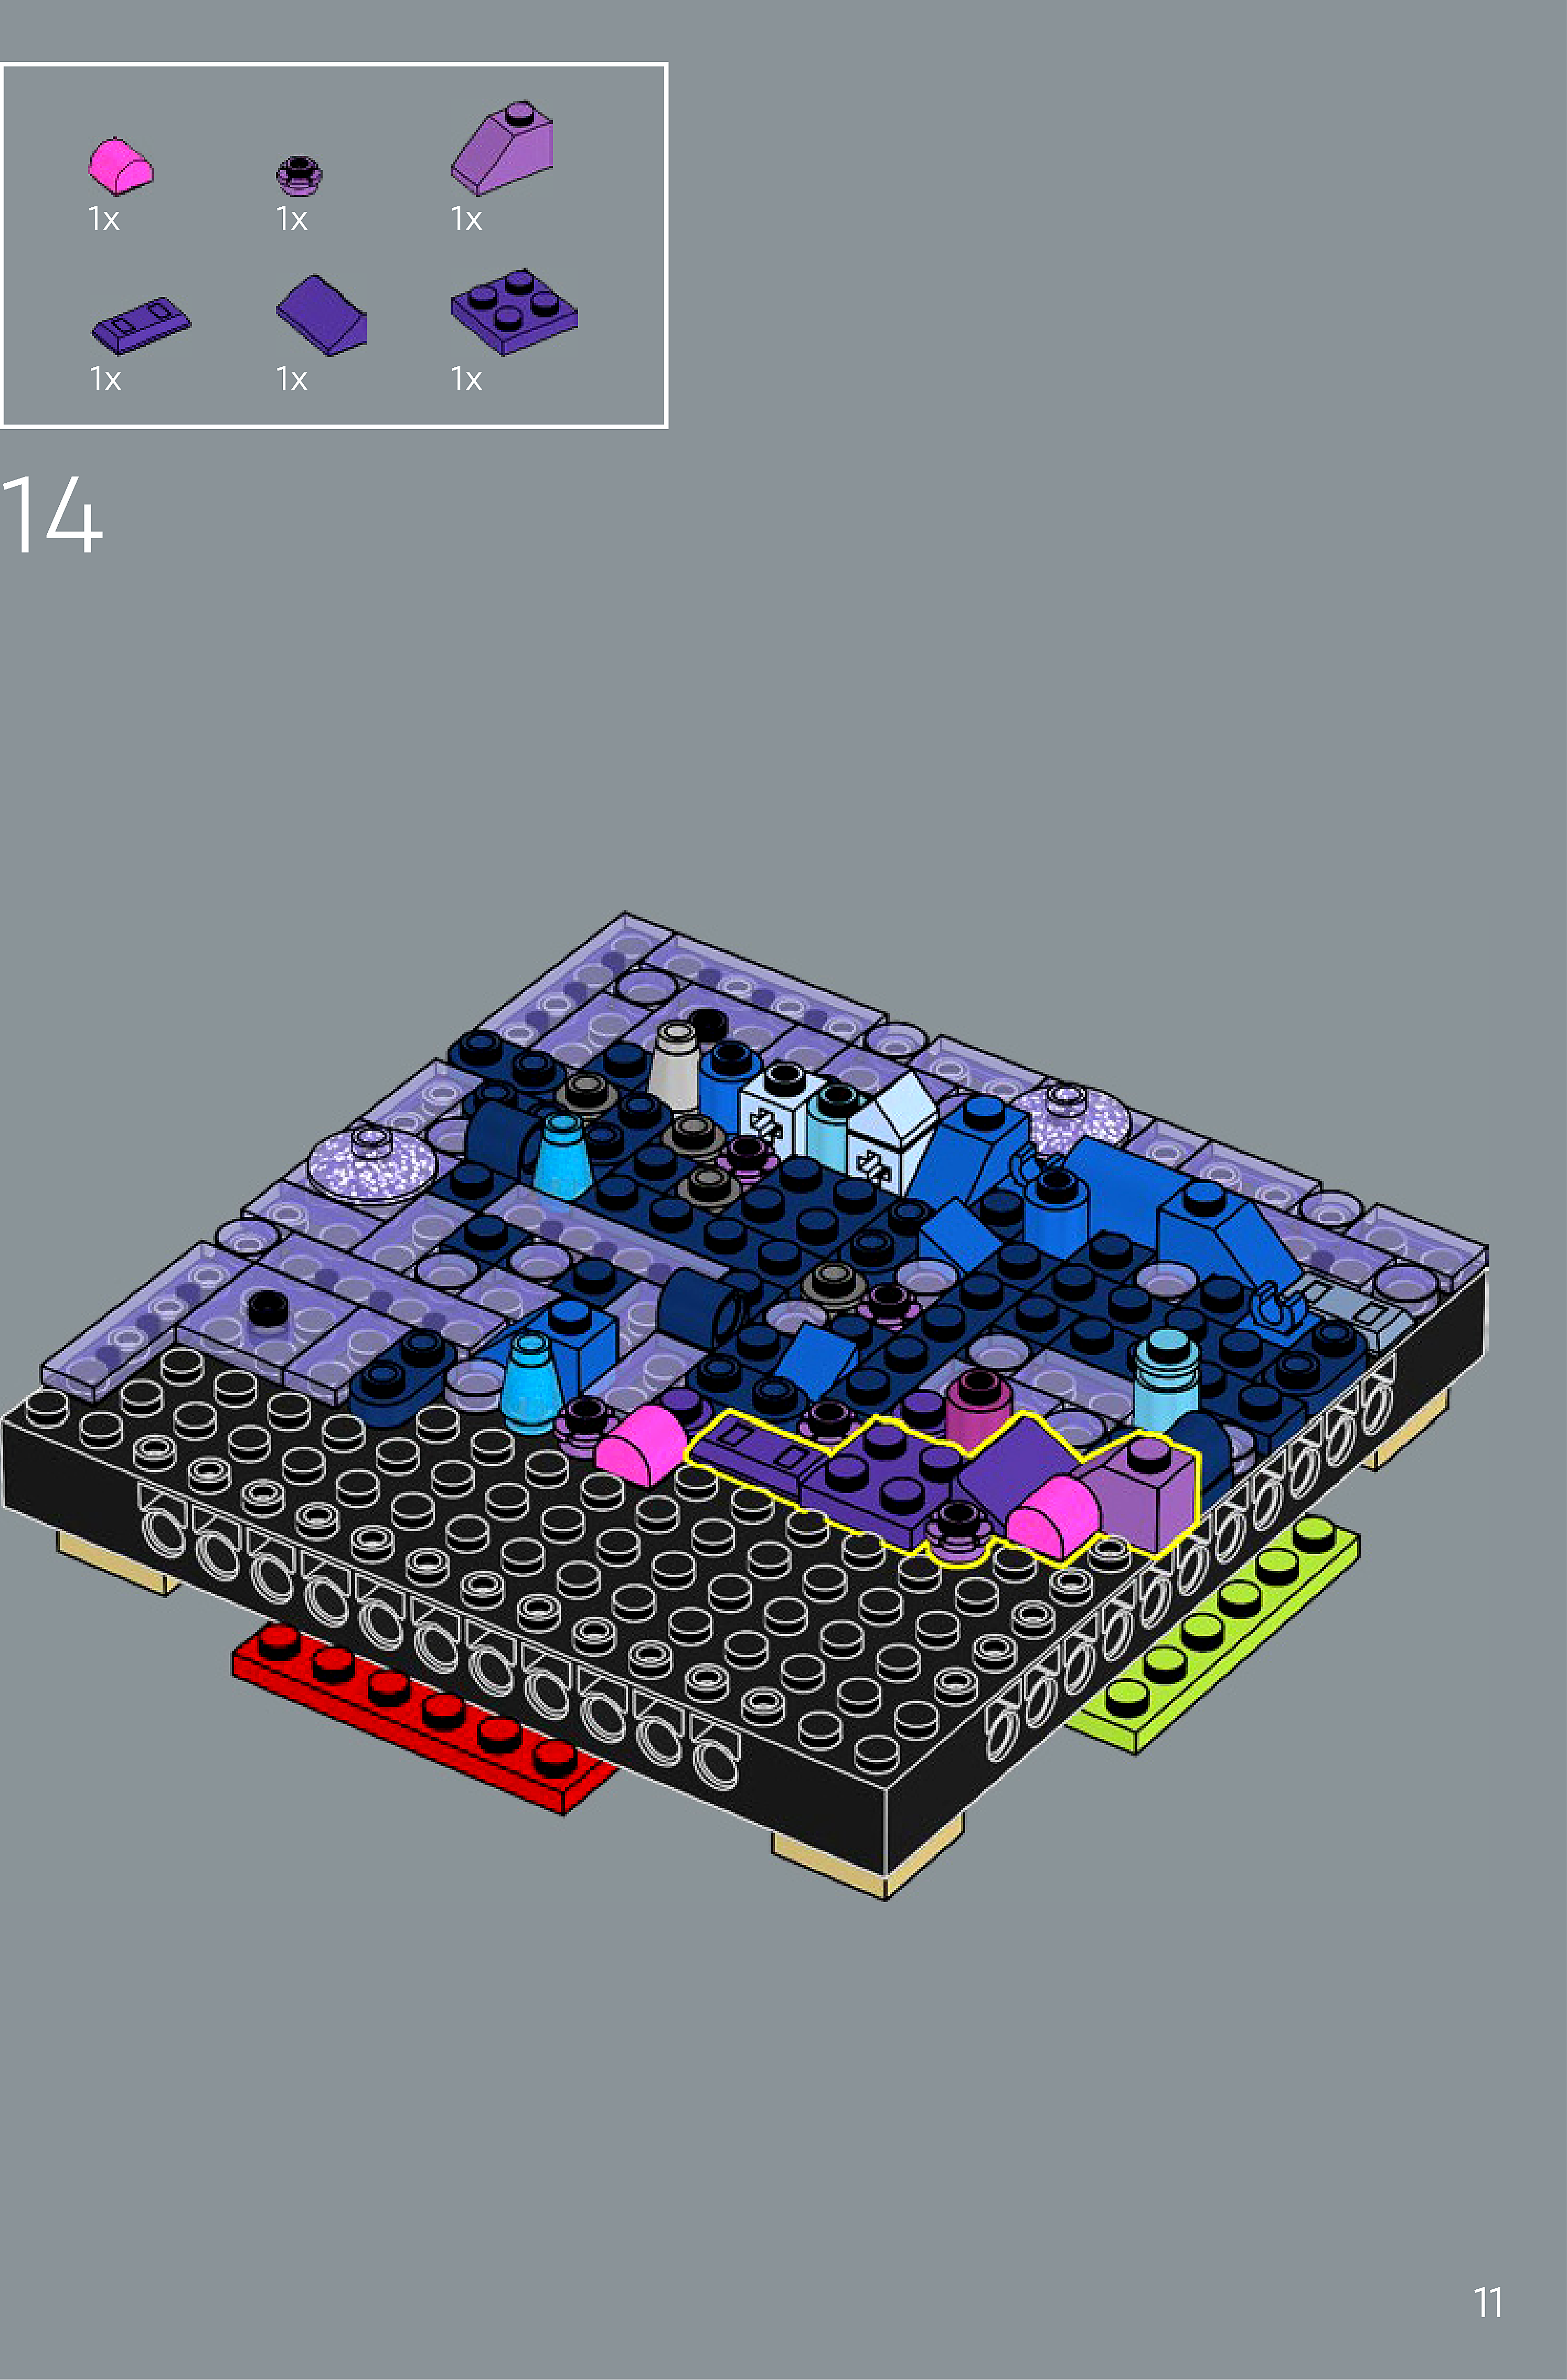
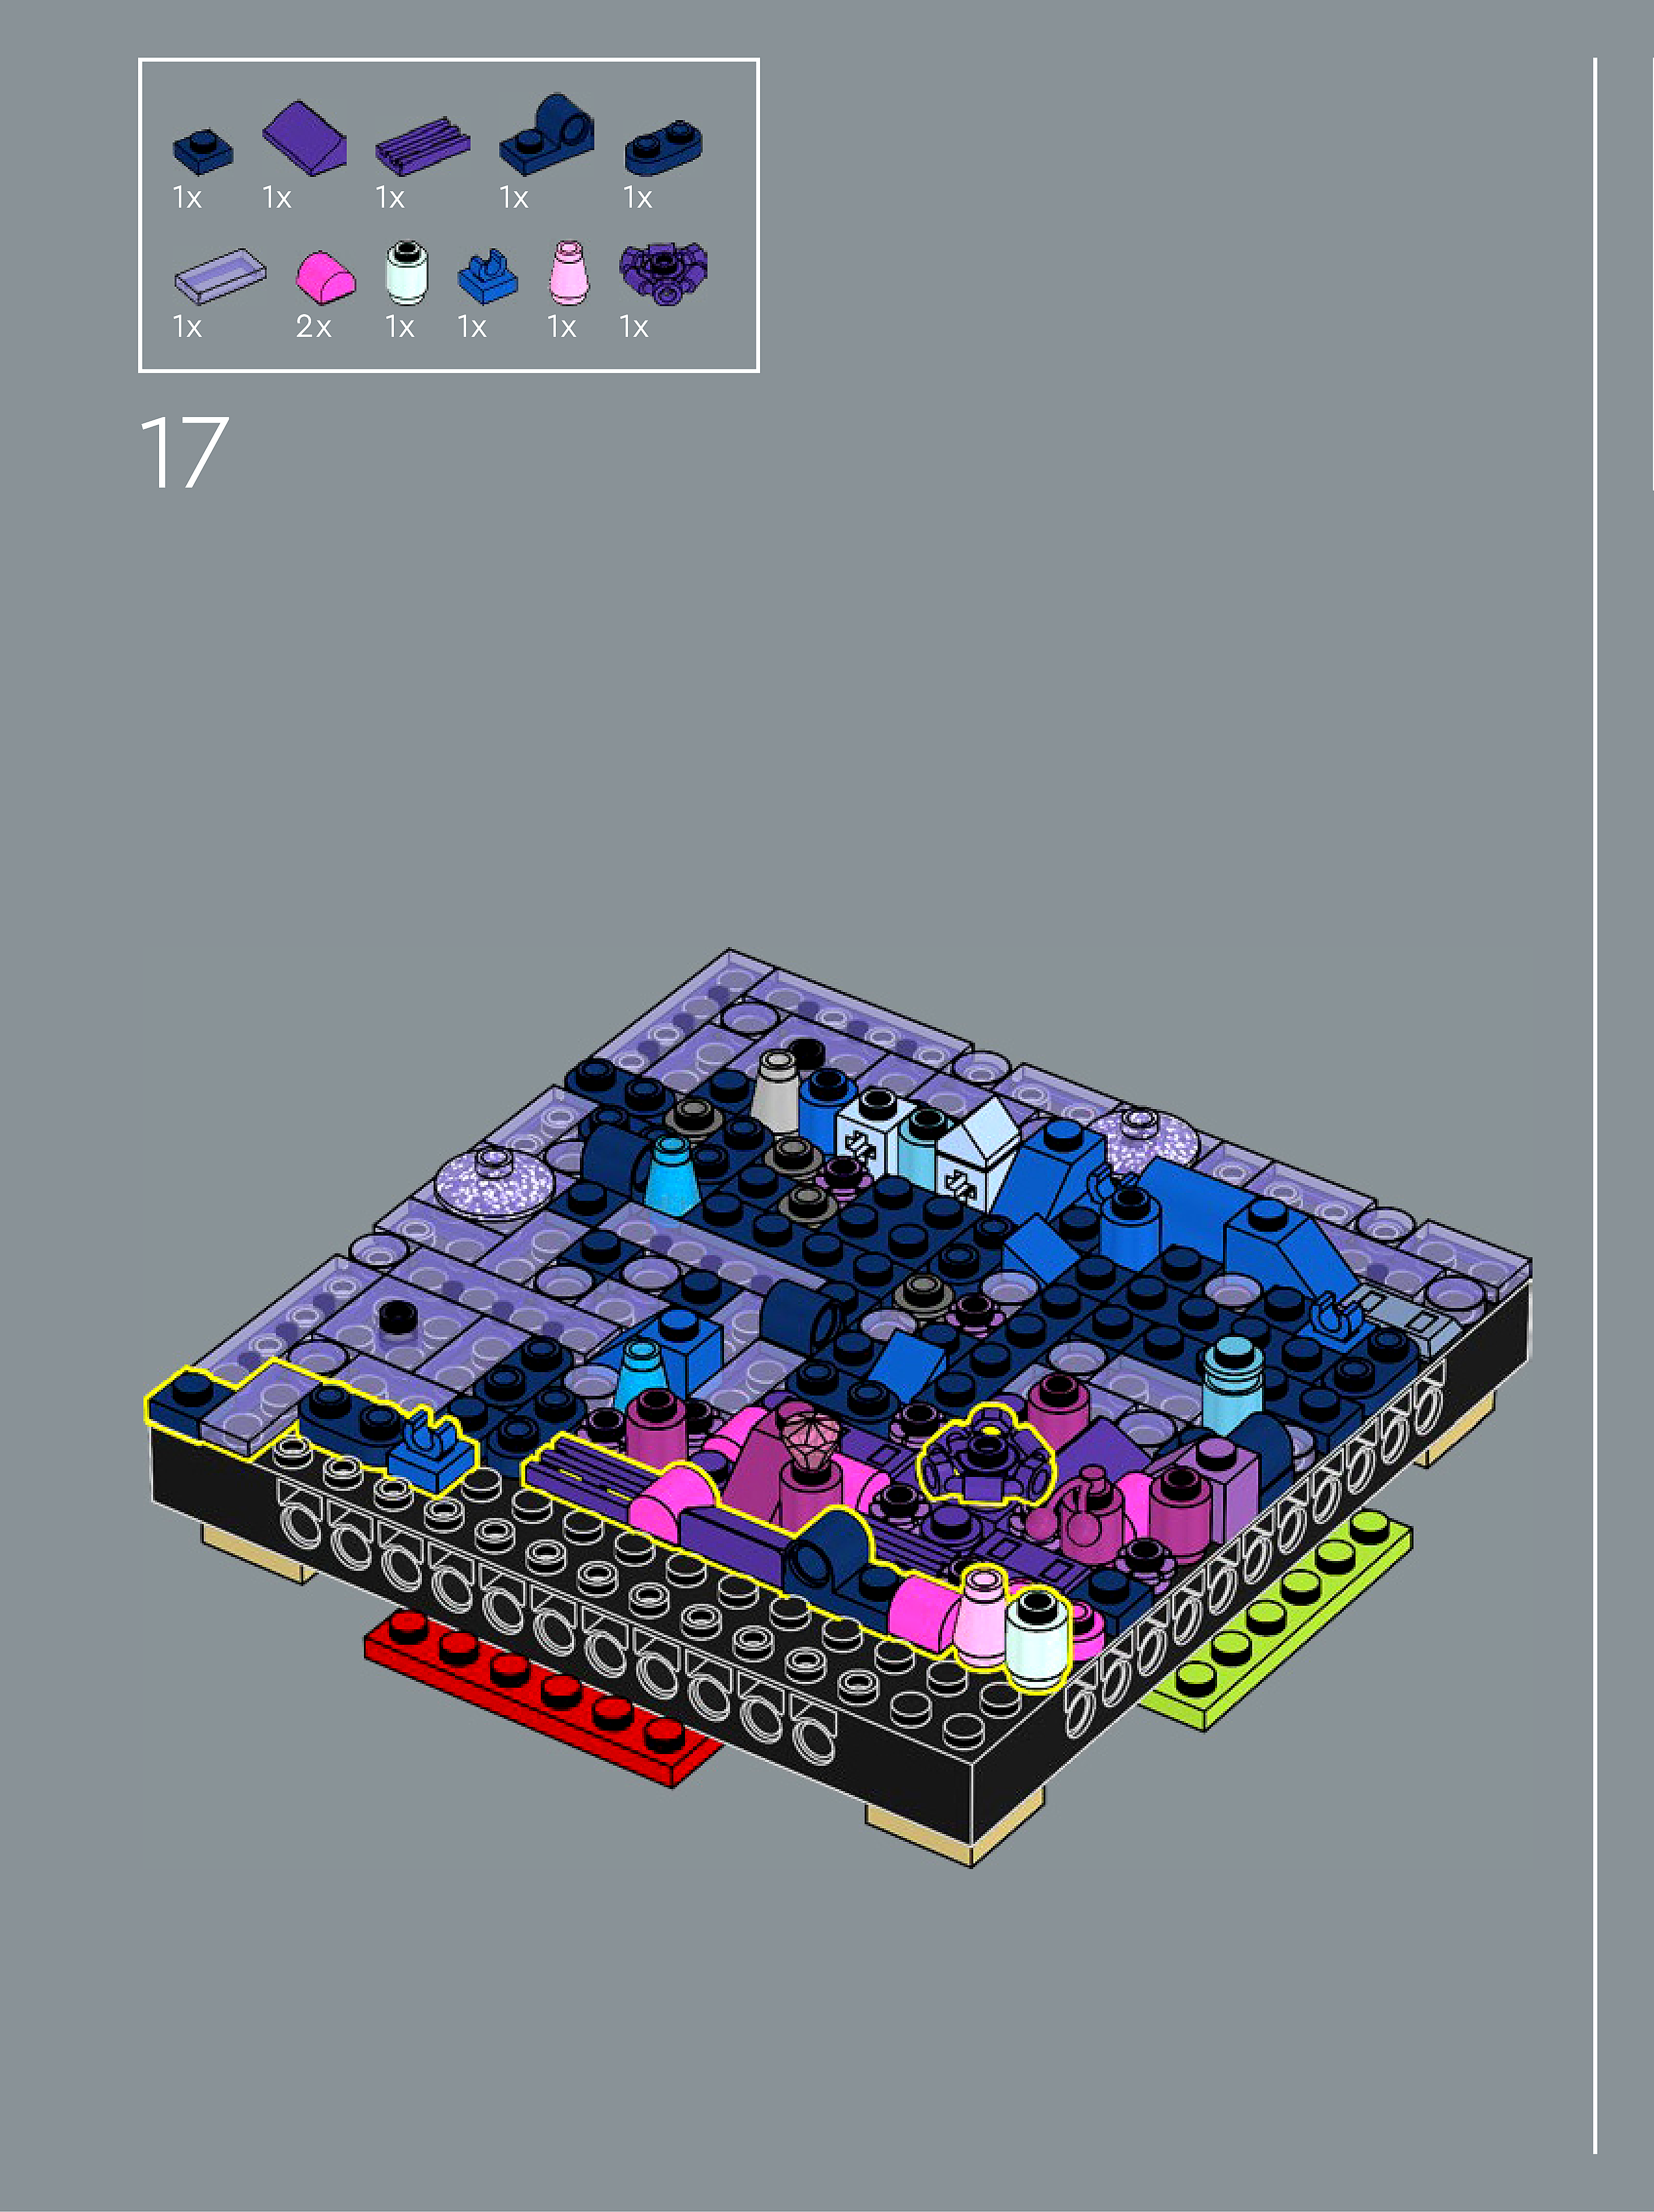
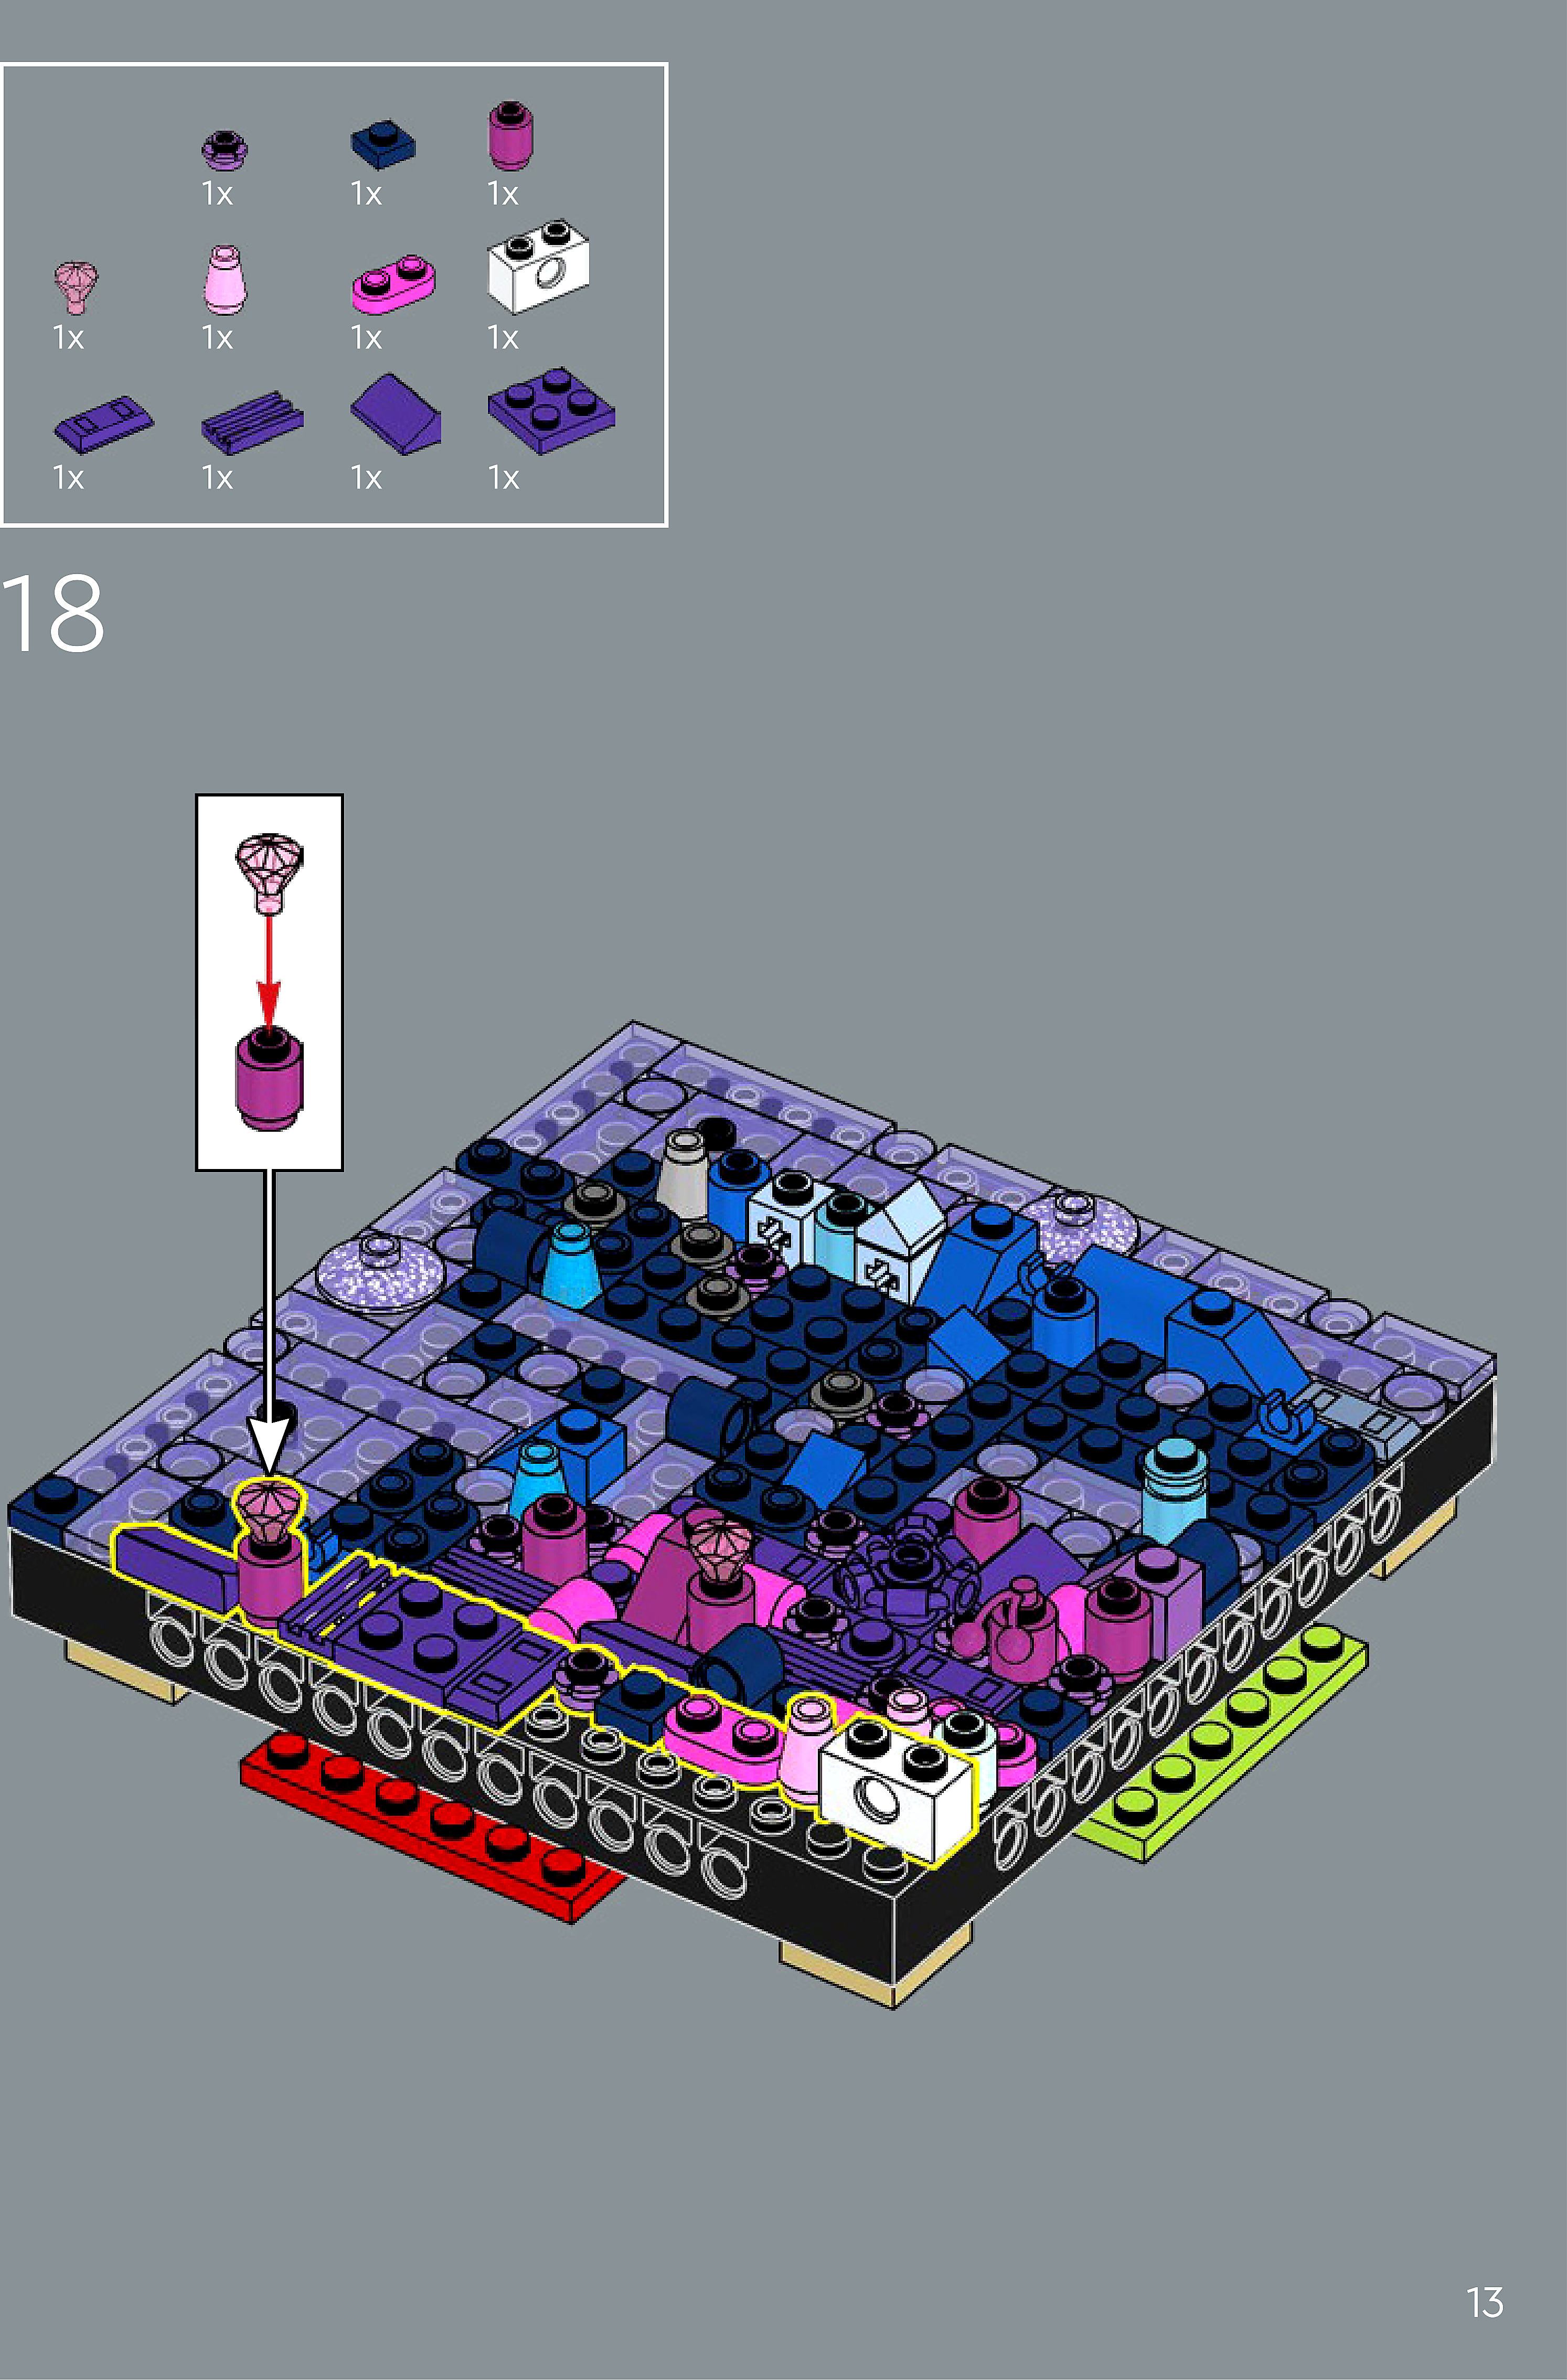
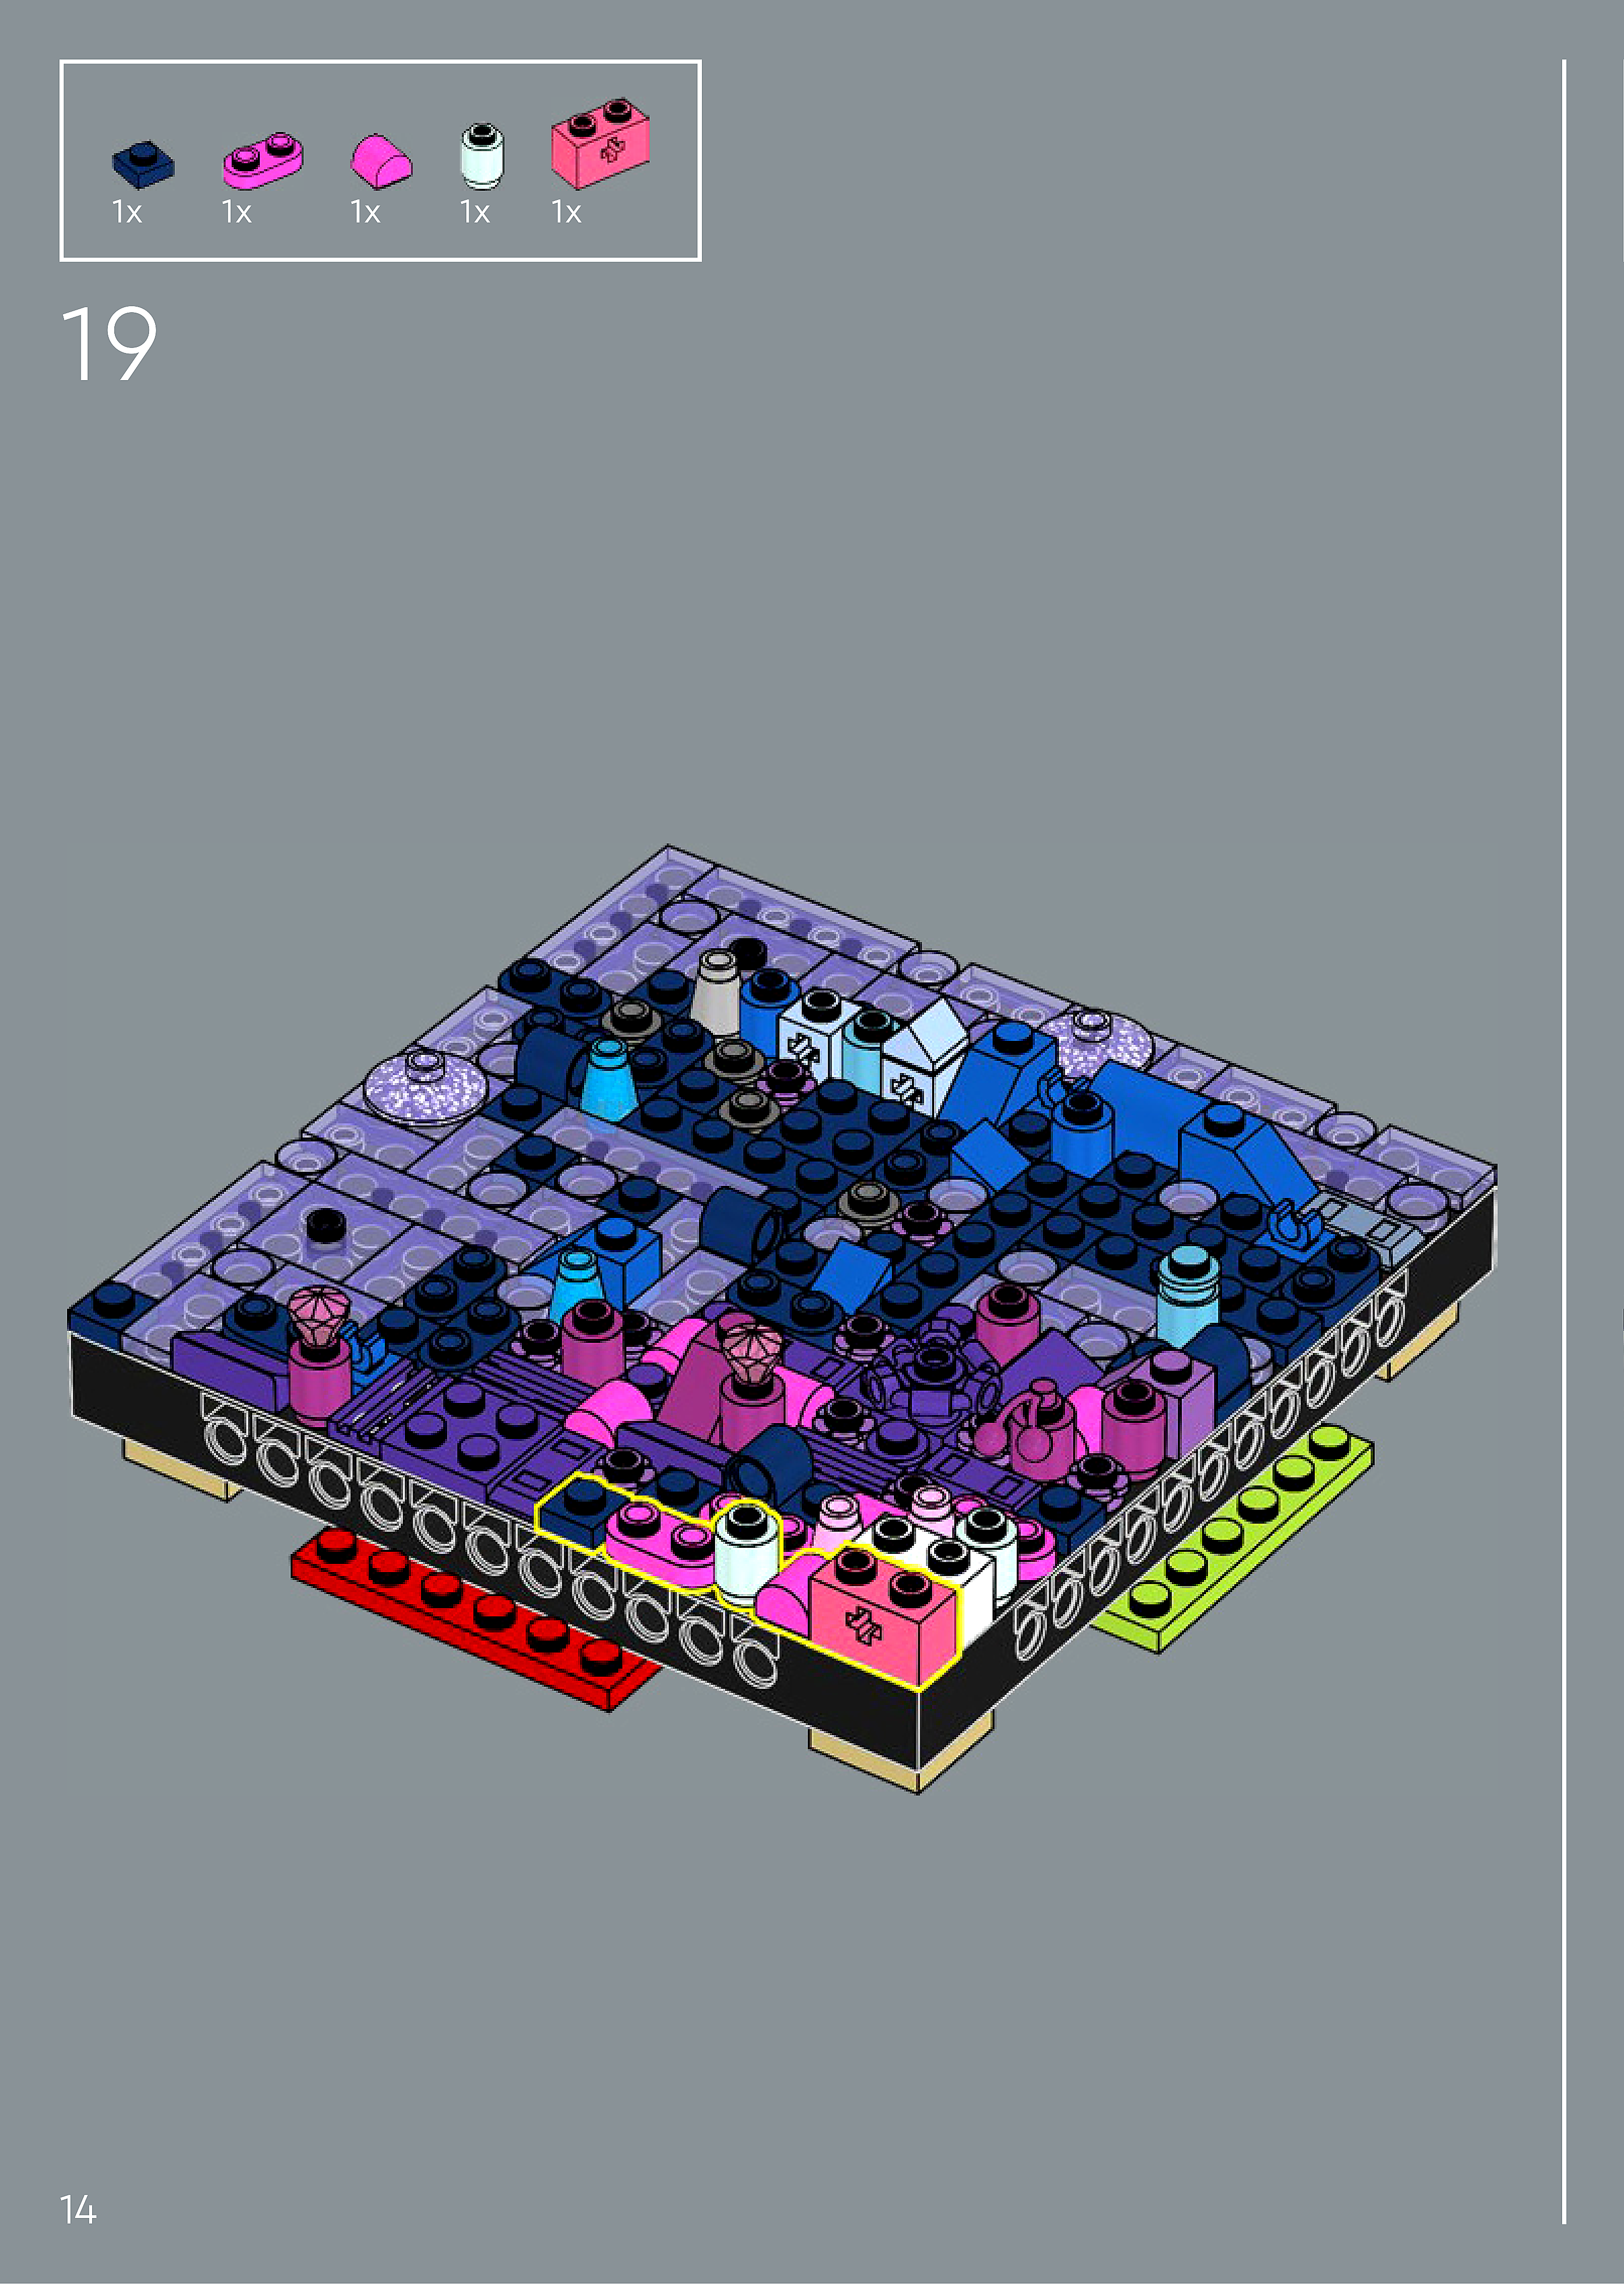
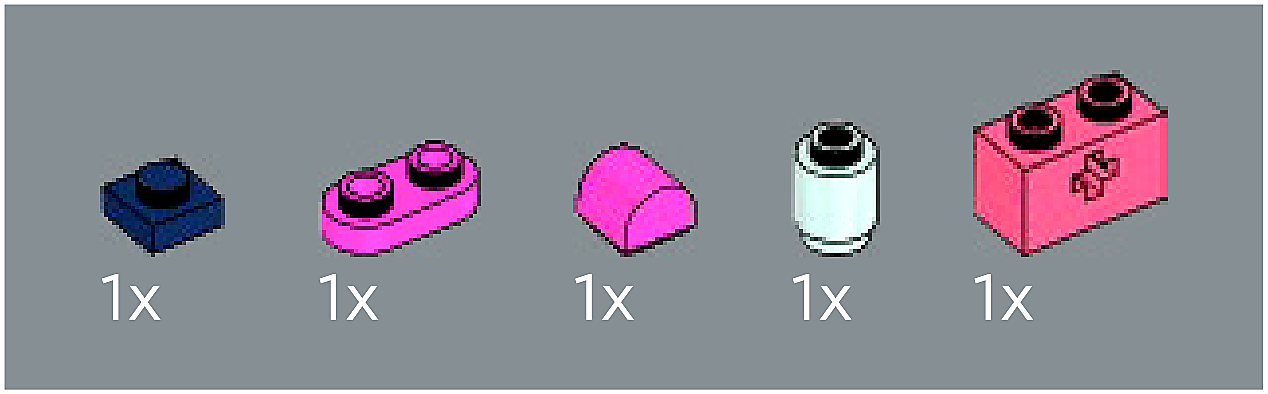
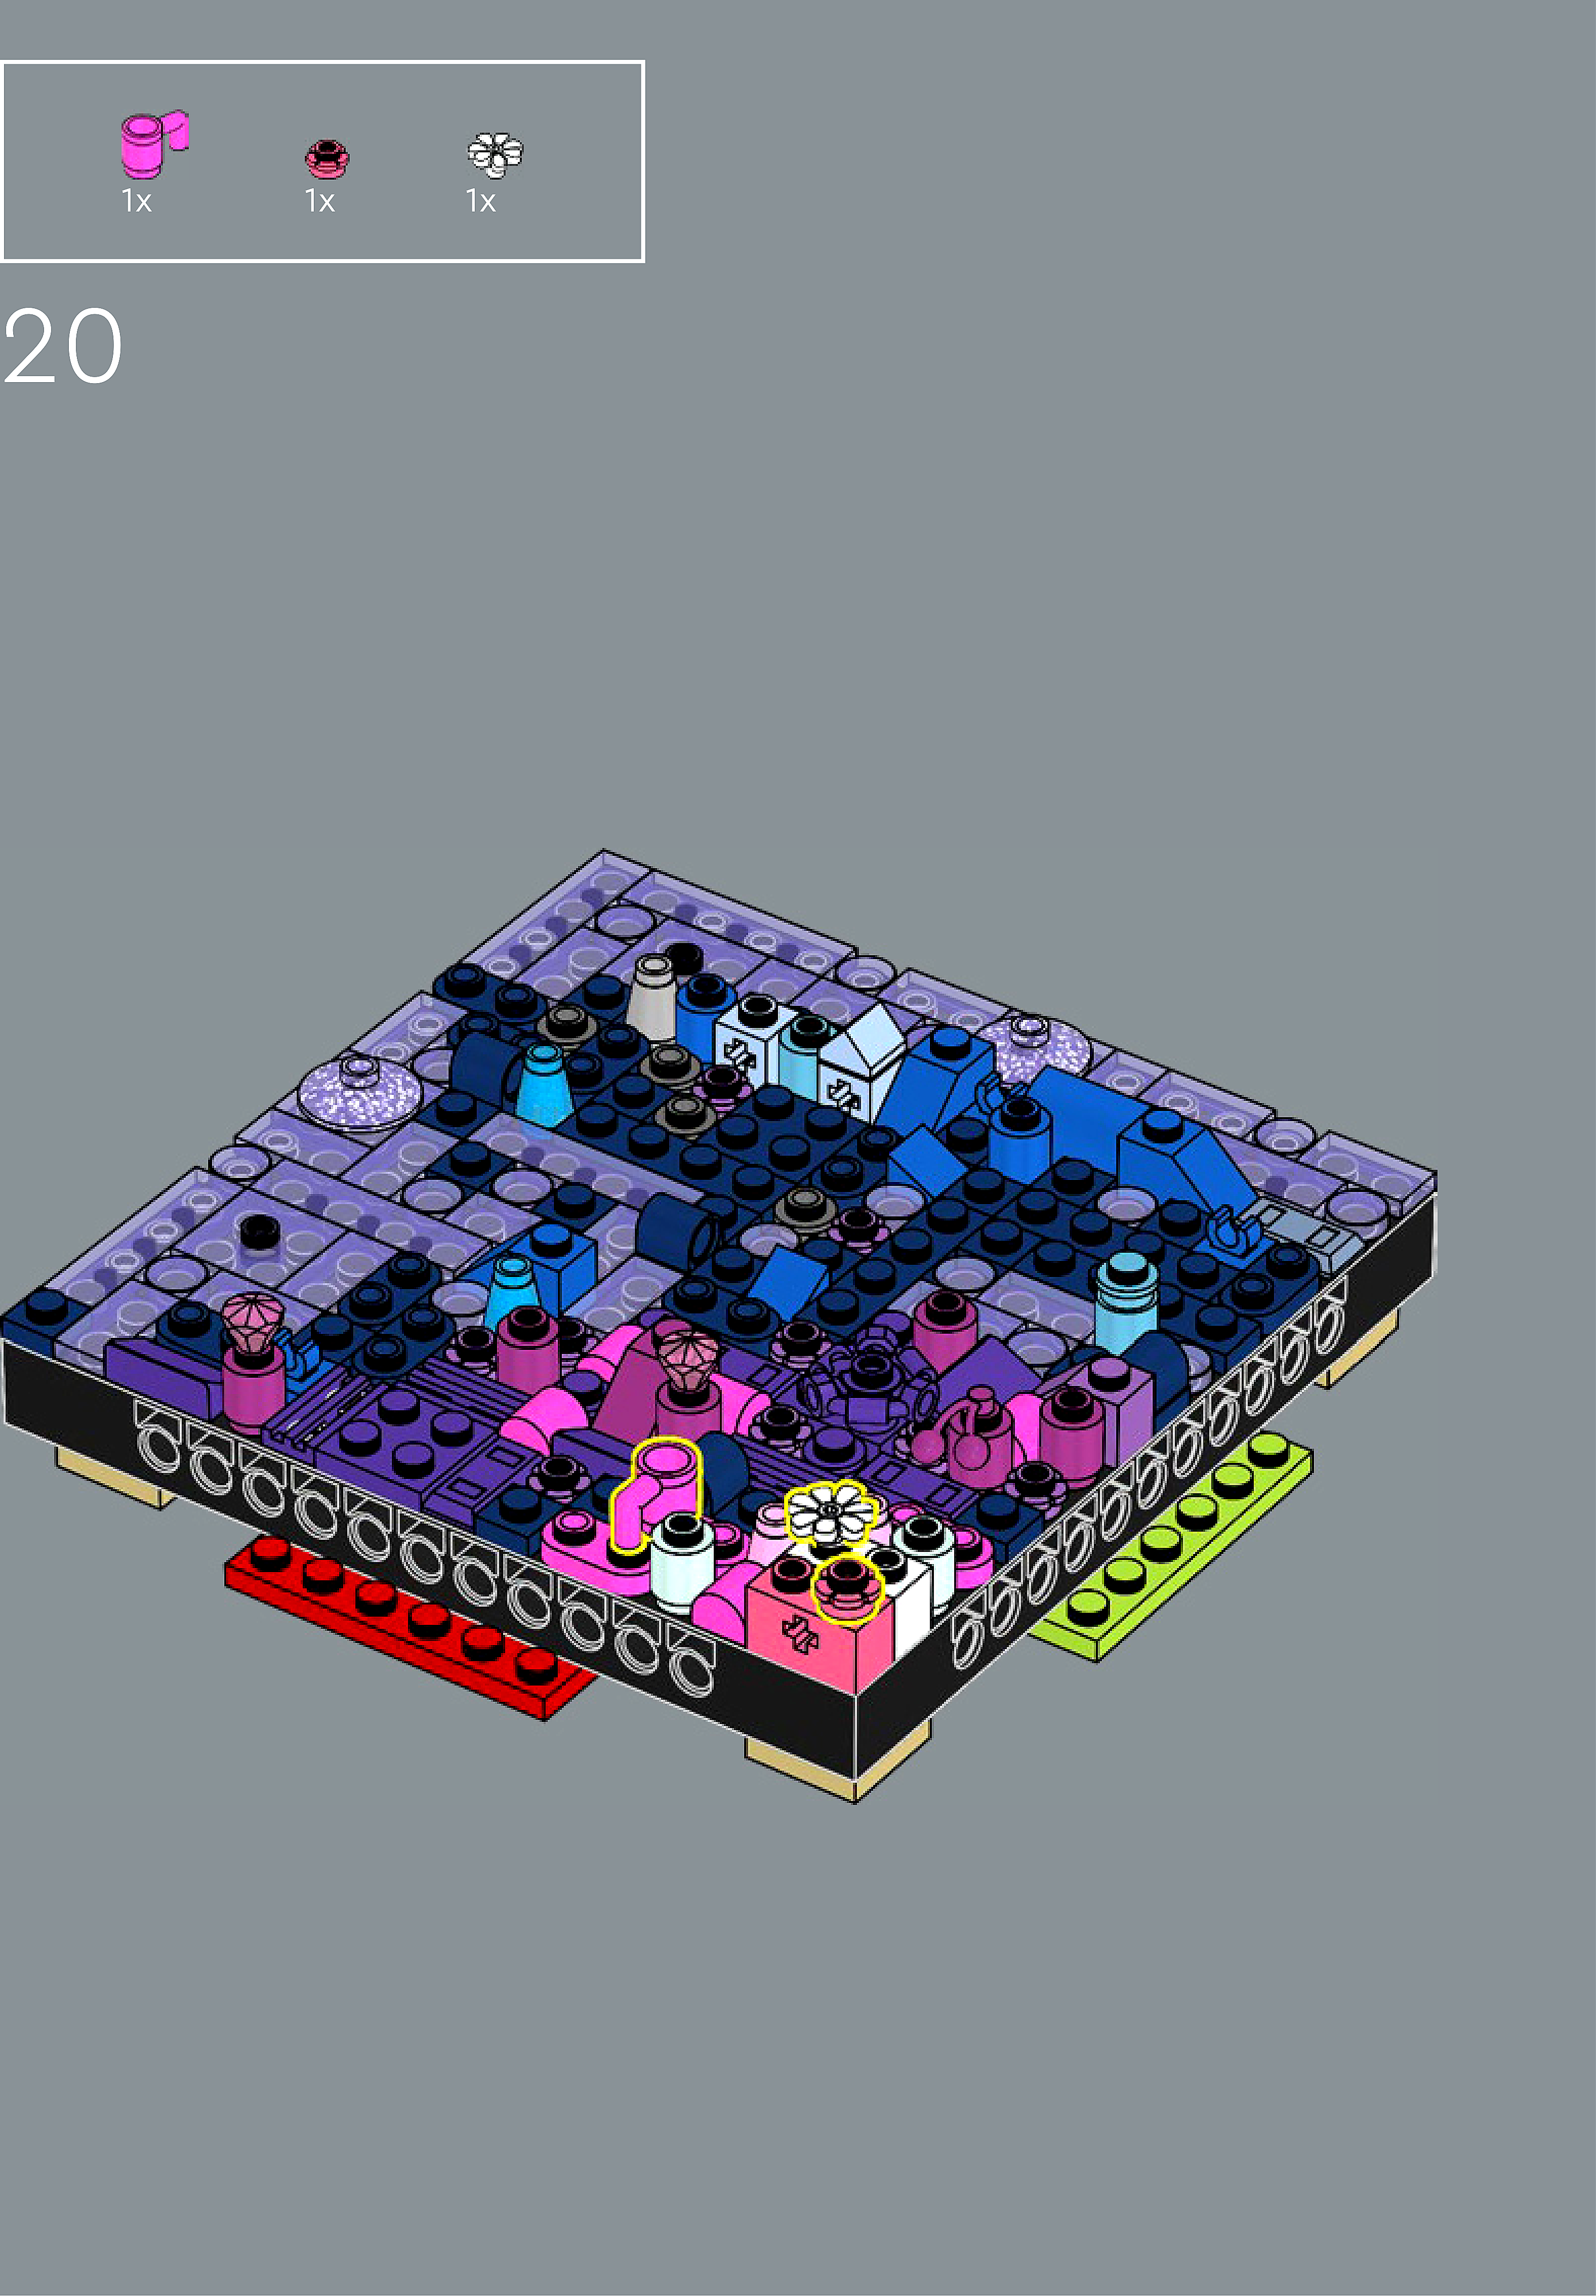
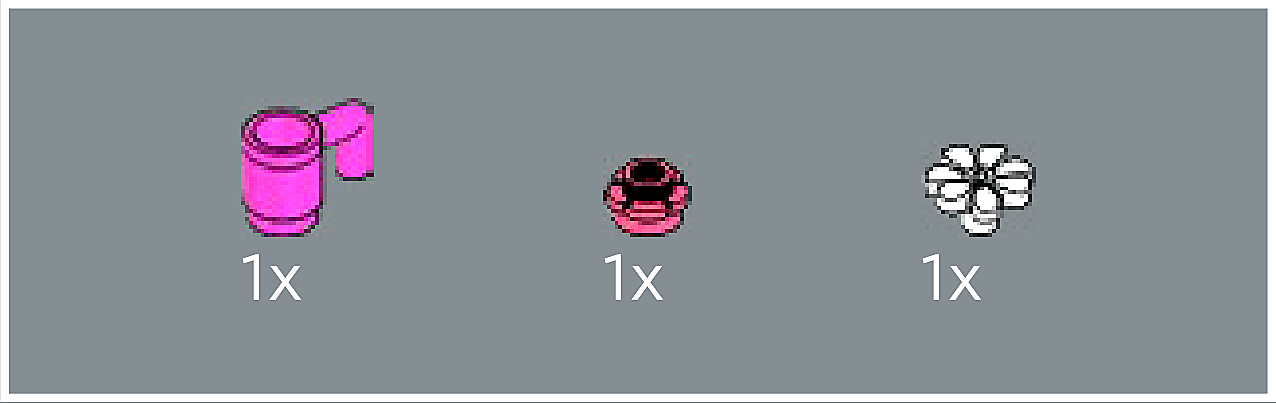
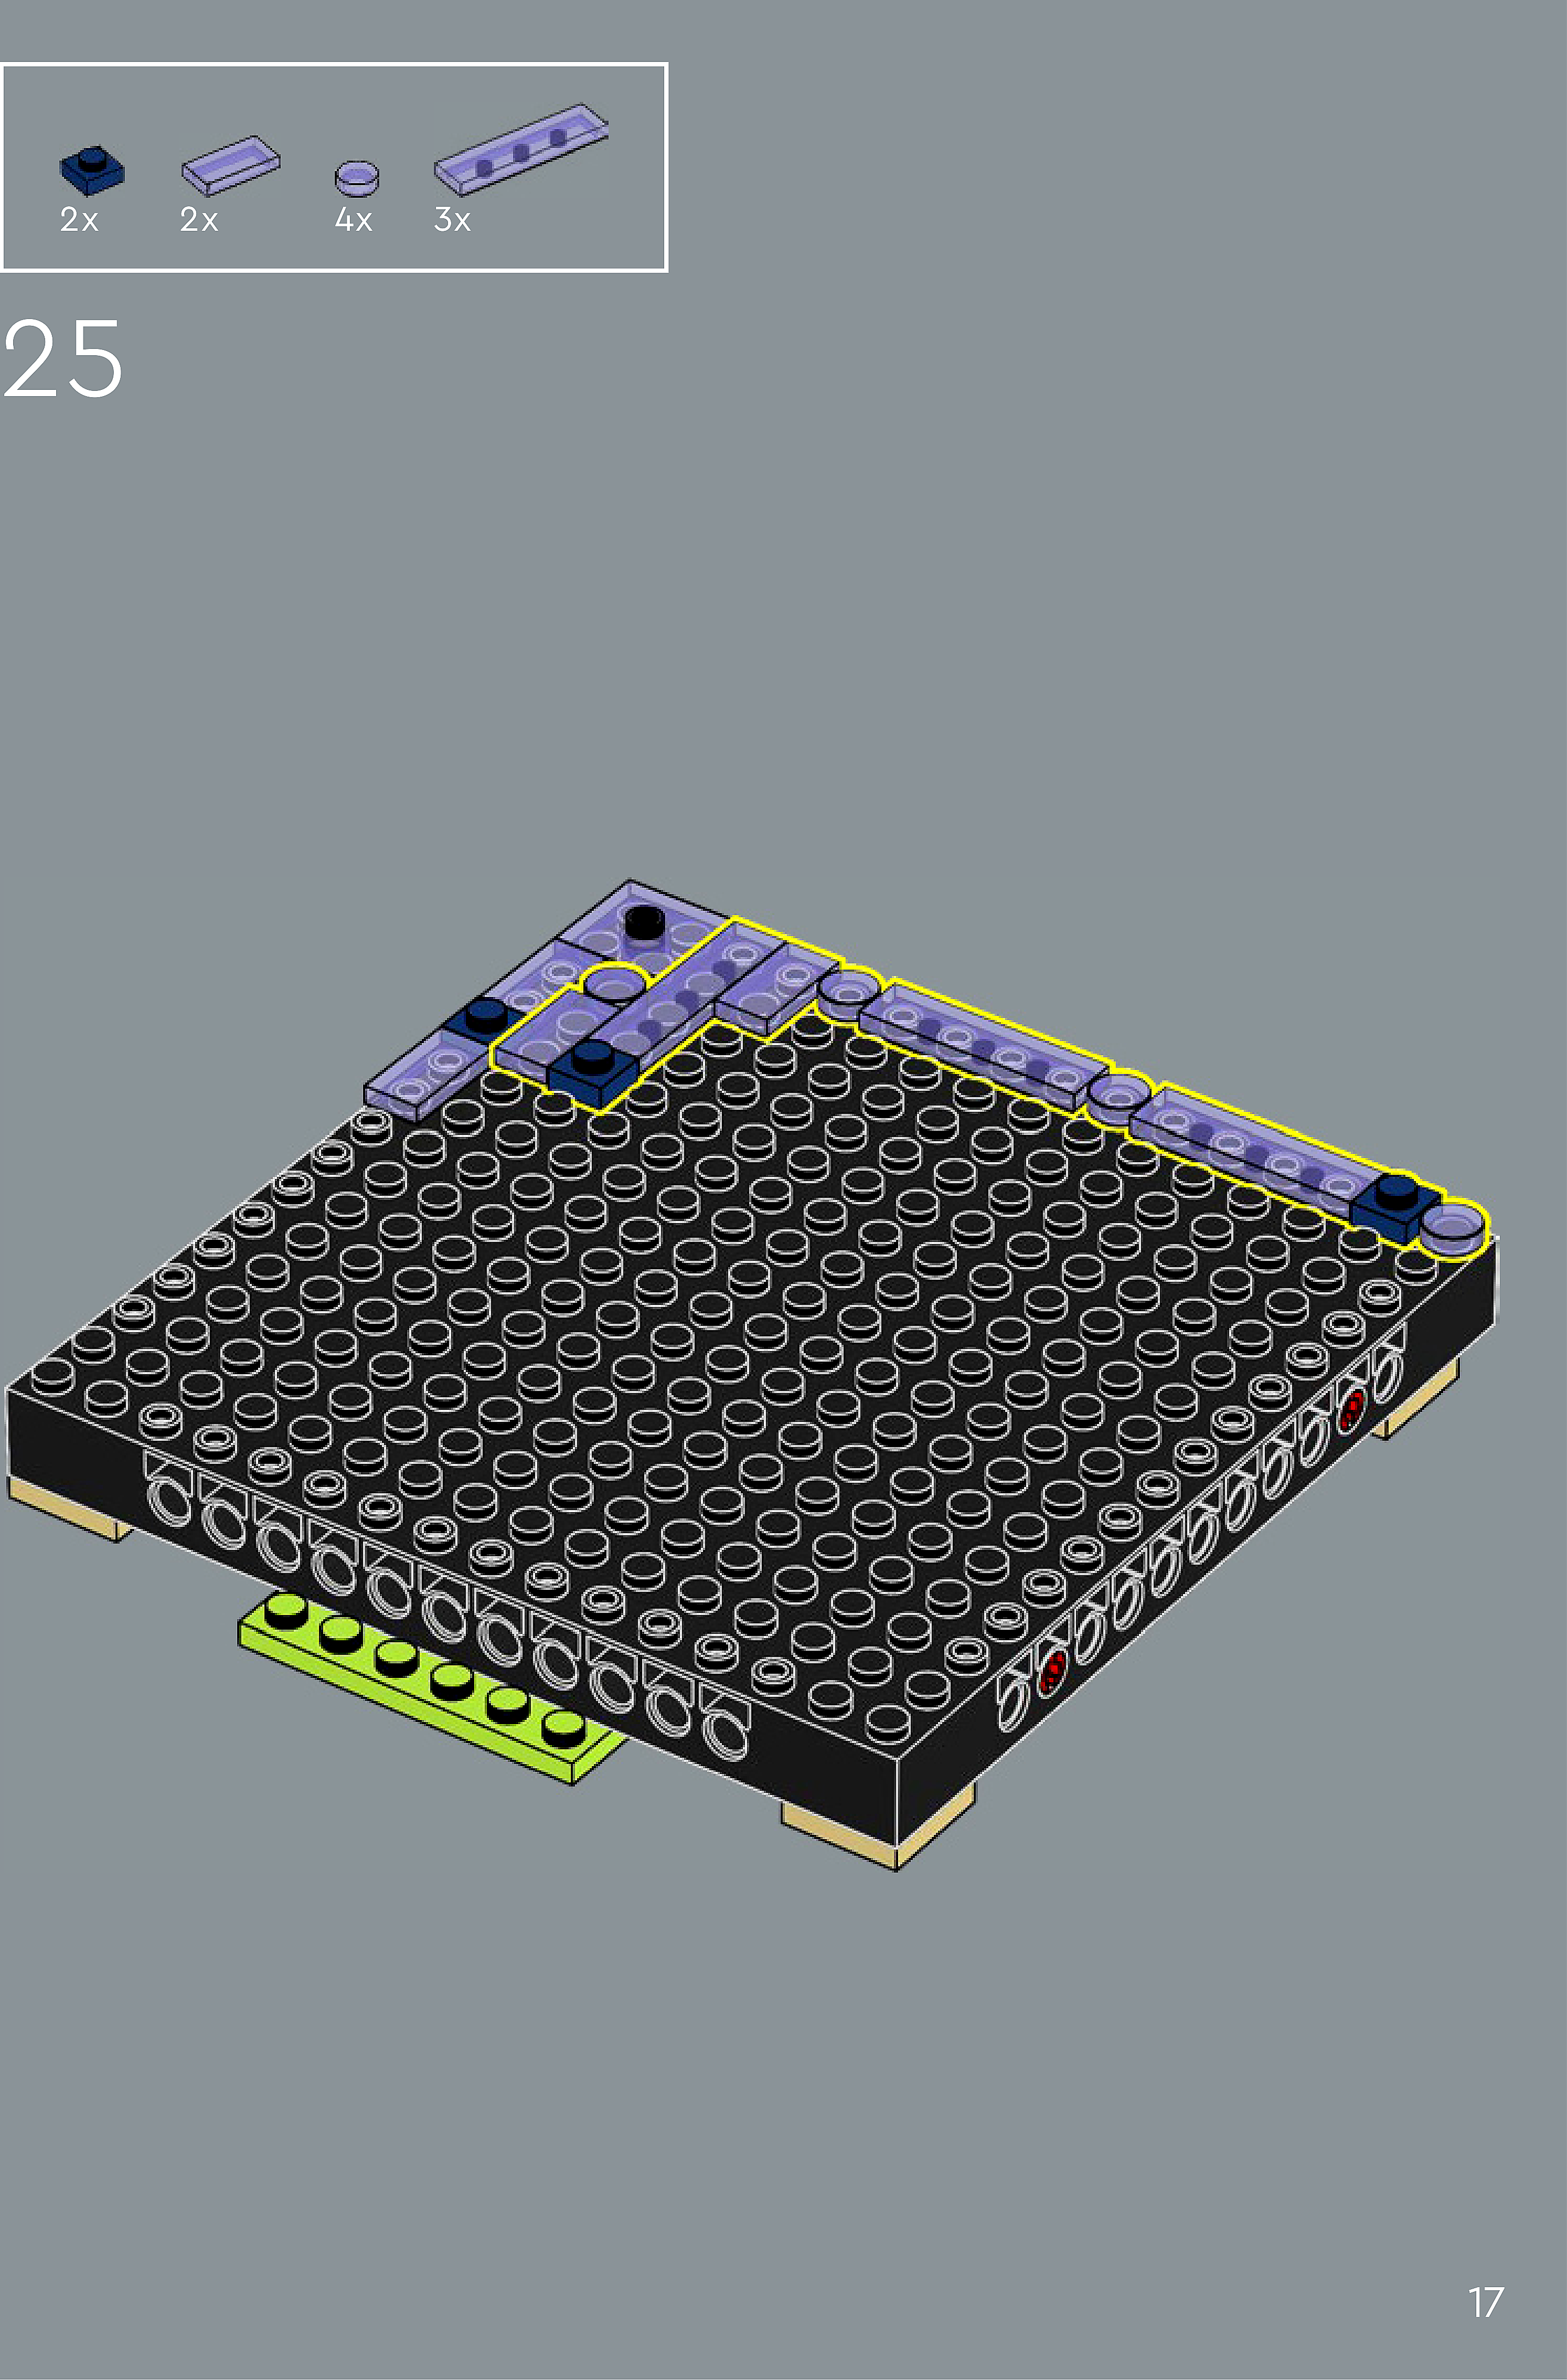
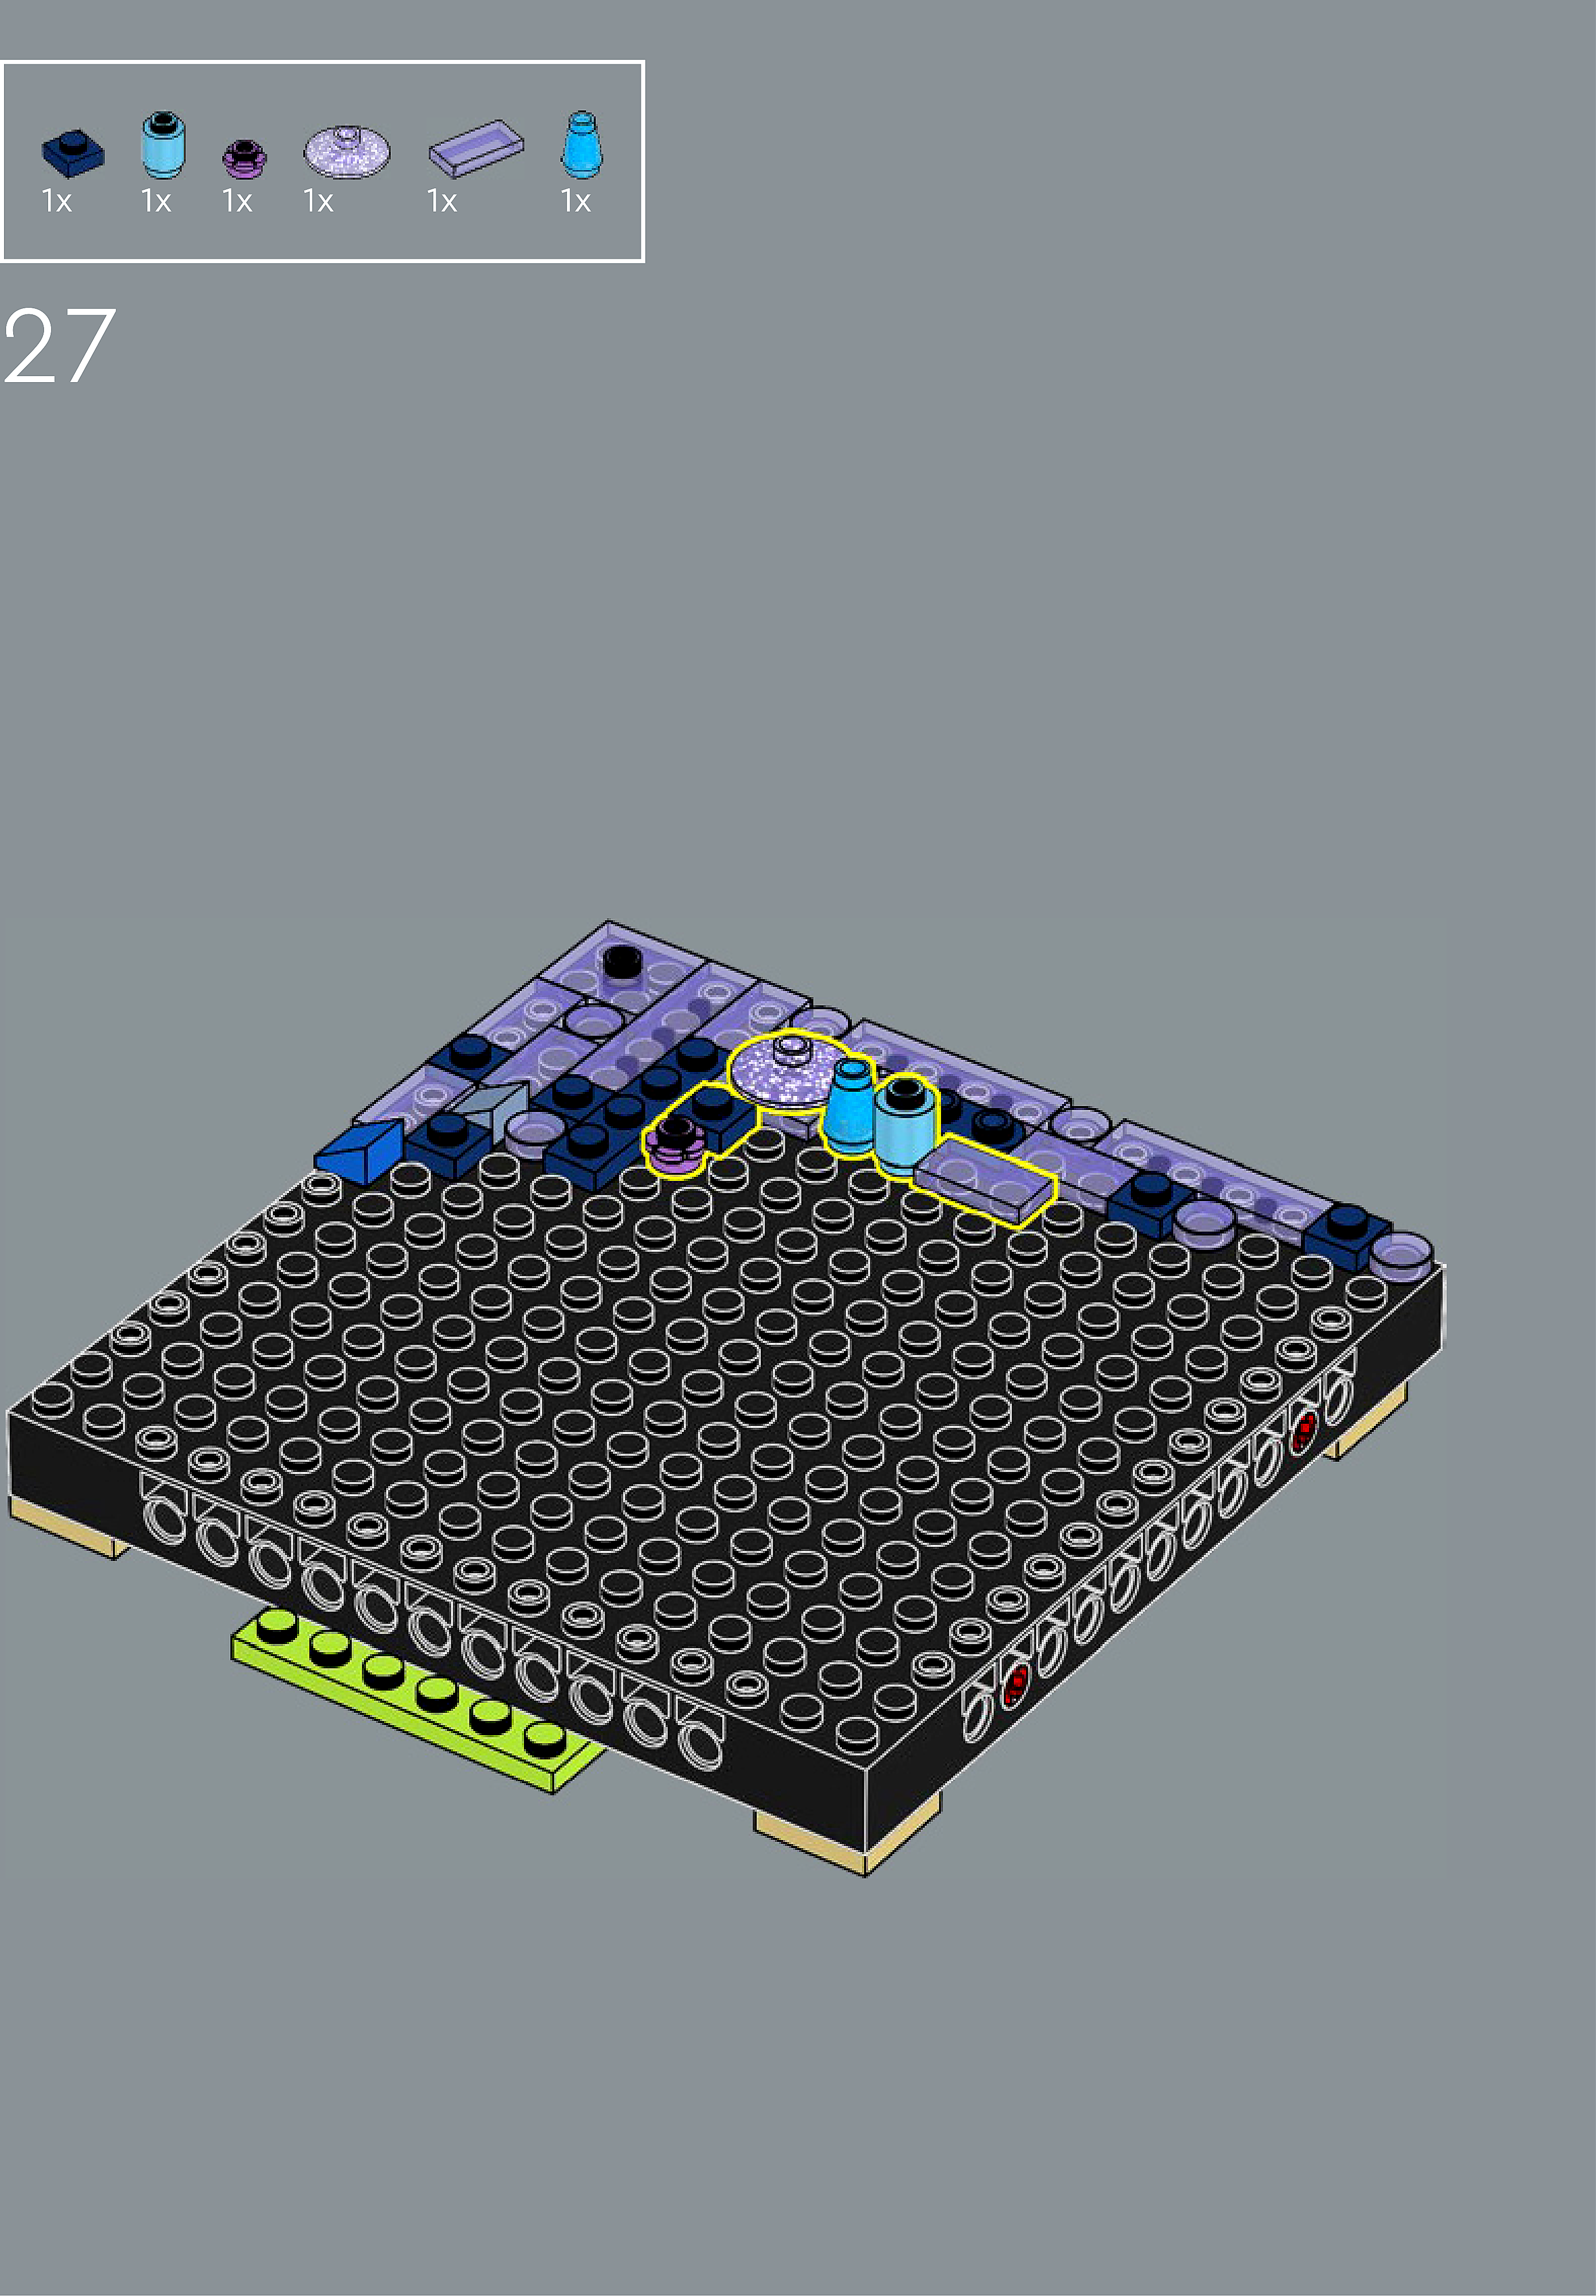
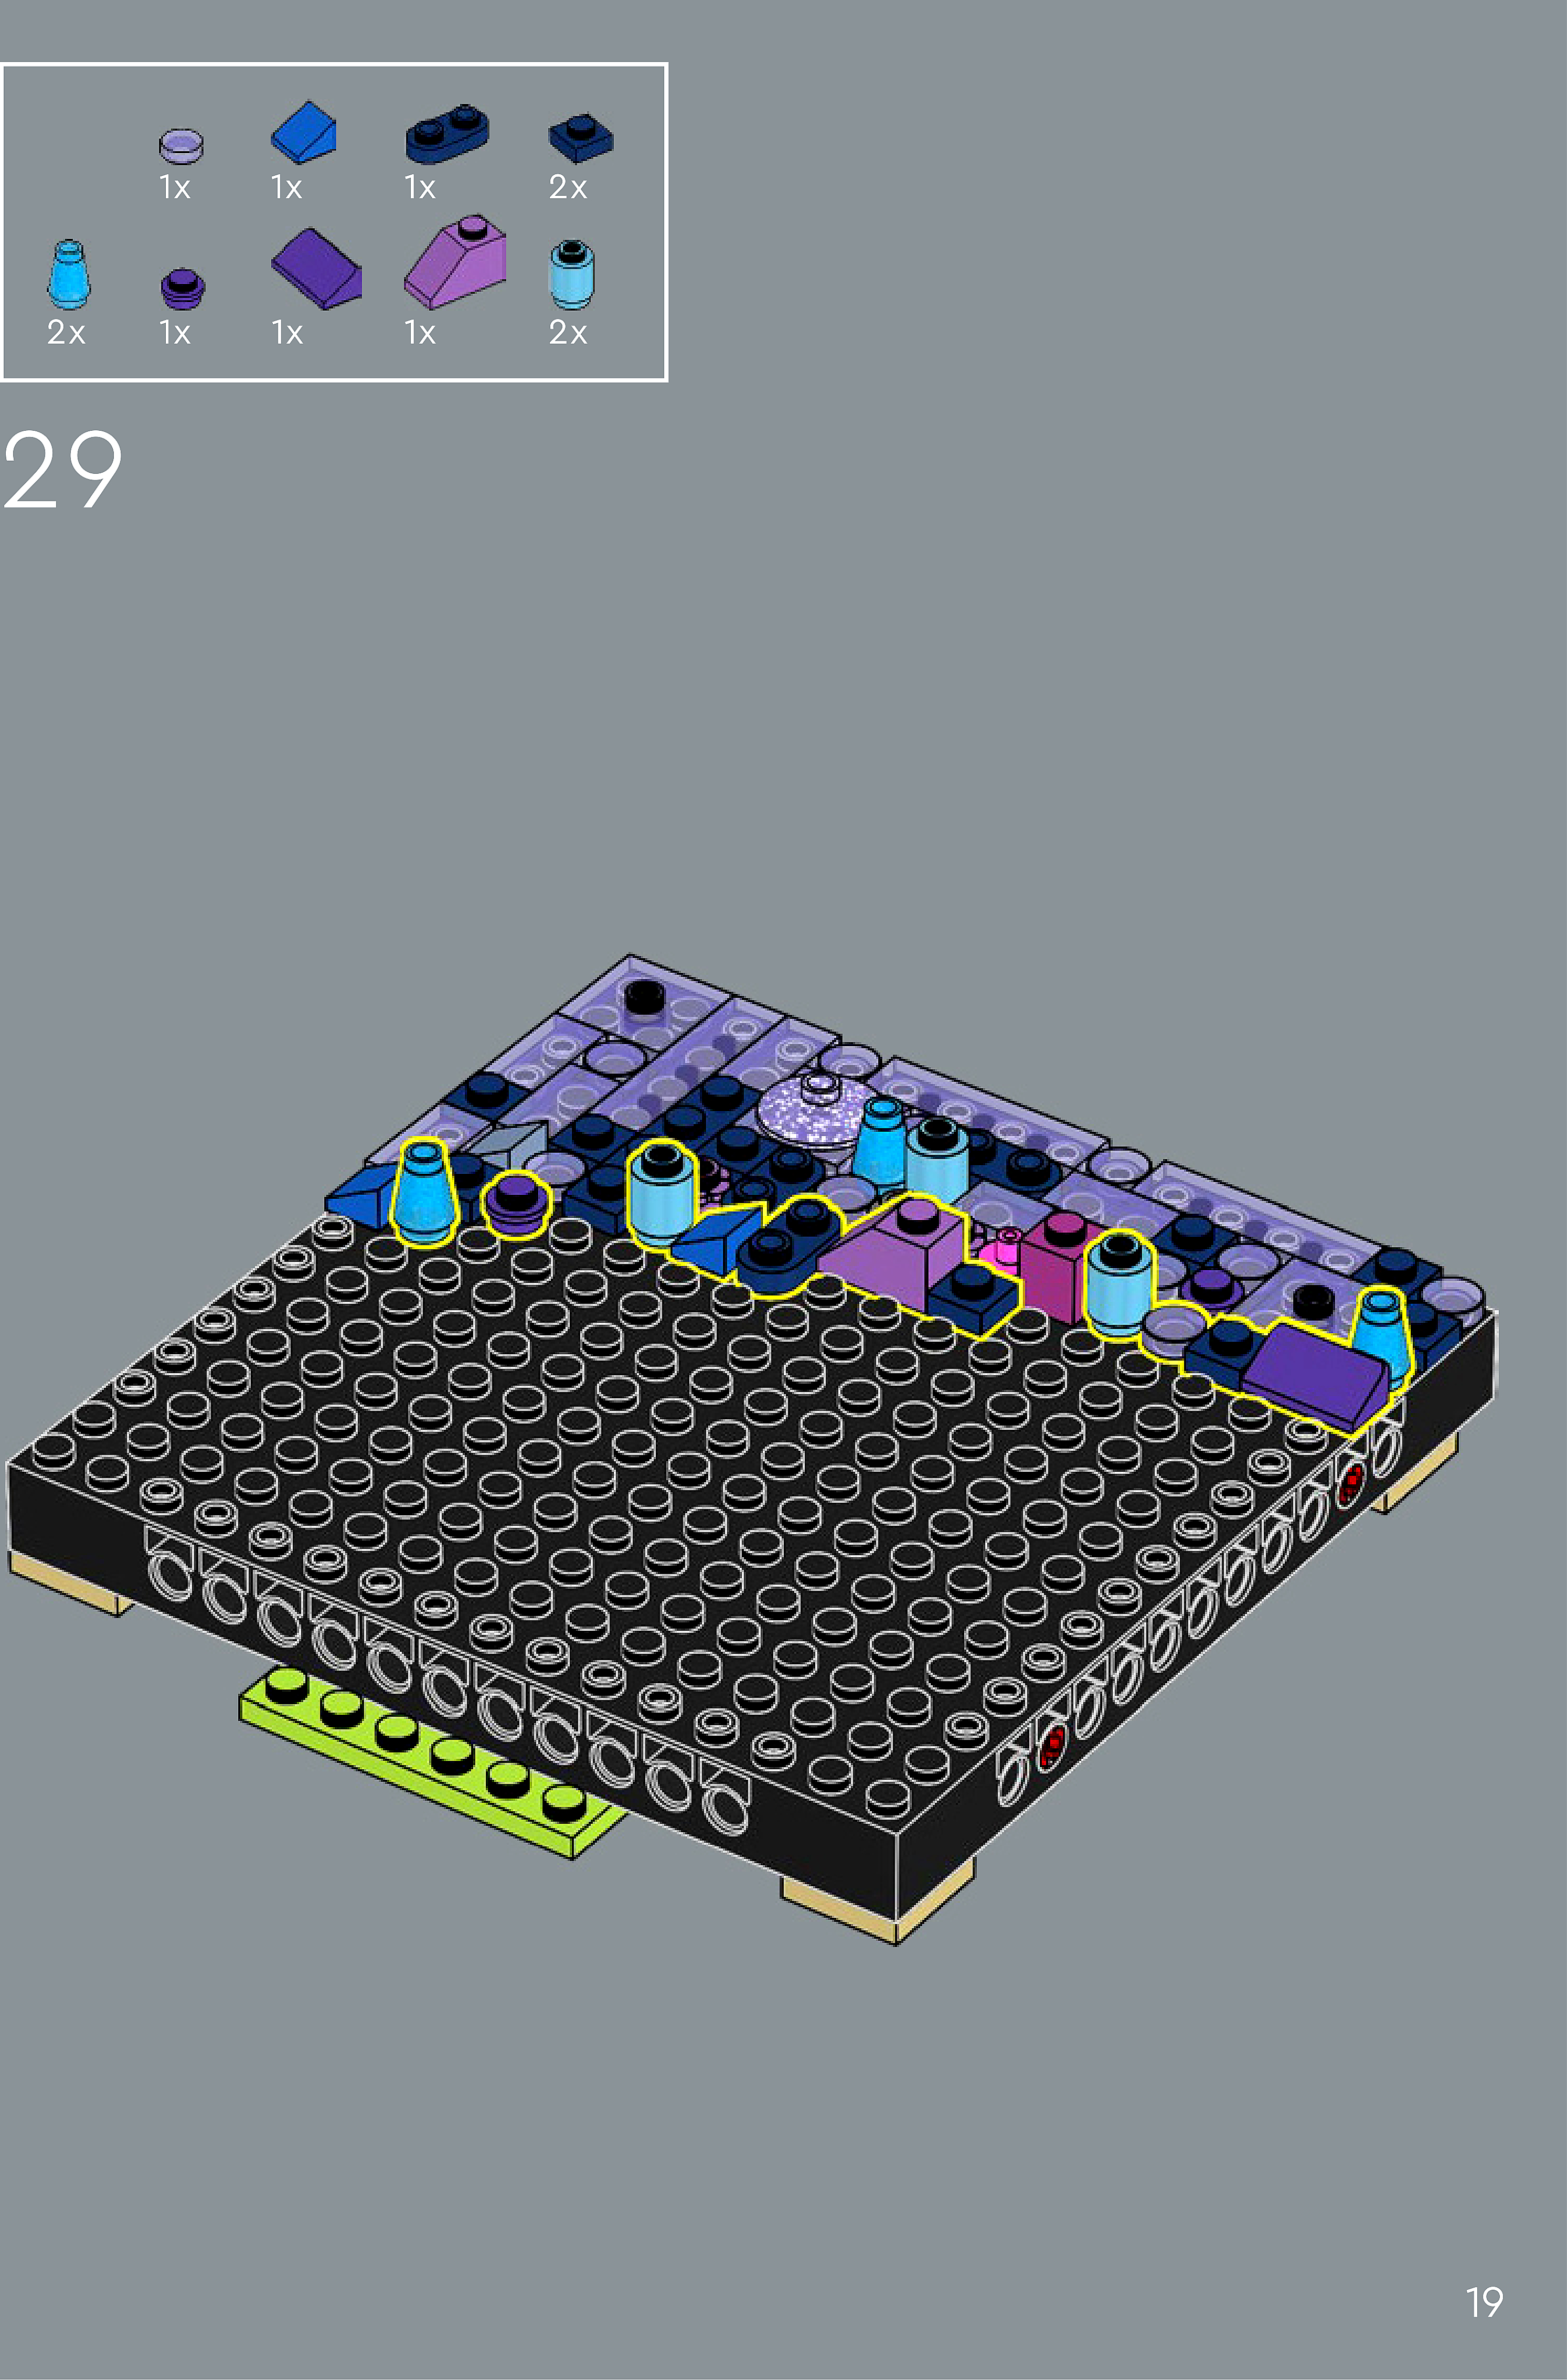
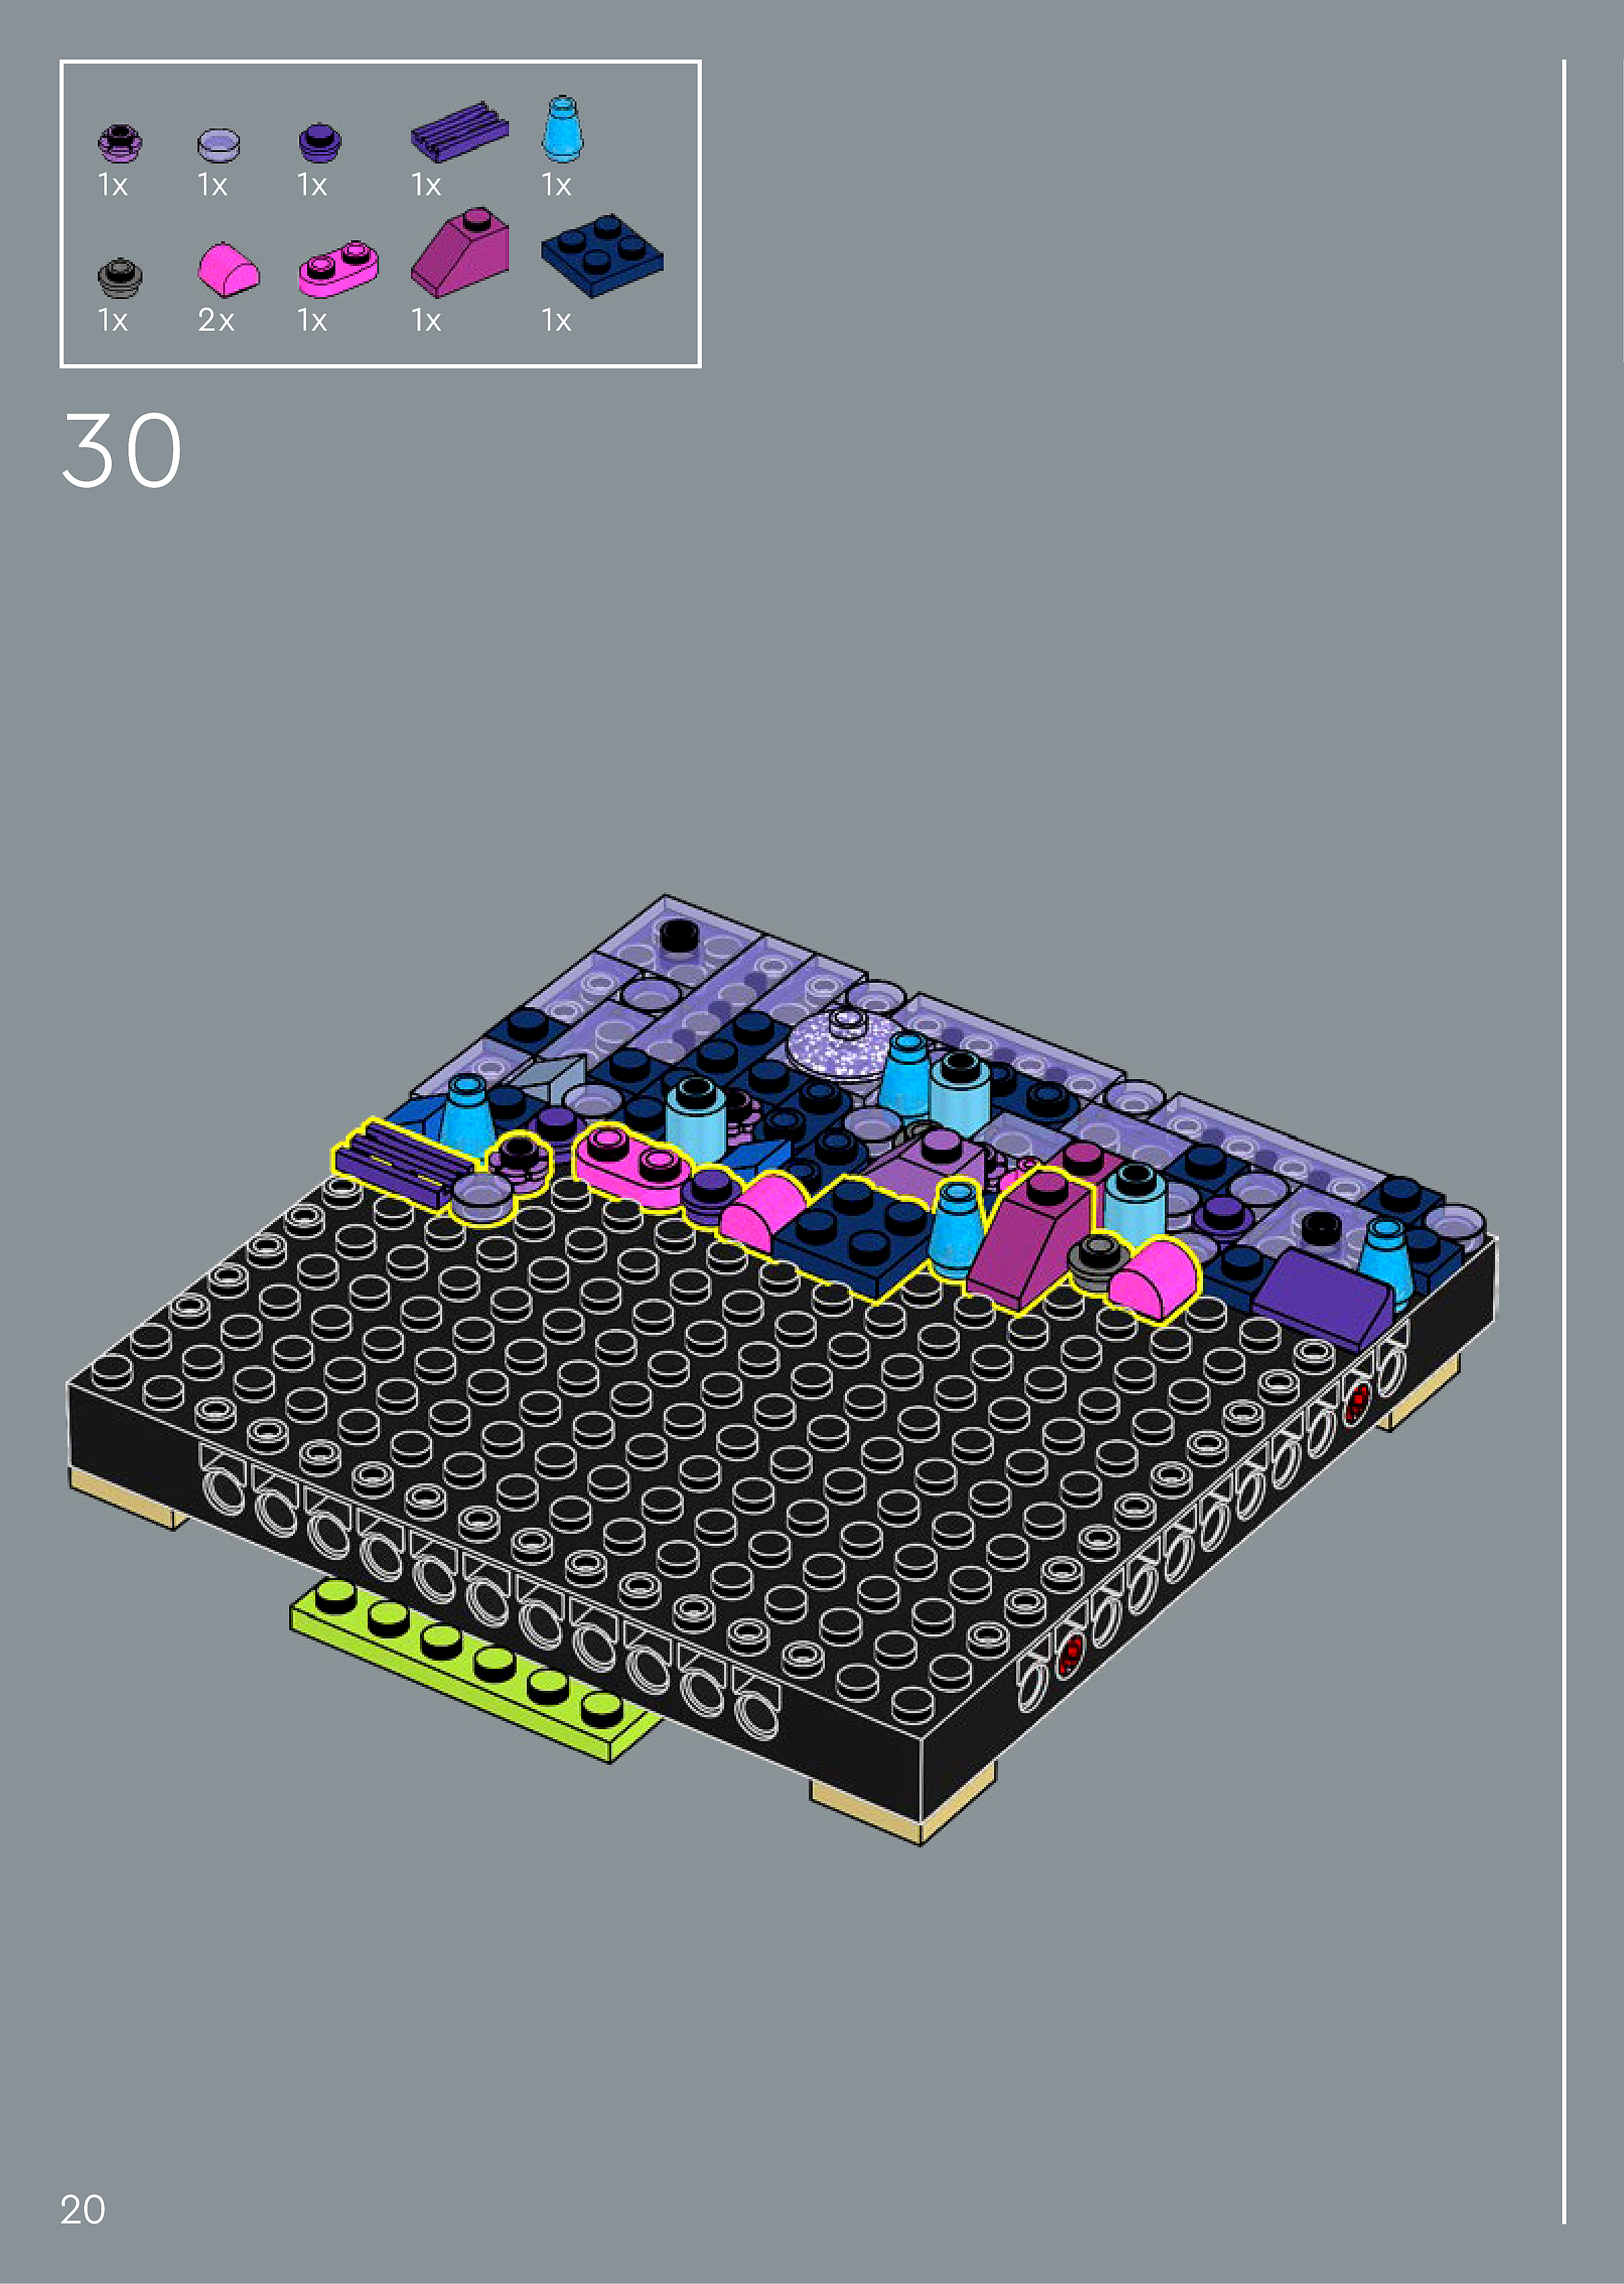
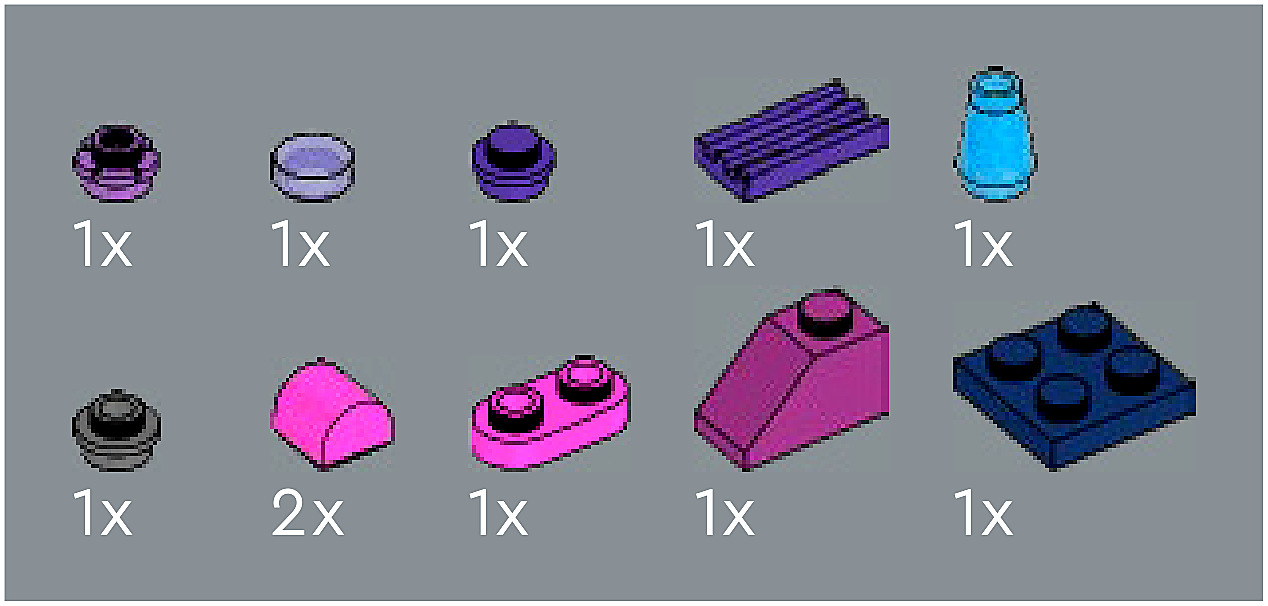
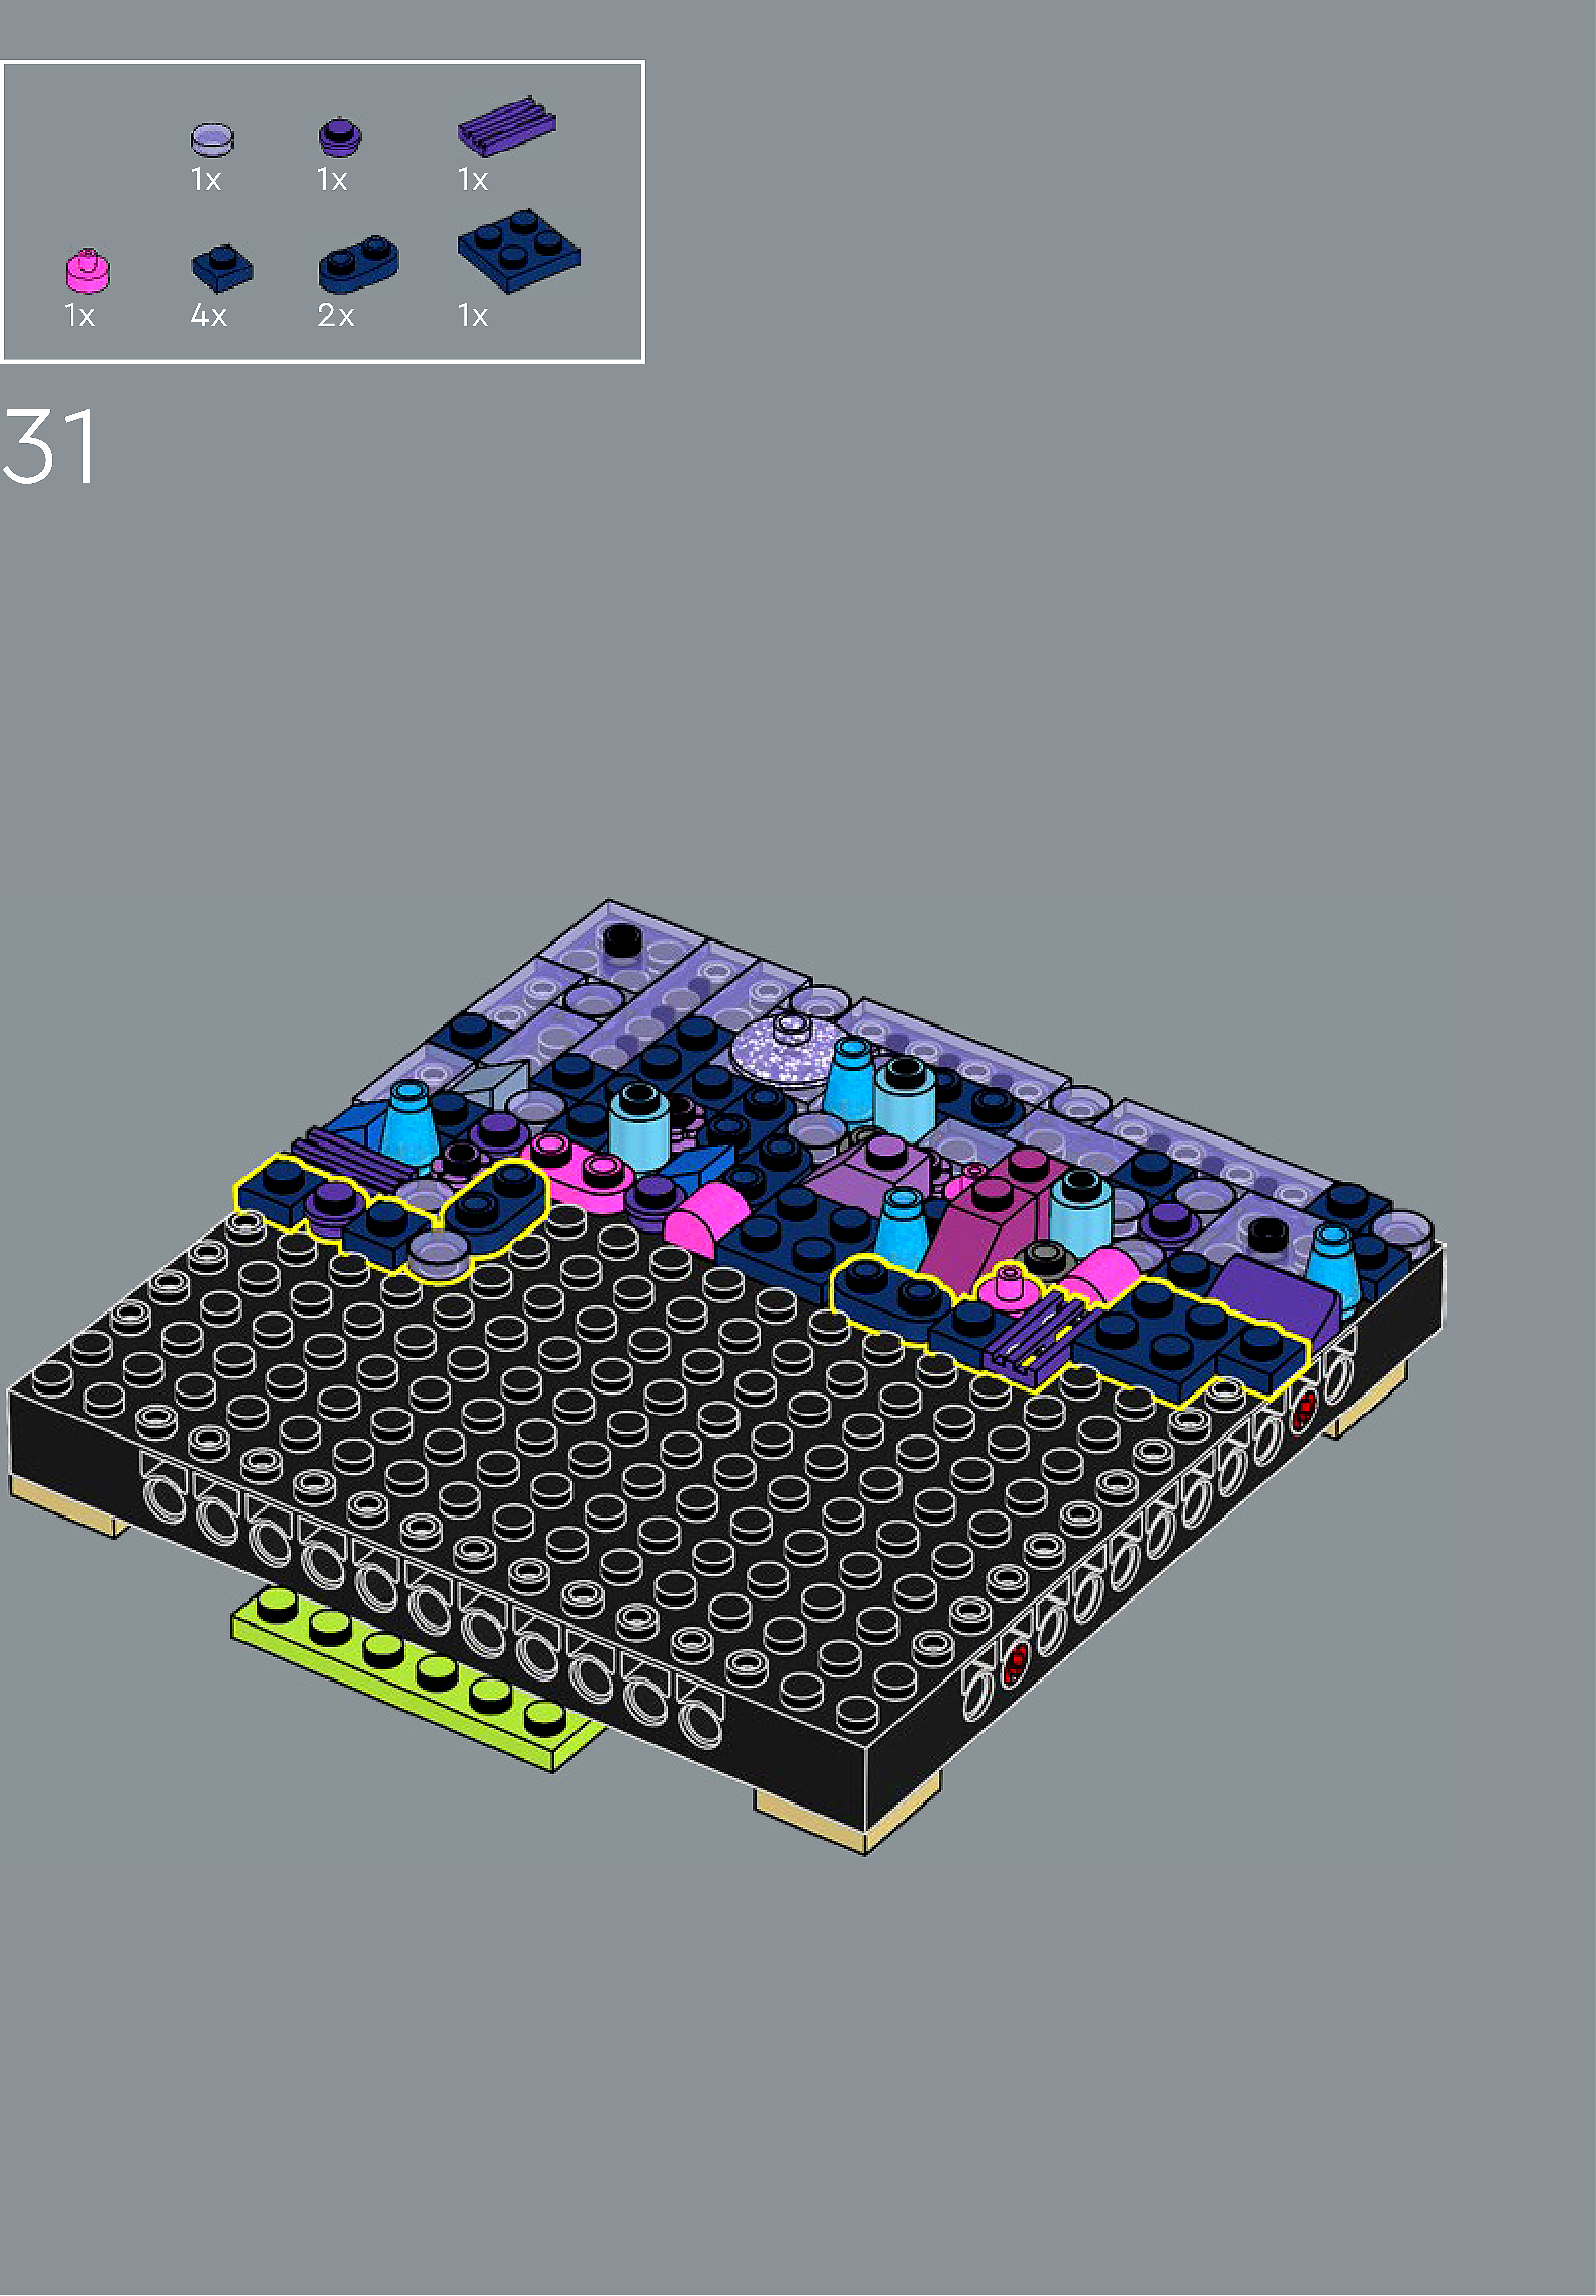
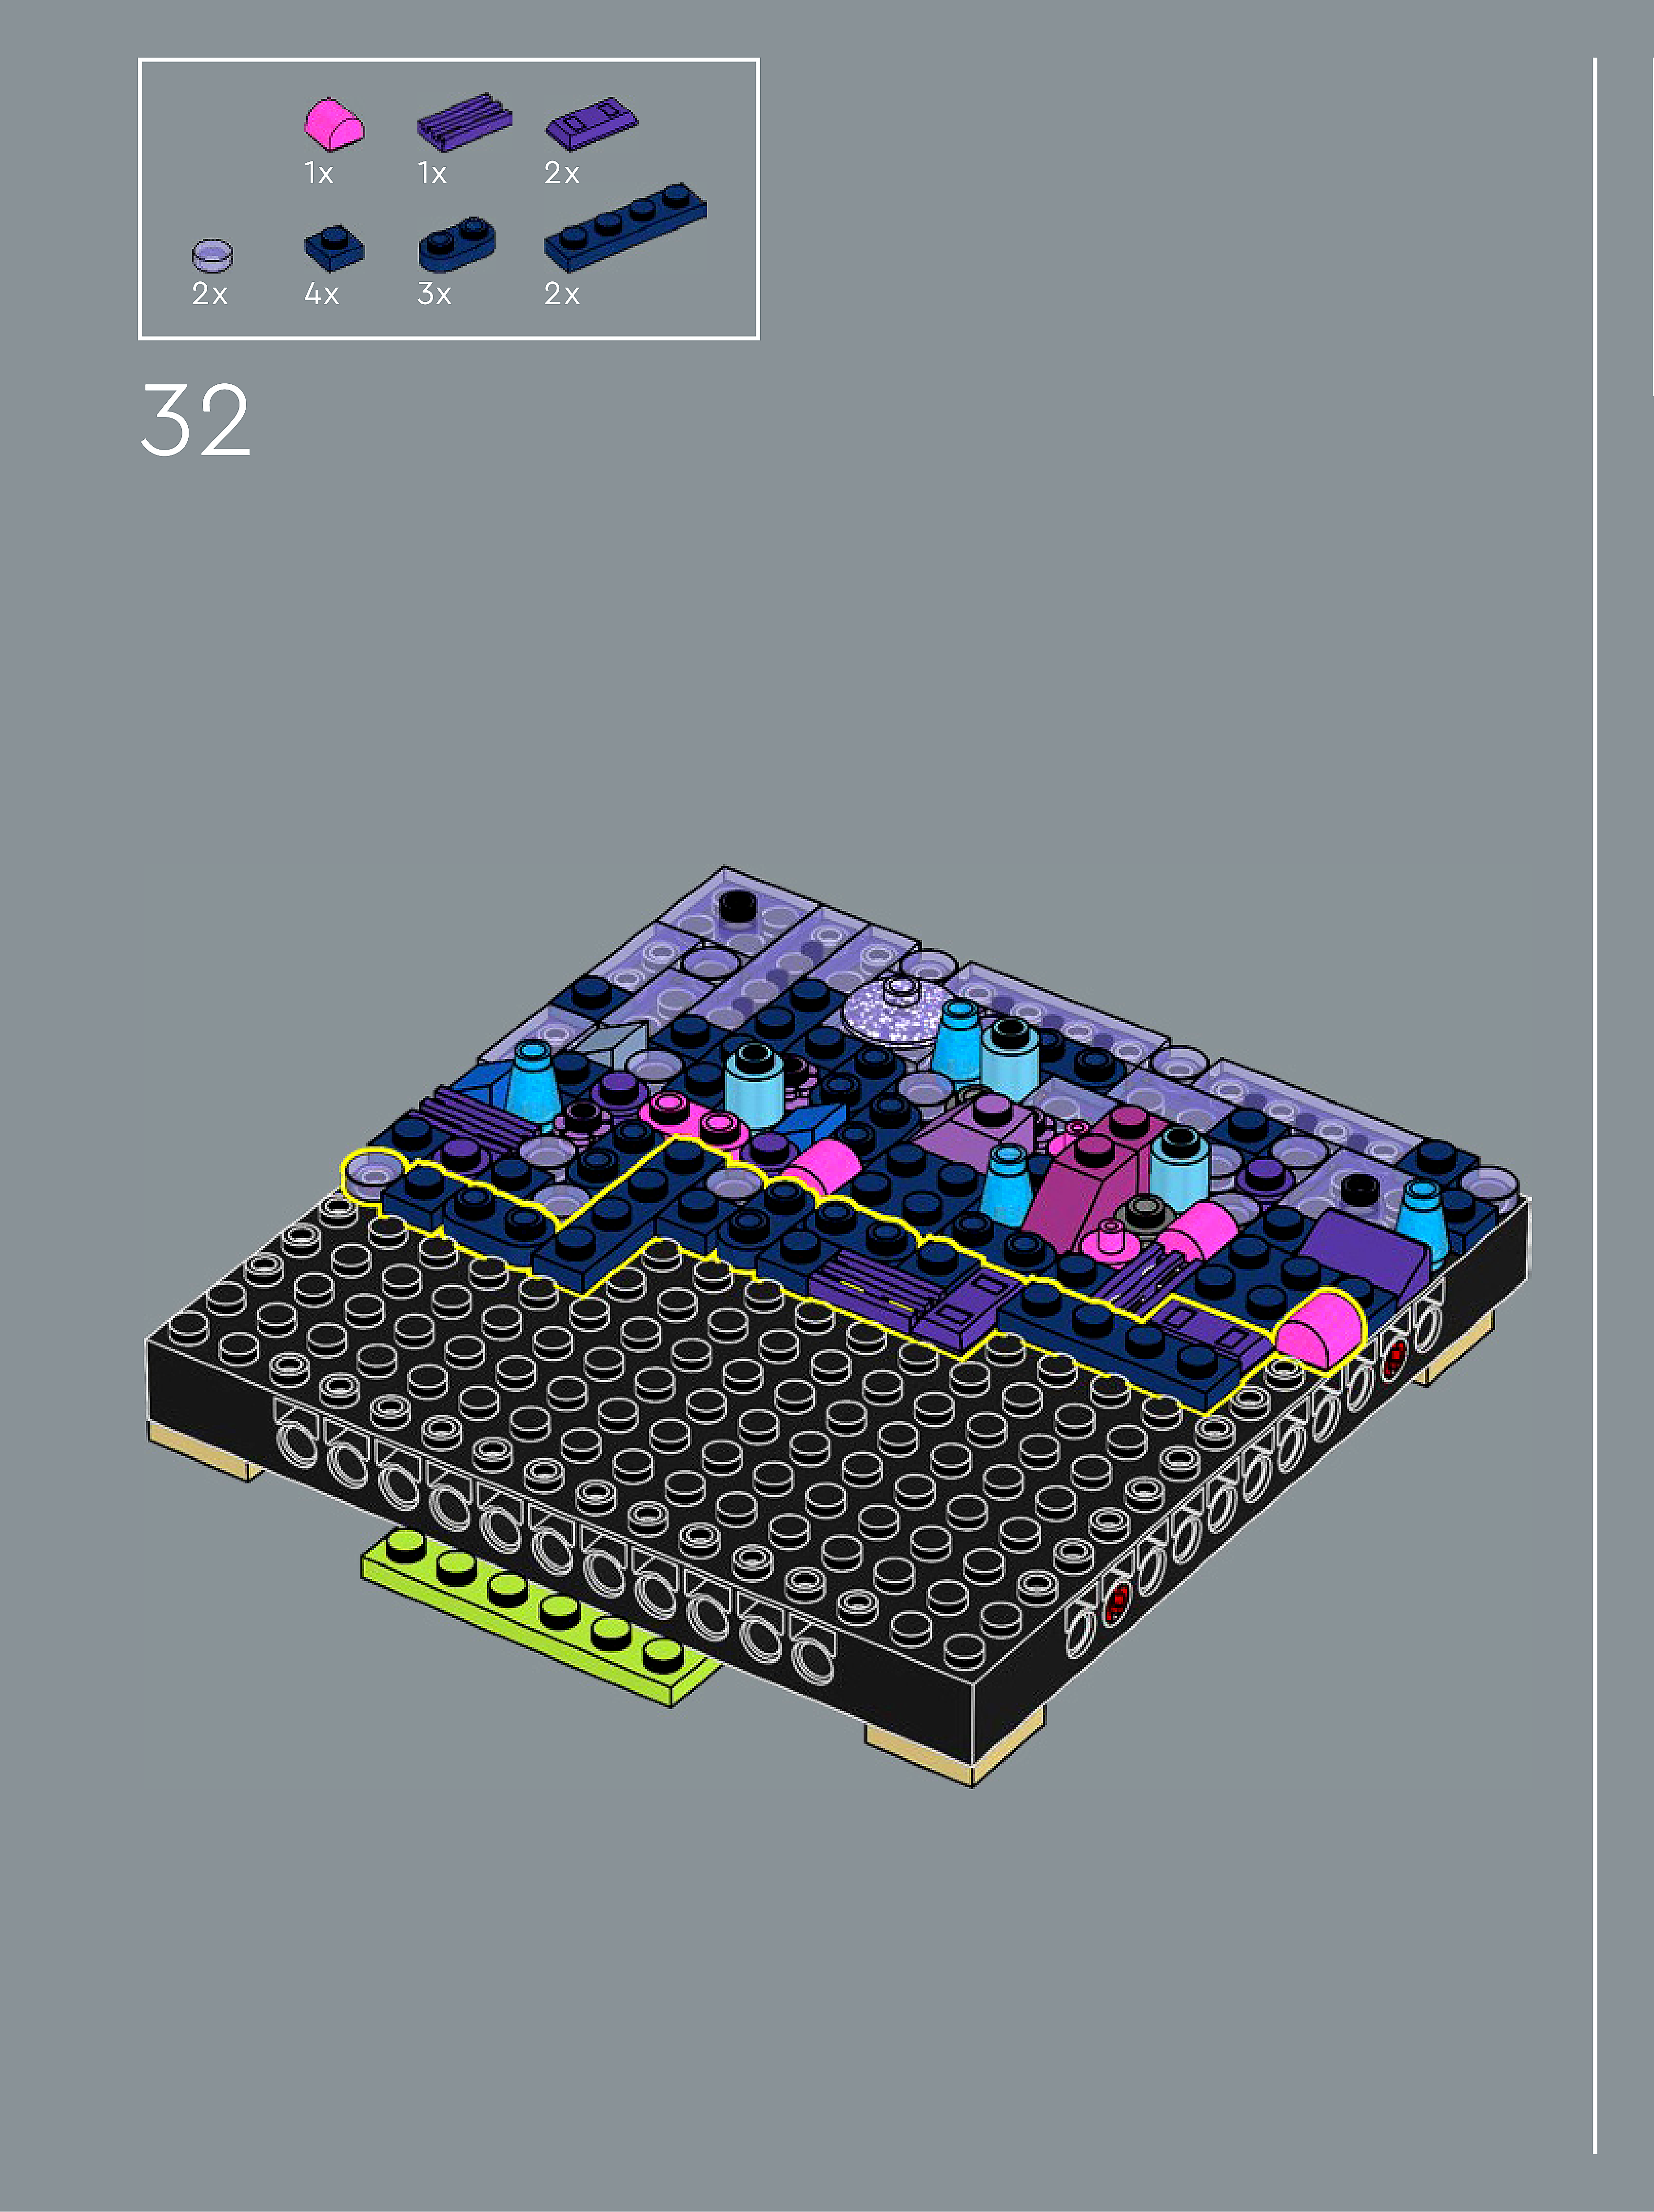
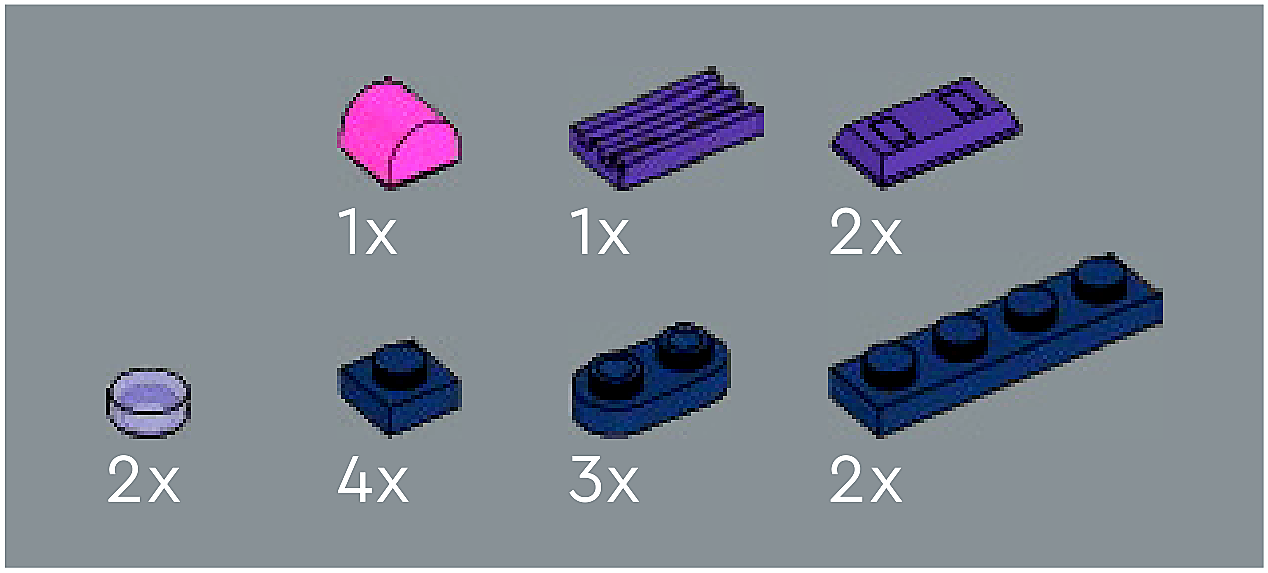
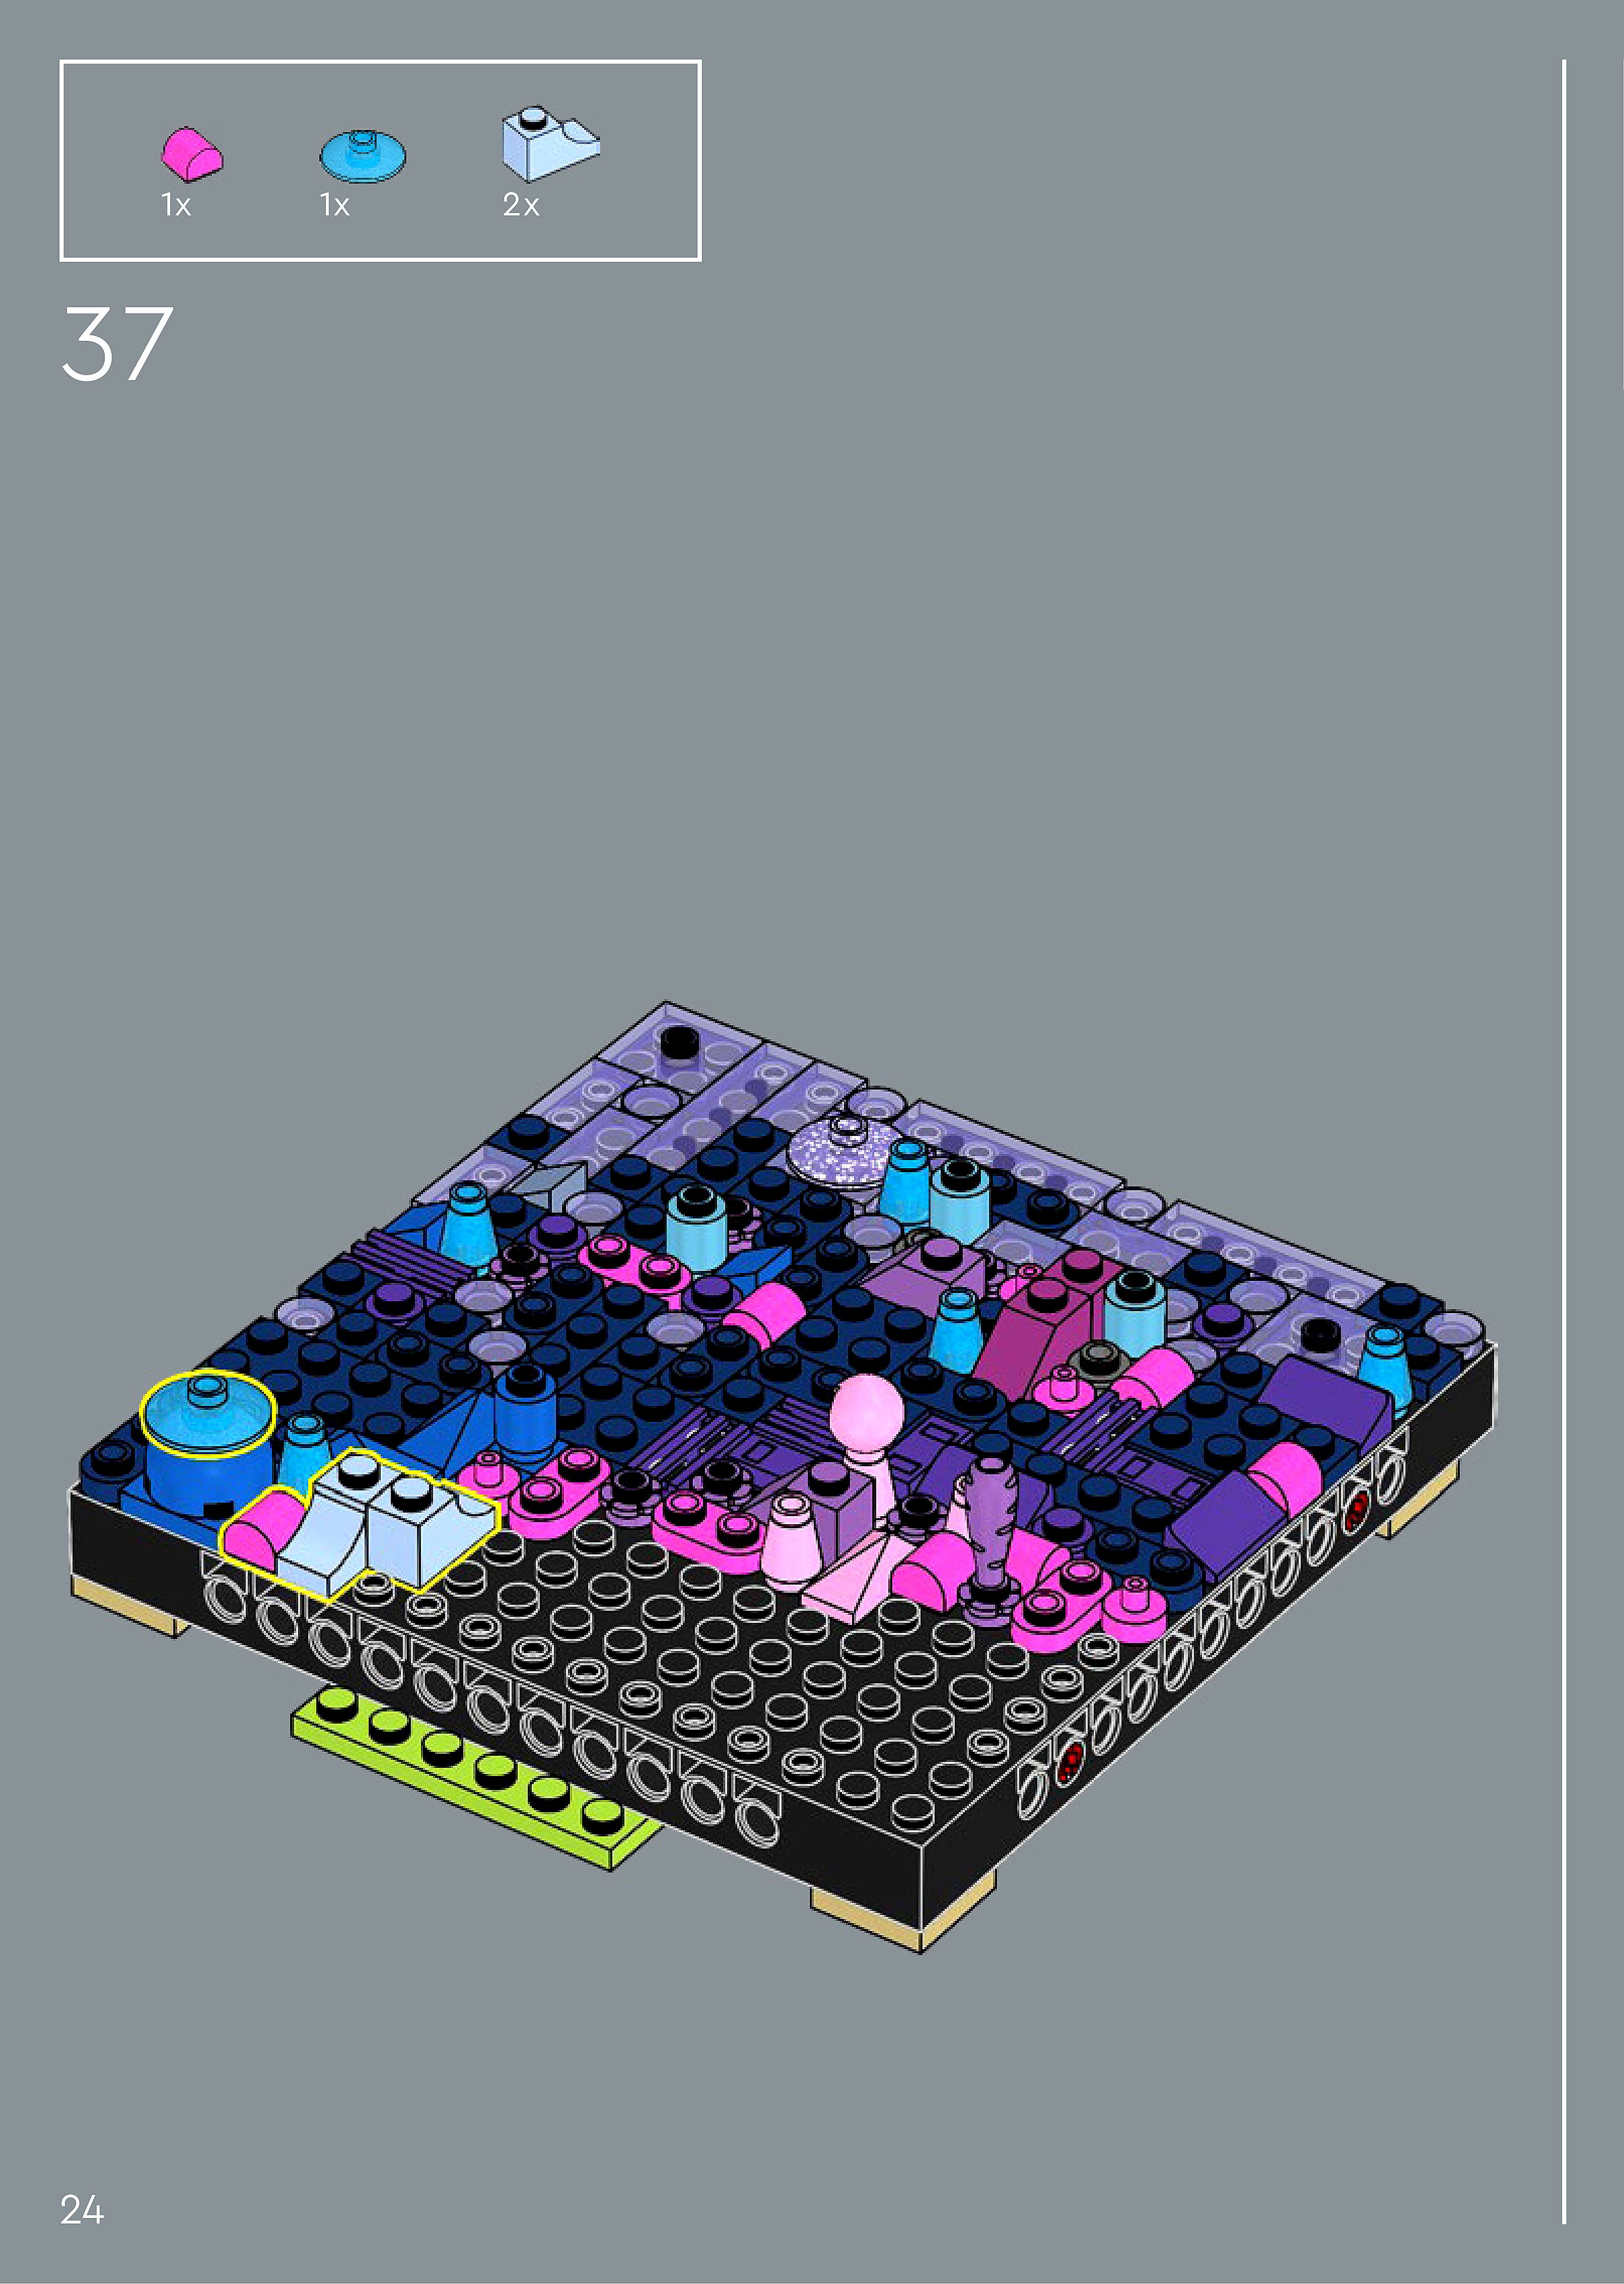
Step 4
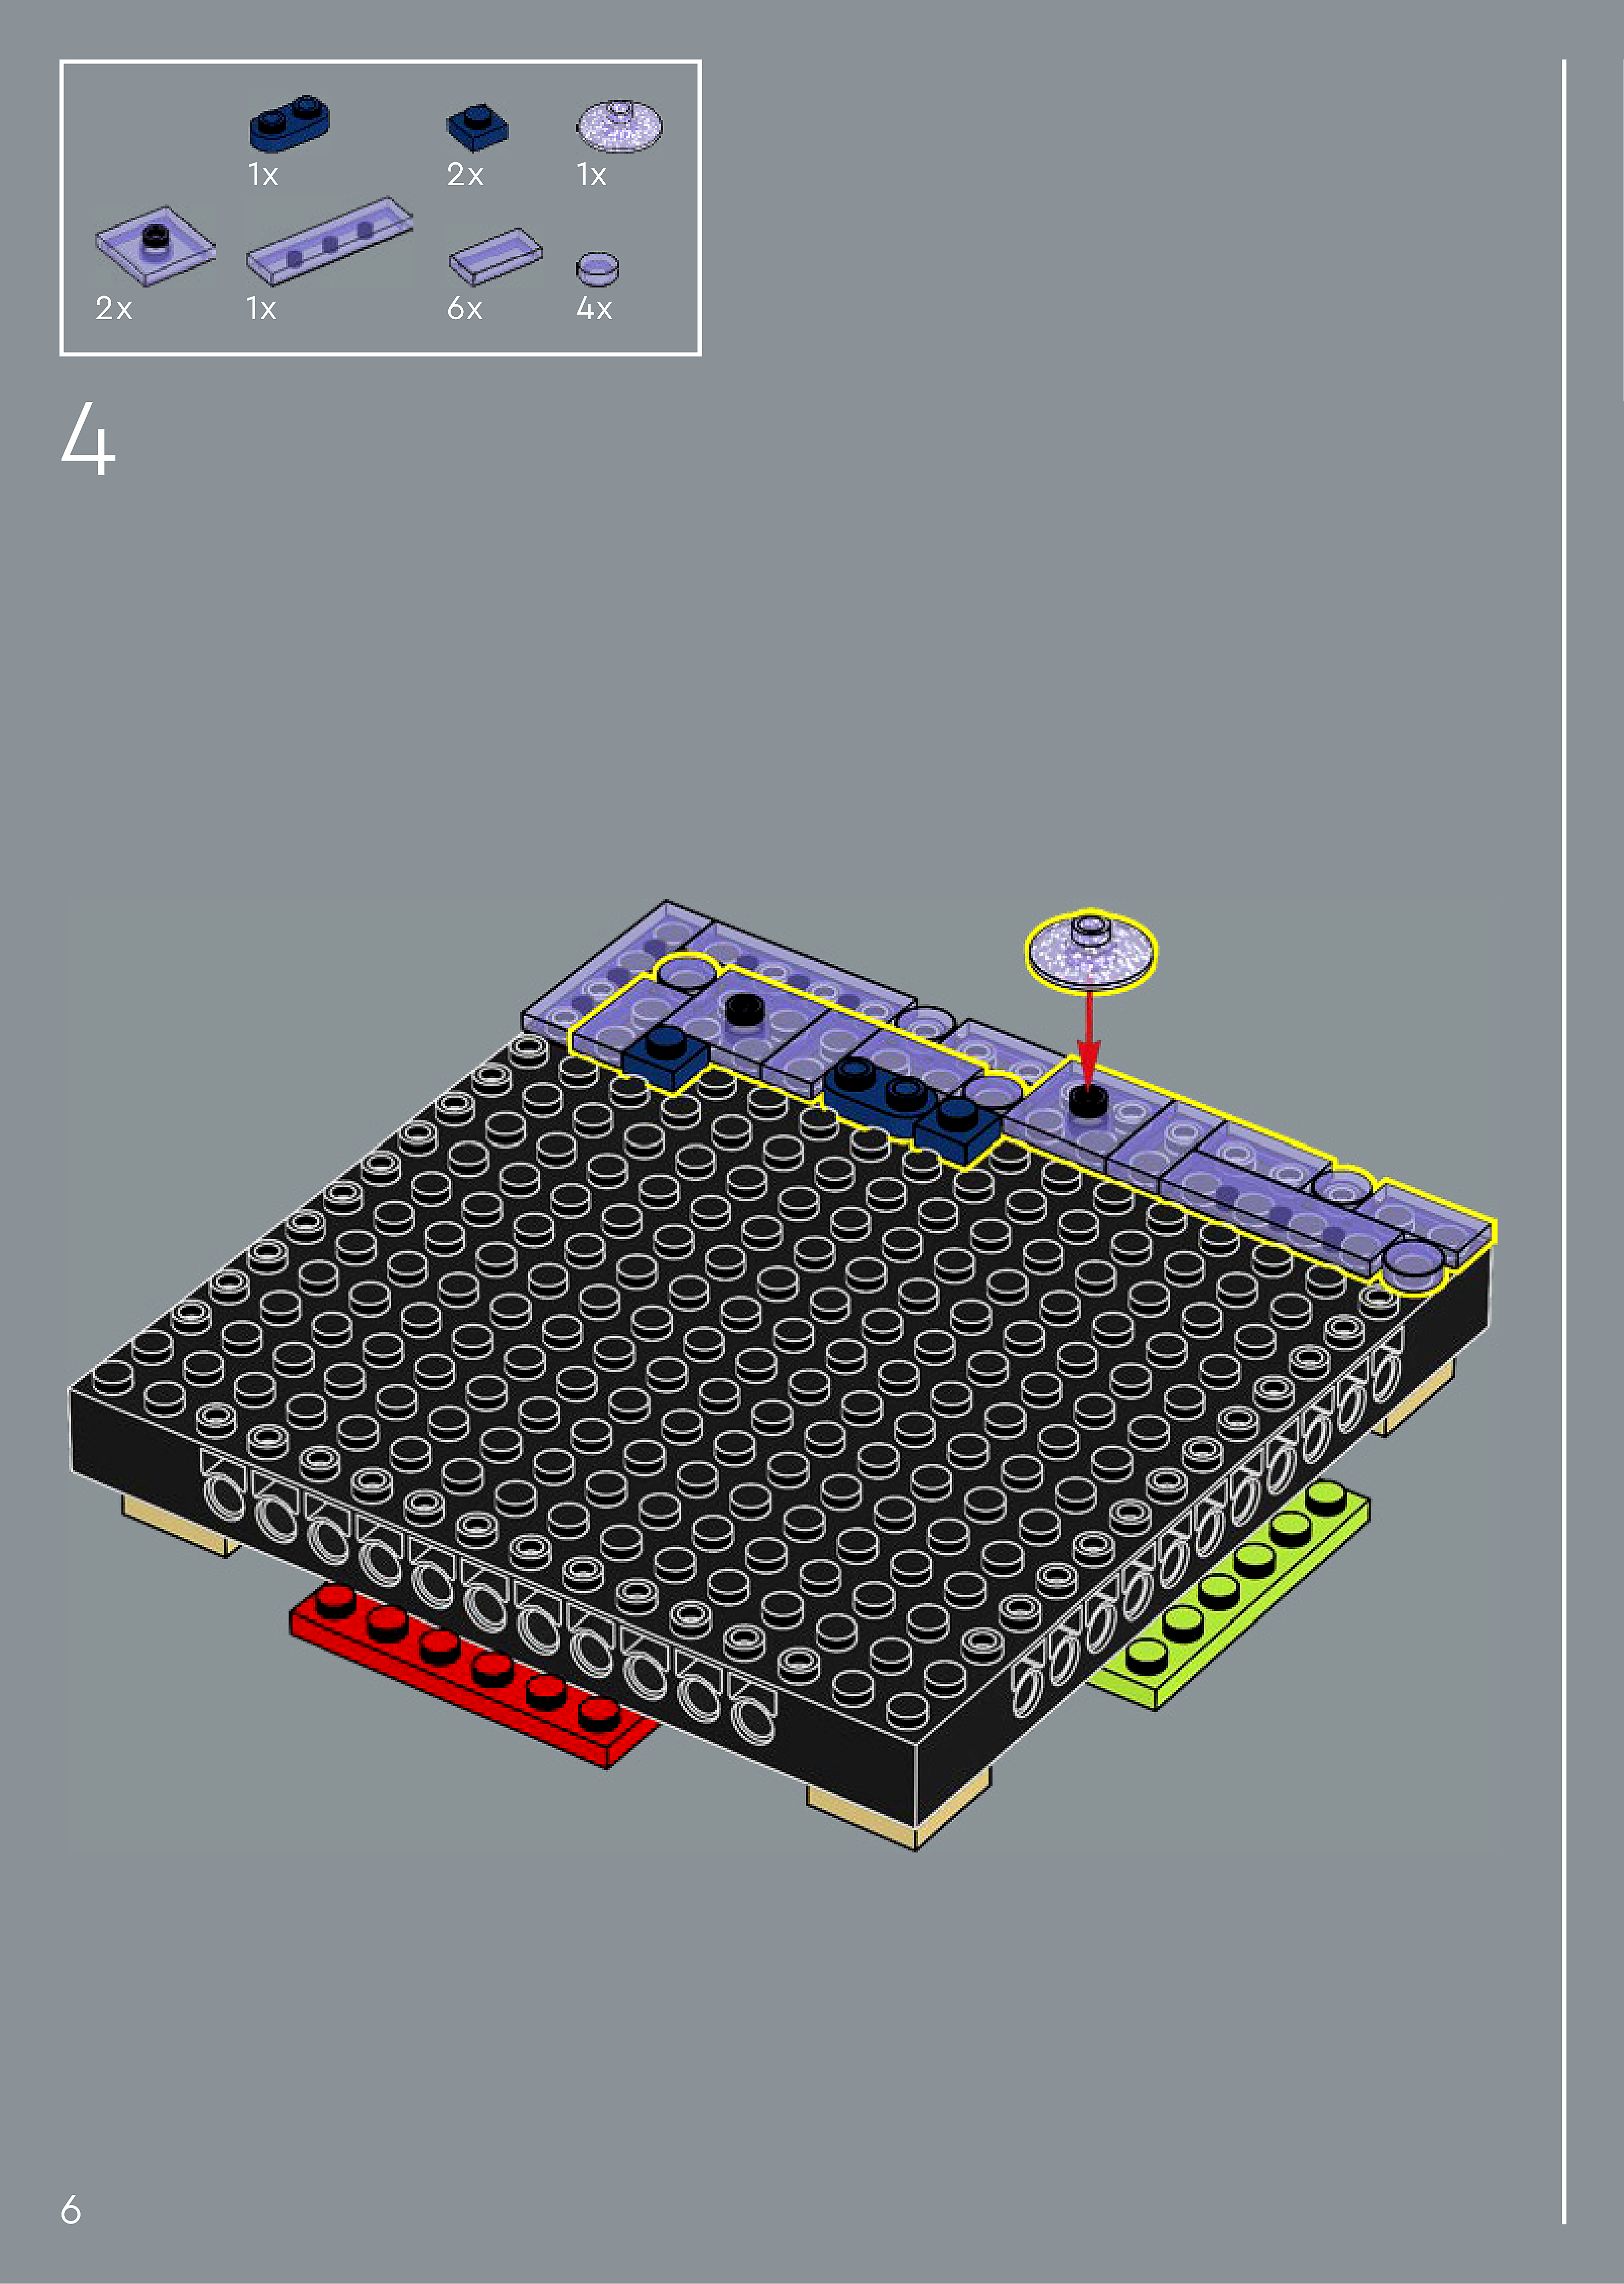
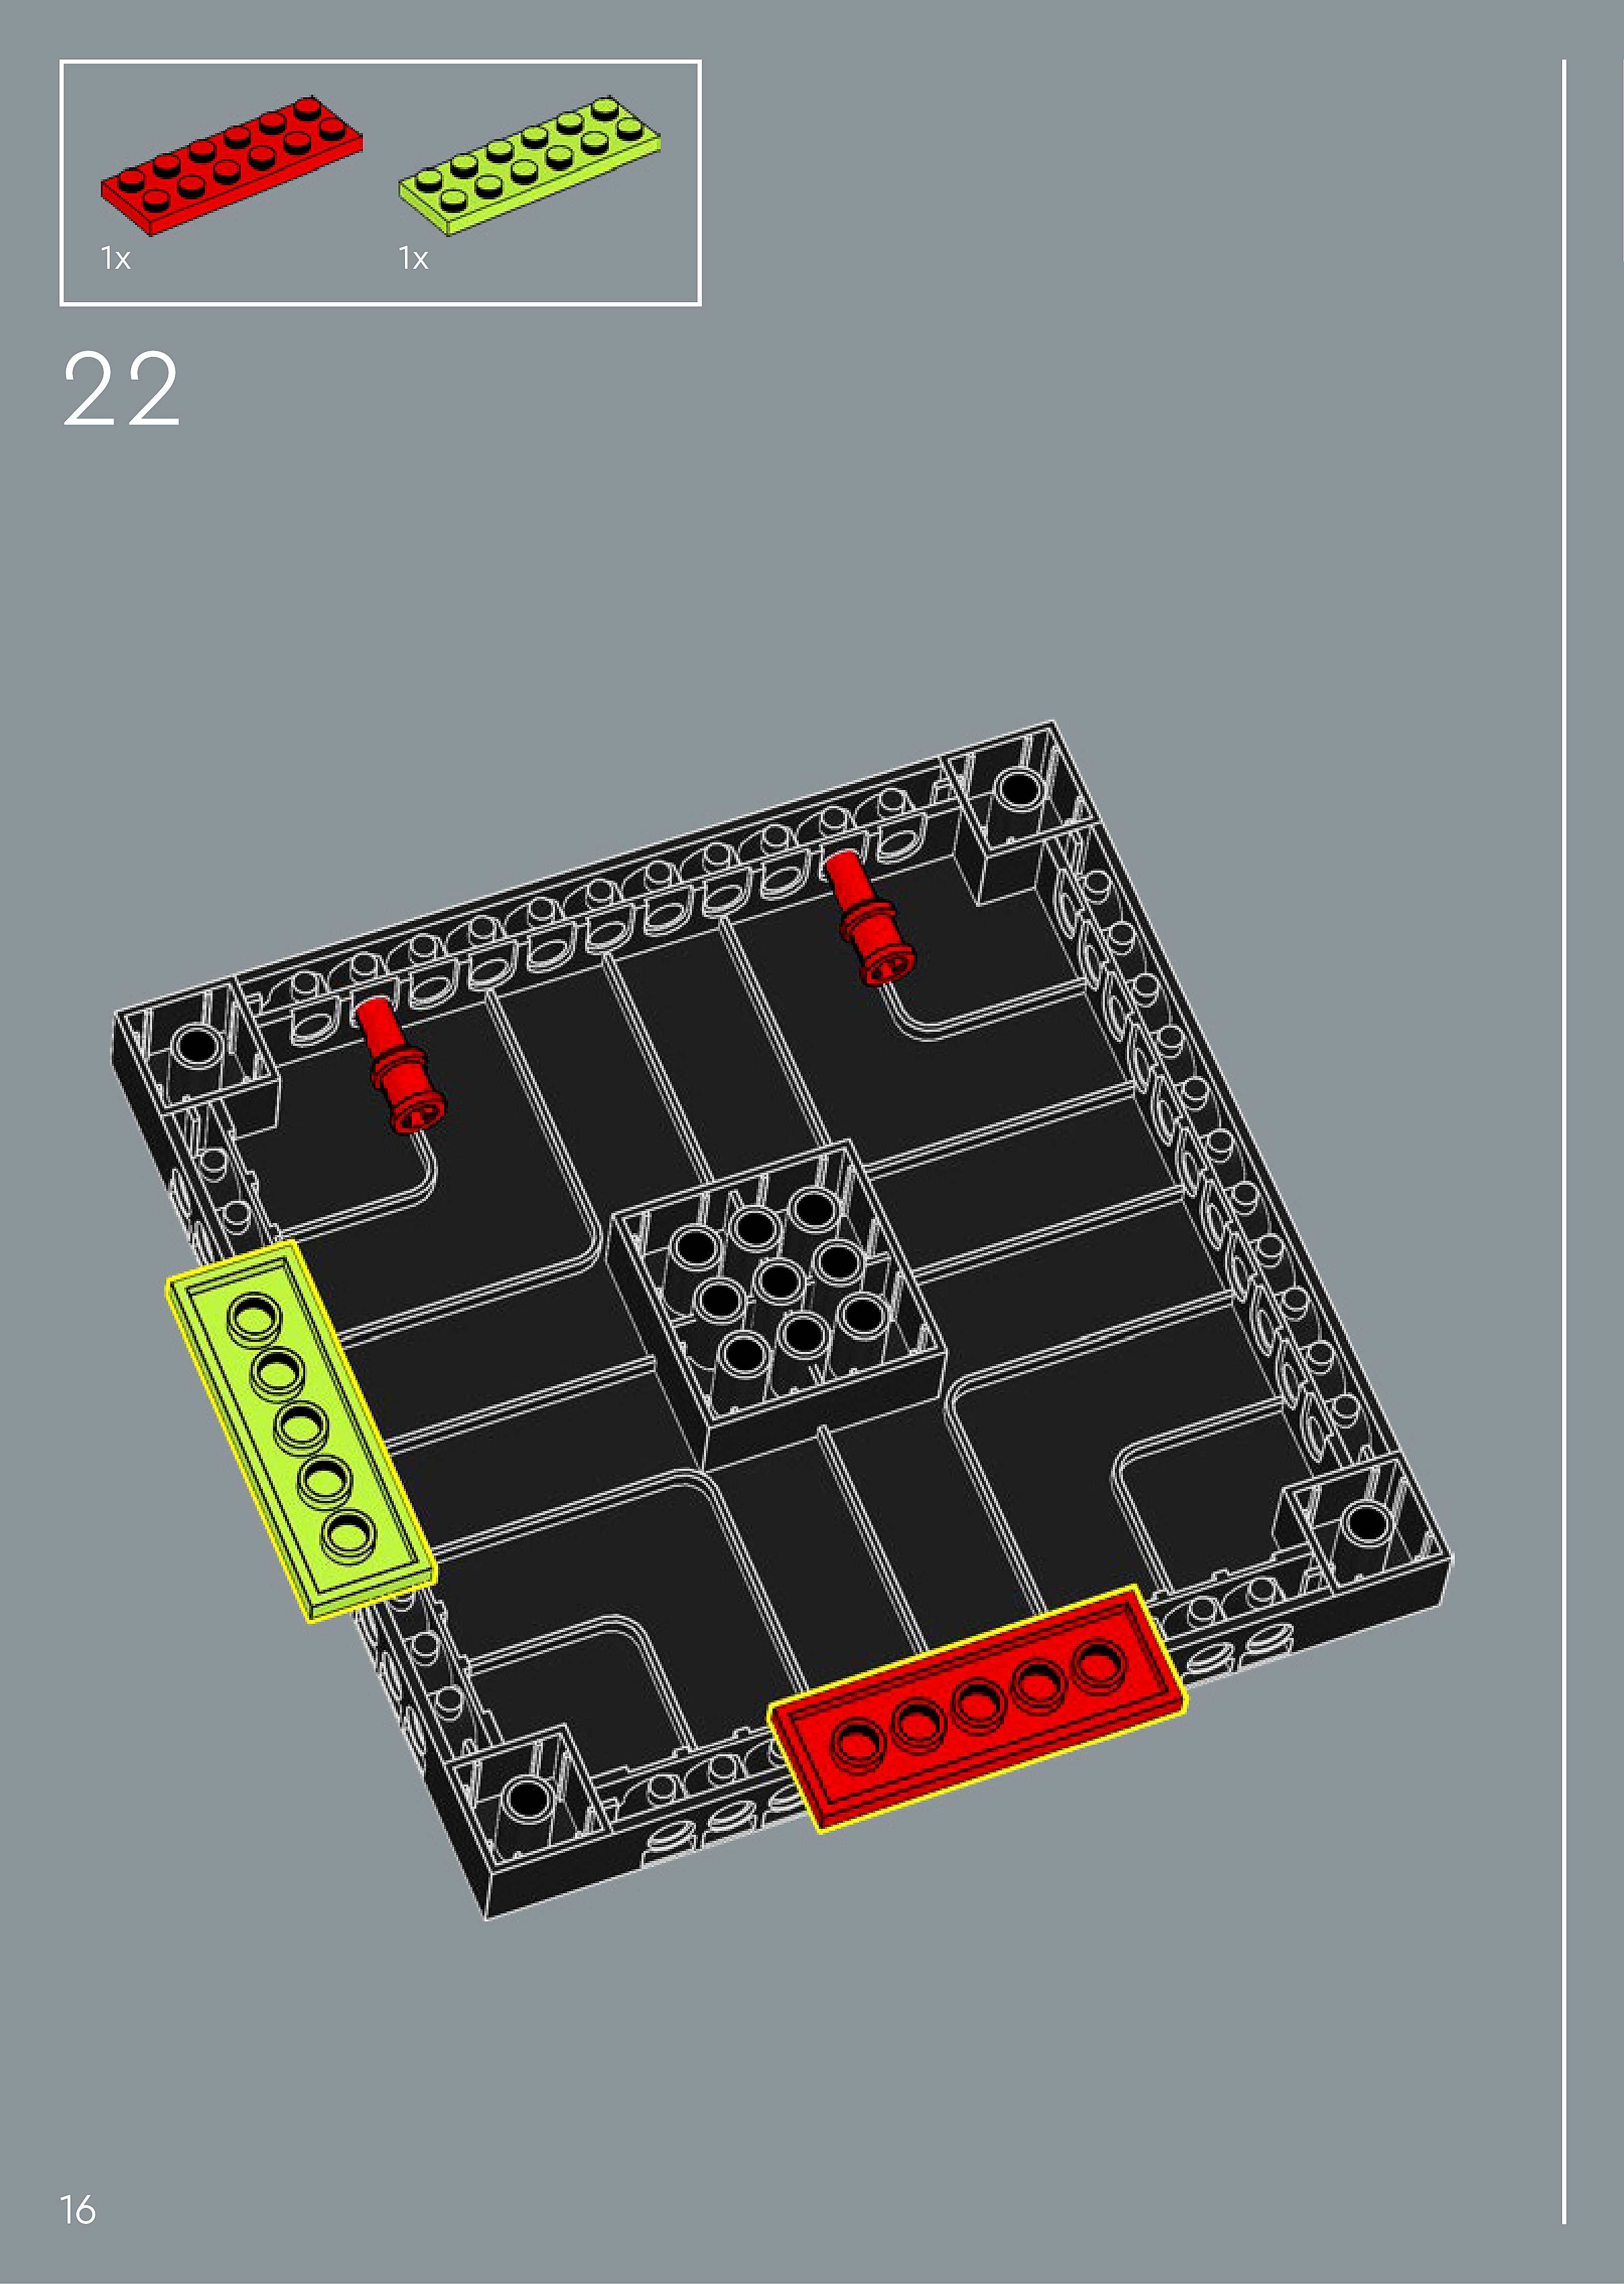
Assembly — page 3

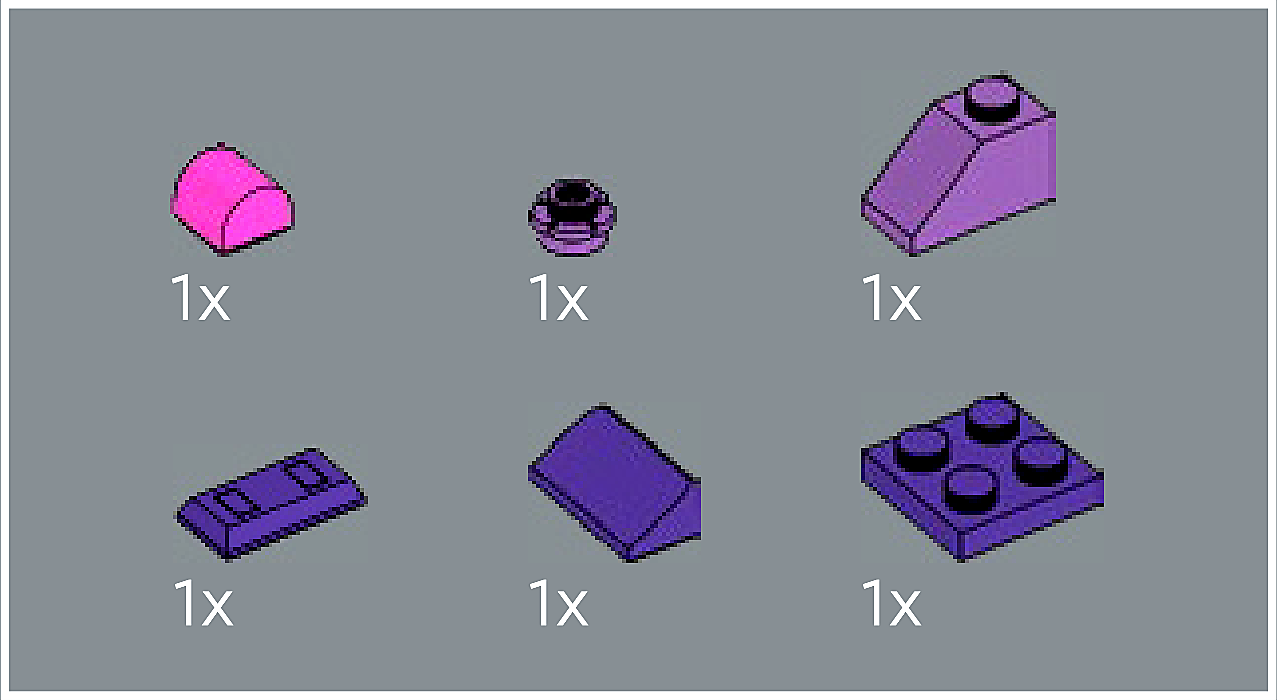
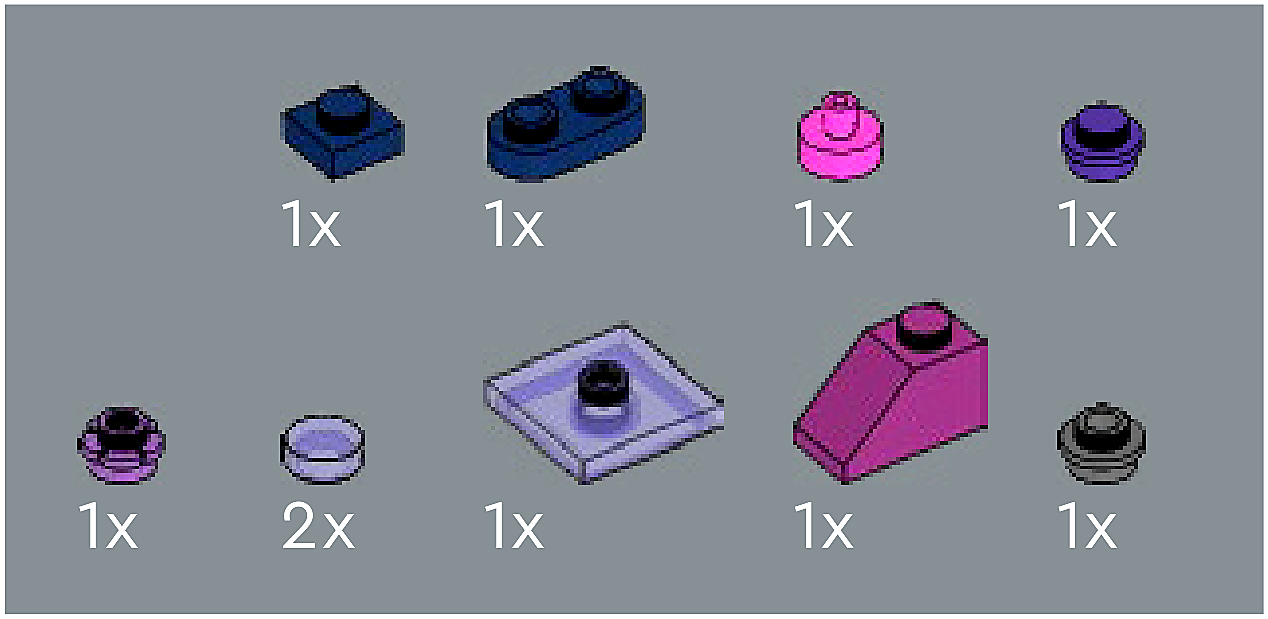
Inset — page 3
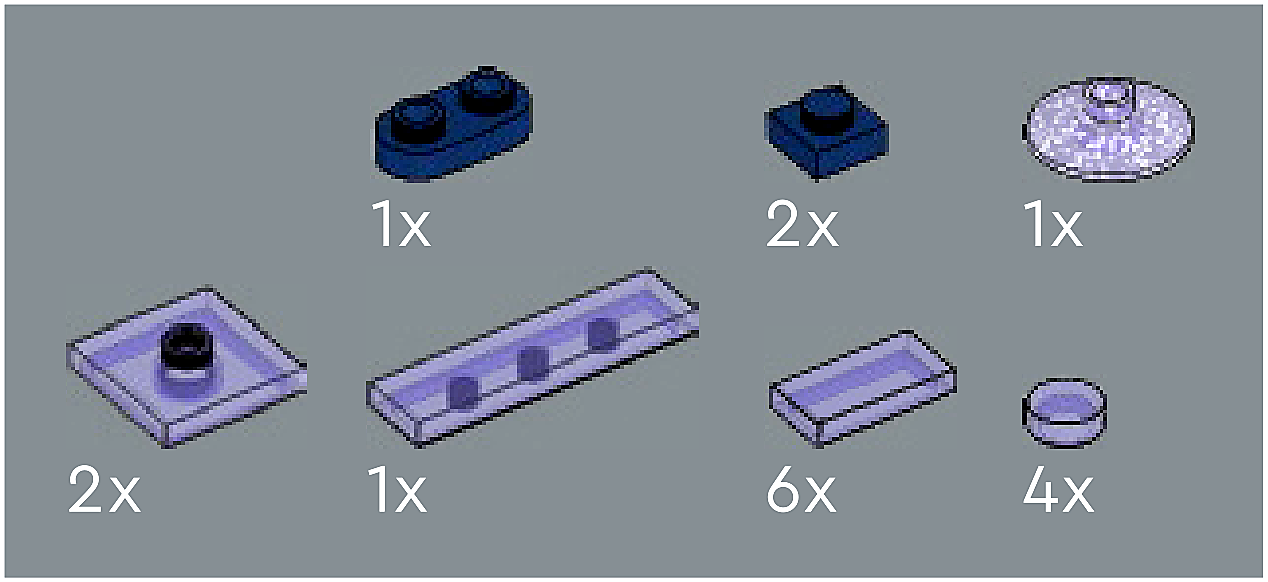
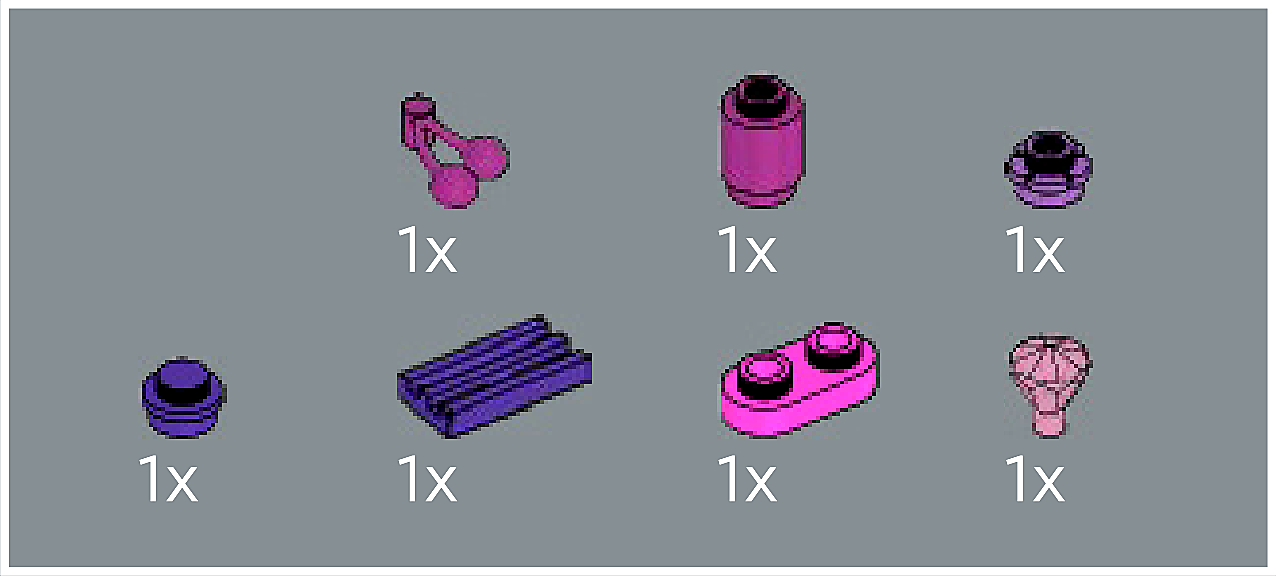
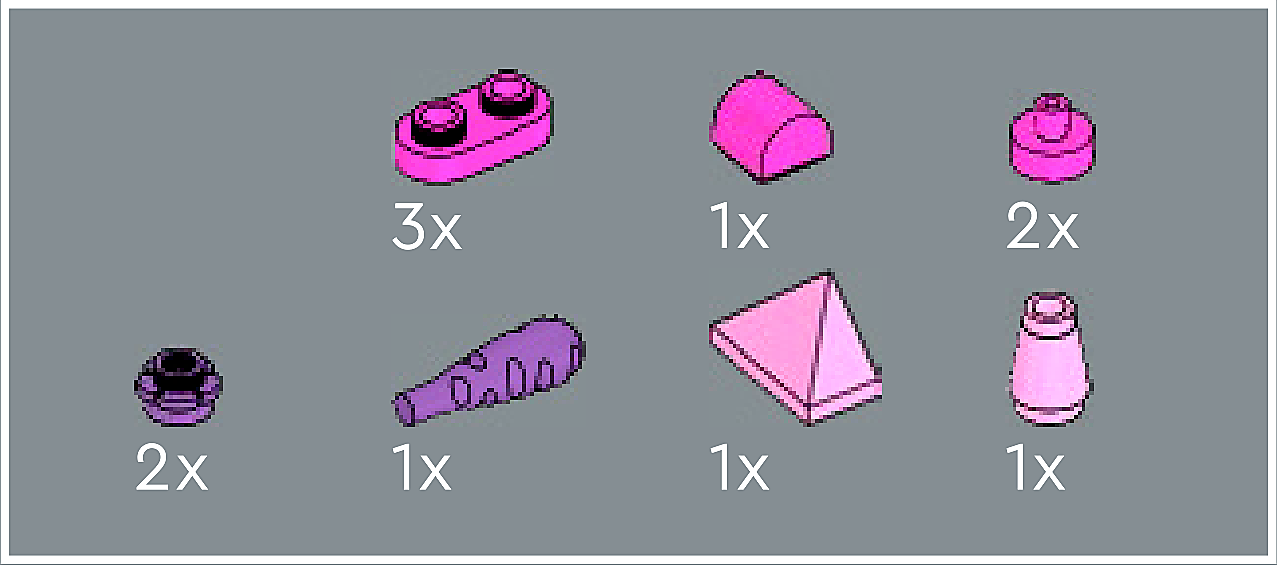
Phase 2 — Pieces
What do I do here?
Look at the inset image above. Check that the AI has correctly identified each piece — colour, quantity, and part name. If anything is wrong, edit the table directly. Add any missing pieces using the + row button, or remove incorrect ones with ✕.
When you are satisfied that all pieces are correct, click Save Pieces. This enables Phase 3 to run for this step.
Error: Error code: 400 - {'type': 'error', 'error': {'type': 'invalid_request_error', 'message': 'messages.0.content.0.image.source.base64: image exceeds 10 MB maximum: 15161672 bytes > 10485760 bytes'}, 'request_id': 'req_011CbTXNnHDYMKmxmJi2VvY3'}
Phase 3 — Spatial placement
What do I do here?
The AI has described where each piece was placed by comparing the before and after images. Read every description carefully. Check that directions (left, right, front, back) are correct from the builder's perspective, and that stud counts are accurate.
If a description is vague, wrong, or uses the wrong direction — click Edit in that row and correct it. Once every placement description for this step is accurate, click Approve. Approval is required before the accessible prose can be generated.
This is the most important phase — a blind builder will follow these descriptions precisely.
Not yet extracted.
Phase 4 — Accessible prose
What do I do here?
This step is completed by the builder, not the sighted reviewer. The app generates an accessible prose paragraph from the approved Phase 3 descriptions. No action is needed from you here — your work is done once Phase 3 is approved.
Not yet generated. Complete Phase 3 and approve placement first.
Step 5

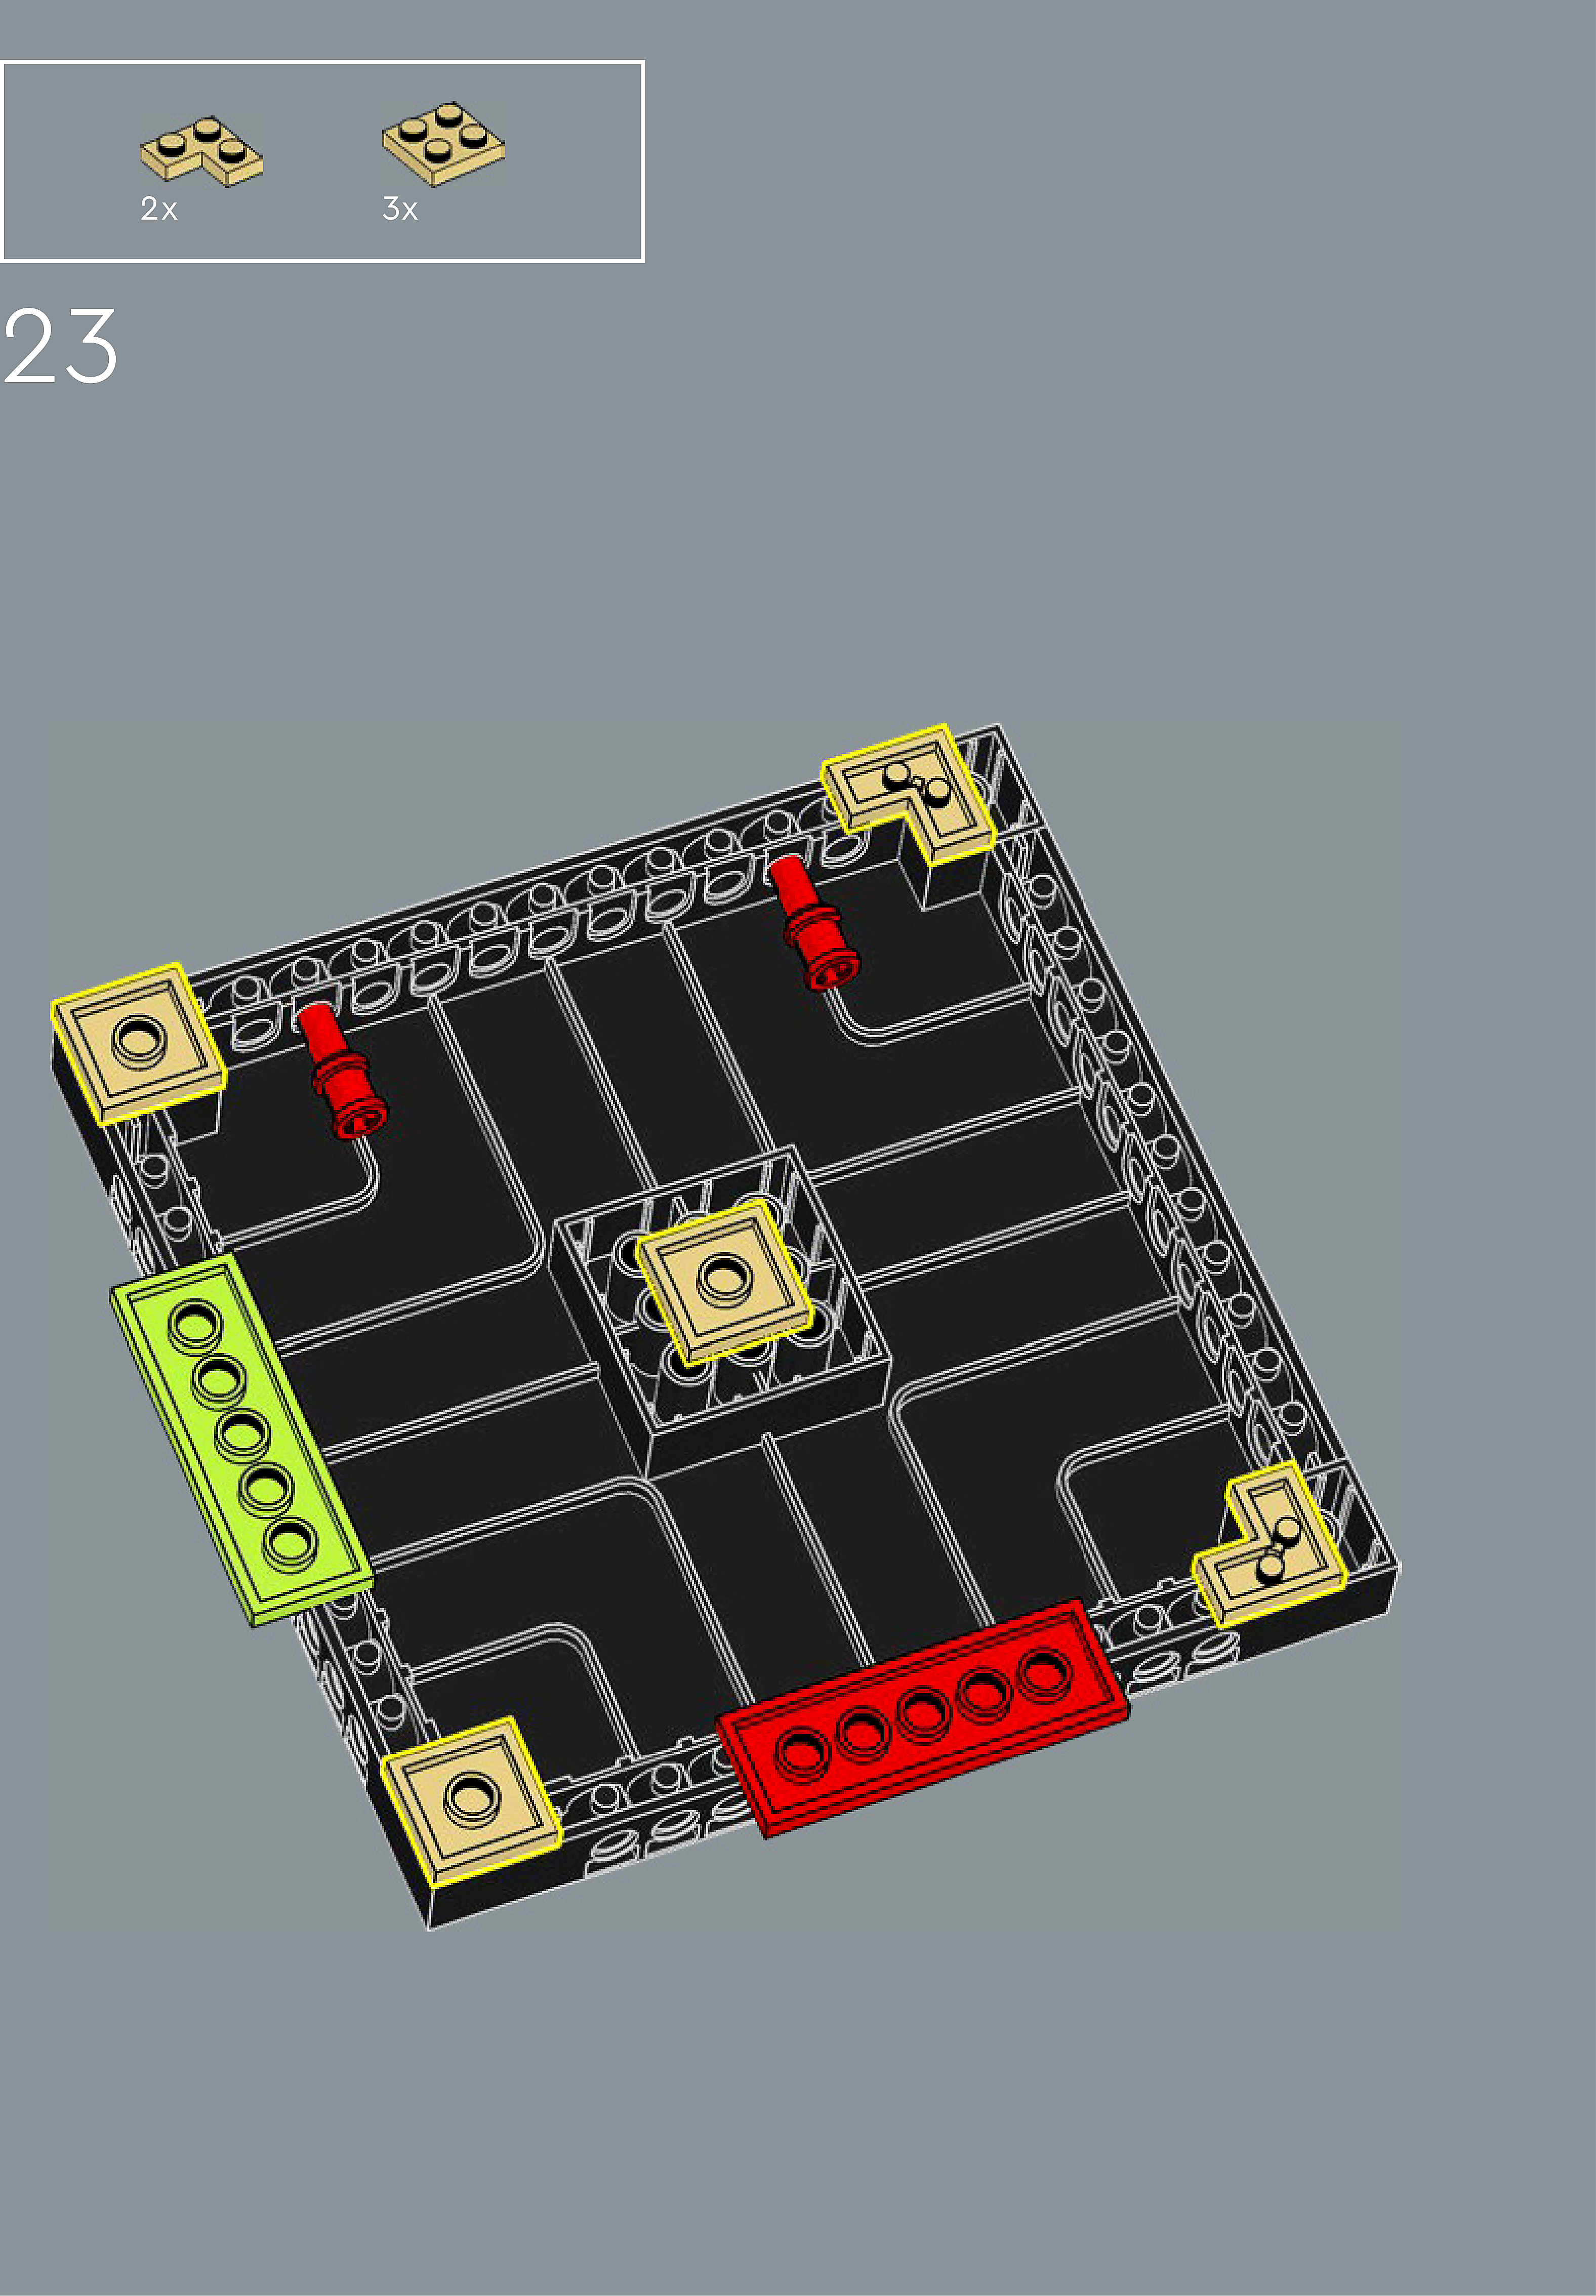
Assembly — page 3

Inset — page 3
Phase 2 — Pieces
What do I do here?
Look at the inset image above. Check that the AI has correctly identified each piece — colour, quantity, and part name. If anything is wrong, edit the table directly. Add any missing pieces using the + row button, or remove incorrect ones with ✕.
When you are satisfied that all pieces are correct, click Save Pieces. This enables Phase 3 to run for this step.
Error: Error code: 400 - {'type': 'error', 'error': {'type': 'invalid_request_error', 'message': 'messages.0.content.0.image.source.base64: image exceeds 10 MB maximum: 15161672 bytes > 10485760 bytes'}, 'request_id': 'req_011CbTXNxvBZUMtbV7qqNNXx'}
Phase 3 — Spatial placement
What do I do here?
The AI has described where each piece was placed by comparing the before and after images. Read every description carefully. Check that directions (left, right, front, back) are correct from the builder's perspective, and that stud counts are accurate.
If a description is vague, wrong, or uses the wrong direction — click Edit in that row and correct it. Once every placement description for this step is accurate, click Approve. Approval is required before the accessible prose can be generated.
This is the most important phase — a blind builder will follow these descriptions precisely.
Not yet extracted.
Phase 4 — Accessible prose
What do I do here?
This step is completed by the builder, not the sighted reviewer. The app generates an accessible prose paragraph from the approved Phase 3 descriptions. No action is needed from you here — your work is done once Phase 3 is approved.
Not yet generated. Complete Phase 3 and approve placement first.
Step 6

Assembly — page 3

Inset — page 3
Phase 2 — Pieces
What do I do here?
Look at the inset image above. Check that the AI has correctly identified each piece — colour, quantity, and part name. If anything is wrong, edit the table directly. Add any missing pieces using the + row button, or remove incorrect ones with ✕.
When you are satisfied that all pieces are correct, click Save Pieces. This enables Phase 3 to run for this step.
Error: Error code: 400 - {'type': 'error', 'error': {'type': 'invalid_request_error', 'message': 'messages.0.content.0.image.source.base64: image exceeds 10 MB maximum: 15161672 bytes > 10485760 bytes'}, 'request_id': 'req_011CbTXP9UvoakSpVH85rWgF'}
Phase 3 — Spatial placement
What do I do here?
The AI has described where each piece was placed by comparing the before and after images. Read every description carefully. Check that directions (left, right, front, back) are correct from the builder's perspective, and that stud counts are accurate.
If a description is vague, wrong, or uses the wrong direction — click Edit in that row and correct it. Once every placement description for this step is accurate, click Approve. Approval is required before the accessible prose can be generated.
This is the most important phase — a blind builder will follow these descriptions precisely.
Not yet extracted.
Phase 4 — Accessible prose
What do I do here?
This step is completed by the builder, not the sighted reviewer. The app generates an accessible prose paragraph from the approved Phase 3 descriptions. No action is needed from you here — your work is done once Phase 3 is approved.
Not yet generated. Complete Phase 3 and approve placement first.
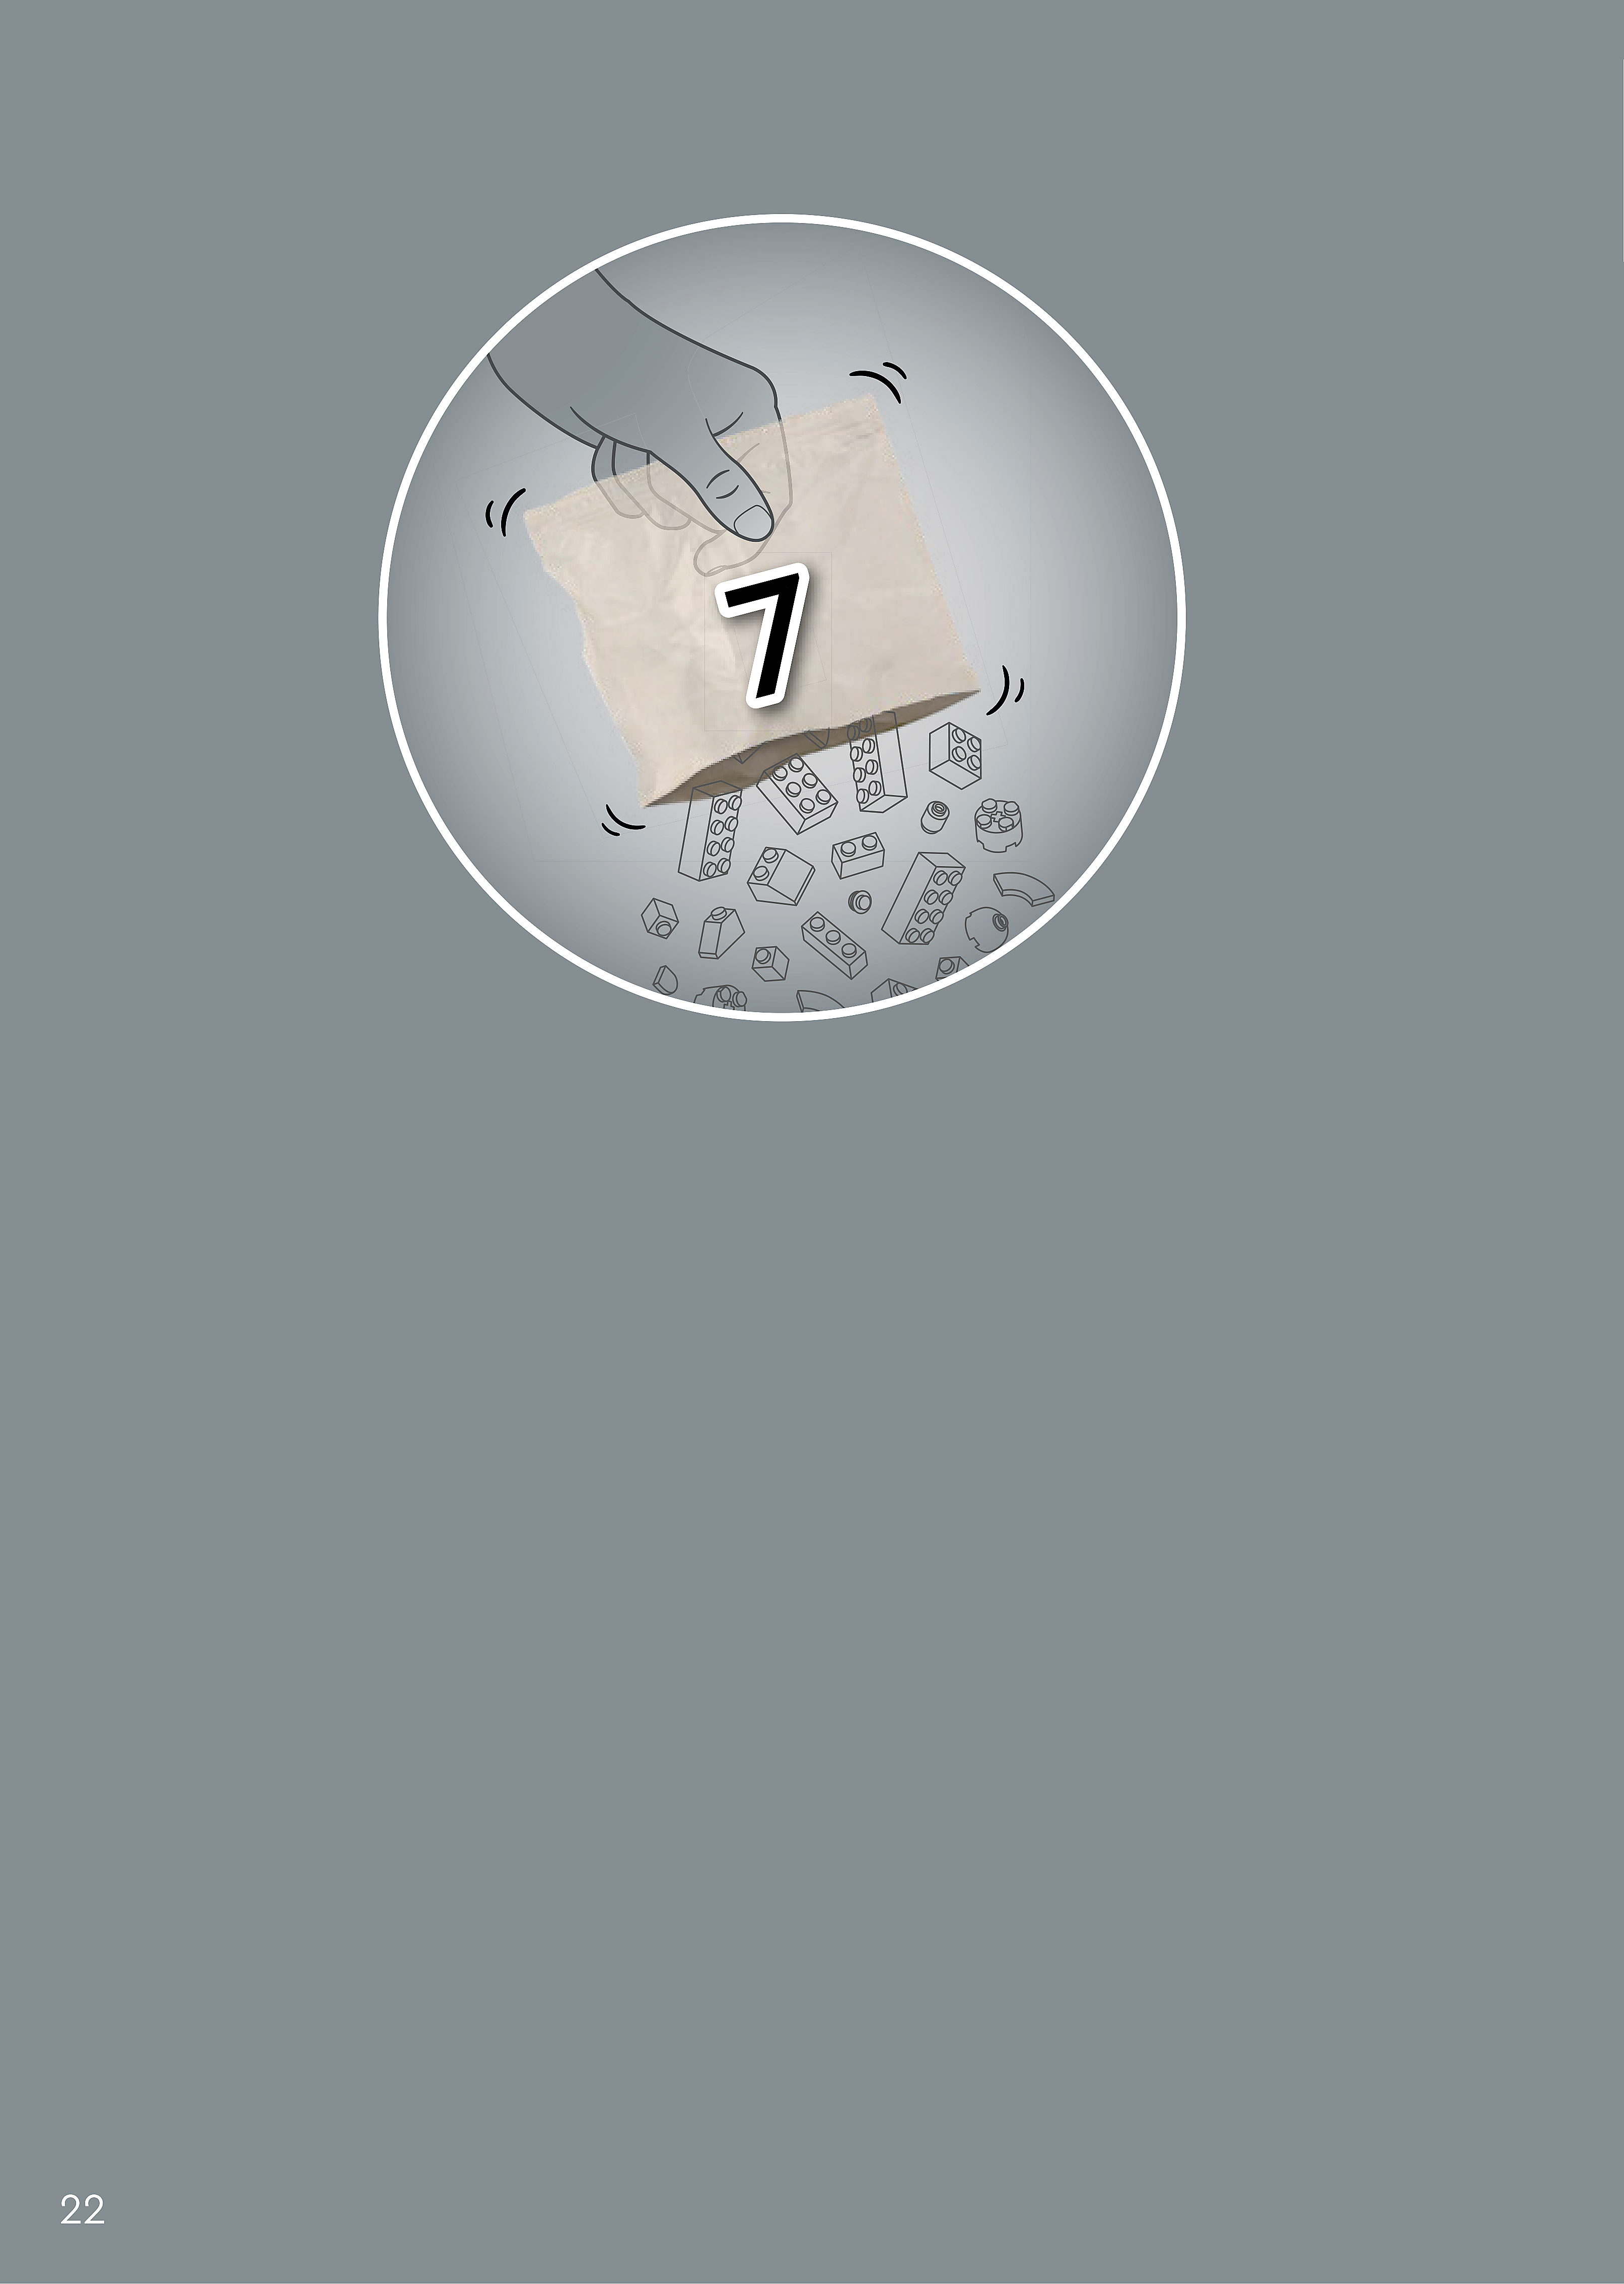
Step 7

Assembly — page 3
Inset — page 3
Phase 2 — Pieces
What do I do here?
Look at the inset image above. Check that the AI has correctly identified each piece — colour, quantity, and part name. If anything is wrong, edit the table directly. Add any missing pieces using the + row button, or remove incorrect ones with ✕.
When you are satisfied that all pieces are correct, click Save Pieces. This enables Phase 3 to run for this step.
Error: Error code: 400 - {'type': 'error', 'error': {'type': 'invalid_request_error', 'message': 'messages.0.content.0.image.source.base64: image exceeds 10 MB maximum: 15161672 bytes > 10485760 bytes'}, 'request_id': 'req_011CbTXPKcNtJK3hiayFtCZt'}
Phase 3 — Spatial placement
What do I do here?
The AI has described where each piece was placed by comparing the before and after images. Read every description carefully. Check that directions (left, right, front, back) are correct from the builder's perspective, and that stud counts are accurate.
If a description is vague, wrong, or uses the wrong direction — click Edit in that row and correct it. Once every placement description for this step is accurate, click Approve. Approval is required before the accessible prose can be generated.
This is the most important phase — a blind builder will follow these descriptions precisely.
Not yet extracted.
Phase 4 — Accessible prose
What do I do here?
This step is completed by the builder, not the sighted reviewer. The app generates an accessible prose paragraph from the approved Phase 3 descriptions. No action is needed from you here — your work is done once Phase 3 is approved.
Not yet generated. Complete Phase 3 and approve placement first.
Step 8
Assembly — page 3

Inset — page 3
Phase 2 — Pieces
What do I do here?
Look at the inset image above. Check that the AI has correctly identified each piece — colour, quantity, and part name. If anything is wrong, edit the table directly. Add any missing pieces using the + row button, or remove incorrect ones with ✕.
When you are satisfied that all pieces are correct, click Save Pieces. This enables Phase 3 to run for this step.
Error: Error code: 400 - {'type': 'error', 'error': {'type': 'invalid_request_error', 'message': 'messages.0.content.0.image.source.base64: image exceeds 10 MB maximum: 15161672 bytes > 10485760 bytes'}, 'request_id': 'req_011CbTXPWFqRvL2oDHQ3mApc'}
Phase 3 — Spatial placement
What do I do here?
The AI has described where each piece was placed by comparing the before and after images. Read every description carefully. Check that directions (left, right, front, back) are correct from the builder's perspective, and that stud counts are accurate.
If a description is vague, wrong, or uses the wrong direction — click Edit in that row and correct it. Once every placement description for this step is accurate, click Approve. Approval is required before the accessible prose can be generated.
This is the most important phase — a blind builder will follow these descriptions precisely.
Not yet extracted.
Phase 4 — Accessible prose
What do I do here?
This step is completed by the builder, not the sighted reviewer. The app generates an accessible prose paragraph from the approved Phase 3 descriptions. No action is needed from you here — your work is done once Phase 3 is approved.
Not yet generated. Complete Phase 3 and approve placement first.
Build 2
Step 1
Assembly — page 4

Inset — page 4
Phase 2 — Pieces
What do I do here?
Look at the inset image above. Check that the AI has correctly identified each piece — colour, quantity, and part name. If anything is wrong, edit the table directly. Add any missing pieces using the + row button, or remove incorrect ones with ✕.
When you are satisfied that all pieces are correct, click Save Pieces. This enables Phase 3 to run for this step.
| Qty | Colour | Part name | Part # | |
|---|---|---|---|---|
Phase 3 — Spatial placement
What do I do here?
The AI has described where each piece was placed by comparing the before and after images. Read every description carefully. Check that directions (left, right, front, back) are correct from the builder's perspective, and that stud counts are accurate.
If a description is vague, wrong, or uses the wrong direction — click Edit in that row and correct it. Once every placement description for this step is accurate, click Approve. Approval is required before the accessible prose can be generated.
This is the most important phase — a blind builder will follow these descriptions precisely.
Not yet extracted.
Phase 4 — Accessible prose
What do I do here?
This step is completed by the builder, not the sighted reviewer. The app generates an accessible prose paragraph from the approved Phase 3 descriptions. No action is needed from you here — your work is done once Phase 3 is approved.
Not yet generated. Complete Phase 3 and approve placement first.
Step 4
Assembly — page 4
Inset — page 4
Phase 2 — Pieces
What do I do here?
Look at the inset image above. Check that the AI has correctly identified each piece — colour, quantity, and part name. If anything is wrong, edit the table directly. Add any missing pieces using the + row button, or remove incorrect ones with ✕.
When you are satisfied that all pieces are correct, click Save Pieces. This enables Phase 3 to run for this step.
| Qty | Colour | Part name | Part # | |
|---|---|---|---|---|
Phase 3 — Spatial placement
What do I do here?
The AI has described where each piece was placed by comparing the before and after images. Read every description carefully. Check that directions (left, right, front, back) are correct from the builder's perspective, and that stud counts are accurate.
If a description is vague, wrong, or uses the wrong direction — click Edit in that row and correct it. Once every placement description for this step is accurate, click Approve. Approval is required before the accessible prose can be generated.
This is the most important phase — a blind builder will follow these descriptions precisely.
Not yet extracted.
Phase 4 — Accessible prose
What do I do here?
This step is completed by the builder, not the sighted reviewer. The app generates an accessible prose paragraph from the approved Phase 3 descriptions. No action is needed from you here — your work is done once Phase 3 is approved.
Not yet generated. Complete Phase 3 and approve placement first.
Build 3
Step 2

Assembly — page 5
Inset — page 5
Phase 2 — Pieces
What do I do here?
Look at the inset image above. Check that the AI has correctly identified each piece — colour, quantity, and part name. If anything is wrong, edit the table directly. Add any missing pieces using the + row button, or remove incorrect ones with ✕.
When you are satisfied that all pieces are correct, click Save Pieces. This enables Phase 3 to run for this step.
| Qty | Colour | Part name | Part # | |
|---|---|---|---|---|
Phase 3 — Spatial placement
What do I do here?
The AI has described where each piece was placed by comparing the before and after images. Read every description carefully. Check that directions (left, right, front, back) are correct from the builder's perspective, and that stud counts are accurate.
If a description is vague, wrong, or uses the wrong direction — click Edit in that row and correct it. Once every placement description for this step is accurate, click Approve. Approval is required before the accessible prose can be generated.
This is the most important phase — a blind builder will follow these descriptions precisely.
Not yet extracted.
Phase 4 — Accessible prose
What do I do here?
This step is completed by the builder, not the sighted reviewer. The app generates an accessible prose paragraph from the approved Phase 3 descriptions. No action is needed from you here — your work is done once Phase 3 is approved.
Not yet generated. Complete Phase 3 and approve placement first.
Step 3
Assembly — page 5
Inset — page 5
Phase 2 — Pieces
What do I do here?
Look at the inset image above. Check that the AI has correctly identified each piece — colour, quantity, and part name. If anything is wrong, edit the table directly. Add any missing pieces using the + row button, or remove incorrect ones with ✕.
When you are satisfied that all pieces are correct, click Save Pieces. This enables Phase 3 to run for this step.
| Qty | Colour | Part name | Part # | |
|---|---|---|---|---|
Phase 3 — Spatial placement
What do I do here?
The AI has described where each piece was placed by comparing the before and after images. Read every description carefully. Check that directions (left, right, front, back) are correct from the builder's perspective, and that stud counts are accurate.
If a description is vague, wrong, or uses the wrong direction — click Edit in that row and correct it. Once every placement description for this step is accurate, click Approve. Approval is required before the accessible prose can be generated.
This is the most important phase — a blind builder will follow these descriptions precisely.
Not yet extracted.
Phase 4 — Accessible prose
What do I do here?
This step is completed by the builder, not the sighted reviewer. The app generates an accessible prose paragraph from the approved Phase 3 descriptions. No action is needed from you here — your work is done once Phase 3 is approved.
Not yet generated. Complete Phase 3 and approve placement first.
Step 4
Assembly — page 6
Inset — page 6
Phase 2 — Pieces
What do I do here?
Look at the inset image above. Check that the AI has correctly identified each piece — colour, quantity, and part name. If anything is wrong, edit the table directly. Add any missing pieces using the + row button, or remove incorrect ones with ✕.
When you are satisfied that all pieces are correct, click Save Pieces. This enables Phase 3 to run for this step.
| Qty | Colour | Part name | Part # | |
|---|---|---|---|---|
Phase 3 — Spatial placement
What do I do here?
The AI has described where each piece was placed by comparing the before and after images. Read every description carefully. Check that directions (left, right, front, back) are correct from the builder's perspective, and that stud counts are accurate.
If a description is vague, wrong, or uses the wrong direction — click Edit in that row and correct it. Once every placement description for this step is accurate, click Approve. Approval is required before the accessible prose can be generated.
This is the most important phase — a blind builder will follow these descriptions precisely.
Not yet extracted.
Phase 4 — Accessible prose
What do I do here?
This step is completed by the builder, not the sighted reviewer. The app generates an accessible prose paragraph from the approved Phase 3 descriptions. No action is needed from you here — your work is done once Phase 3 is approved.
Not yet generated. Complete Phase 3 and approve placement first.
Step 5
Assembly — page 6
Inset — page 6
Phase 2 — Pieces
What do I do here?
Look at the inset image above. Check that the AI has correctly identified each piece — colour, quantity, and part name. If anything is wrong, edit the table directly. Add any missing pieces using the + row button, or remove incorrect ones with ✕.
When you are satisfied that all pieces are correct, click Save Pieces. This enables Phase 3 to run for this step.
| Qty | Colour | Part name | Part # | |
|---|---|---|---|---|
Phase 3 — Spatial placement
What do I do here?
The AI has described where each piece was placed by comparing the before and after images. Read every description carefully. Check that directions (left, right, front, back) are correct from the builder's perspective, and that stud counts are accurate.
If a description is vague, wrong, or uses the wrong direction — click Edit in that row and correct it. Once every placement description for this step is accurate, click Approve. Approval is required before the accessible prose can be generated.
This is the most important phase — a blind builder will follow these descriptions precisely.
Not yet extracted.
Phase 4 — Accessible prose
What do I do here?
This step is completed by the builder, not the sighted reviewer. The app generates an accessible prose paragraph from the approved Phase 3 descriptions. No action is needed from you here — your work is done once Phase 3 is approved.
Not yet generated. Complete Phase 3 and approve placement first.
Step 6
Assembly — page 7
Inset — page 7
Phase 2 — Pieces
What do I do here?
Look at the inset image above. Check that the AI has correctly identified each piece — colour, quantity, and part name. If anything is wrong, edit the table directly. Add any missing pieces using the + row button, or remove incorrect ones with ✕.
When you are satisfied that all pieces are correct, click Save Pieces. This enables Phase 3 to run for this step.
| Qty | Colour | Part name | Part # | |
|---|---|---|---|---|
Phase 3 — Spatial placement
What do I do here?
The AI has described where each piece was placed by comparing the before and after images. Read every description carefully. Check that directions (left, right, front, back) are correct from the builder's perspective, and that stud counts are accurate.
If a description is vague, wrong, or uses the wrong direction — click Edit in that row and correct it. Once every placement description for this step is accurate, click Approve. Approval is required before the accessible prose can be generated.
This is the most important phase — a blind builder will follow these descriptions precisely.
Not yet extracted.
Phase 4 — Accessible prose
What do I do here?
This step is completed by the builder, not the sighted reviewer. The app generates an accessible prose paragraph from the approved Phase 3 descriptions. No action is needed from you here — your work is done once Phase 3 is approved.
Not yet generated. Complete Phase 3 and approve placement first.
Step 7
Assembly — page 7
Inset — page 7
Phase 2 — Pieces
What do I do here?
Look at the inset image above. Check that the AI has correctly identified each piece — colour, quantity, and part name. If anything is wrong, edit the table directly. Add any missing pieces using the + row button, or remove incorrect ones with ✕.
When you are satisfied that all pieces are correct, click Save Pieces. This enables Phase 3 to run for this step.
| Qty | Colour | Part name | Part # | |
|---|---|---|---|---|
Phase 3 — Spatial placement
What do I do here?
The AI has described where each piece was placed by comparing the before and after images. Read every description carefully. Check that directions (left, right, front, back) are correct from the builder's perspective, and that stud counts are accurate.
If a description is vague, wrong, or uses the wrong direction — click Edit in that row and correct it. Once every placement description for this step is accurate, click Approve. Approval is required before the accessible prose can be generated.
This is the most important phase — a blind builder will follow these descriptions precisely.
Not yet extracted.
Phase 4 — Accessible prose
What do I do here?
This step is completed by the builder, not the sighted reviewer. The app generates an accessible prose paragraph from the approved Phase 3 descriptions. No action is needed from you here — your work is done once Phase 3 is approved.
Not yet generated. Complete Phase 3 and approve placement first.
Step 8
Assembly — page 8
Inset — page 8
Phase 2 — Pieces
What do I do here?
Look at the inset image above. Check that the AI has correctly identified each piece — colour, quantity, and part name. If anything is wrong, edit the table directly. Add any missing pieces using the + row button, or remove incorrect ones with ✕.
When you are satisfied that all pieces are correct, click Save Pieces. This enables Phase 3 to run for this step.
| Qty | Colour | Part name | Part # | |
|---|---|---|---|---|
Phase 3 — Spatial placement
What do I do here?
The AI has described where each piece was placed by comparing the before and after images. Read every description carefully. Check that directions (left, right, front, back) are correct from the builder's perspective, and that stud counts are accurate.
If a description is vague, wrong, or uses the wrong direction — click Edit in that row and correct it. Once every placement description for this step is accurate, click Approve. Approval is required before the accessible prose can be generated.
This is the most important phase — a blind builder will follow these descriptions precisely.
Not yet extracted.
Phase 4 — Accessible prose
What do I do here?
This step is completed by the builder, not the sighted reviewer. The app generates an accessible prose paragraph from the approved Phase 3 descriptions. No action is needed from you here — your work is done once Phase 3 is approved.
Not yet generated. Complete Phase 3 and approve placement first.
Step 9
Assembly — page 8
Inset — page 8
Phase 2 — Pieces
What do I do here?
Look at the inset image above. Check that the AI has correctly identified each piece — colour, quantity, and part name. If anything is wrong, edit the table directly. Add any missing pieces using the + row button, or remove incorrect ones with ✕.
When you are satisfied that all pieces are correct, click Save Pieces. This enables Phase 3 to run for this step.
| Qty | Colour | Part name | Part # | |
|---|---|---|---|---|
Phase 3 — Spatial placement
What do I do here?
The AI has described where each piece was placed by comparing the before and after images. Read every description carefully. Check that directions (left, right, front, back) are correct from the builder's perspective, and that stud counts are accurate.
If a description is vague, wrong, or uses the wrong direction — click Edit in that row and correct it. Once every placement description for this step is accurate, click Approve. Approval is required before the accessible prose can be generated.
This is the most important phase — a blind builder will follow these descriptions precisely.
Not yet extracted.
Phase 4 — Accessible prose
What do I do here?
This step is completed by the builder, not the sighted reviewer. The app generates an accessible prose paragraph from the approved Phase 3 descriptions. No action is needed from you here — your work is done once Phase 3 is approved.
Not yet generated. Complete Phase 3 and approve placement first.
Step 10
Assembly — page 9

Inset — page 9
Phase 2 — Pieces
What do I do here?
Look at the inset image above. Check that the AI has correctly identified each piece — colour, quantity, and part name. If anything is wrong, edit the table directly. Add any missing pieces using the + row button, or remove incorrect ones with ✕.
When you are satisfied that all pieces are correct, click Save Pieces. This enables Phase 3 to run for this step.
| Qty | Colour | Part name | Part # | |
|---|---|---|---|---|
Phase 3 — Spatial placement
What do I do here?
The AI has described where each piece was placed by comparing the before and after images. Read every description carefully. Check that directions (left, right, front, back) are correct from the builder's perspective, and that stud counts are accurate.
If a description is vague, wrong, or uses the wrong direction — click Edit in that row and correct it. Once every placement description for this step is accurate, click Approve. Approval is required before the accessible prose can be generated.
This is the most important phase — a blind builder will follow these descriptions precisely.
Not yet extracted.
Phase 4 — Accessible prose
What do I do here?
This step is completed by the builder, not the sighted reviewer. The app generates an accessible prose paragraph from the approved Phase 3 descriptions. No action is needed from you here — your work is done once Phase 3 is approved.
Not yet generated. Complete Phase 3 and approve placement first.
Step 11
Assembly — page 9
Inset — page 9
Phase 2 — Pieces
What do I do here?
Look at the inset image above. Check that the AI has correctly identified each piece — colour, quantity, and part name. If anything is wrong, edit the table directly. Add any missing pieces using the + row button, or remove incorrect ones with ✕.
When you are satisfied that all pieces are correct, click Save Pieces. This enables Phase 3 to run for this step.
| Qty | Colour | Part name | Part # | |
|---|---|---|---|---|
Phase 3 — Spatial placement
What do I do here?
The AI has described where each piece was placed by comparing the before and after images. Read every description carefully. Check that directions (left, right, front, back) are correct from the builder's perspective, and that stud counts are accurate.
If a description is vague, wrong, or uses the wrong direction — click Edit in that row and correct it. Once every placement description for this step is accurate, click Approve. Approval is required before the accessible prose can be generated.
This is the most important phase — a blind builder will follow these descriptions precisely.
Not yet extracted.
Phase 4 — Accessible prose
What do I do here?
This step is completed by the builder, not the sighted reviewer. The app generates an accessible prose paragraph from the approved Phase 3 descriptions. No action is needed from you here — your work is done once Phase 3 is approved.
Not yet generated. Complete Phase 3 and approve placement first.
Build 4
Step 5
Assembly — page 10
Inset — page 10
Phase 2 — Pieces
What do I do here?
Look at the inset image above. Check that the AI has correctly identified each piece — colour, quantity, and part name. If anything is wrong, edit the table directly. Add any missing pieces using the + row button, or remove incorrect ones with ✕.
When you are satisfied that all pieces are correct, click Save Pieces. This enables Phase 3 to run for this step.
| Qty | Colour | Part name | Part # | |
|---|---|---|---|---|
Phase 3 — Spatial placement
What do I do here?
The AI has described where each piece was placed by comparing the before and after images. Read every description carefully. Check that directions (left, right, front, back) are correct from the builder's perspective, and that stud counts are accurate.
If a description is vague, wrong, or uses the wrong direction — click Edit in that row and correct it. Once every placement description for this step is accurate, click Approve. Approval is required before the accessible prose can be generated.
This is the most important phase — a blind builder will follow these descriptions precisely.
Not yet extracted.
Phase 4 — Accessible prose
What do I do here?
This step is completed by the builder, not the sighted reviewer. The app generates an accessible prose paragraph from the approved Phase 3 descriptions. No action is needed from you here — your work is done once Phase 3 is approved.
Not yet generated. Complete Phase 3 and approve placement first.
Step 12
Assembly — page 10

Inset — page 10
Phase 2 — Pieces
What do I do here?
Look at the inset image above. Check that the AI has correctly identified each piece — colour, quantity, and part name. If anything is wrong, edit the table directly. Add any missing pieces using the + row button, or remove incorrect ones with ✕.
When you are satisfied that all pieces are correct, click Save Pieces. This enables Phase 3 to run for this step.
| Qty | Colour | Part name | Part # | |
|---|---|---|---|---|
Phase 3 — Spatial placement
What do I do here?
The AI has described where each piece was placed by comparing the before and after images. Read every description carefully. Check that directions (left, right, front, back) are correct from the builder's perspective, and that stud counts are accurate.
If a description is vague, wrong, or uses the wrong direction — click Edit in that row and correct it. Once every placement description for this step is accurate, click Approve. Approval is required before the accessible prose can be generated.
This is the most important phase — a blind builder will follow these descriptions precisely.
Not yet extracted.
Phase 4 — Accessible prose
What do I do here?
This step is completed by the builder, not the sighted reviewer. The app generates an accessible prose paragraph from the approved Phase 3 descriptions. No action is needed from you here — your work is done once Phase 3 is approved.
Not yet generated. Complete Phase 3 and approve placement first.
Step 13
Assembly — page 11
Inset — page 11
Phase 2 — Pieces
What do I do here?
Look at the inset image above. Check that the AI has correctly identified each piece — colour, quantity, and part name. If anything is wrong, edit the table directly. Add any missing pieces using the + row button, or remove incorrect ones with ✕.
When you are satisfied that all pieces are correct, click Save Pieces. This enables Phase 3 to run for this step.
| Qty | Colour | Part name | Part # | |
|---|---|---|---|---|
Phase 3 — Spatial placement
What do I do here?
The AI has described where each piece was placed by comparing the before and after images. Read every description carefully. Check that directions (left, right, front, back) are correct from the builder's perspective, and that stud counts are accurate.
If a description is vague, wrong, or uses the wrong direction — click Edit in that row and correct it. Once every placement description for this step is accurate, click Approve. Approval is required before the accessible prose can be generated.
This is the most important phase — a blind builder will follow these descriptions precisely.
Not yet extracted.
Phase 4 — Accessible prose
What do I do here?
This step is completed by the builder, not the sighted reviewer. The app generates an accessible prose paragraph from the approved Phase 3 descriptions. No action is needed from you here — your work is done once Phase 3 is approved.
Not yet generated. Complete Phase 3 and approve placement first.
Step 14
Assembly — page 11
Inset — page 11
Phase 2 — Pieces
What do I do here?
Look at the inset image above. Check that the AI has correctly identified each piece — colour, quantity, and part name. If anything is wrong, edit the table directly. Add any missing pieces using the + row button, or remove incorrect ones with ✕.
When you are satisfied that all pieces are correct, click Save Pieces. This enables Phase 3 to run for this step.
| Qty | Colour | Part name | Part # | |
|---|---|---|---|---|
Phase 3 — Spatial placement
What do I do here?
The AI has described where each piece was placed by comparing the before and after images. Read every description carefully. Check that directions (left, right, front, back) are correct from the builder's perspective, and that stud counts are accurate.
If a description is vague, wrong, or uses the wrong direction — click Edit in that row and correct it. Once every placement description for this step is accurate, click Approve. Approval is required before the accessible prose can be generated.
This is the most important phase — a blind builder will follow these descriptions precisely.
Not yet extracted.
Phase 4 — Accessible prose
What do I do here?
This step is completed by the builder, not the sighted reviewer. The app generates an accessible prose paragraph from the approved Phase 3 descriptions. No action is needed from you here — your work is done once Phase 3 is approved.
Not yet generated. Complete Phase 3 and approve placement first.
Step 15
Assembly — page 12
Inset — page 12
Phase 2 — Pieces
What do I do here?
Look at the inset image above. Check that the AI has correctly identified each piece — colour, quantity, and part name. If anything is wrong, edit the table directly. Add any missing pieces using the + row button, or remove incorrect ones with ✕.
When you are satisfied that all pieces are correct, click Save Pieces. This enables Phase 3 to run for this step.
| Qty | Colour | Part name | Part # | |
|---|---|---|---|---|
Phase 3 — Spatial placement
What do I do here?
The AI has described where each piece was placed by comparing the before and after images. Read every description carefully. Check that directions (left, right, front, back) are correct from the builder's perspective, and that stud counts are accurate.
If a description is vague, wrong, or uses the wrong direction — click Edit in that row and correct it. Once every placement description for this step is accurate, click Approve. Approval is required before the accessible prose can be generated.
This is the most important phase — a blind builder will follow these descriptions precisely.
Not yet extracted.
Phase 4 — Accessible prose
What do I do here?
This step is completed by the builder, not the sighted reviewer. The app generates an accessible prose paragraph from the approved Phase 3 descriptions. No action is needed from you here — your work is done once Phase 3 is approved.
Not yet generated. Complete Phase 3 and approve placement first.
Step 16
Assembly — page 12
Inset — page 12
Phase 2 — Pieces
What do I do here?
Look at the inset image above. Check that the AI has correctly identified each piece — colour, quantity, and part name. If anything is wrong, edit the table directly. Add any missing pieces using the + row button, or remove incorrect ones with ✕.
When you are satisfied that all pieces are correct, click Save Pieces. This enables Phase 3 to run for this step.
| Qty | Colour | Part name | Part # | |
|---|---|---|---|---|
Phase 3 — Spatial placement
What do I do here?
The AI has described where each piece was placed by comparing the before and after images. Read every description carefully. Check that directions (left, right, front, back) are correct from the builder's perspective, and that stud counts are accurate.
If a description is vague, wrong, or uses the wrong direction — click Edit in that row and correct it. Once every placement description for this step is accurate, click Approve. Approval is required before the accessible prose can be generated.
This is the most important phase — a blind builder will follow these descriptions precisely.
Not yet extracted.
Phase 4 — Accessible prose
What do I do here?
This step is completed by the builder, not the sighted reviewer. The app generates an accessible prose paragraph from the approved Phase 3 descriptions. No action is needed from you here — your work is done once Phase 3 is approved.
Not yet generated. Complete Phase 3 and approve placement first.
Step 17
Assembly — page 13
Inset — page 13
Phase 2 — Pieces
What do I do here?
Look at the inset image above. Check that the AI has correctly identified each piece — colour, quantity, and part name. If anything is wrong, edit the table directly. Add any missing pieces using the + row button, or remove incorrect ones with ✕.
When you are satisfied that all pieces are correct, click Save Pieces. This enables Phase 3 to run for this step.
| Qty | Colour | Part name | Part # | |
|---|---|---|---|---|
Phase 3 — Spatial placement
What do I do here?
The AI has described where each piece was placed by comparing the before and after images. Read every description carefully. Check that directions (left, right, front, back) are correct from the builder's perspective, and that stud counts are accurate.
If a description is vague, wrong, or uses the wrong direction — click Edit in that row and correct it. Once every placement description for this step is accurate, click Approve. Approval is required before the accessible prose can be generated.
This is the most important phase — a blind builder will follow these descriptions precisely.
Not yet extracted.
Phase 4 — Accessible prose
What do I do here?
This step is completed by the builder, not the sighted reviewer. The app generates an accessible prose paragraph from the approved Phase 3 descriptions. No action is needed from you here — your work is done once Phase 3 is approved.
Not yet generated. Complete Phase 3 and approve placement first.
Step 18
Assembly — page 13
Inset — page 13
Phase 2 — Pieces
What do I do here?
Look at the inset image above. Check that the AI has correctly identified each piece — colour, quantity, and part name. If anything is wrong, edit the table directly. Add any missing pieces using the + row button, or remove incorrect ones with ✕.
When you are satisfied that all pieces are correct, click Save Pieces. This enables Phase 3 to run for this step.
| Qty | Colour | Part name | Part # | |
|---|---|---|---|---|
Phase 3 — Spatial placement
What do I do here?
The AI has described where each piece was placed by comparing the before and after images. Read every description carefully. Check that directions (left, right, front, back) are correct from the builder's perspective, and that stud counts are accurate.
If a description is vague, wrong, or uses the wrong direction — click Edit in that row and correct it. Once every placement description for this step is accurate, click Approve. Approval is required before the accessible prose can be generated.
This is the most important phase — a blind builder will follow these descriptions precisely.
Not yet extracted.
Phase 4 — Accessible prose
What do I do here?
This step is completed by the builder, not the sighted reviewer. The app generates an accessible prose paragraph from the approved Phase 3 descriptions. No action is needed from you here — your work is done once Phase 3 is approved.
Not yet generated. Complete Phase 3 and approve placement first.
Step 19
Assembly — page 14
Inset — page 14
Phase 2 — Pieces
What do I do here?
Look at the inset image above. Check that the AI has correctly identified each piece — colour, quantity, and part name. If anything is wrong, edit the table directly. Add any missing pieces using the + row button, or remove incorrect ones with ✕.
When you are satisfied that all pieces are correct, click Save Pieces. This enables Phase 3 to run for this step.
| Qty | Colour | Part name | Part # | |
|---|---|---|---|---|
Phase 3 — Spatial placement
What do I do here?
The AI has described where each piece was placed by comparing the before and after images. Read every description carefully. Check that directions (left, right, front, back) are correct from the builder's perspective, and that stud counts are accurate.
If a description is vague, wrong, or uses the wrong direction — click Edit in that row and correct it. Once every placement description for this step is accurate, click Approve. Approval is required before the accessible prose can be generated.
This is the most important phase — a blind builder will follow these descriptions precisely.
Not yet extracted.
Phase 4 — Accessible prose
What do I do here?
This step is completed by the builder, not the sighted reviewer. The app generates an accessible prose paragraph from the approved Phase 3 descriptions. No action is needed from you here — your work is done once Phase 3 is approved.
Not yet generated. Complete Phase 3 and approve placement first.
Step 20
Assembly — page 14
Inset — page 14
Phase 2 — Pieces
What do I do here?
Look at the inset image above. Check that the AI has correctly identified each piece — colour, quantity, and part name. If anything is wrong, edit the table directly. Add any missing pieces using the + row button, or remove incorrect ones with ✕.
When you are satisfied that all pieces are correct, click Save Pieces. This enables Phase 3 to run for this step.
| Qty | Colour | Part name | Part # | |
|---|---|---|---|---|
Phase 3 — Spatial placement
What do I do here?
The AI has described where each piece was placed by comparing the before and after images. Read every description carefully. Check that directions (left, right, front, back) are correct from the builder's perspective, and that stud counts are accurate.
If a description is vague, wrong, or uses the wrong direction — click Edit in that row and correct it. Once every placement description for this step is accurate, click Approve. Approval is required before the accessible prose can be generated.
This is the most important phase — a blind builder will follow these descriptions precisely.
Not yet extracted.
Phase 4 — Accessible prose
What do I do here?
This step is completed by the builder, not the sighted reviewer. The app generates an accessible prose paragraph from the approved Phase 3 descriptions. No action is needed from you here — your work is done once Phase 3 is approved.
Not yet generated. Complete Phase 3 and approve placement first.
Build 5
Step 6

Assembly — page 15

Inset — page 15
Phase 2 — Pieces
What do I do here?
Look at the inset image above. Check that the AI has correctly identified each piece — colour, quantity, and part name. If anything is wrong, edit the table directly. Add any missing pieces using the + row button, or remove incorrect ones with ✕.
When you are satisfied that all pieces are correct, click Save Pieces. This enables Phase 3 to run for this step.
| Qty | Colour | Part name | Part # | |
|---|---|---|---|---|
Phase 3 — Spatial placement
What do I do here?
The AI has described where each piece was placed by comparing the before and after images. Read every description carefully. Check that directions (left, right, front, back) are correct from the builder's perspective, and that stud counts are accurate.
If a description is vague, wrong, or uses the wrong direction — click Edit in that row and correct it. Once every placement description for this step is accurate, click Approve. Approval is required before the accessible prose can be generated.
This is the most important phase — a blind builder will follow these descriptions precisely.
Not yet extracted.
Phase 4 — Accessible prose
What do I do here?
This step is completed by the builder, not the sighted reviewer. The app generates an accessible prose paragraph from the approved Phase 3 descriptions. No action is needed from you here — your work is done once Phase 3 is approved.
Not yet generated. Complete Phase 3 and approve placement first.
Step 21
Assembly — page 15

Inset — page 15
Phase 2 — Pieces
What do I do here?
Look at the inset image above. Check that the AI has correctly identified each piece — colour, quantity, and part name. If anything is wrong, edit the table directly. Add any missing pieces using the + row button, or remove incorrect ones with ✕.
When you are satisfied that all pieces are correct, click Save Pieces. This enables Phase 3 to run for this step.
| Qty | Colour | Part name | Part # | |
|---|---|---|---|---|
Phase 3 — Spatial placement
What do I do here?
The AI has described where each piece was placed by comparing the before and after images. Read every description carefully. Check that directions (left, right, front, back) are correct from the builder's perspective, and that stud counts are accurate.
If a description is vague, wrong, or uses the wrong direction — click Edit in that row and correct it. Once every placement description for this step is accurate, click Approve. Approval is required before the accessible prose can be generated.
This is the most important phase — a blind builder will follow these descriptions precisely.
Not yet extracted.
Phase 4 — Accessible prose
What do I do here?
This step is completed by the builder, not the sighted reviewer. The app generates an accessible prose paragraph from the approved Phase 3 descriptions. No action is needed from you here — your work is done once Phase 3 is approved.
Not yet generated. Complete Phase 3 and approve placement first.
Step 22
Assembly — page 16
Inset — page 16
Phase 2 — Pieces
What do I do here?
Look at the inset image above. Check that the AI has correctly identified each piece — colour, quantity, and part name. If anything is wrong, edit the table directly. Add any missing pieces using the + row button, or remove incorrect ones with ✕.
When you are satisfied that all pieces are correct, click Save Pieces. This enables Phase 3 to run for this step.
| Qty | Colour | Part name | Part # | |
|---|---|---|---|---|
Phase 3 — Spatial placement
What do I do here?
The AI has described where each piece was placed by comparing the before and after images. Read every description carefully. Check that directions (left, right, front, back) are correct from the builder's perspective, and that stud counts are accurate.
If a description is vague, wrong, or uses the wrong direction — click Edit in that row and correct it. Once every placement description for this step is accurate, click Approve. Approval is required before the accessible prose can be generated.
This is the most important phase — a blind builder will follow these descriptions precisely.
Not yet extracted.
Phase 4 — Accessible prose
What do I do here?
This step is completed by the builder, not the sighted reviewer. The app generates an accessible prose paragraph from the approved Phase 3 descriptions. No action is needed from you here — your work is done once Phase 3 is approved.
Not yet generated. Complete Phase 3 and approve placement first.
Step 23
Assembly — page 16
Inset — page 16
Phase 2 — Pieces
What do I do here?
Look at the inset image above. Check that the AI has correctly identified each piece — colour, quantity, and part name. If anything is wrong, edit the table directly. Add any missing pieces using the + row button, or remove incorrect ones with ✕.
When you are satisfied that all pieces are correct, click Save Pieces. This enables Phase 3 to run for this step.
| Qty | Colour | Part name | Part # | |
|---|---|---|---|---|
Phase 3 — Spatial placement
What do I do here?
The AI has described where each piece was placed by comparing the before and after images. Read every description carefully. Check that directions (left, right, front, back) are correct from the builder's perspective, and that stud counts are accurate.
If a description is vague, wrong, or uses the wrong direction — click Edit in that row and correct it. Once every placement description for this step is accurate, click Approve. Approval is required before the accessible prose can be generated.
This is the most important phase — a blind builder will follow these descriptions precisely.
Not yet extracted.
Phase 4 — Accessible prose
What do I do here?
This step is completed by the builder, not the sighted reviewer. The app generates an accessible prose paragraph from the approved Phase 3 descriptions. No action is needed from you here — your work is done once Phase 3 is approved.
Not yet generated. Complete Phase 3 and approve placement first.
Step 24
Assembly — page 17
Inset — page 17
Phase 2 — Pieces
What do I do here?
Look at the inset image above. Check that the AI has correctly identified each piece — colour, quantity, and part name. If anything is wrong, edit the table directly. Add any missing pieces using the + row button, or remove incorrect ones with ✕.
When you are satisfied that all pieces are correct, click Save Pieces. This enables Phase 3 to run for this step.
| Qty | Colour | Part name | Part # | |
|---|---|---|---|---|
Phase 3 — Spatial placement
What do I do here?
The AI has described where each piece was placed by comparing the before and after images. Read every description carefully. Check that directions (left, right, front, back) are correct from the builder's perspective, and that stud counts are accurate.
If a description is vague, wrong, or uses the wrong direction — click Edit in that row and correct it. Once every placement description for this step is accurate, click Approve. Approval is required before the accessible prose can be generated.
This is the most important phase — a blind builder will follow these descriptions precisely.
Not yet extracted.
Phase 4 — Accessible prose
What do I do here?
This step is completed by the builder, not the sighted reviewer. The app generates an accessible prose paragraph from the approved Phase 3 descriptions. No action is needed from you here — your work is done once Phase 3 is approved.
Not yet generated. Complete Phase 3 and approve placement first.
Step 25
Assembly — page 17
Inset — page 17
Phase 2 — Pieces
What do I do here?
Look at the inset image above. Check that the AI has correctly identified each piece — colour, quantity, and part name. If anything is wrong, edit the table directly. Add any missing pieces using the + row button, or remove incorrect ones with ✕.
When you are satisfied that all pieces are correct, click Save Pieces. This enables Phase 3 to run for this step.
| Qty | Colour | Part name | Part # | |
|---|---|---|---|---|
Phase 3 — Spatial placement
What do I do here?
The AI has described where each piece was placed by comparing the before and after images. Read every description carefully. Check that directions (left, right, front, back) are correct from the builder's perspective, and that stud counts are accurate.
If a description is vague, wrong, or uses the wrong direction — click Edit in that row and correct it. Once every placement description for this step is accurate, click Approve. Approval is required before the accessible prose can be generated.
This is the most important phase — a blind builder will follow these descriptions precisely.
Not yet extracted.
Phase 4 — Accessible prose
What do I do here?
This step is completed by the builder, not the sighted reviewer. The app generates an accessible prose paragraph from the approved Phase 3 descriptions. No action is needed from you here — your work is done once Phase 3 is approved.
Not yet generated. Complete Phase 3 and approve placement first.
Step 26
Assembly — page 18
Inset — page 18
Phase 2 — Pieces
What do I do here?
Look at the inset image above. Check that the AI has correctly identified each piece — colour, quantity, and part name. If anything is wrong, edit the table directly. Add any missing pieces using the + row button, or remove incorrect ones with ✕.
When you are satisfied that all pieces are correct, click Save Pieces. This enables Phase 3 to run for this step.
| Qty | Colour | Part name | Part # | |
|---|---|---|---|---|
Phase 3 — Spatial placement
What do I do here?
The AI has described where each piece was placed by comparing the before and after images. Read every description carefully. Check that directions (left, right, front, back) are correct from the builder's perspective, and that stud counts are accurate.
If a description is vague, wrong, or uses the wrong direction — click Edit in that row and correct it. Once every placement description for this step is accurate, click Approve. Approval is required before the accessible prose can be generated.
This is the most important phase — a blind builder will follow these descriptions precisely.
Not yet extracted.
Phase 4 — Accessible prose
What do I do here?
This step is completed by the builder, not the sighted reviewer. The app generates an accessible prose paragraph from the approved Phase 3 descriptions. No action is needed from you here — your work is done once Phase 3 is approved.
Not yet generated. Complete Phase 3 and approve placement first.
Step 27
Assembly — page 18
Inset — page 18
Phase 2 — Pieces
What do I do here?
Look at the inset image above. Check that the AI has correctly identified each piece — colour, quantity, and part name. If anything is wrong, edit the table directly. Add any missing pieces using the + row button, or remove incorrect ones with ✕.
When you are satisfied that all pieces are correct, click Save Pieces. This enables Phase 3 to run for this step.
| Qty | Colour | Part name | Part # | |
|---|---|---|---|---|
Phase 3 — Spatial placement
What do I do here?
The AI has described where each piece was placed by comparing the before and after images. Read every description carefully. Check that directions (left, right, front, back) are correct from the builder's perspective, and that stud counts are accurate.
If a description is vague, wrong, or uses the wrong direction — click Edit in that row and correct it. Once every placement description for this step is accurate, click Approve. Approval is required before the accessible prose can be generated.
This is the most important phase — a blind builder will follow these descriptions precisely.
Not yet extracted.
Phase 4 — Accessible prose
What do I do here?
This step is completed by the builder, not the sighted reviewer. The app generates an accessible prose paragraph from the approved Phase 3 descriptions. No action is needed from you here — your work is done once Phase 3 is approved.
Not yet generated. Complete Phase 3 and approve placement first.
Step 28
Assembly — page 19
Inset — page 19
Phase 2 — Pieces
What do I do here?
Look at the inset image above. Check that the AI has correctly identified each piece — colour, quantity, and part name. If anything is wrong, edit the table directly. Add any missing pieces using the + row button, or remove incorrect ones with ✕.
When you are satisfied that all pieces are correct, click Save Pieces. This enables Phase 3 to run for this step.
| Qty | Colour | Part name | Part # | |
|---|---|---|---|---|
Phase 3 — Spatial placement
What do I do here?
The AI has described where each piece was placed by comparing the before and after images. Read every description carefully. Check that directions (left, right, front, back) are correct from the builder's perspective, and that stud counts are accurate.
If a description is vague, wrong, or uses the wrong direction — click Edit in that row and correct it. Once every placement description for this step is accurate, click Approve. Approval is required before the accessible prose can be generated.
This is the most important phase — a blind builder will follow these descriptions precisely.
Not yet extracted.
Phase 4 — Accessible prose
What do I do here?
This step is completed by the builder, not the sighted reviewer. The app generates an accessible prose paragraph from the approved Phase 3 descriptions. No action is needed from you here — your work is done once Phase 3 is approved.
Not yet generated. Complete Phase 3 and approve placement first.
Step 29
Assembly — page 19
Inset — page 19
Phase 2 — Pieces
What do I do here?
Look at the inset image above. Check that the AI has correctly identified each piece — colour, quantity, and part name. If anything is wrong, edit the table directly. Add any missing pieces using the + row button, or remove incorrect ones with ✕.
When you are satisfied that all pieces are correct, click Save Pieces. This enables Phase 3 to run for this step.
| Qty | Colour | Part name | Part # | |
|---|---|---|---|---|
Phase 3 — Spatial placement
What do I do here?
The AI has described where each piece was placed by comparing the before and after images. Read every description carefully. Check that directions (left, right, front, back) are correct from the builder's perspective, and that stud counts are accurate.
If a description is vague, wrong, or uses the wrong direction — click Edit in that row and correct it. Once every placement description for this step is accurate, click Approve. Approval is required before the accessible prose can be generated.
This is the most important phase — a blind builder will follow these descriptions precisely.
Not yet extracted.
Phase 4 — Accessible prose
What do I do here?
This step is completed by the builder, not the sighted reviewer. The app generates an accessible prose paragraph from the approved Phase 3 descriptions. No action is needed from you here — your work is done once Phase 3 is approved.
Not yet generated. Complete Phase 3 and approve placement first.
Step 30
Assembly — page 20
Inset — page 20
Phase 2 — Pieces
What do I do here?
Look at the inset image above. Check that the AI has correctly identified each piece — colour, quantity, and part name. If anything is wrong, edit the table directly. Add any missing pieces using the + row button, or remove incorrect ones with ✕.
When you are satisfied that all pieces are correct, click Save Pieces. This enables Phase 3 to run for this step.
| Qty | Colour | Part name | Part # | |
|---|---|---|---|---|
Phase 3 — Spatial placement
What do I do here?
The AI has described where each piece was placed by comparing the before and after images. Read every description carefully. Check that directions (left, right, front, back) are correct from the builder's perspective, and that stud counts are accurate.
If a description is vague, wrong, or uses the wrong direction — click Edit in that row and correct it. Once every placement description for this step is accurate, click Approve. Approval is required before the accessible prose can be generated.
This is the most important phase — a blind builder will follow these descriptions precisely.
Not yet extracted.
Phase 4 — Accessible prose
What do I do here?
This step is completed by the builder, not the sighted reviewer. The app generates an accessible prose paragraph from the approved Phase 3 descriptions. No action is needed from you here — your work is done once Phase 3 is approved.
Not yet generated. Complete Phase 3 and approve placement first.
Step 31
Assembly — page 20
Inset — page 20
Phase 2 — Pieces
What do I do here?
Look at the inset image above. Check that the AI has correctly identified each piece — colour, quantity, and part name. If anything is wrong, edit the table directly. Add any missing pieces using the + row button, or remove incorrect ones with ✕.
When you are satisfied that all pieces are correct, click Save Pieces. This enables Phase 3 to run for this step.
| Qty | Colour | Part name | Part # | |
|---|---|---|---|---|
Phase 3 — Spatial placement
What do I do here?
The AI has described where each piece was placed by comparing the before and after images. Read every description carefully. Check that directions (left, right, front, back) are correct from the builder's perspective, and that stud counts are accurate.
If a description is vague, wrong, or uses the wrong direction — click Edit in that row and correct it. Once every placement description for this step is accurate, click Approve. Approval is required before the accessible prose can be generated.
This is the most important phase — a blind builder will follow these descriptions precisely.
Not yet extracted.
Phase 4 — Accessible prose
What do I do here?
This step is completed by the builder, not the sighted reviewer. The app generates an accessible prose paragraph from the approved Phase 3 descriptions. No action is needed from you here — your work is done once Phase 3 is approved.
Not yet generated. Complete Phase 3 and approve placement first.
Step 32
Assembly — page 21
Inset — page 21
Phase 2 — Pieces
What do I do here?
Look at the inset image above. Check that the AI has correctly identified each piece — colour, quantity, and part name. If anything is wrong, edit the table directly. Add any missing pieces using the + row button, or remove incorrect ones with ✕.
When you are satisfied that all pieces are correct, click Save Pieces. This enables Phase 3 to run for this step.
| Qty | Colour | Part name | Part # | |
|---|---|---|---|---|
Phase 3 — Spatial placement
What do I do here?
The AI has described where each piece was placed by comparing the before and after images. Read every description carefully. Check that directions (left, right, front, back) are correct from the builder's perspective, and that stud counts are accurate.
If a description is vague, wrong, or uses the wrong direction — click Edit in that row and correct it. Once every placement description for this step is accurate, click Approve. Approval is required before the accessible prose can be generated.
This is the most important phase — a blind builder will follow these descriptions precisely.
Not yet extracted.
Phase 4 — Accessible prose
What do I do here?
This step is completed by the builder, not the sighted reviewer. The app generates an accessible prose paragraph from the approved Phase 3 descriptions. No action is needed from you here — your work is done once Phase 3 is approved.
Not yet generated. Complete Phase 3 and approve placement first.
Step 33

Assembly — page 21
Inset — page 21
Phase 2 — Pieces
What do I do here?
Look at the inset image above. Check that the AI has correctly identified each piece — colour, quantity, and part name. If anything is wrong, edit the table directly. Add any missing pieces using the + row button, or remove incorrect ones with ✕.
When you are satisfied that all pieces are correct, click Save Pieces. This enables Phase 3 to run for this step.
| Qty | Colour | Part name | Part # | |
|---|---|---|---|---|
Phase 3 — Spatial placement
What do I do here?
The AI has described where each piece was placed by comparing the before and after images. Read every description carefully. Check that directions (left, right, front, back) are correct from the builder's perspective, and that stud counts are accurate.
If a description is vague, wrong, or uses the wrong direction — click Edit in that row and correct it. Once every placement description for this step is accurate, click Approve. Approval is required before the accessible prose can be generated.
This is the most important phase — a blind builder will follow these descriptions precisely.
Not yet extracted.
Phase 4 — Accessible prose
What do I do here?
This step is completed by the builder, not the sighted reviewer. The app generates an accessible prose paragraph from the approved Phase 3 descriptions. No action is needed from you here — your work is done once Phase 3 is approved.
Not yet generated. Complete Phase 3 and approve placement first.
Build 6
Step 7
Assembly — page 22

Inset — page 22
Phase 2 — Pieces
What do I do here?
Look at the inset image above. Check that the AI has correctly identified each piece — colour, quantity, and part name. If anything is wrong, edit the table directly. Add any missing pieces using the + row button, or remove incorrect ones with ✕.
When you are satisfied that all pieces are correct, click Save Pieces. This enables Phase 3 to run for this step.
| Qty | Colour | Part name | Part # | |
|---|---|---|---|---|
Phase 3 — Spatial placement
What do I do here?
The AI has described where each piece was placed by comparing the before and after images. Read every description carefully. Check that directions (left, right, front, back) are correct from the builder's perspective, and that stud counts are accurate.
If a description is vague, wrong, or uses the wrong direction — click Edit in that row and correct it. Once every placement description for this step is accurate, click Approve. Approval is required before the accessible prose can be generated.
This is the most important phase — a blind builder will follow these descriptions precisely.
Not yet extracted.
Phase 4 — Accessible prose
What do I do here?
This step is completed by the builder, not the sighted reviewer. The app generates an accessible prose paragraph from the approved Phase 3 descriptions. No action is needed from you here — your work is done once Phase 3 is approved.
Not yet generated. Complete Phase 3 and approve placement first.
Step 34
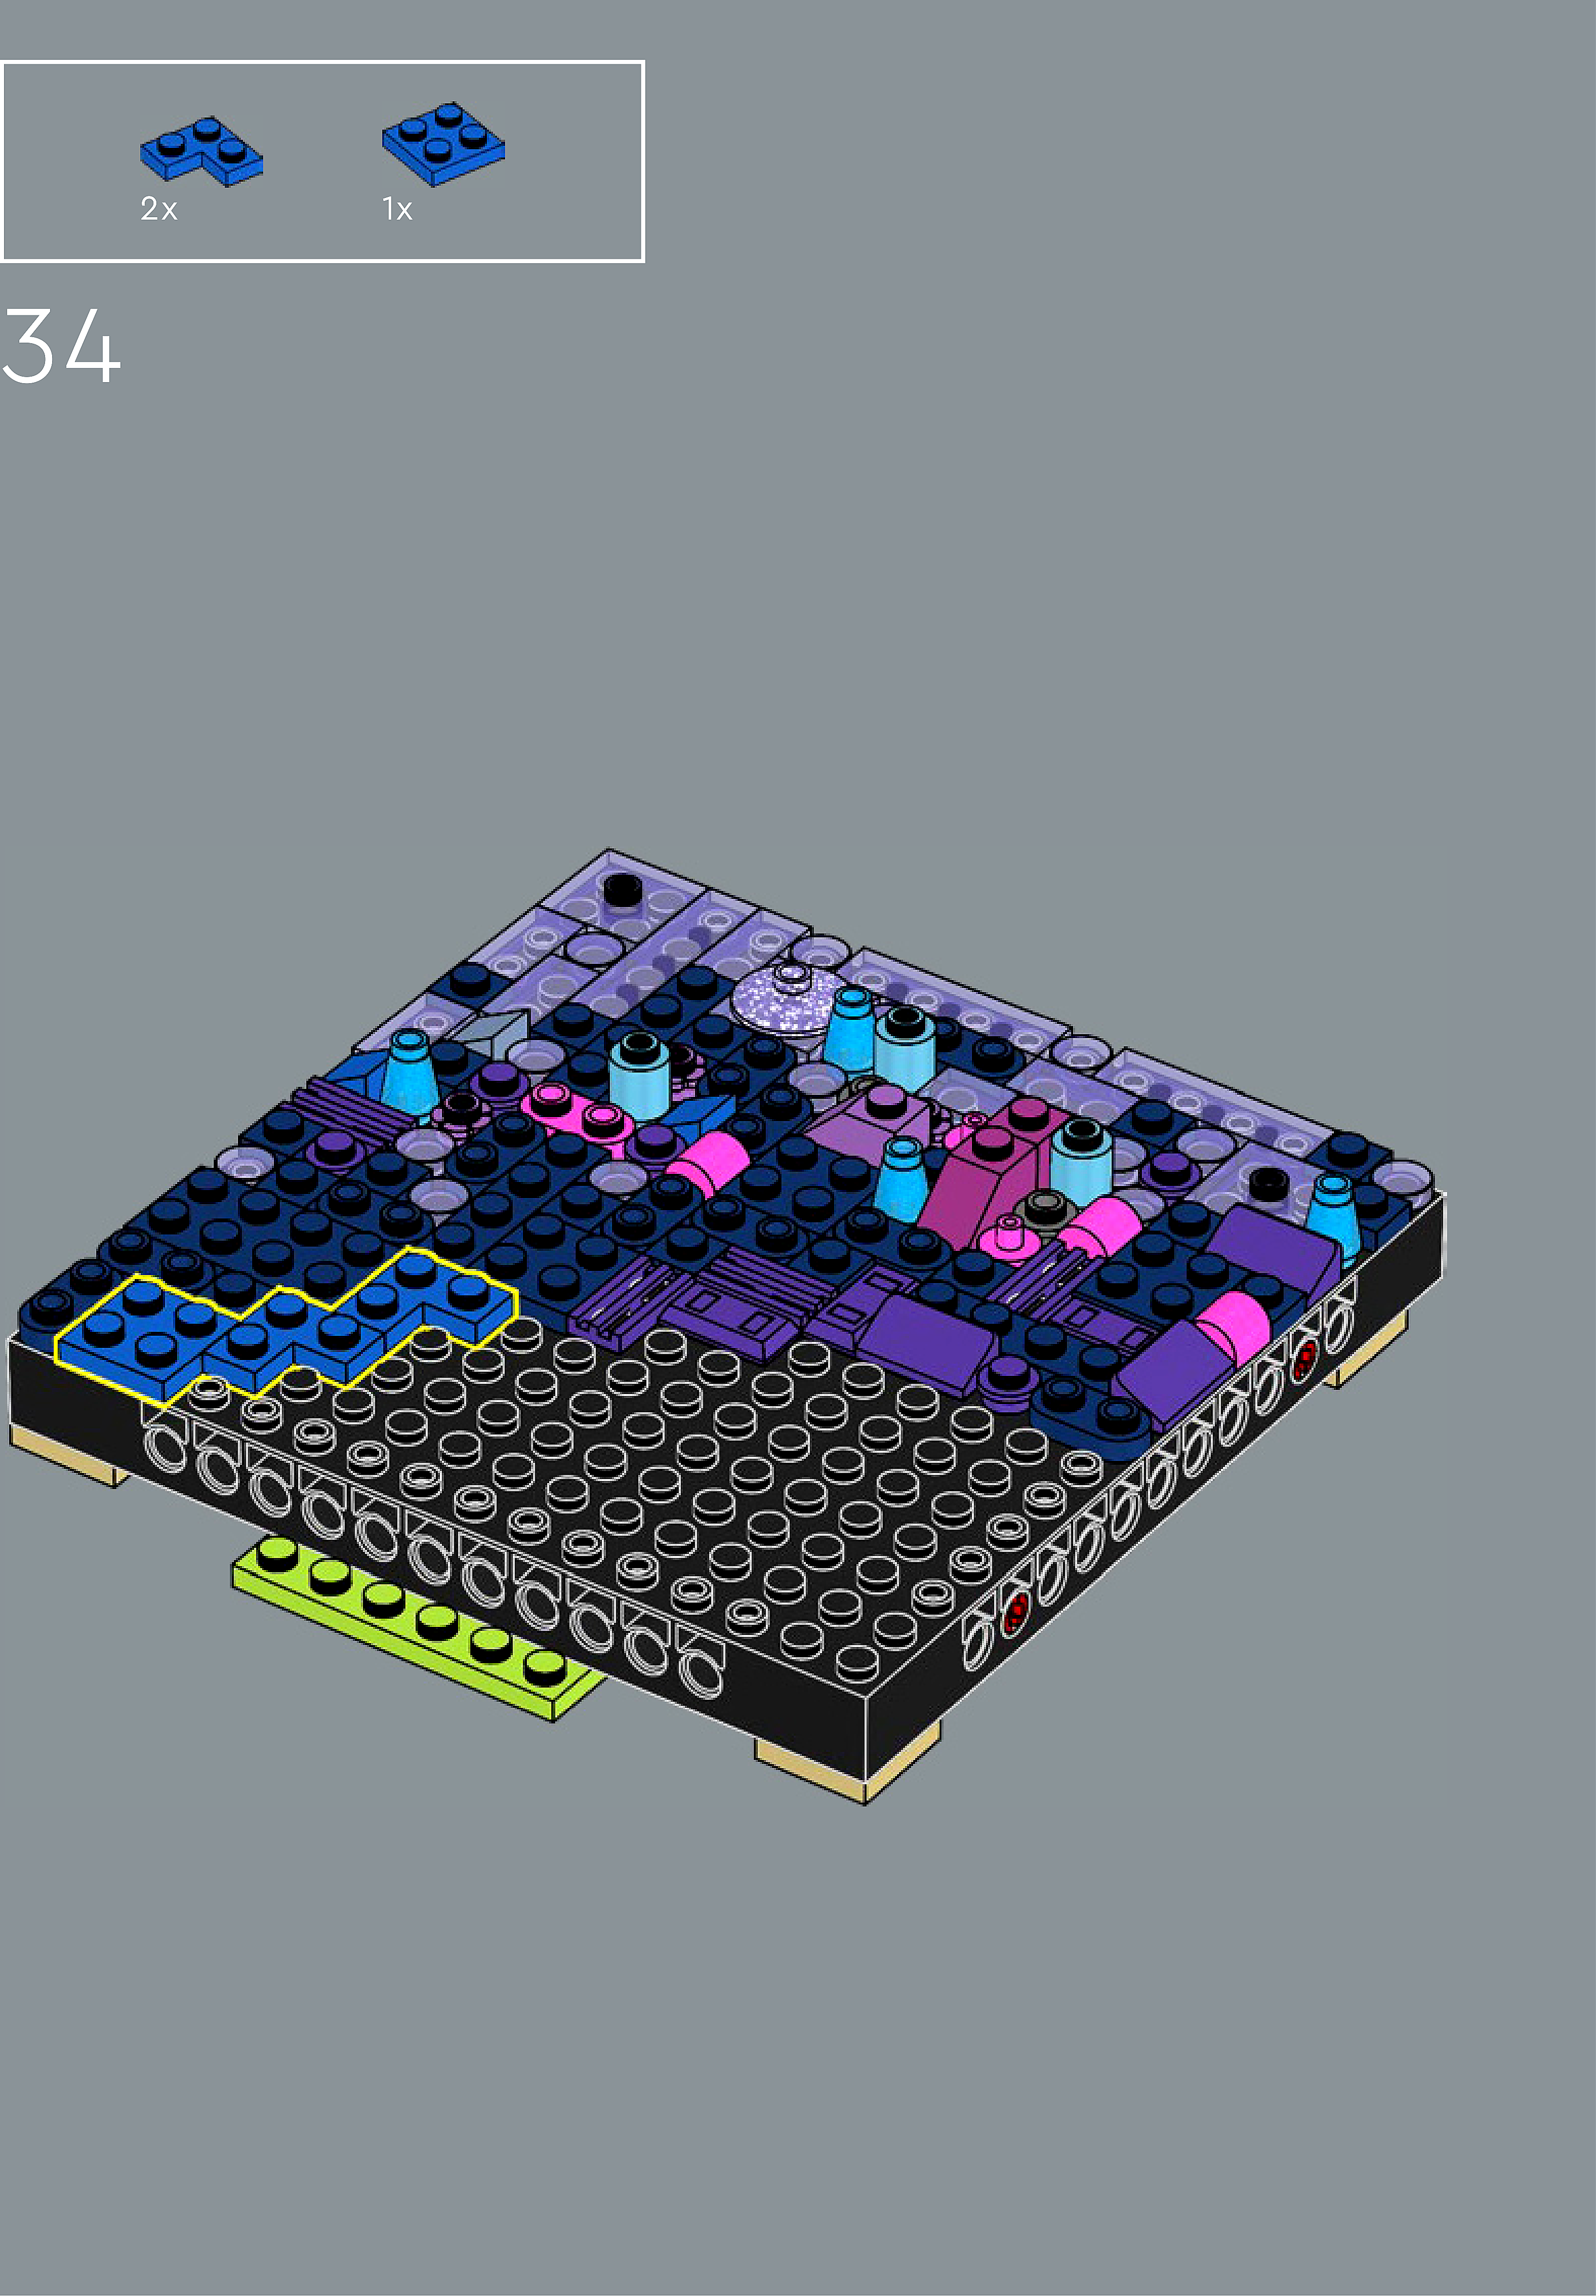
Assembly — page 22
Inset — page 22
Phase 2 — Pieces
What do I do here?
Look at the inset image above. Check that the AI has correctly identified each piece — colour, quantity, and part name. If anything is wrong, edit the table directly. Add any missing pieces using the + row button, or remove incorrect ones with ✕.
When you are satisfied that all pieces are correct, click Save Pieces. This enables Phase 3 to run for this step.
| Qty | Colour | Part name | Part # | |
|---|---|---|---|---|
Phase 3 — Spatial placement
What do I do here?
The AI has described where each piece was placed by comparing the before and after images. Read every description carefully. Check that directions (left, right, front, back) are correct from the builder's perspective, and that stud counts are accurate.
If a description is vague, wrong, or uses the wrong direction — click Edit in that row and correct it. Once every placement description for this step is accurate, click Approve. Approval is required before the accessible prose can be generated.
This is the most important phase — a blind builder will follow these descriptions precisely.
Not yet extracted.
Phase 4 — Accessible prose
What do I do here?
This step is completed by the builder, not the sighted reviewer. The app generates an accessible prose paragraph from the approved Phase 3 descriptions. No action is needed from you here — your work is done once Phase 3 is approved.
Not yet generated. Complete Phase 3 and approve placement first.
Step 35
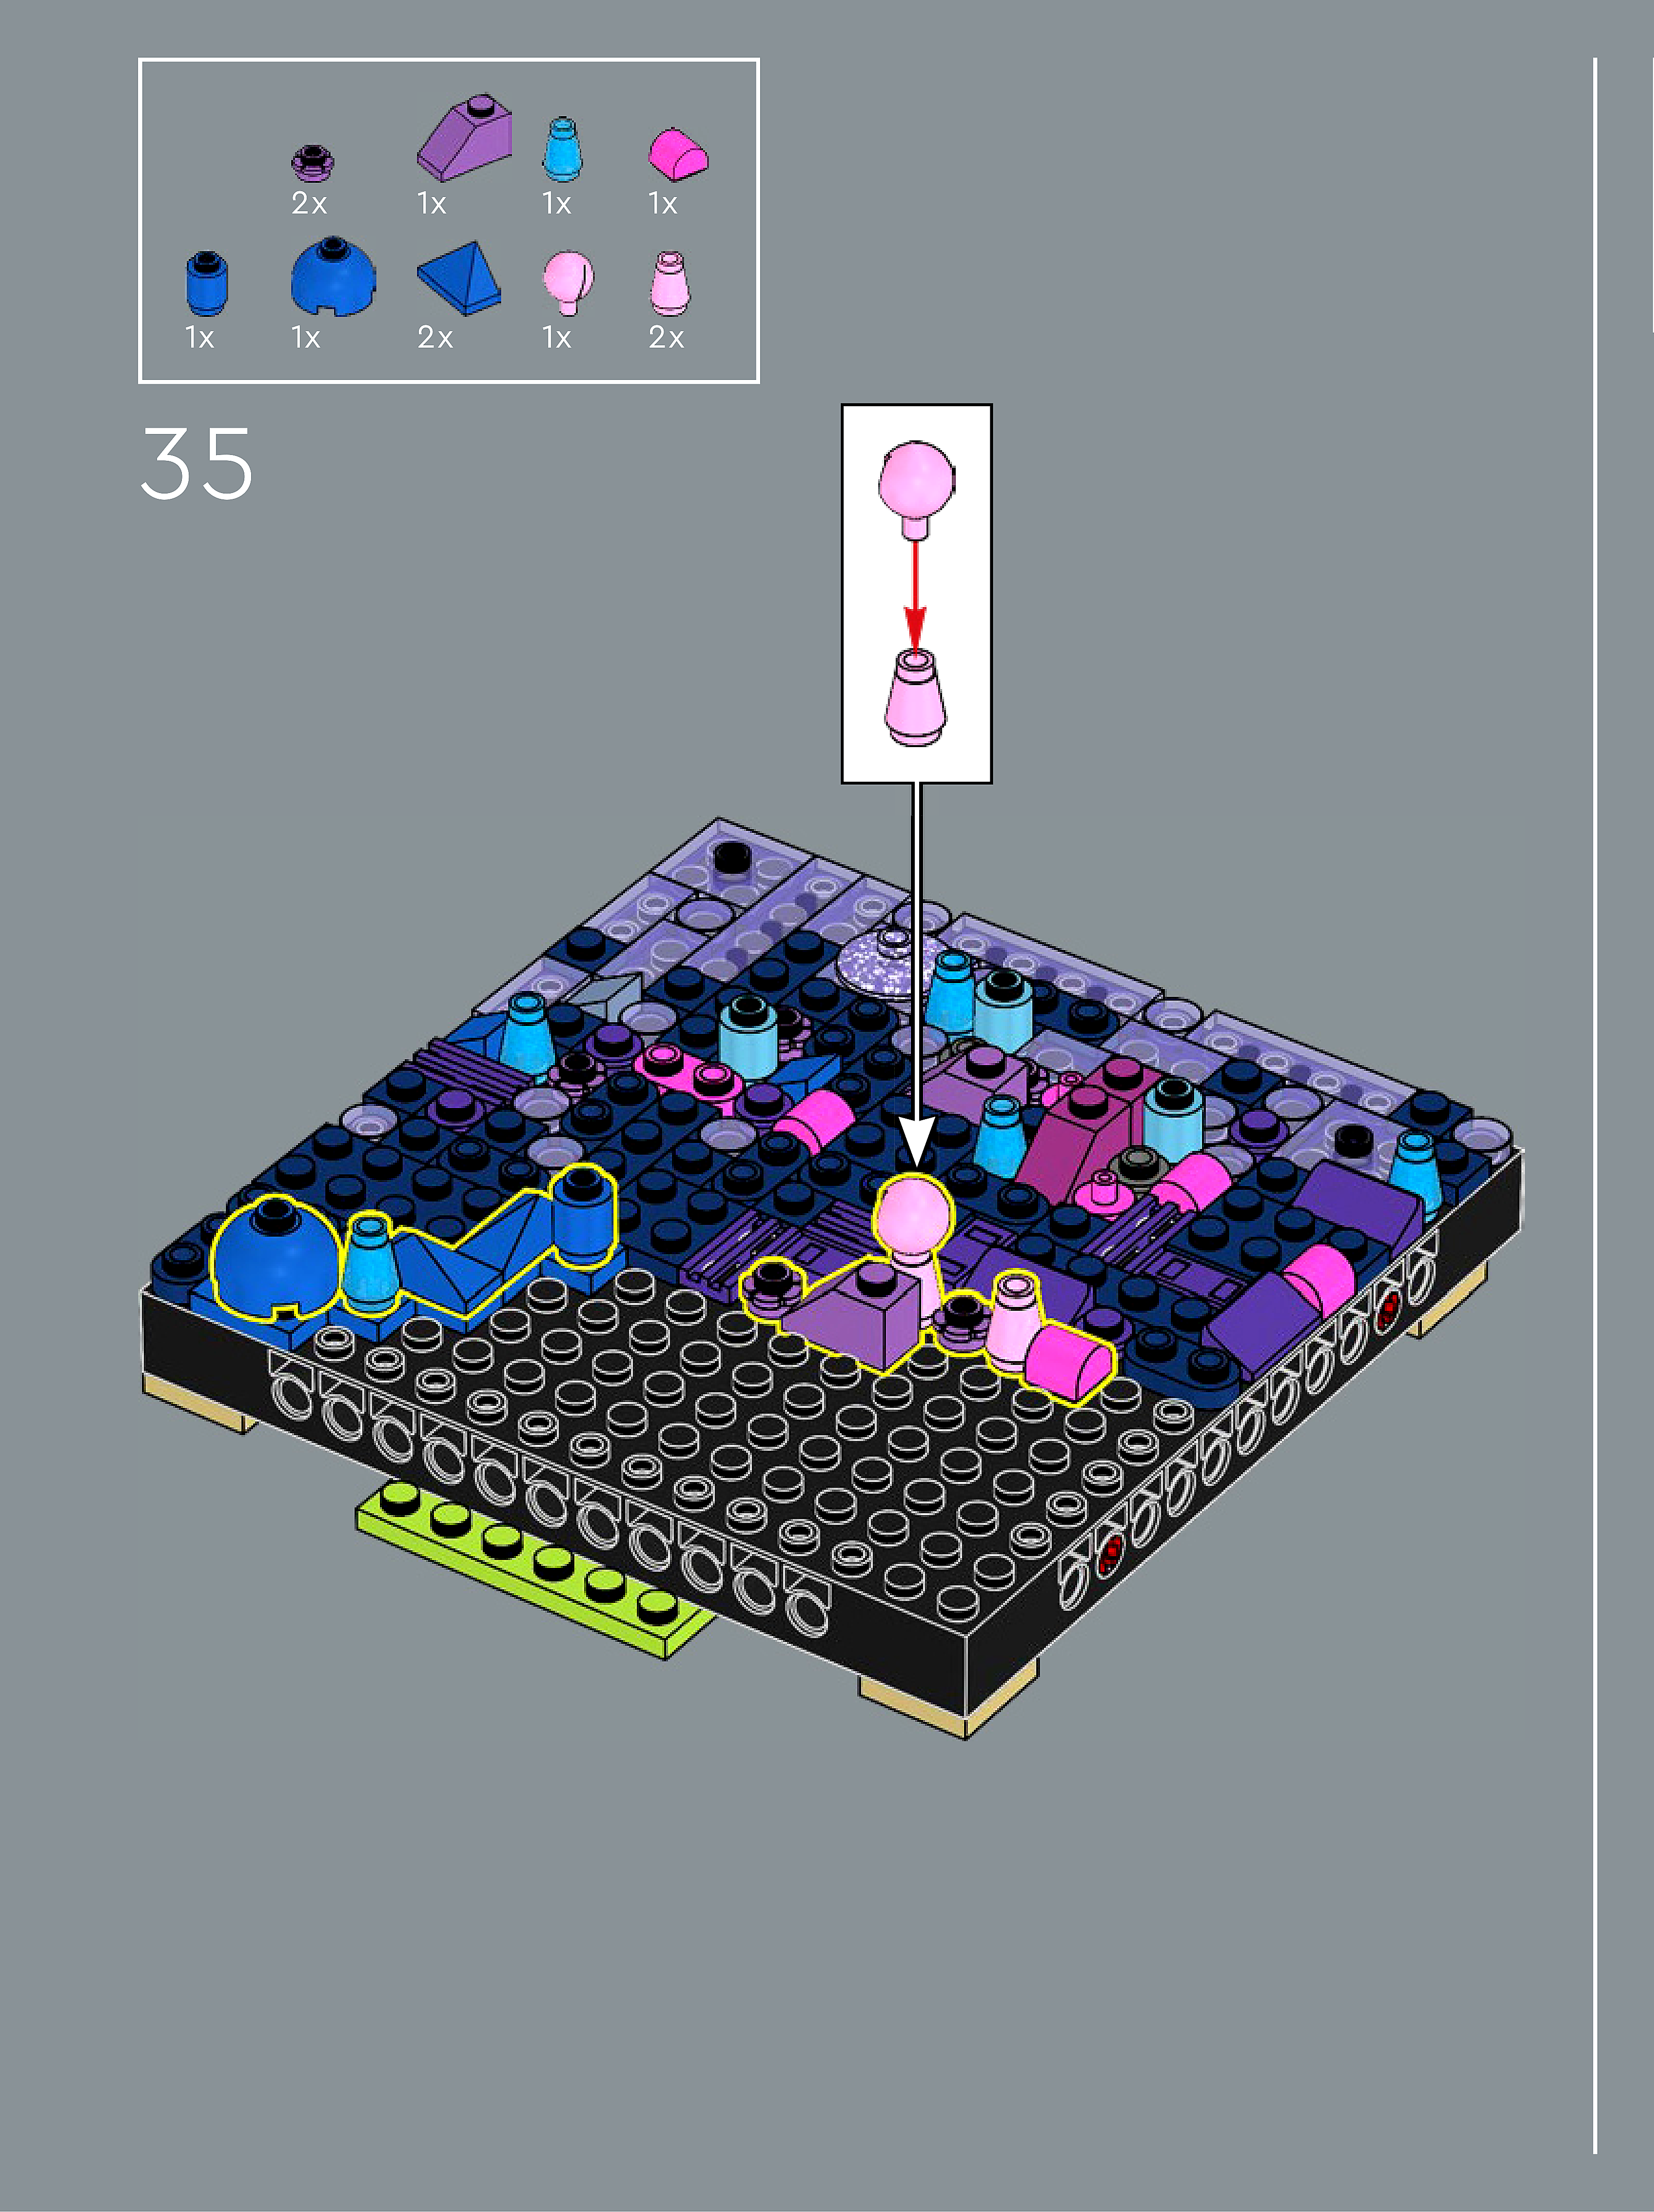
Assembly — page 23
Inset — page 23
Phase 2 — Pieces
What do I do here?
Look at the inset image above. Check that the AI has correctly identified each piece — colour, quantity, and part name. If anything is wrong, edit the table directly. Add any missing pieces using the + row button, or remove incorrect ones with ✕.
When you are satisfied that all pieces are correct, click Save Pieces. This enables Phase 3 to run for this step.
| Qty | Colour | Part name | Part # | |
|---|---|---|---|---|
Phase 3 — Spatial placement
What do I do here?
The AI has described where each piece was placed by comparing the before and after images. Read every description carefully. Check that directions (left, right, front, back) are correct from the builder's perspective, and that stud counts are accurate.
If a description is vague, wrong, or uses the wrong direction — click Edit in that row and correct it. Once every placement description for this step is accurate, click Approve. Approval is required before the accessible prose can be generated.
This is the most important phase — a blind builder will follow these descriptions precisely.
Not yet extracted.
Phase 4 — Accessible prose
What do I do here?
This step is completed by the builder, not the sighted reviewer. The app generates an accessible prose paragraph from the approved Phase 3 descriptions. No action is needed from you here — your work is done once Phase 3 is approved.
Not yet generated. Complete Phase 3 and approve placement first.
Step 36
Assembly — page 23
Inset — page 23
Phase 2 — Pieces
What do I do here?
Look at the inset image above. Check that the AI has correctly identified each piece — colour, quantity, and part name. If anything is wrong, edit the table directly. Add any missing pieces using the + row button, or remove incorrect ones with ✕.
When you are satisfied that all pieces are correct, click Save Pieces. This enables Phase 3 to run for this step.
| Qty | Colour | Part name | Part # | |
|---|---|---|---|---|
Phase 3 — Spatial placement
What do I do here?
The AI has described where each piece was placed by comparing the before and after images. Read every description carefully. Check that directions (left, right, front, back) are correct from the builder's perspective, and that stud counts are accurate.
If a description is vague, wrong, or uses the wrong direction — click Edit in that row and correct it. Once every placement description for this step is accurate, click Approve. Approval is required before the accessible prose can be generated.
This is the most important phase — a blind builder will follow these descriptions precisely.
Not yet extracted.
Phase 4 — Accessible prose
What do I do here?
This step is completed by the builder, not the sighted reviewer. The app generates an accessible prose paragraph from the approved Phase 3 descriptions. No action is needed from you here — your work is done once Phase 3 is approved.
Not yet generated. Complete Phase 3 and approve placement first.
Step 37
Assembly — page 24
Inset — page 24
Phase 2 — Pieces
What do I do here?
Look at the inset image above. Check that the AI has correctly identified each piece — colour, quantity, and part name. If anything is wrong, edit the table directly. Add any missing pieces using the + row button, or remove incorrect ones with ✕.
When you are satisfied that all pieces are correct, click Save Pieces. This enables Phase 3 to run for this step.
| Qty | Colour | Part name | Part # | |
|---|---|---|---|---|
Phase 3 — Spatial placement
What do I do here?
The AI has described where each piece was placed by comparing the before and after images. Read every description carefully. Check that directions (left, right, front, back) are correct from the builder's perspective, and that stud counts are accurate.
If a description is vague, wrong, or uses the wrong direction — click Edit in that row and correct it. Once every placement description for this step is accurate, click Approve. Approval is required before the accessible prose can be generated.
This is the most important phase — a blind builder will follow these descriptions precisely.
Not yet extracted.
Phase 4 — Accessible prose
What do I do here?
This step is completed by the builder, not the sighted reviewer. The app generates an accessible prose paragraph from the approved Phase 3 descriptions. No action is needed from you here — your work is done once Phase 3 is approved.
Not yet generated. Complete Phase 3 and approve placement first.
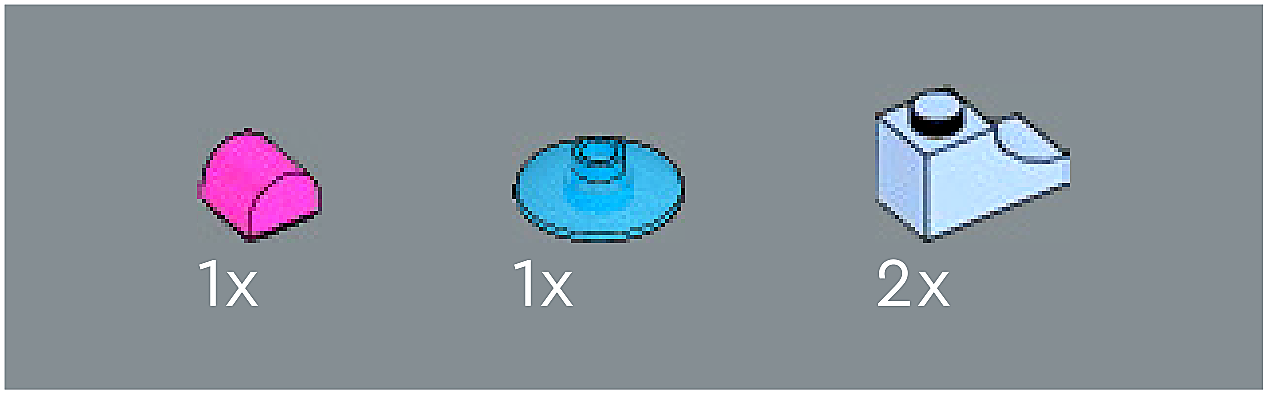
Step 38
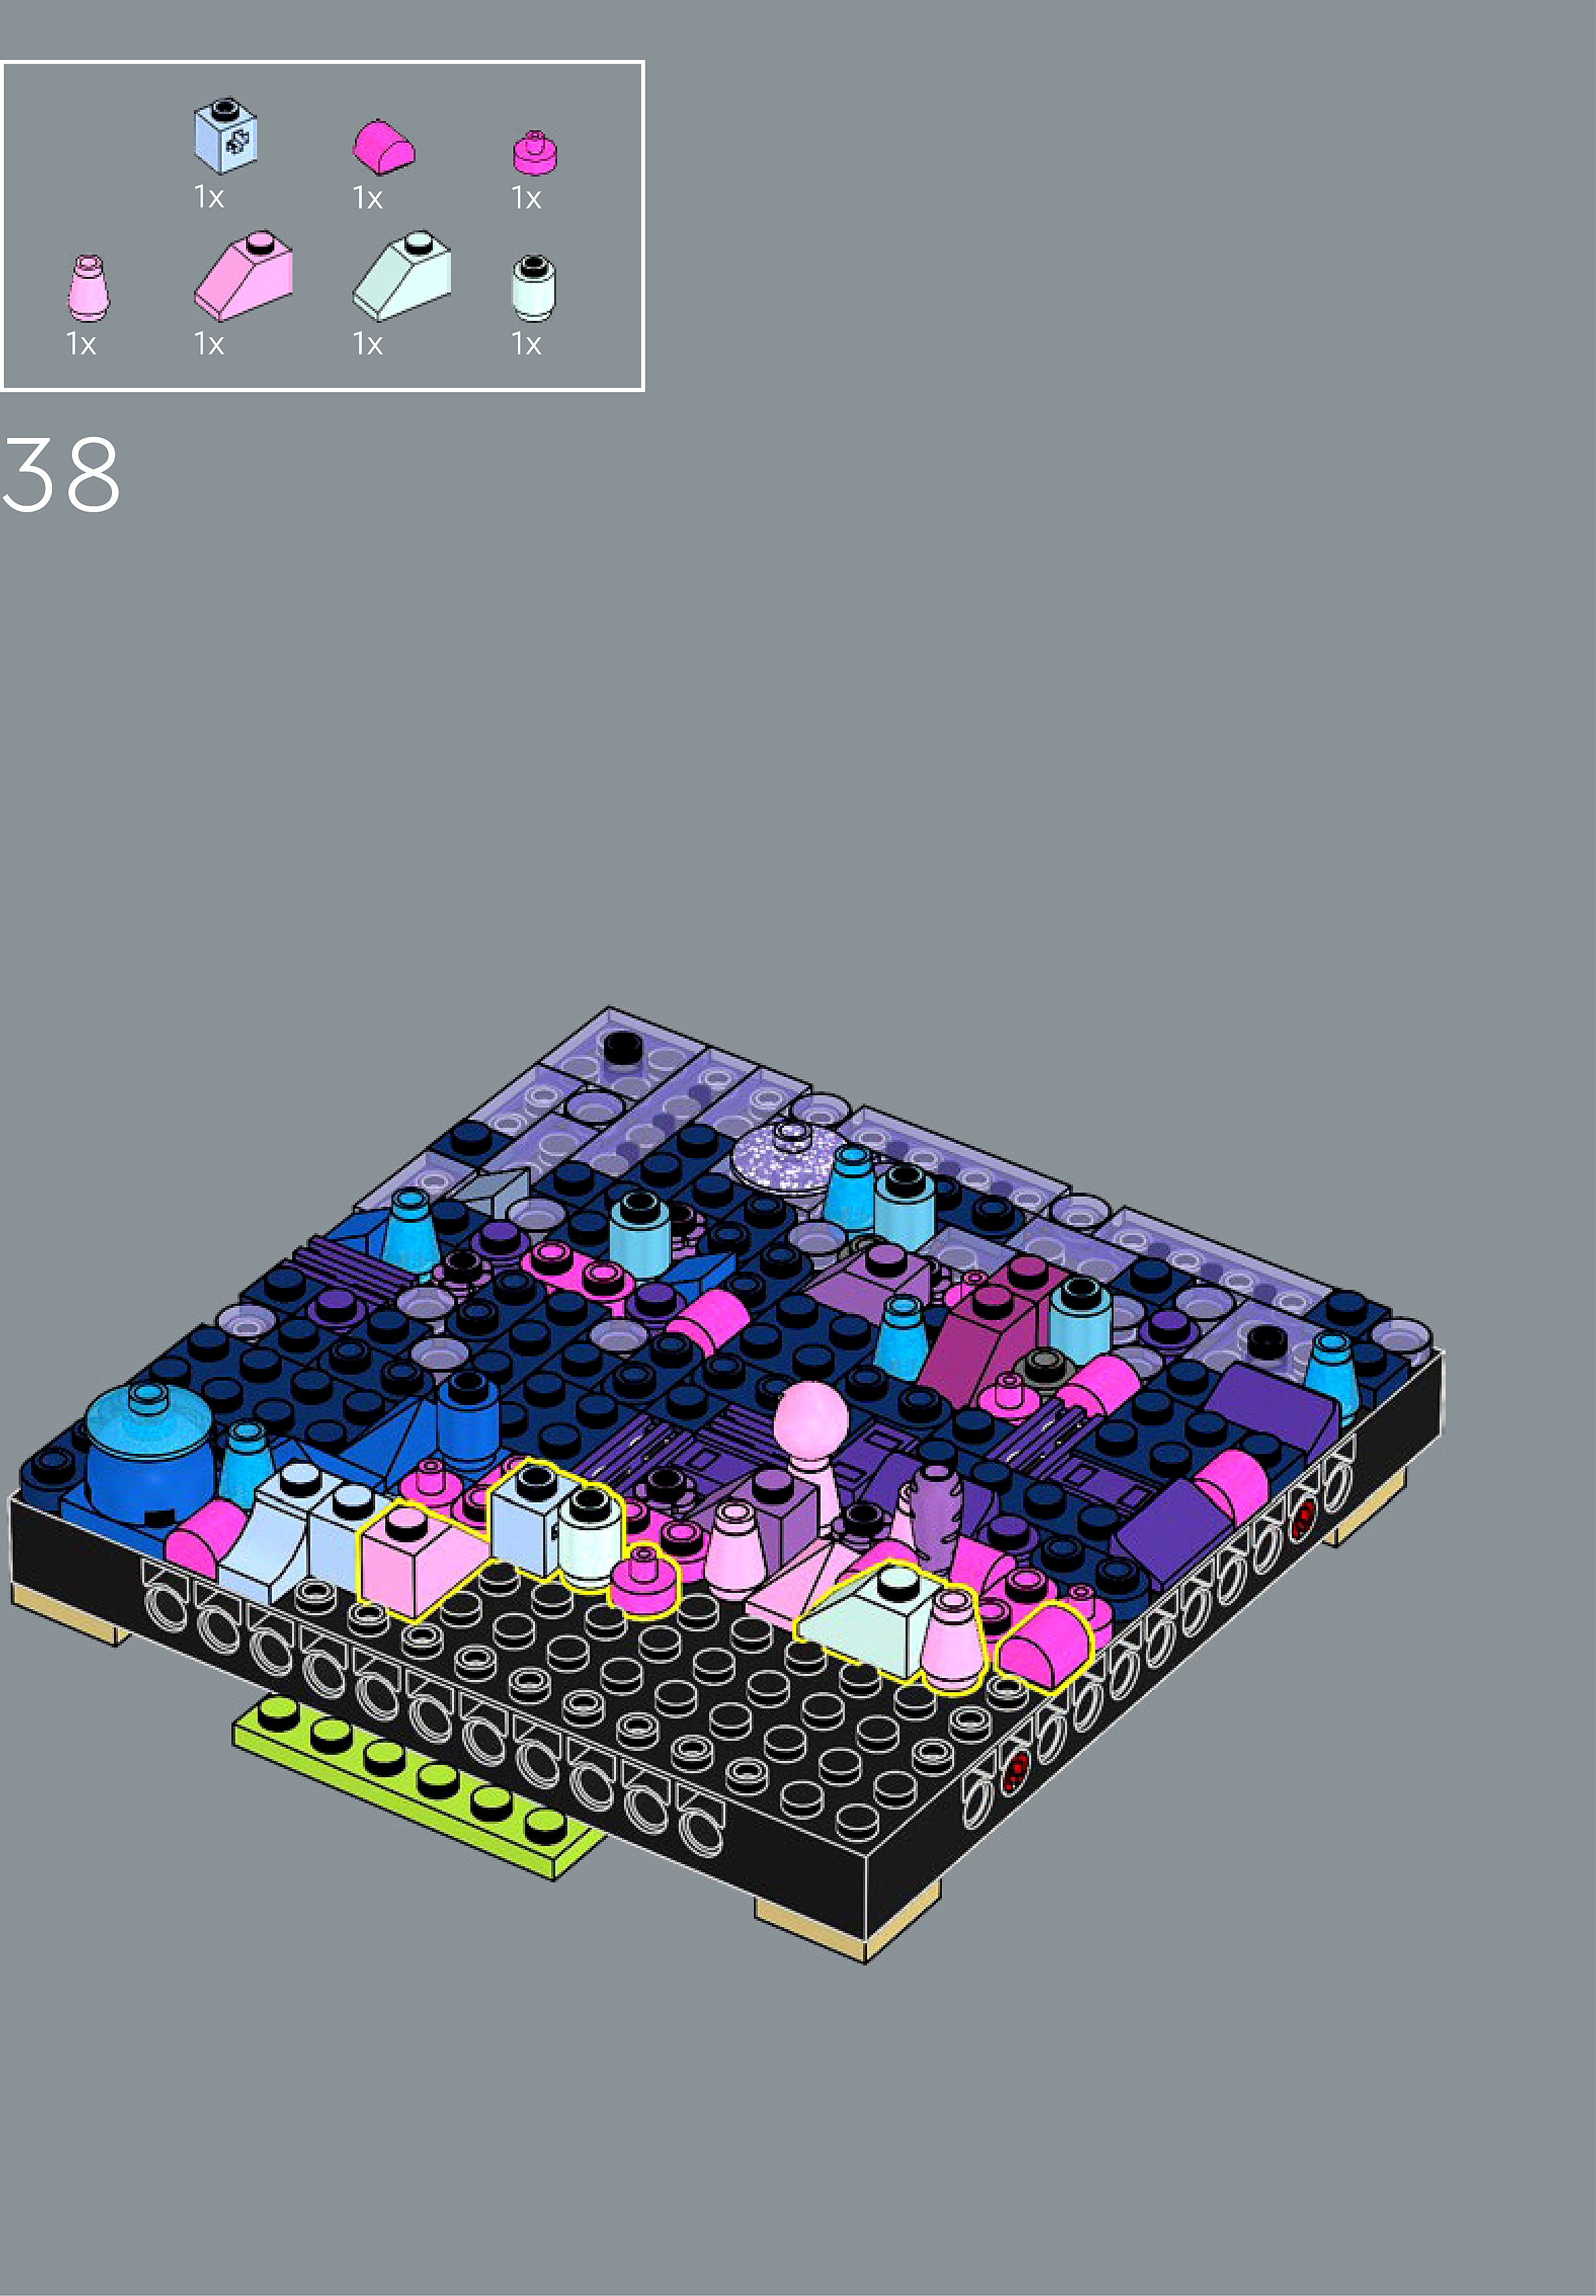
Assembly — page 24
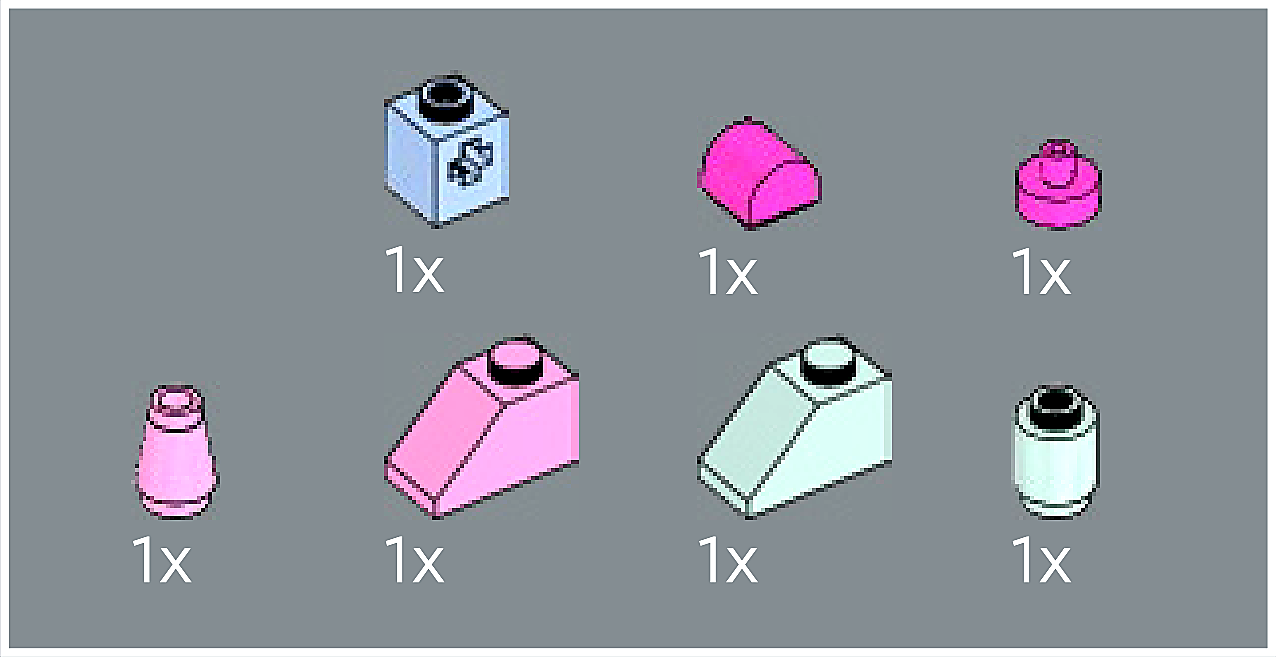
Inset — page 24
Phase 2 — Pieces
What do I do here?
Look at the inset image above. Check that the AI has correctly identified each piece — colour, quantity, and part name. If anything is wrong, edit the table directly. Add any missing pieces using the + row button, or remove incorrect ones with ✕.
When you are satisfied that all pieces are correct, click Save Pieces. This enables Phase 3 to run for this step.
| Qty | Colour | Part name | Part # | |
|---|---|---|---|---|
Phase 3 — Spatial placement
What do I do here?
The AI has described where each piece was placed by comparing the before and after images. Read every description carefully. Check that directions (left, right, front, back) are correct from the builder's perspective, and that stud counts are accurate.
If a description is vague, wrong, or uses the wrong direction — click Edit in that row and correct it. Once every placement description for this step is accurate, click Approve. Approval is required before the accessible prose can be generated.
This is the most important phase — a blind builder will follow these descriptions precisely.
Not yet extracted.
Phase 4 — Accessible prose
What do I do here?
This step is completed by the builder, not the sighted reviewer. The app generates an accessible prose paragraph from the approved Phase 3 descriptions. No action is needed from you here — your work is done once Phase 3 is approved.
Not yet generated. Complete Phase 3 and approve placement first.
Step 39
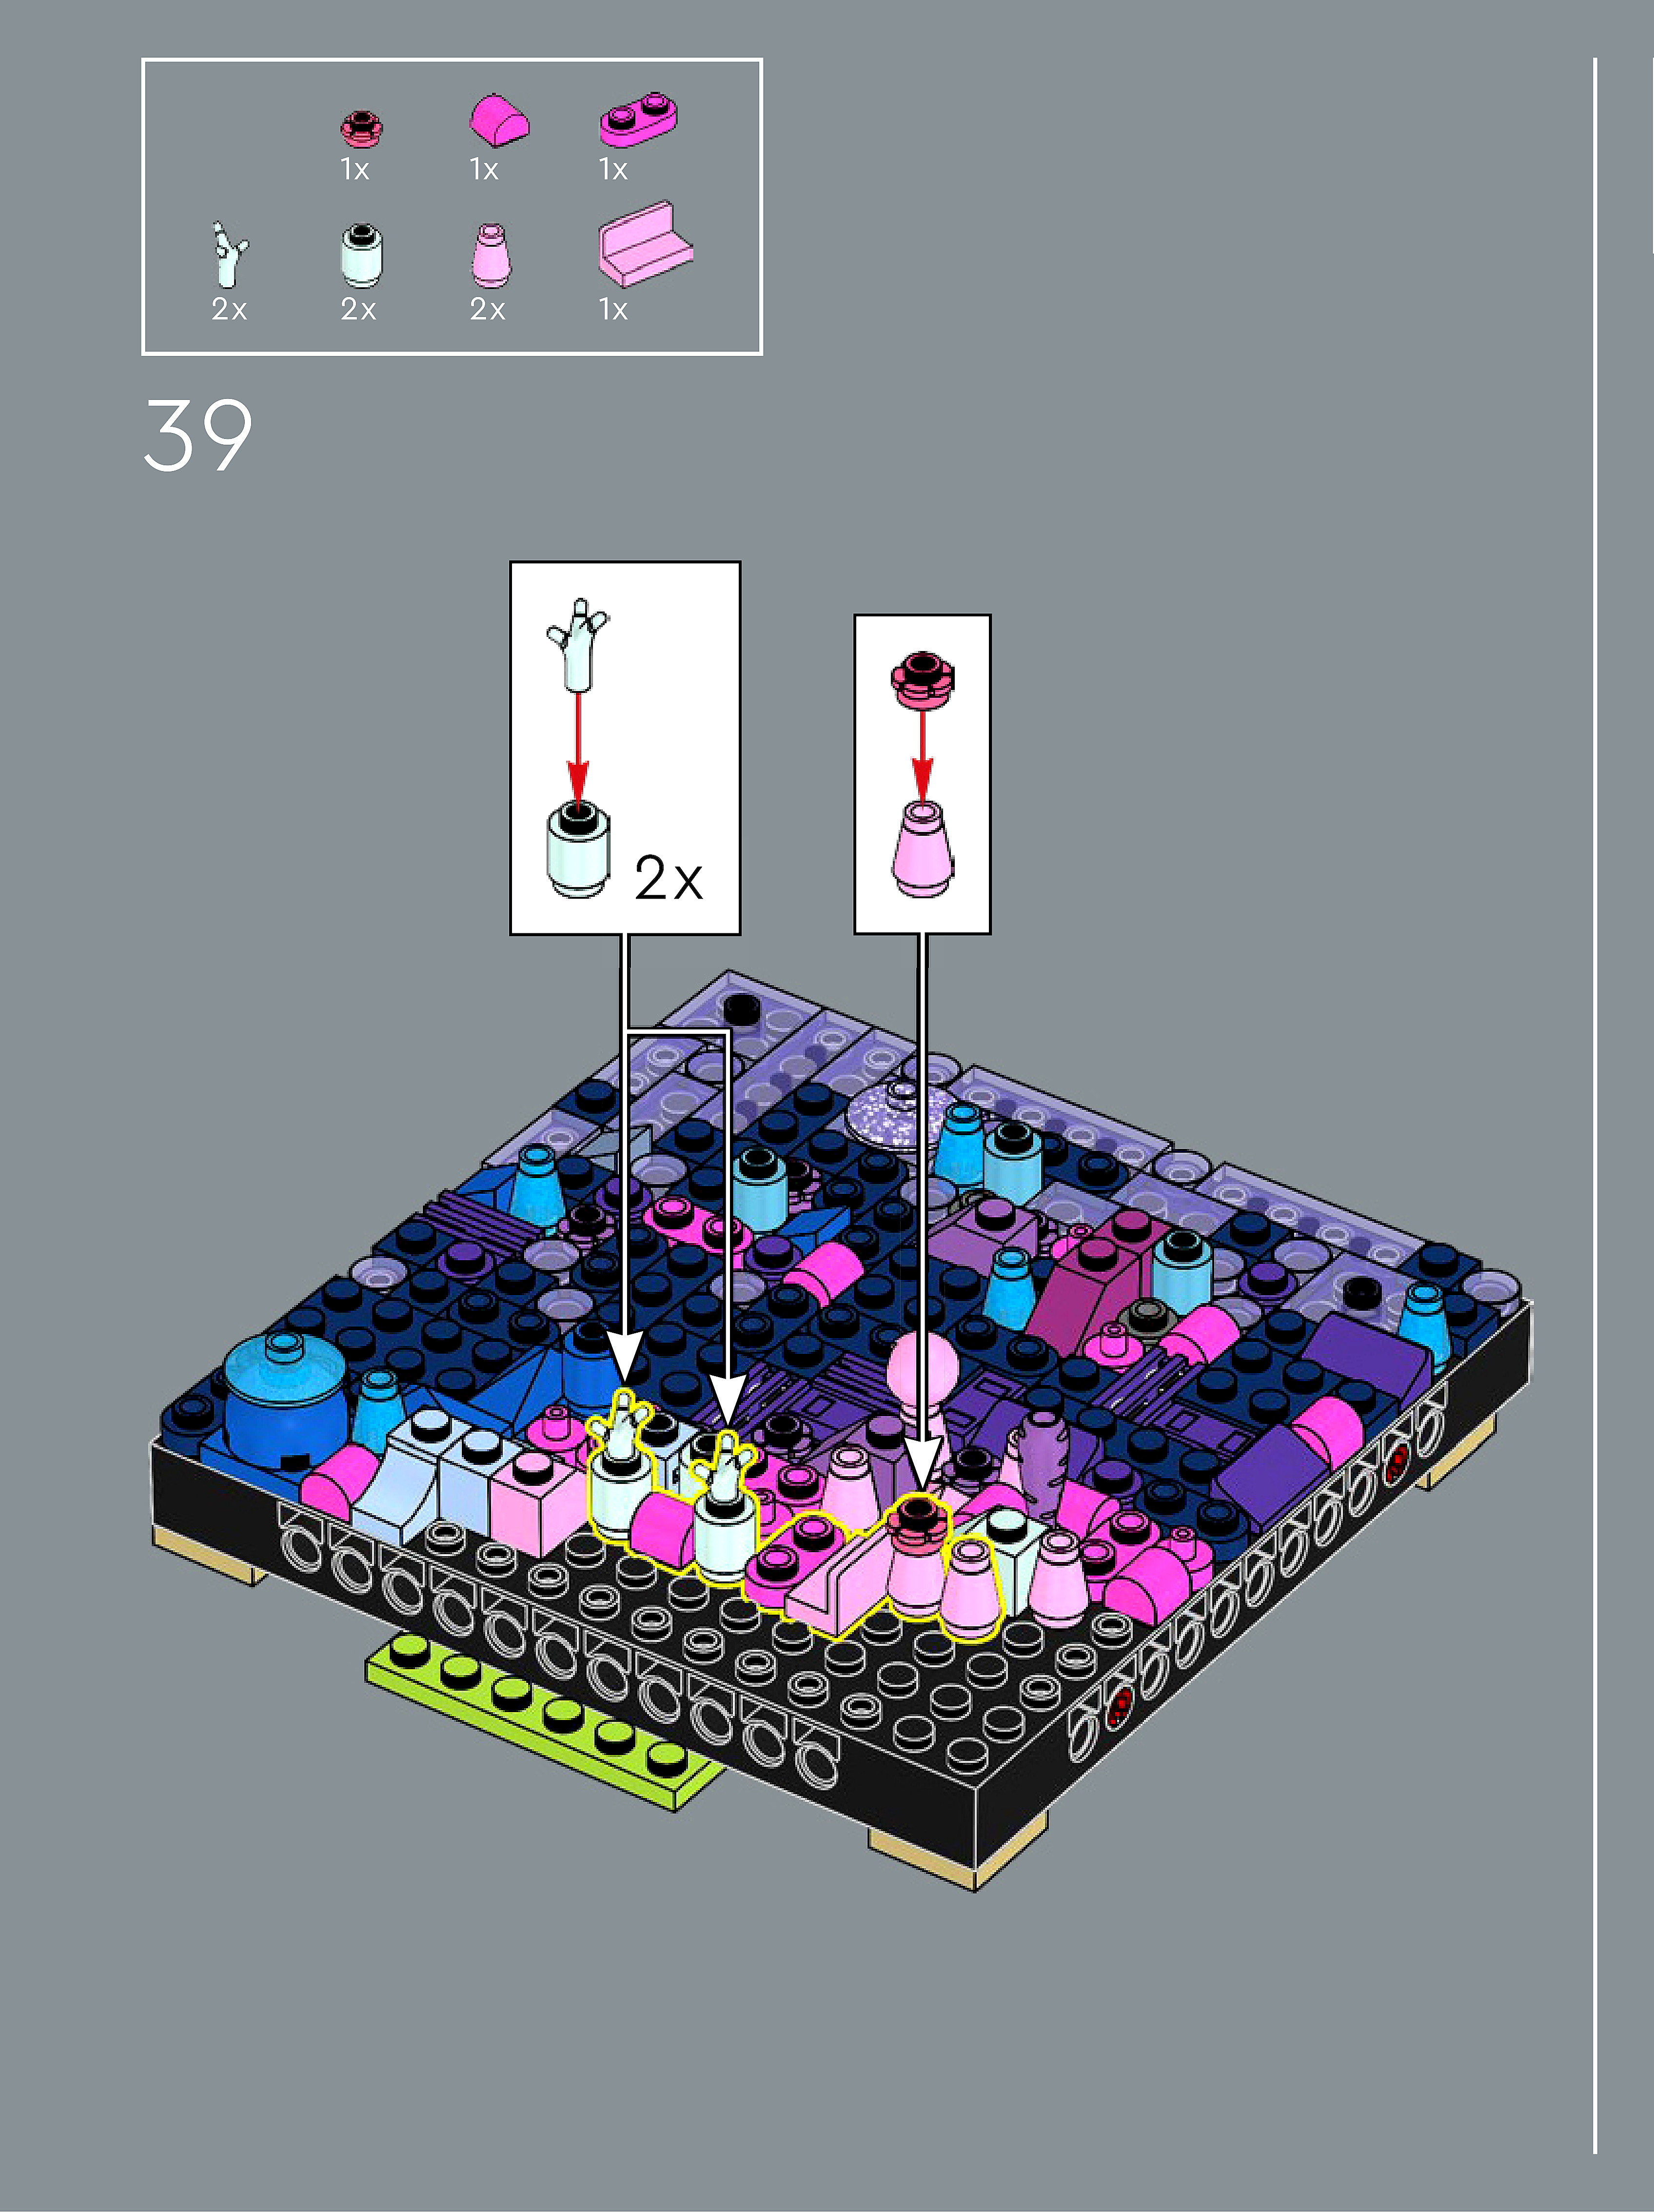
Assembly — page 25
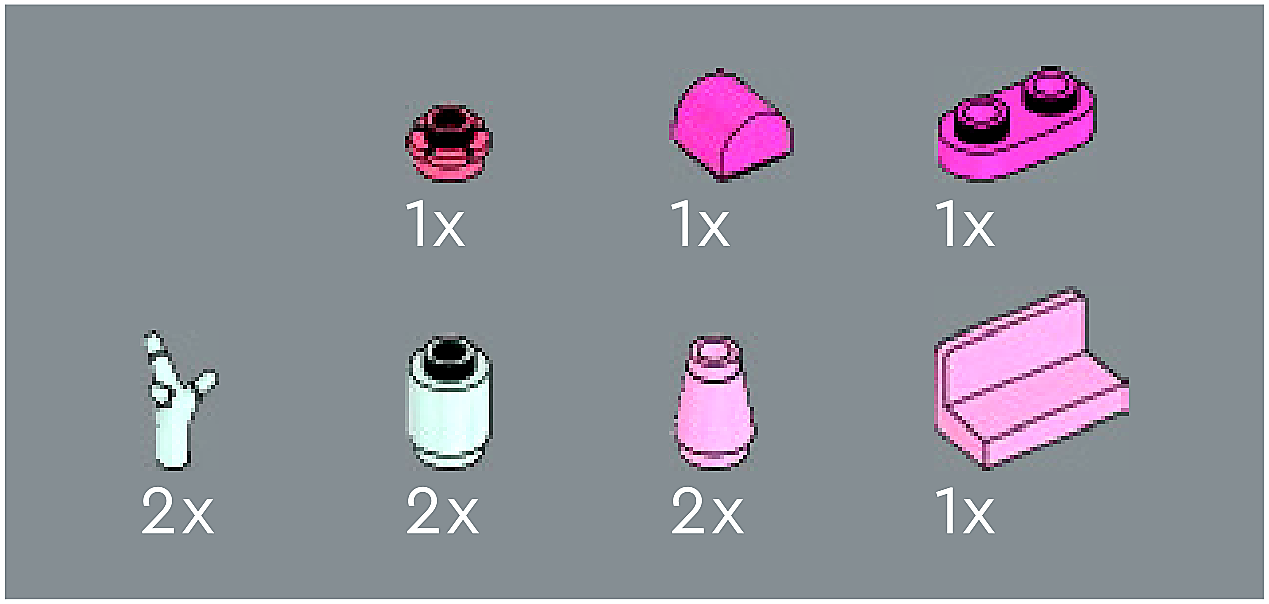
Inset — page 25
Phase 2 — Pieces
What do I do here?
Look at the inset image above. Check that the AI has correctly identified each piece — colour, quantity, and part name. If anything is wrong, edit the table directly. Add any missing pieces using the + row button, or remove incorrect ones with ✕.
When you are satisfied that all pieces are correct, click Save Pieces. This enables Phase 3 to run for this step.
| Qty | Colour | Part name | Part # |
|---|
Phase 3 — Spatial placement
What do I do here?
The AI has described where each piece was placed by comparing the before and after images. Read every description carefully. Check that directions (left, right, front, back) are correct from the builder's perspective, and that stud counts are accurate.
If a description is vague, wrong, or uses the wrong direction — click Edit in that row and correct it. Once every placement description for this step is accurate, click Approve. Approval is required before the accessible prose can be generated.
This is the most important phase — a blind builder will follow these descriptions precisely.
Not yet extracted.
Phase 4 — Accessible prose
What do I do here?
This step is completed by the builder, not the sighted reviewer. The app generates an accessible prose paragraph from the approved Phase 3 descriptions. No action is needed from you here — your work is done once Phase 3 is approved.
Not yet generated. Complete Phase 3 and approve placement first.
Step 40
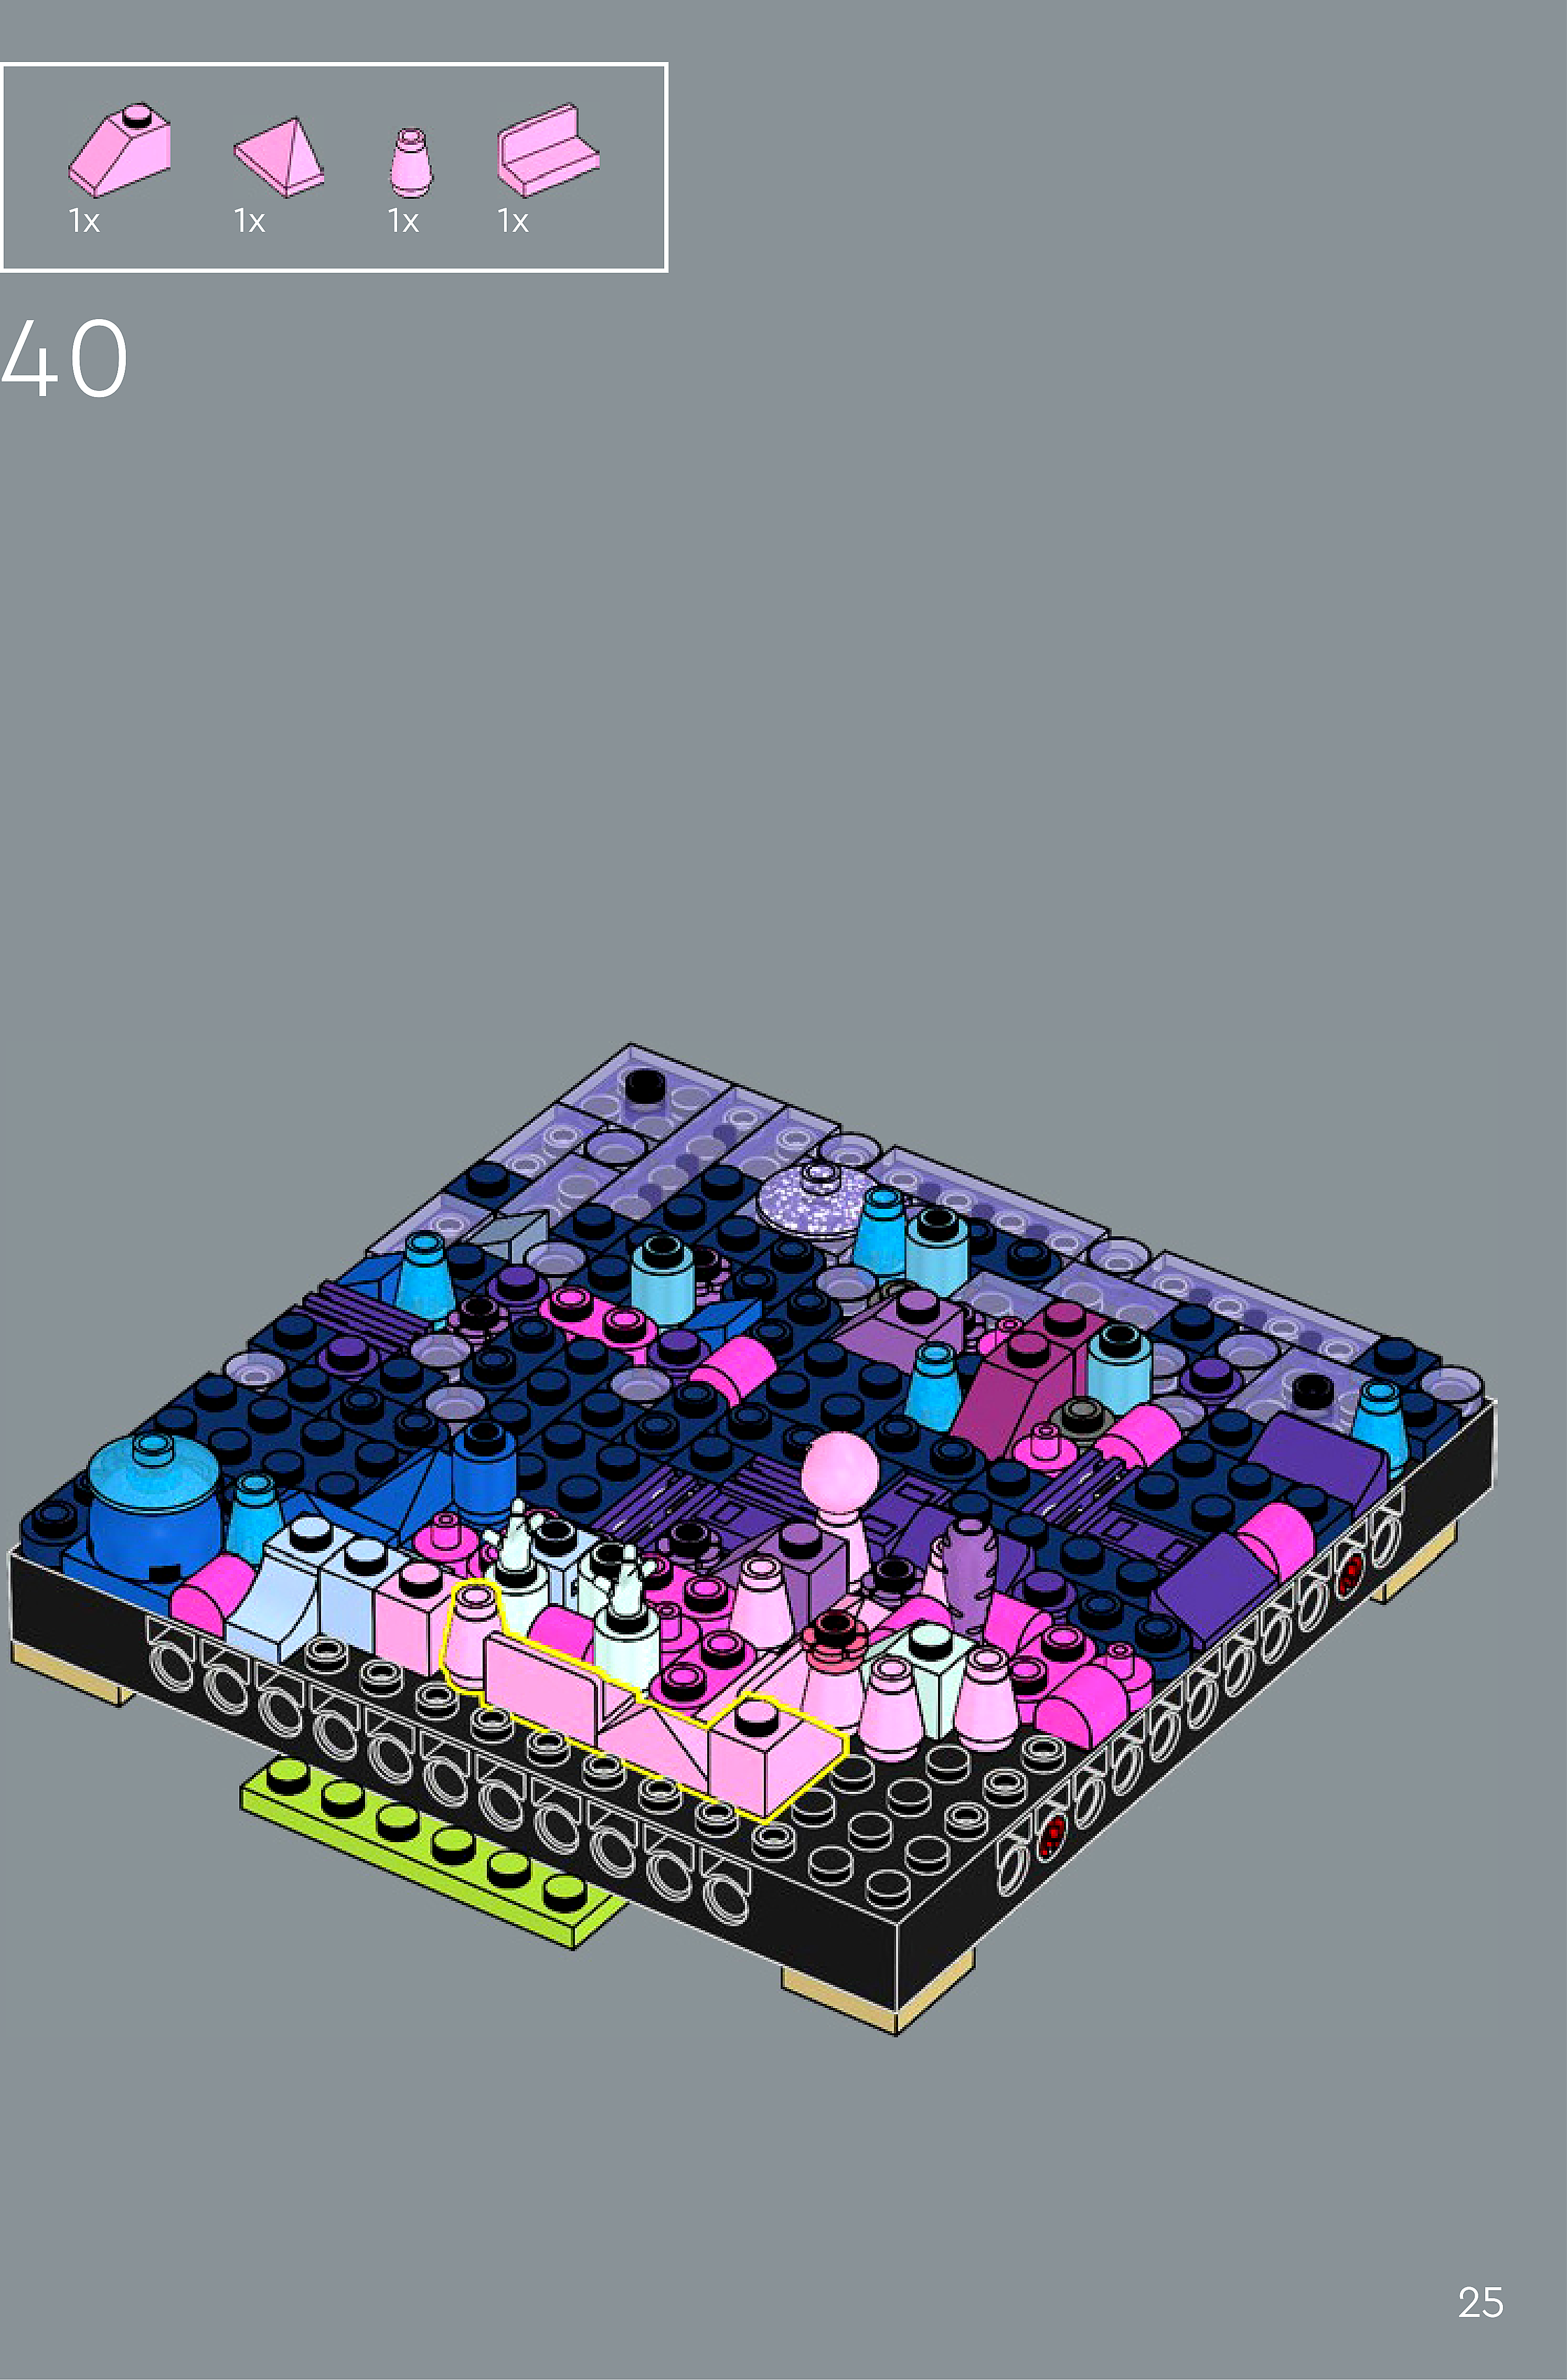
Assembly — page 25
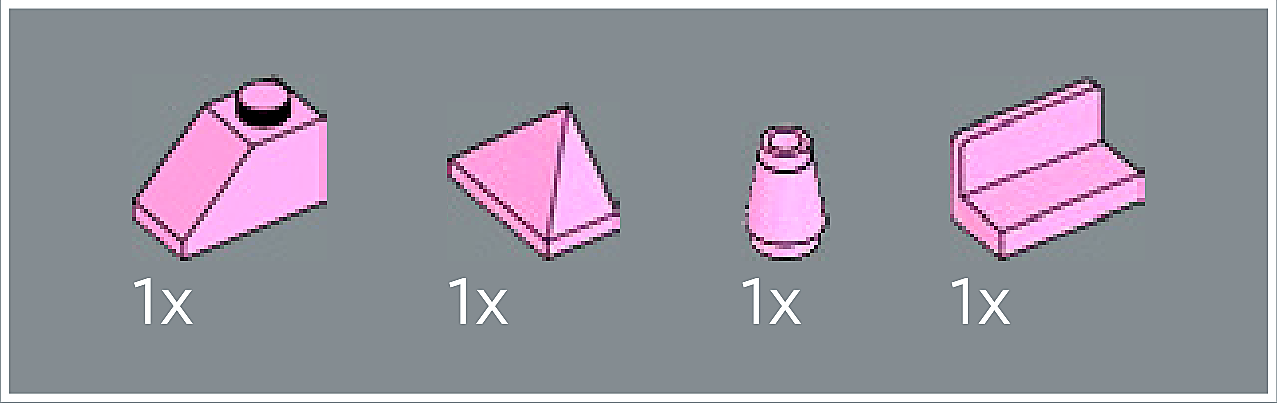
Inset — page 25
Phase 2 — Pieces
What do I do here?
Look at the inset image above. Check that the AI has correctly identified each piece — colour, quantity, and part name. If anything is wrong, edit the table directly. Add any missing pieces using the + row button, or remove incorrect ones with ✕.
When you are satisfied that all pieces are correct, click Save Pieces. This enables Phase 3 to run for this step.
| Qty | Colour | Part name | Part # | |
|---|---|---|---|---|
Phase 3 — Spatial placement
What do I do here?
The AI has described where each piece was placed by comparing the before and after images. Read every description carefully. Check that directions (left, right, front, back) are correct from the builder's perspective, and that stud counts are accurate.
If a description is vague, wrong, or uses the wrong direction — click Edit in that row and correct it. Once every placement description for this step is accurate, click Approve. Approval is required before the accessible prose can be generated.
This is the most important phase — a blind builder will follow these descriptions precisely.
Not yet extracted.
Phase 4 — Accessible prose
What do I do here?
This step is completed by the builder, not the sighted reviewer. The app generates an accessible prose paragraph from the approved Phase 3 descriptions. No action is needed from you here — your work is done once Phase 3 is approved.
Not yet generated. Complete Phase 3 and approve placement first.
Step 41
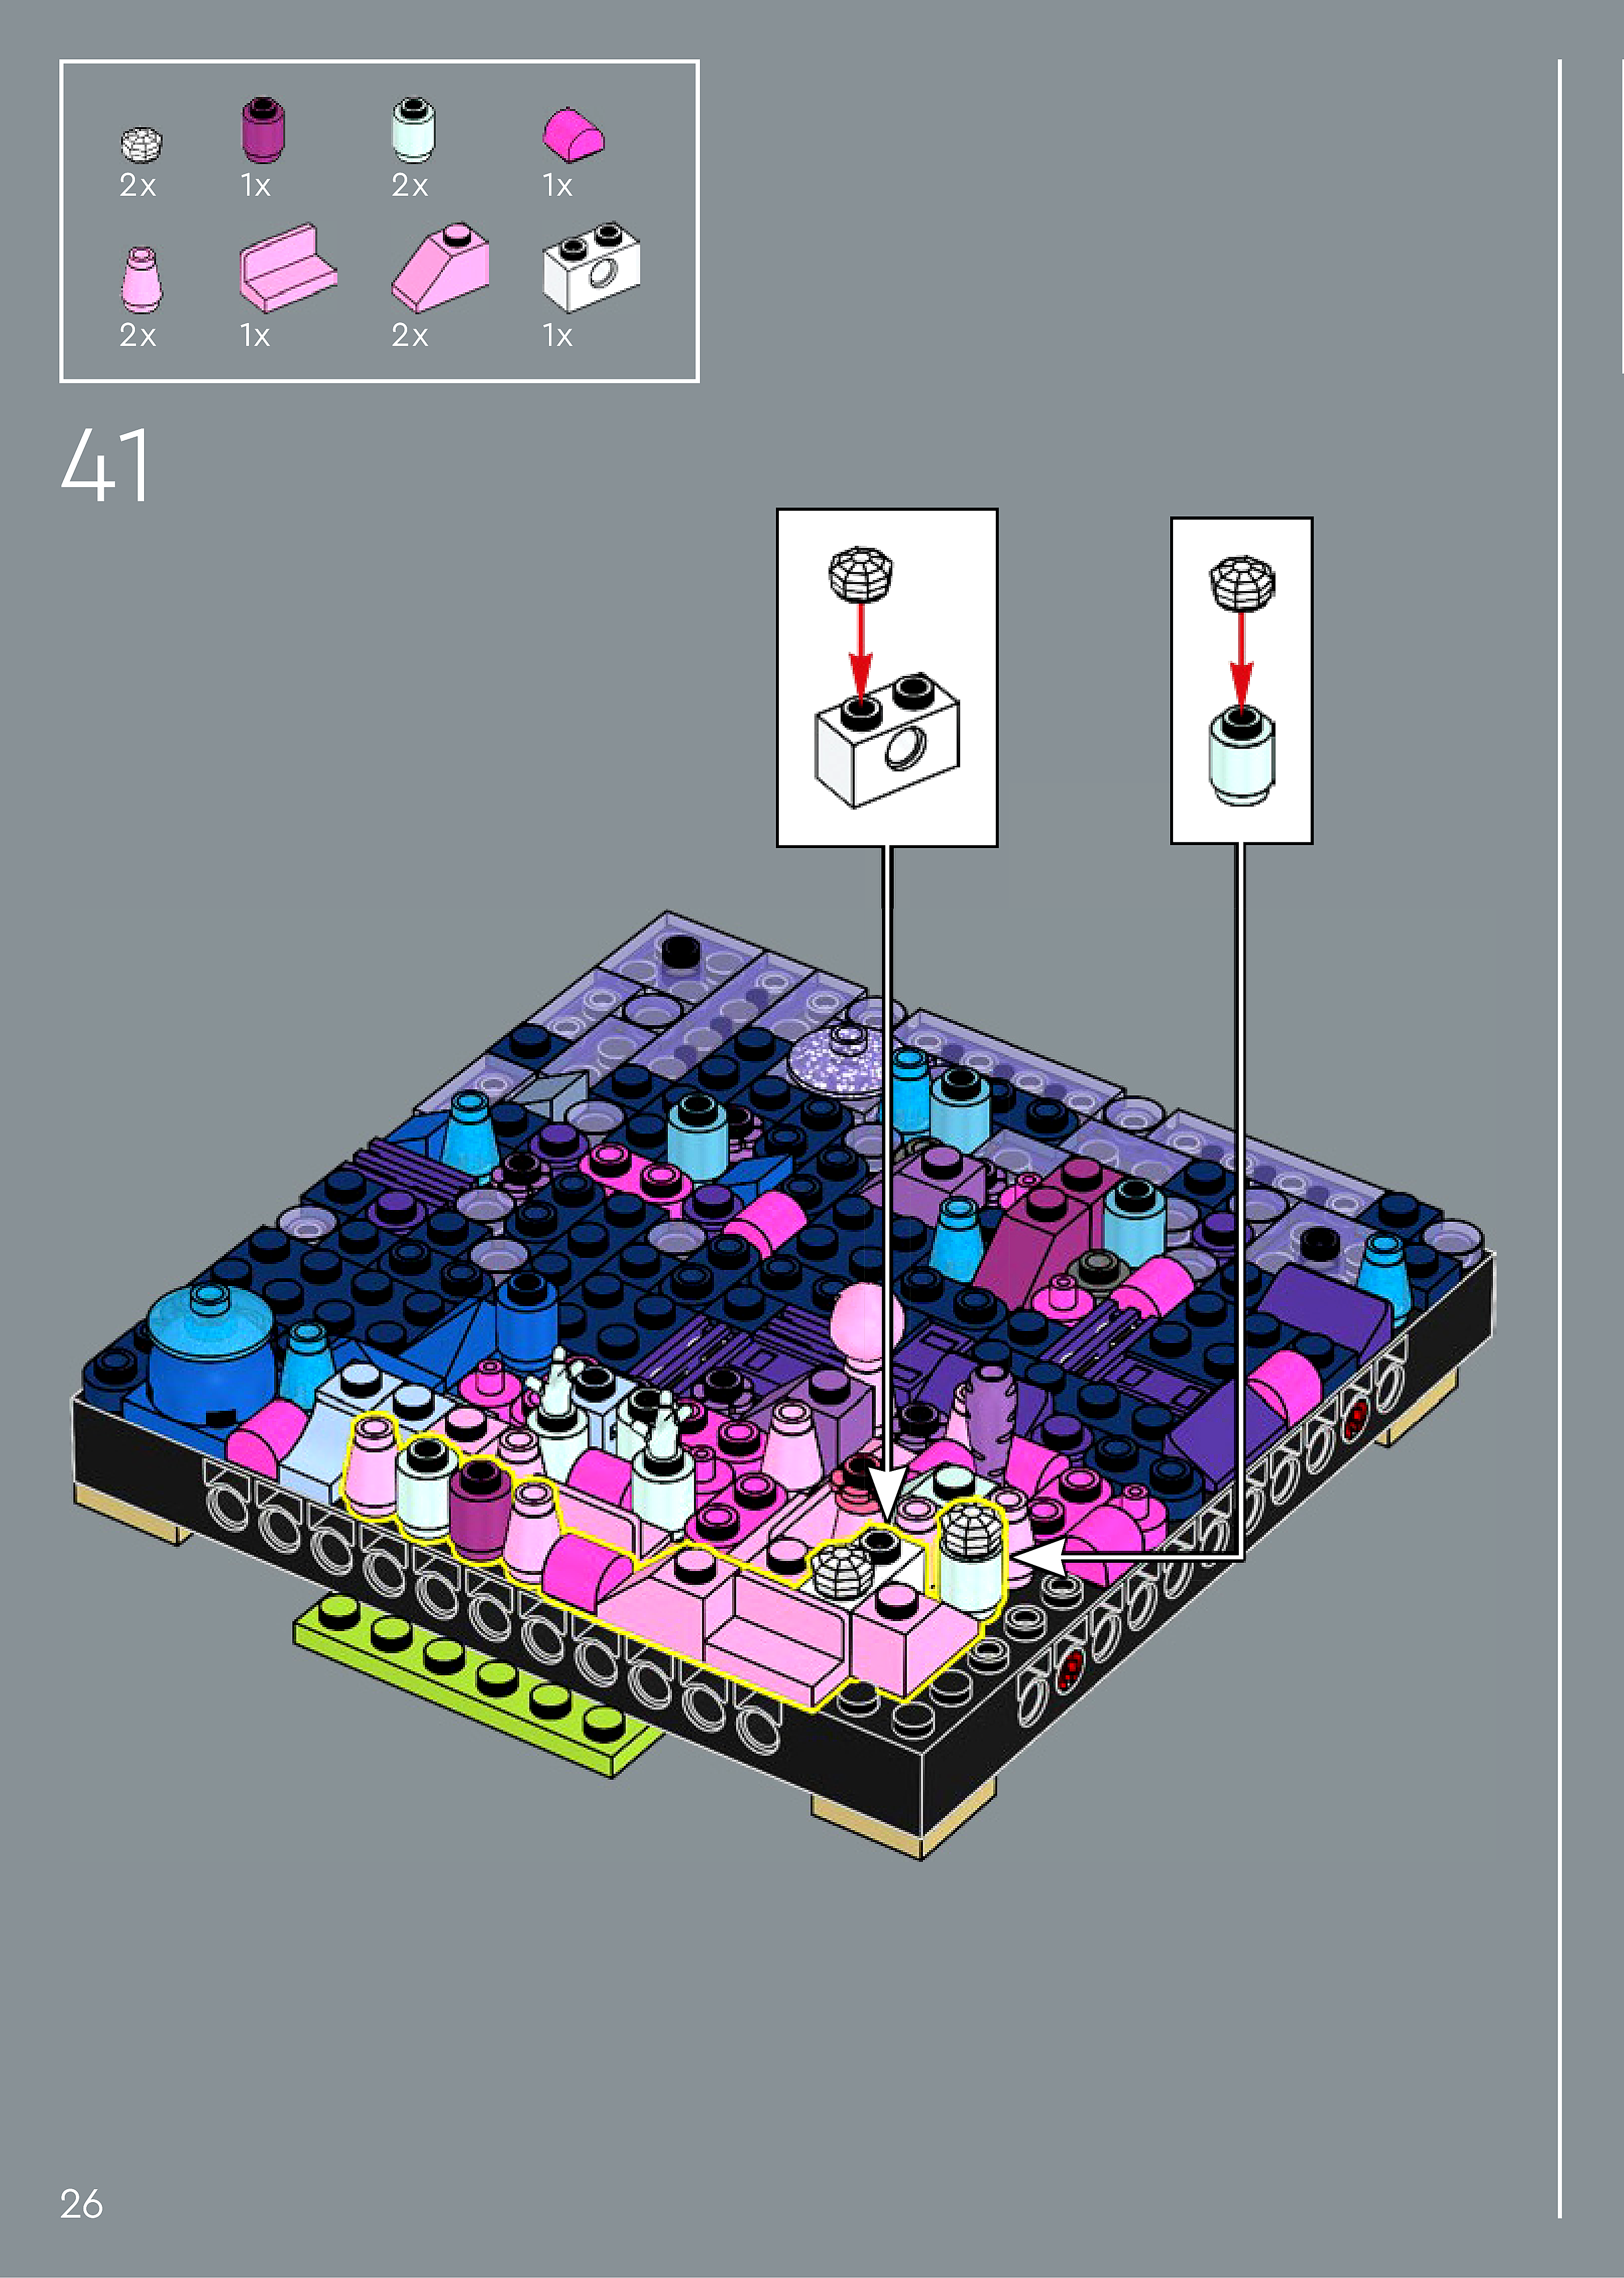
Assembly — page 26
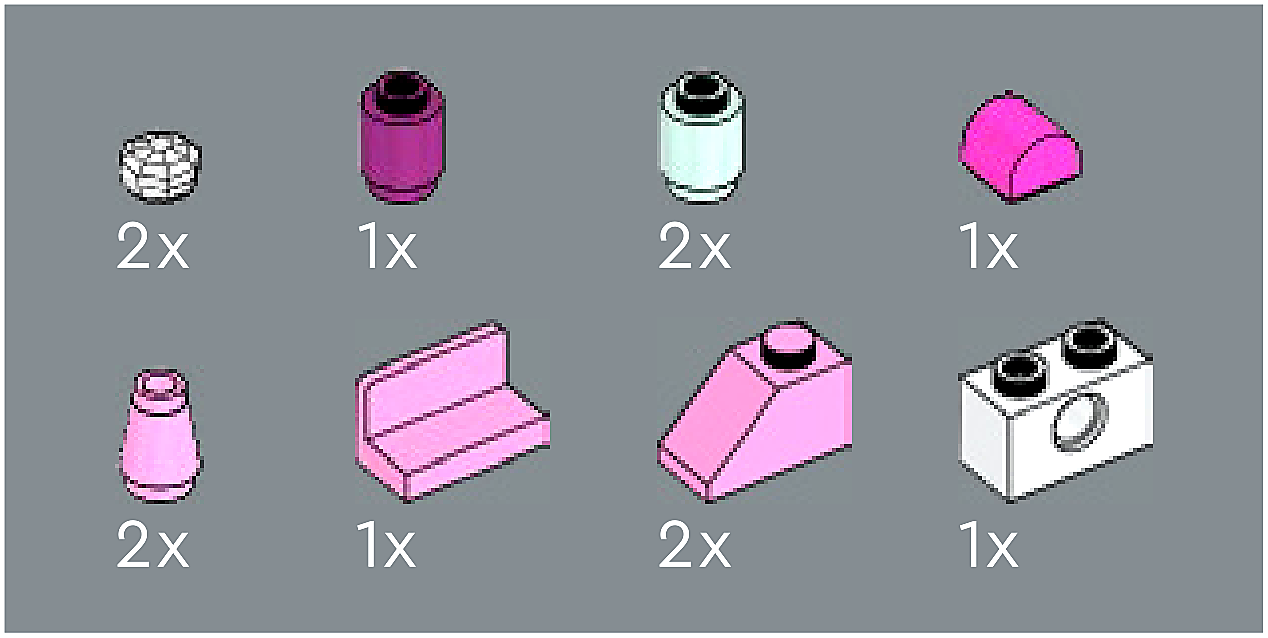
Inset — page 26
Phase 2 — Pieces
What do I do here?
Look at the inset image above. Check that the AI has correctly identified each piece — colour, quantity, and part name. If anything is wrong, edit the table directly. Add any missing pieces using the + row button, or remove incorrect ones with ✕.
When you are satisfied that all pieces are correct, click Save Pieces. This enables Phase 3 to run for this step.
| Qty | Colour | Part name | Part # | |
|---|---|---|---|---|
Phase 3 — Spatial placement
What do I do here?
The AI has described where each piece was placed by comparing the before and after images. Read every description carefully. Check that directions (left, right, front, back) are correct from the builder's perspective, and that stud counts are accurate.
If a description is vague, wrong, or uses the wrong direction — click Edit in that row and correct it. Once every placement description for this step is accurate, click Approve. Approval is required before the accessible prose can be generated.
This is the most important phase — a blind builder will follow these descriptions precisely.
Not yet extracted.
Phase 4 — Accessible prose
What do I do here?
This step is completed by the builder, not the sighted reviewer. The app generates an accessible prose paragraph from the approved Phase 3 descriptions. No action is needed from you here — your work is done once Phase 3 is approved.
Not yet generated. Complete Phase 3 and approve placement first.
Step 42
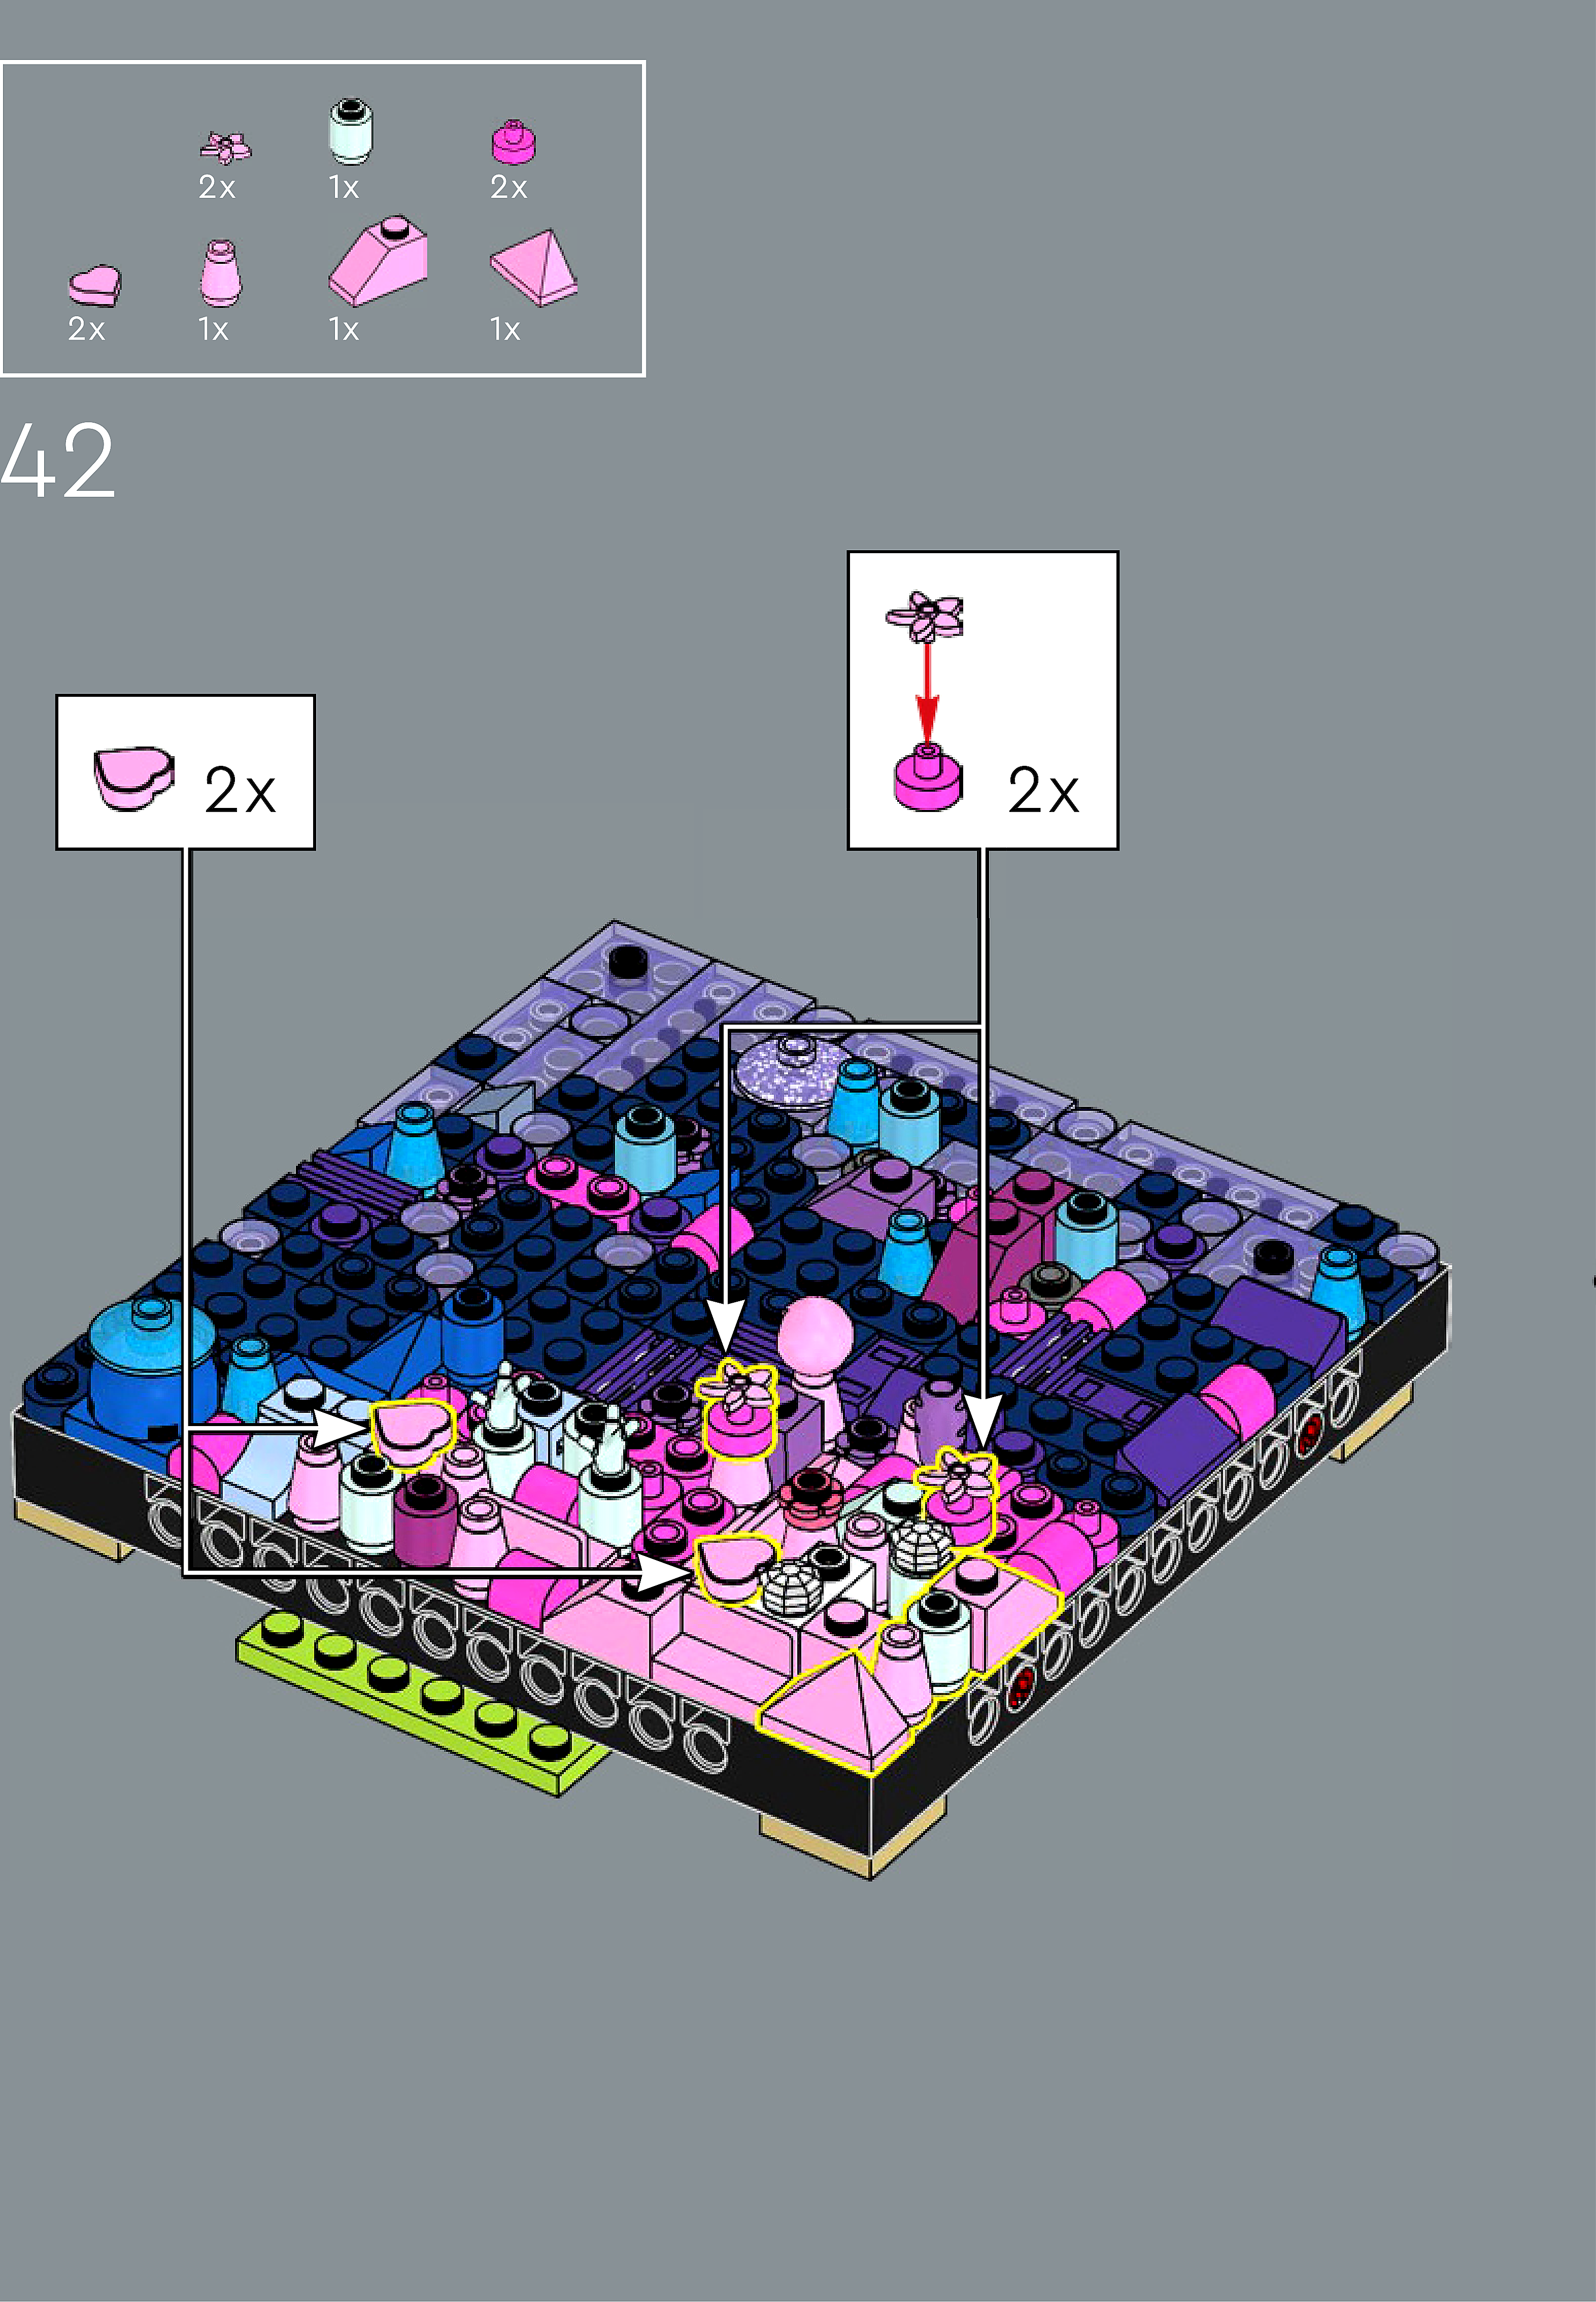
Assembly — page 26
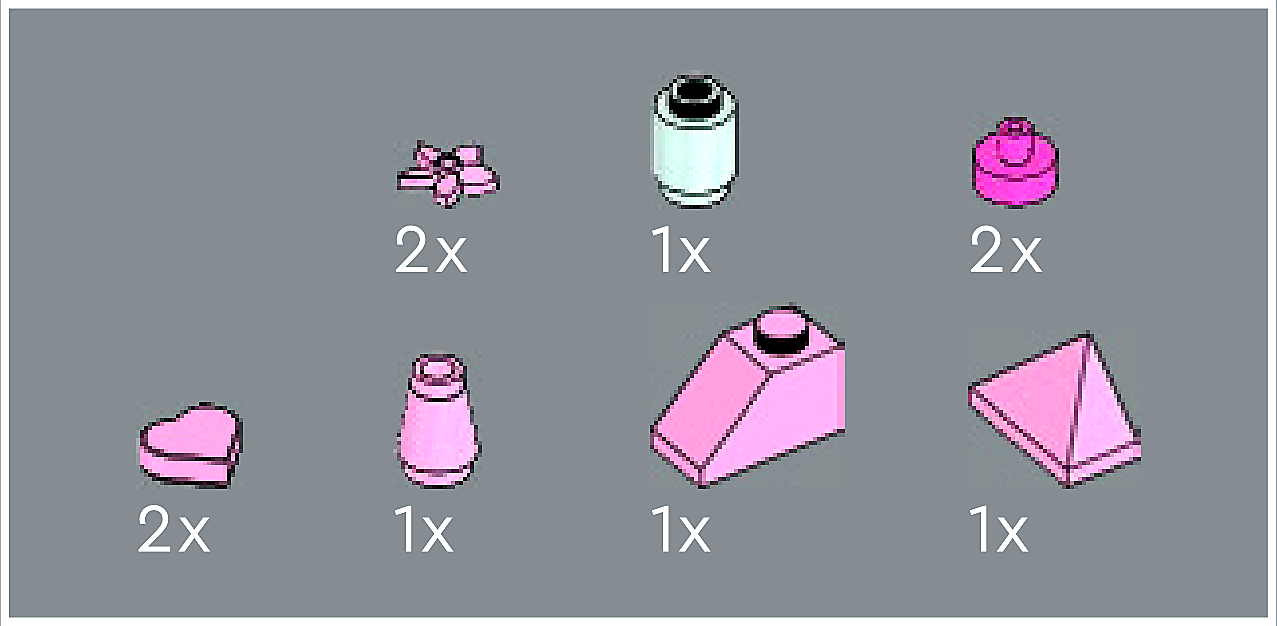
Inset — page 26
Phase 2 — Pieces
What do I do here?
Look at the inset image above. Check that the AI has correctly identified each piece — colour, quantity, and part name. If anything is wrong, edit the table directly. Add any missing pieces using the + row button, or remove incorrect ones with ✕.
When you are satisfied that all pieces are correct, click Save Pieces. This enables Phase 3 to run for this step.
| Qty | Colour | Part name | Part # | |
|---|---|---|---|---|
Phase 3 — Spatial placement
What do I do here?
The AI has described where each piece was placed by comparing the before and after images. Read every description carefully. Check that directions (left, right, front, back) are correct from the builder's perspective, and that stud counts are accurate.
If a description is vague, wrong, or uses the wrong direction — click Edit in that row and correct it. Once every placement description for this step is accurate, click Approve. Approval is required before the accessible prose can be generated.
This is the most important phase — a blind builder will follow these descriptions precisely.
Not yet extracted.
Phase 4 — Accessible prose
What do I do here?
This step is completed by the builder, not the sighted reviewer. The app generates an accessible prose paragraph from the approved Phase 3 descriptions. No action is needed from you here — your work is done once Phase 3 is approved.
Not yet generated. Complete Phase 3 and approve placement first.
Step 43
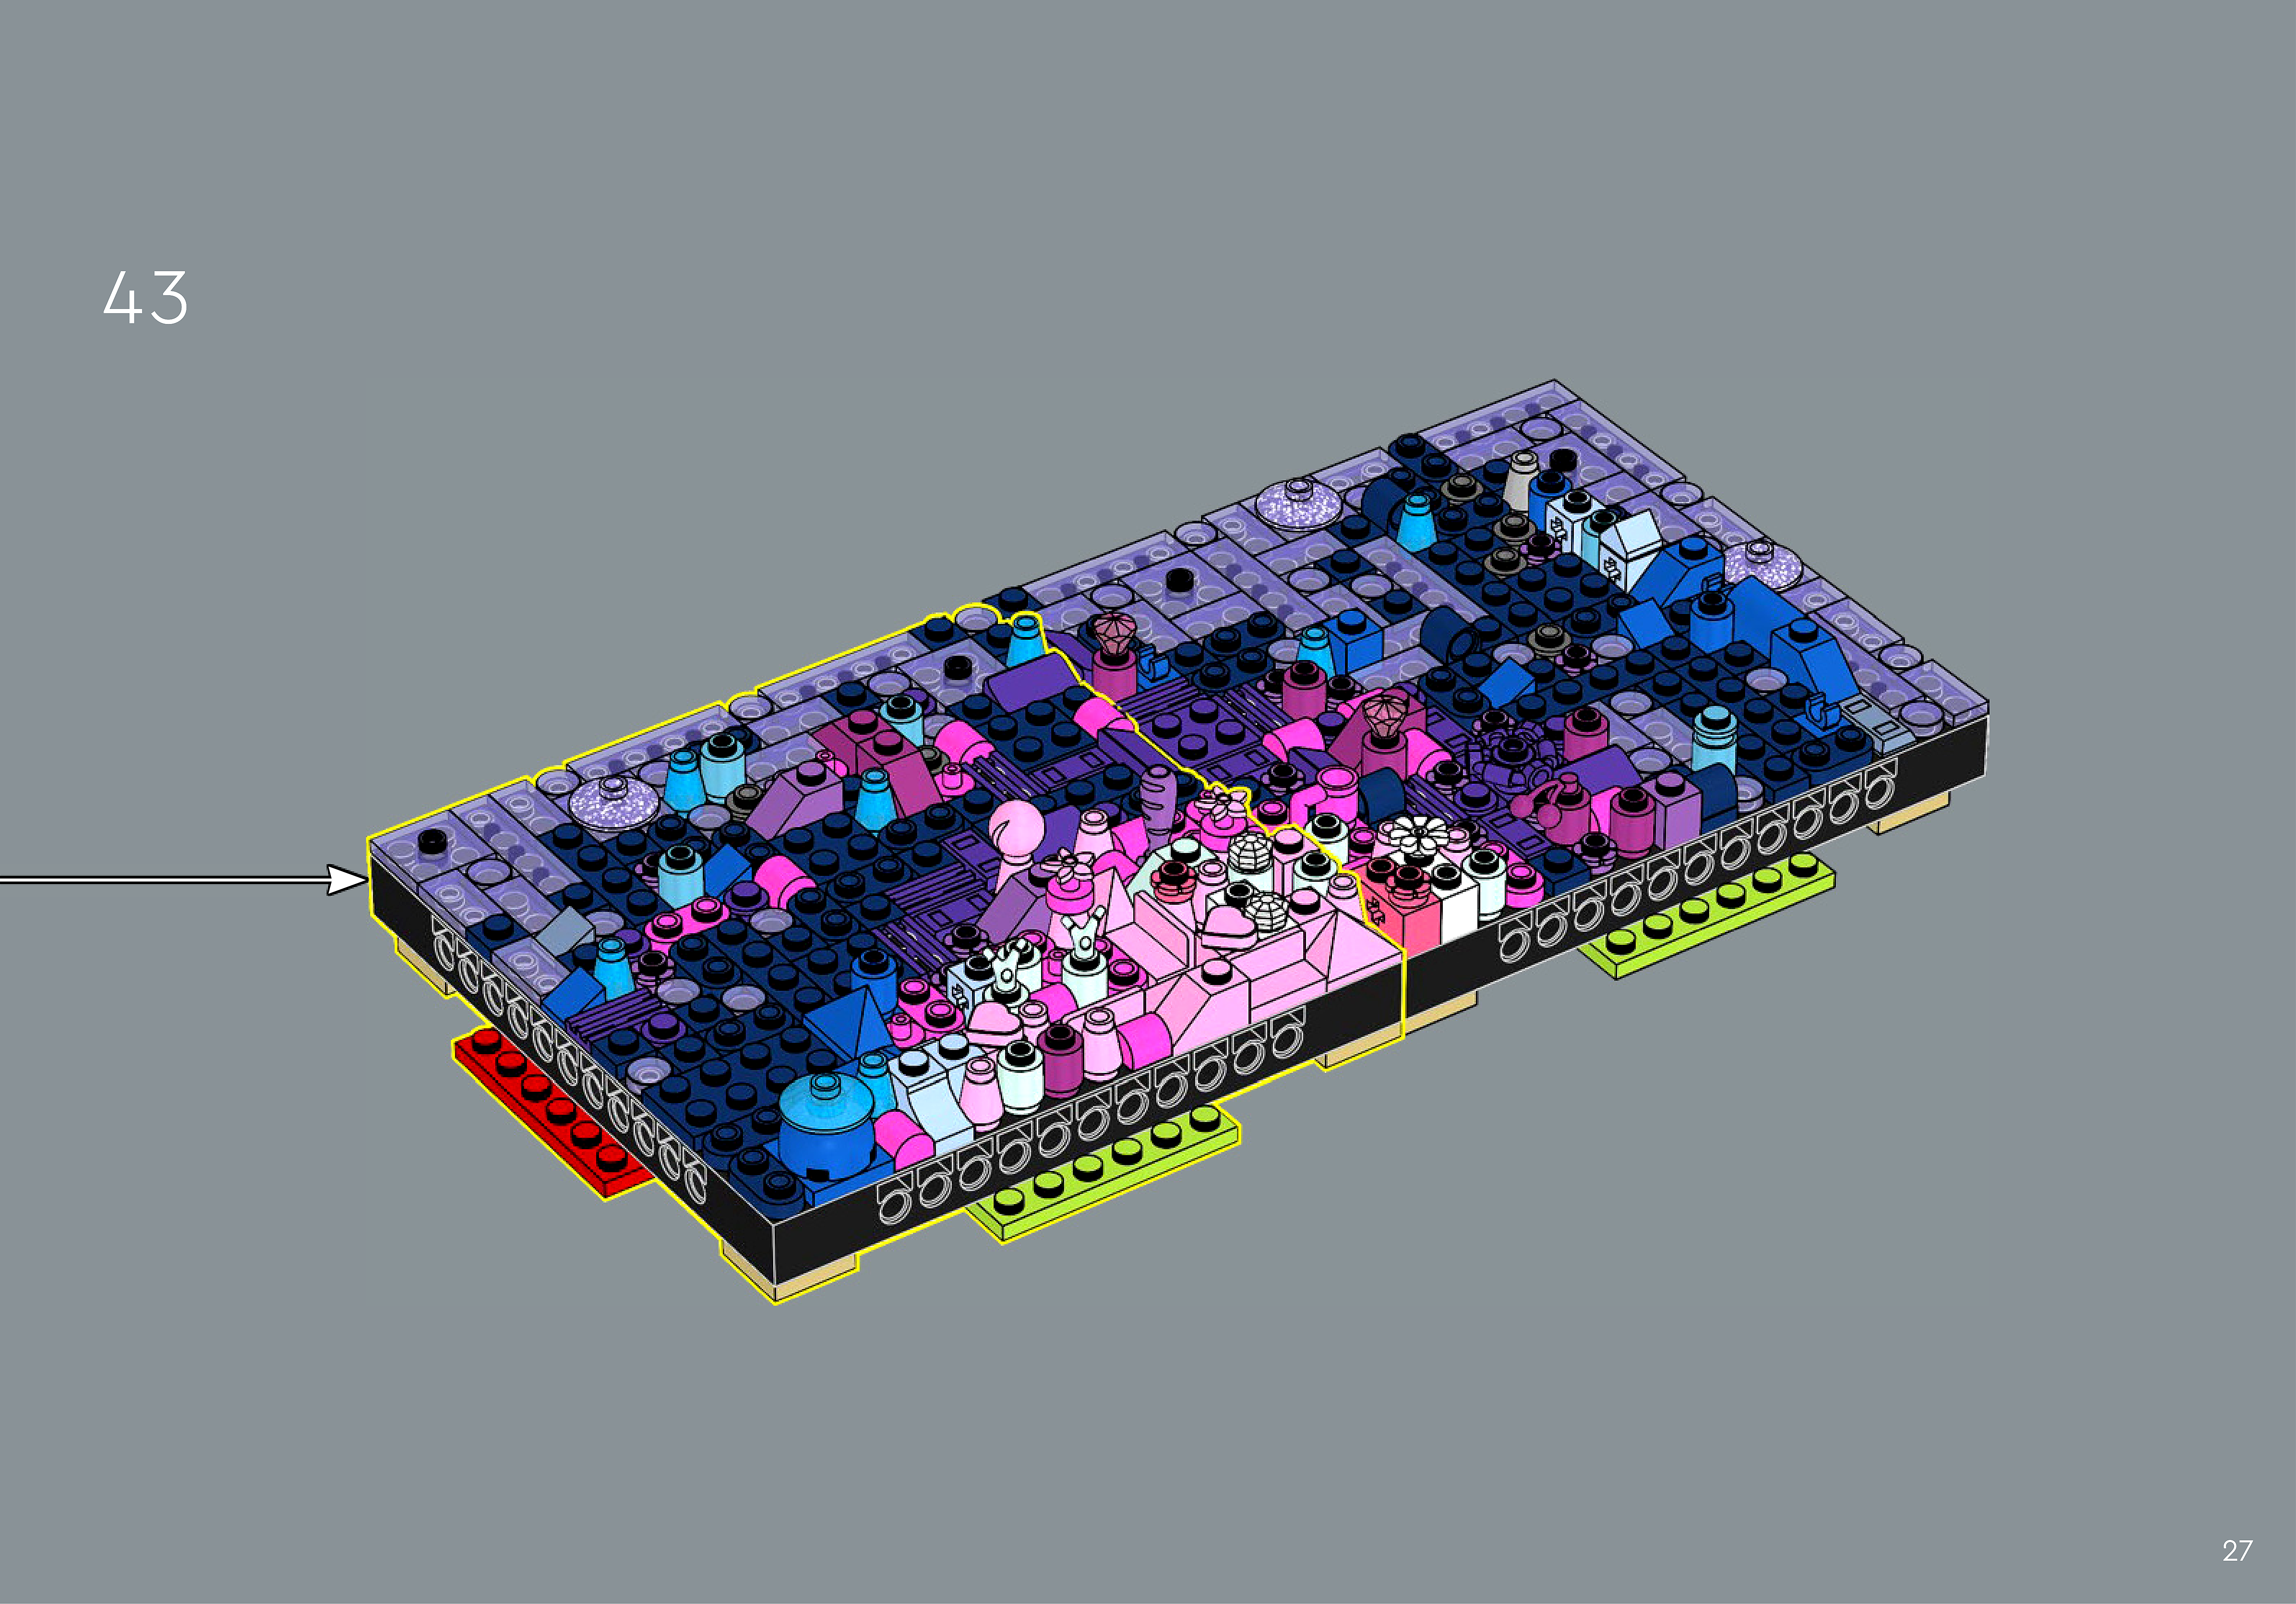
Assembly — page 27
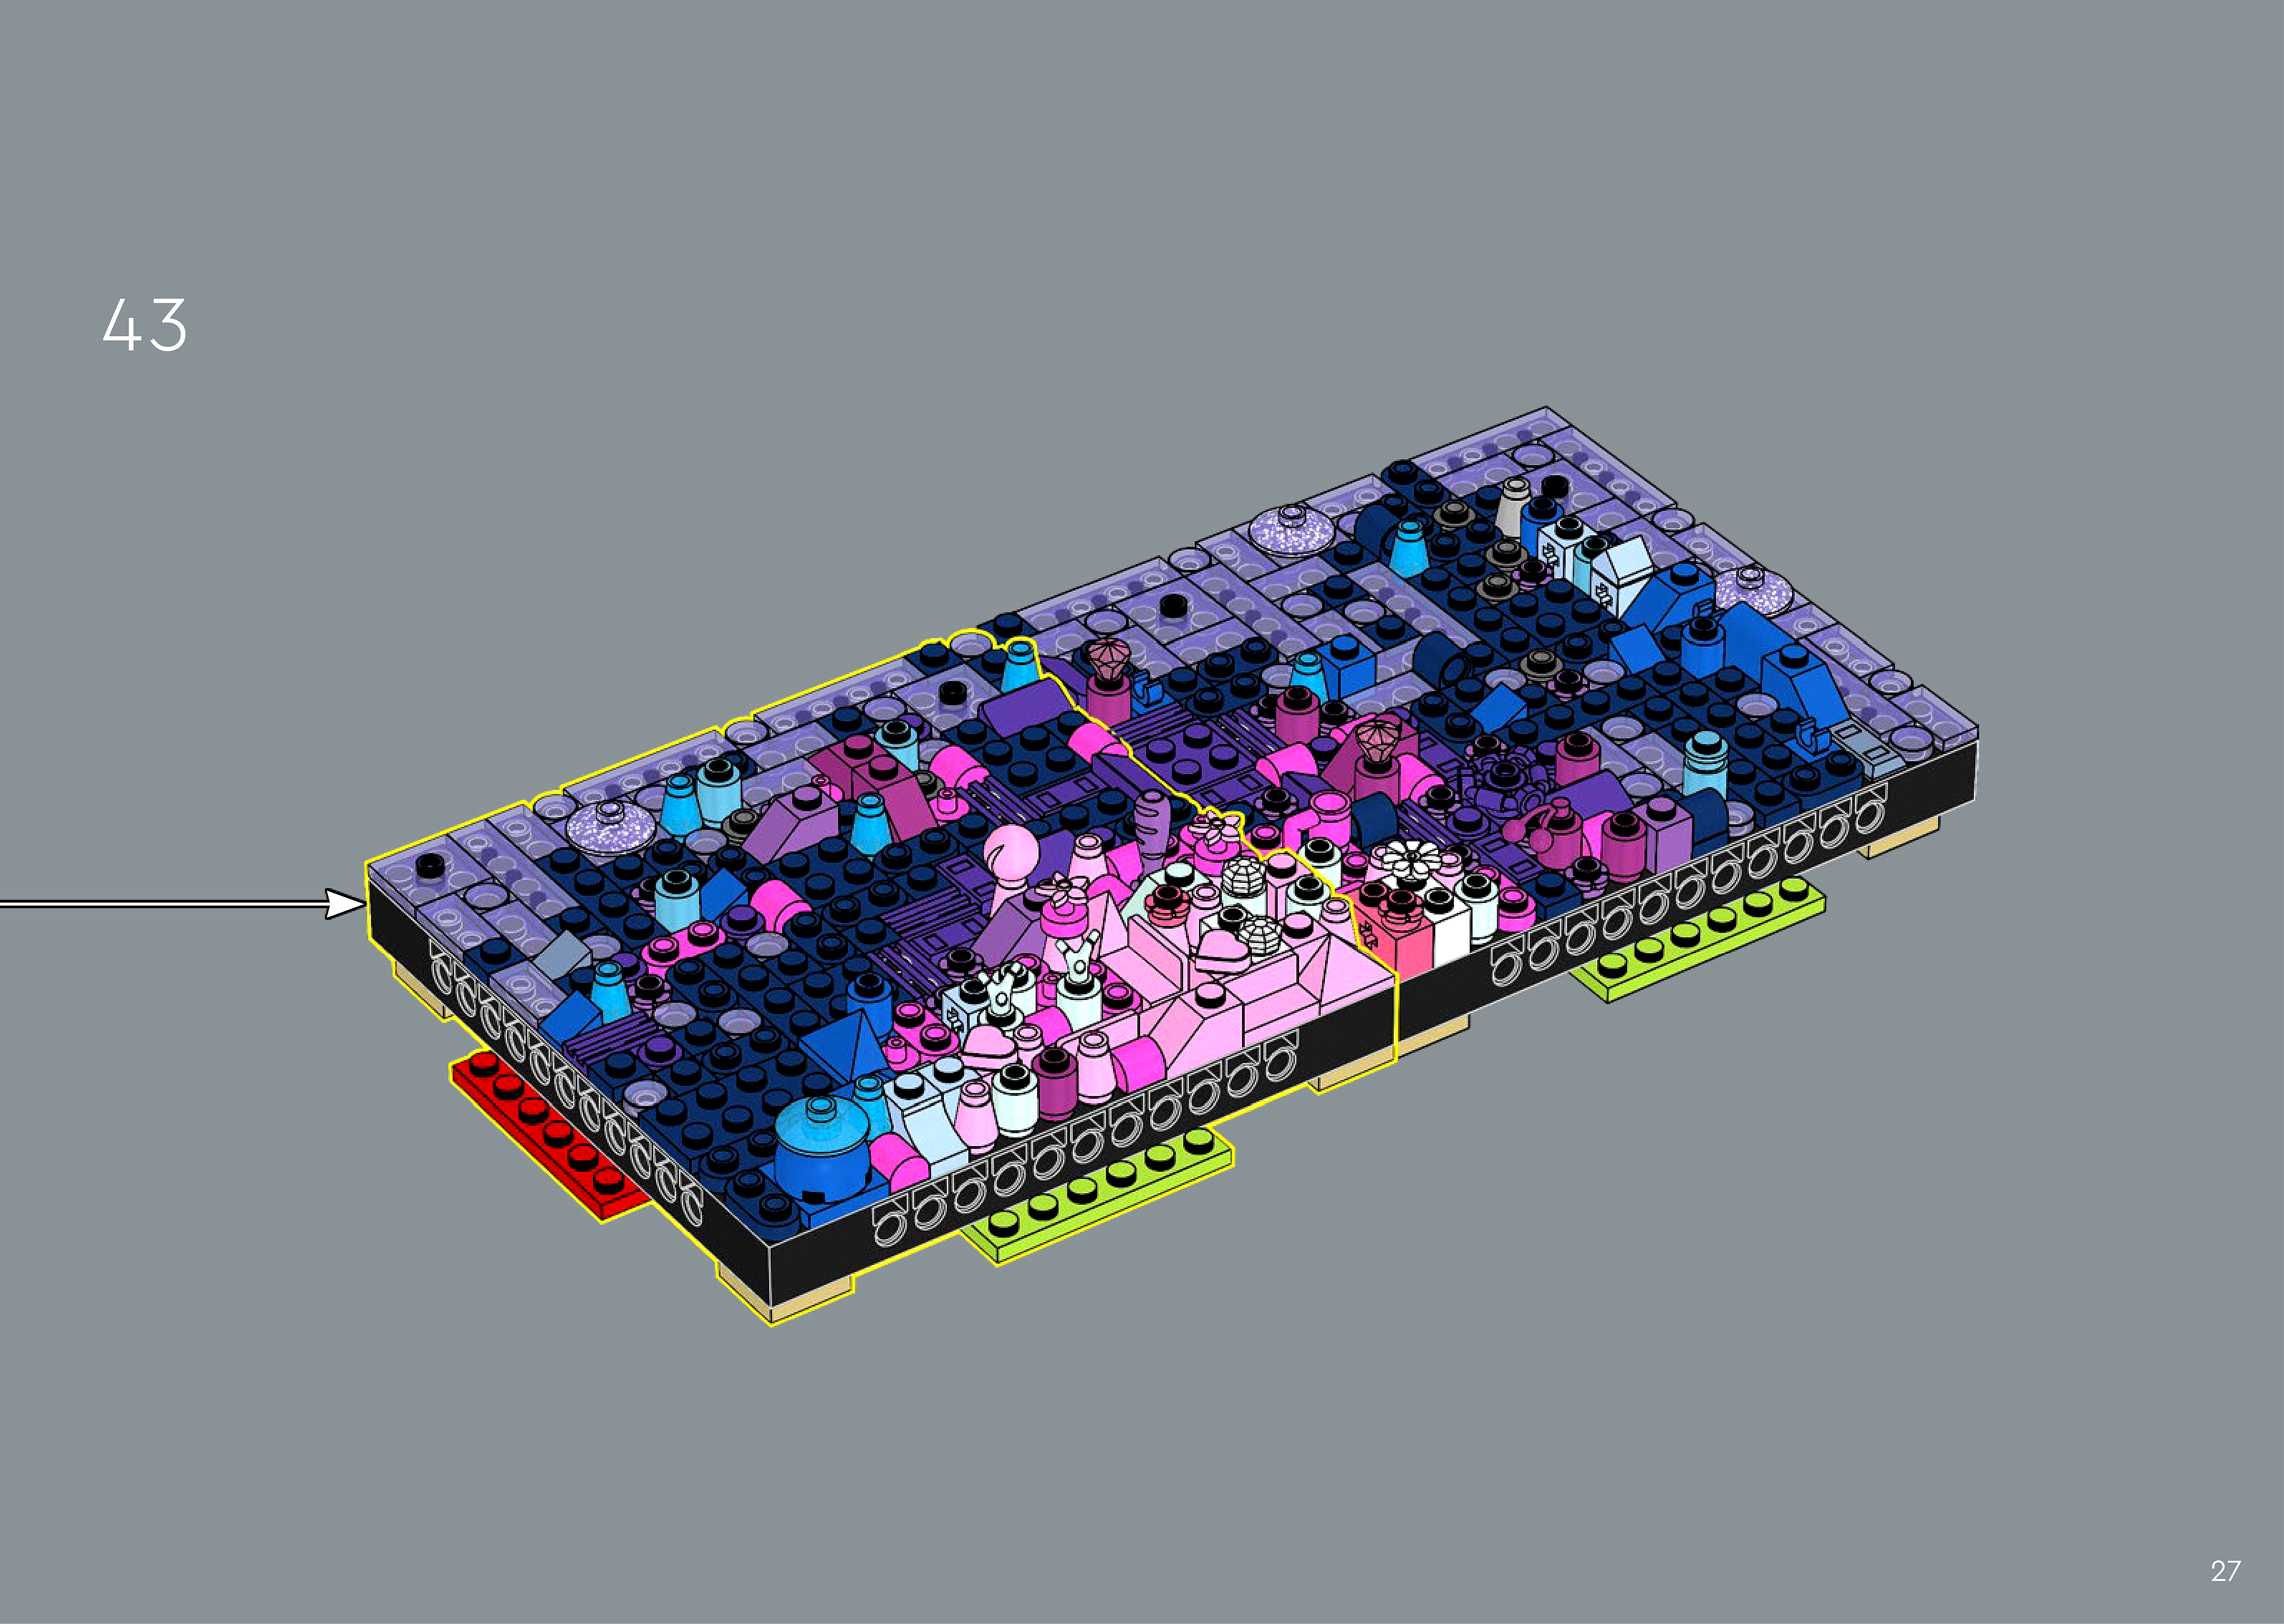
Inset — page 27
Phase 2 — Pieces
What do I do here?
Look at the inset image above. Check that the AI has correctly identified each piece — colour, quantity, and part name. If anything is wrong, edit the table directly. Add any missing pieces using the + row button, or remove incorrect ones with ✕.
When you are satisfied that all pieces are correct, click Save Pieces. This enables Phase 3 to run for this step.
Error: Error code: 400 - {'type': 'error', 'error': {'type': 'invalid_request_error', 'message': 'messages.0.content.0.image.source.base64: image exceeds 10 MB maximum: 10565316 bytes > 10485760 bytes'}, 'request_id': 'req_011CbTXkPkWULNHQeRqAHkTB'}
Phase 3 — Spatial placement
What do I do here?
The AI has described where each piece was placed by comparing the before and after images. Read every description carefully. Check that directions (left, right, front, back) are correct from the builder's perspective, and that stud counts are accurate.
If a description is vague, wrong, or uses the wrong direction — click Edit in that row and correct it. Once every placement description for this step is accurate, click Approve. Approval is required before the accessible prose can be generated.
This is the most important phase — a blind builder will follow these descriptions precisely.
Not yet extracted.
Phase 4 — Accessible prose
What do I do here?
This step is completed by the builder, not the sighted reviewer. The app generates an accessible prose paragraph from the approved Phase 3 descriptions. No action is needed from you here — your work is done once Phase 3 is approved.
Not yet generated. Complete Phase 3 and approve placement first.
Step 44
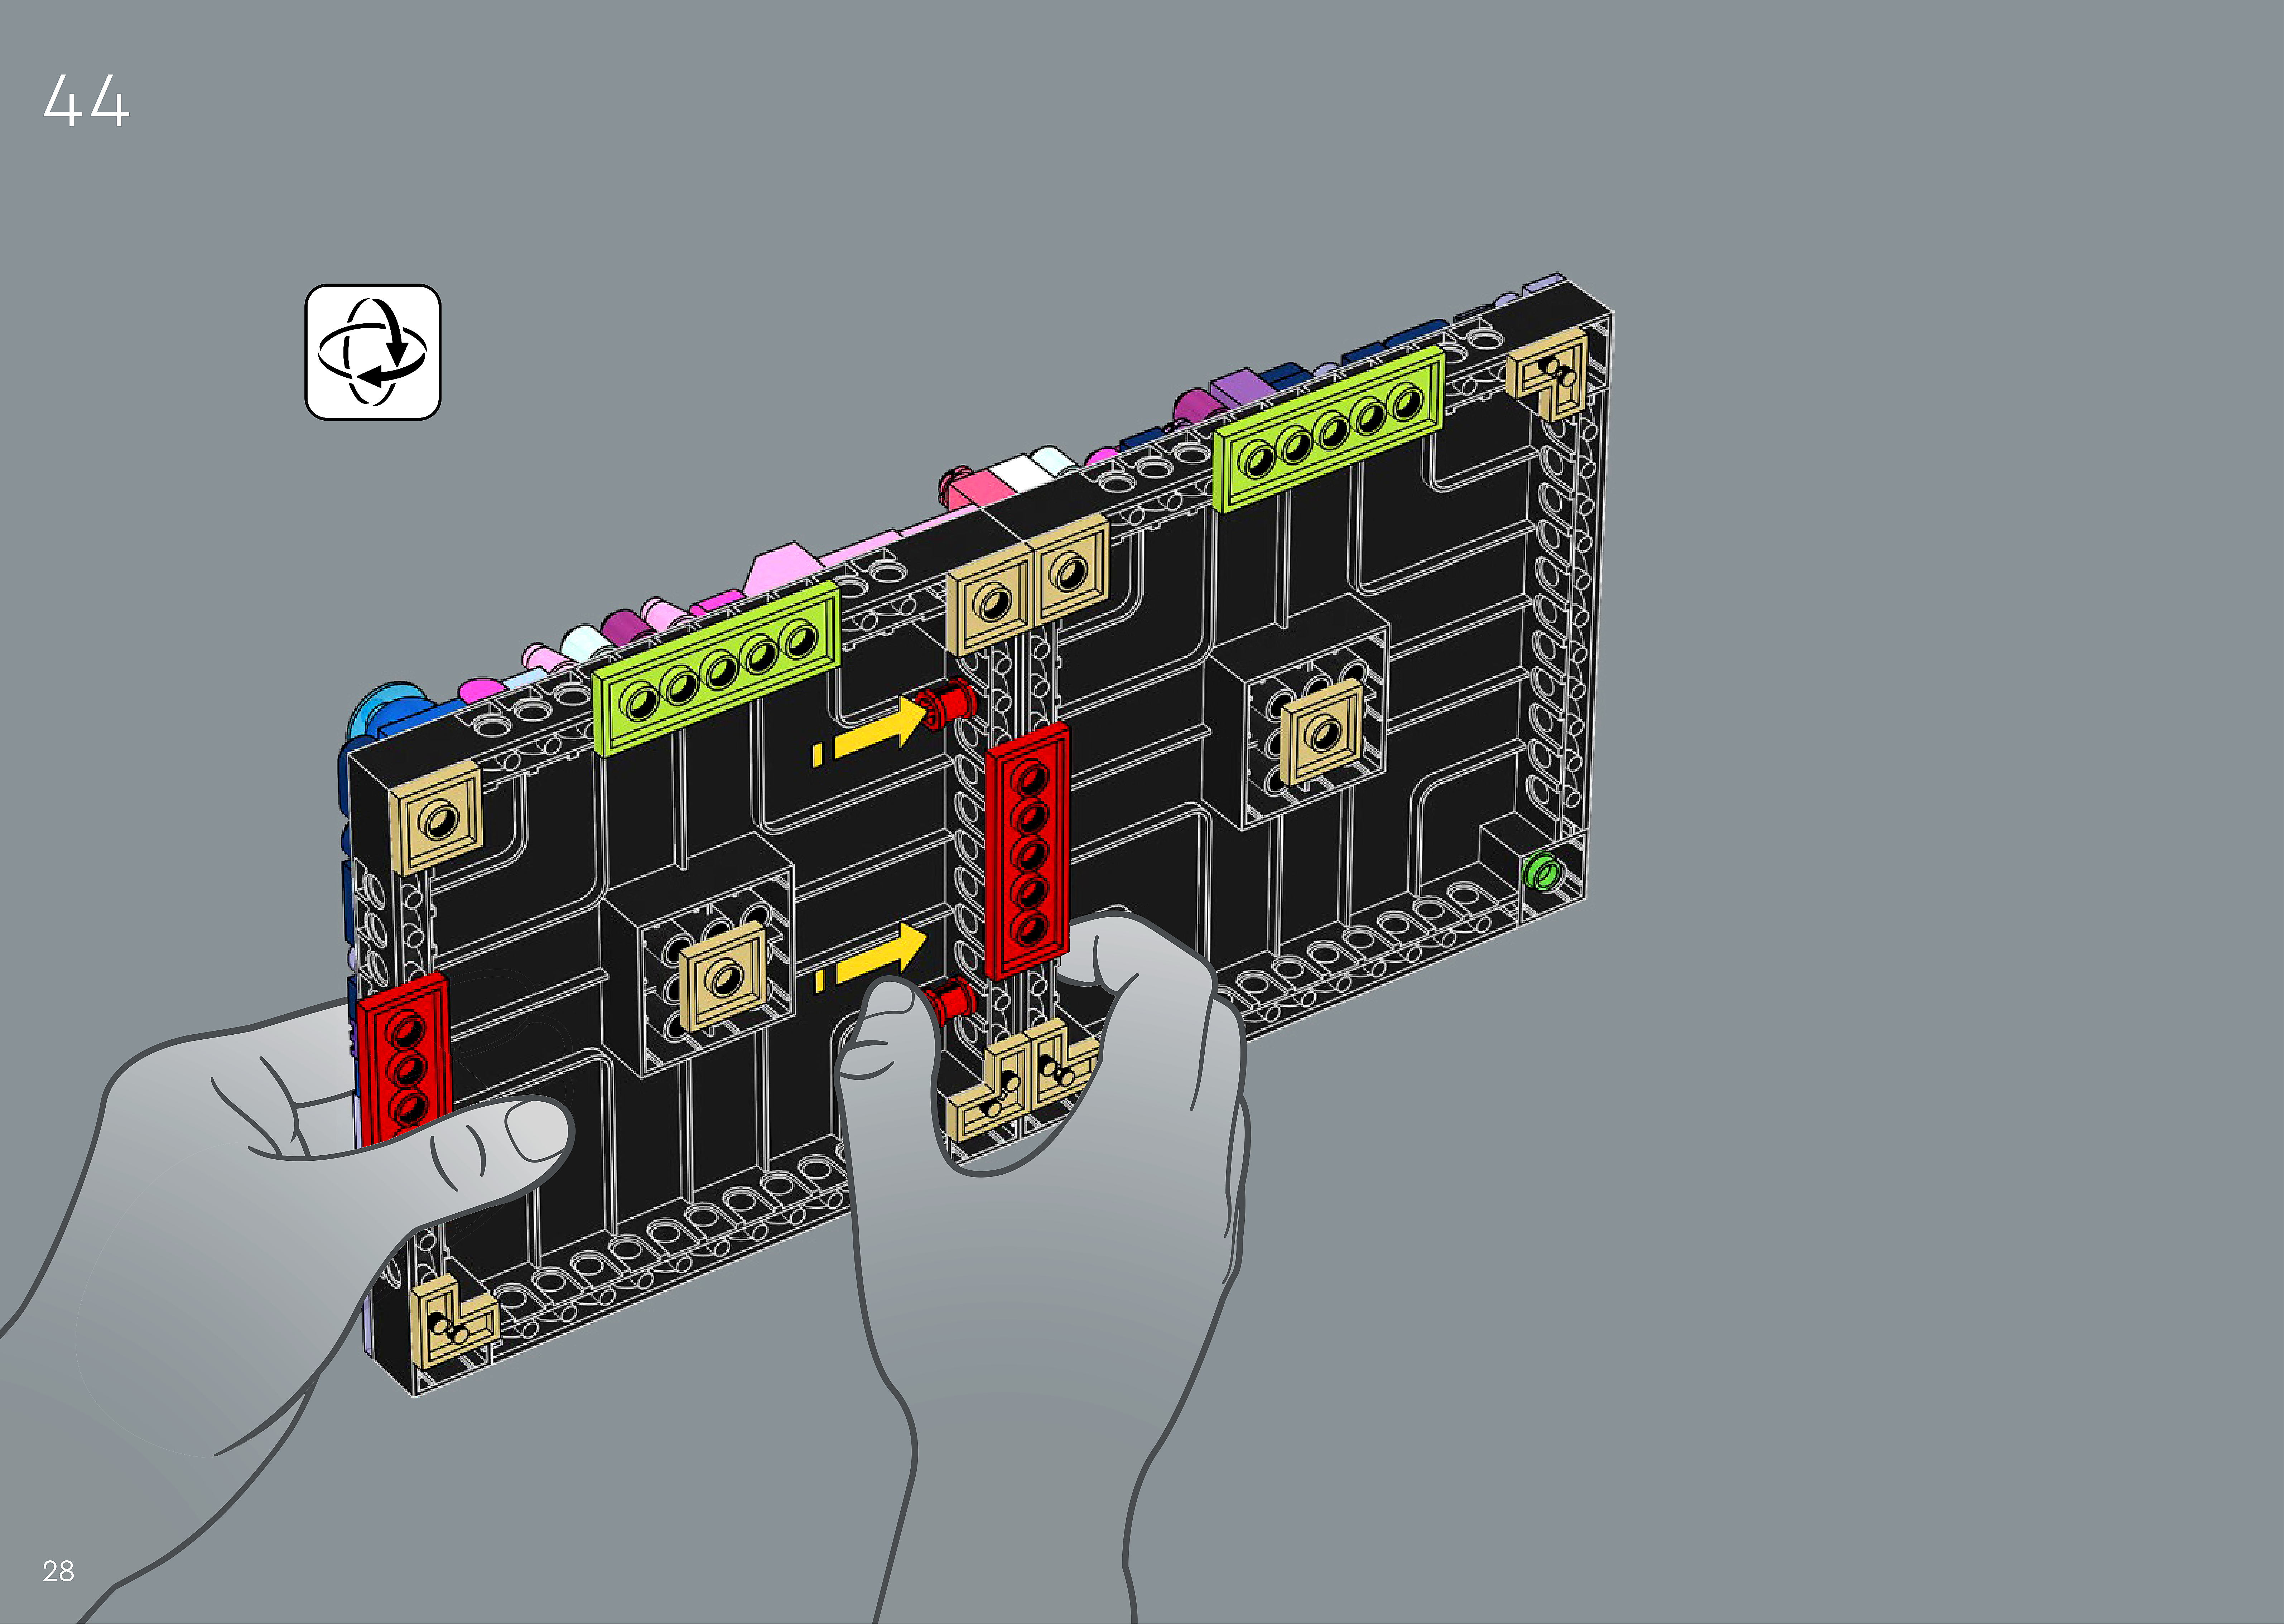
Assembly — page 28

Inset — page 28
Phase 2 — Pieces
What do I do here?
Look at the inset image above. Check that the AI has correctly identified each piece — colour, quantity, and part name. If anything is wrong, edit the table directly. Add any missing pieces using the + row button, or remove incorrect ones with ✕.
When you are satisfied that all pieces are correct, click Save Pieces. This enables Phase 3 to run for this step.
| Qty | Colour | Part name | Part # | |
|---|---|---|---|---|
Phase 3 — Spatial placement
What do I do here?
The AI has described where each piece was placed by comparing the before and after images. Read every description carefully. Check that directions (left, right, front, back) are correct from the builder's perspective, and that stud counts are accurate.
If a description is vague, wrong, or uses the wrong direction — click Edit in that row and correct it. Once every placement description for this step is accurate, click Approve. Approval is required before the accessible prose can be generated.
This is the most important phase — a blind builder will follow these descriptions precisely.
Not yet extracted.
Phase 4 — Accessible prose
What do I do here?
This step is completed by the builder, not the sighted reviewer. The app generates an accessible prose paragraph from the approved Phase 3 descriptions. No action is needed from you here — your work is done once Phase 3 is approved.
Not yet generated. Complete Phase 3 and approve placement first.
Build 7
Step 8
Assembly — page 29

Inset — page 29
Phase 2 — Pieces
What do I do here?
Look at the inset image above. Check that the AI has correctly identified each piece — colour, quantity, and part name. If anything is wrong, edit the table directly. Add any missing pieces using the + row button, or remove incorrect ones with ✕.
When you are satisfied that all pieces are correct, click Save Pieces. This enables Phase 3 to run for this step.
| Qty | Colour | Part name | Part # | |
|---|---|---|---|---|
Phase 3 — Spatial placement
What do I do here?
The AI has described where each piece was placed by comparing the before and after images. Read every description carefully. Check that directions (left, right, front, back) are correct from the builder's perspective, and that stud counts are accurate.
If a description is vague, wrong, or uses the wrong direction — click Edit in that row and correct it. Once every placement description for this step is accurate, click Approve. Approval is required before the accessible prose can be generated.
This is the most important phase — a blind builder will follow these descriptions precisely.
Not yet extracted.
Phase 4 — Accessible prose
What do I do here?
This step is completed by the builder, not the sighted reviewer. The app generates an accessible prose paragraph from the approved Phase 3 descriptions. No action is needed from you here — your work is done once Phase 3 is approved.
Not yet generated. Complete Phase 3 and approve placement first.
Step 45
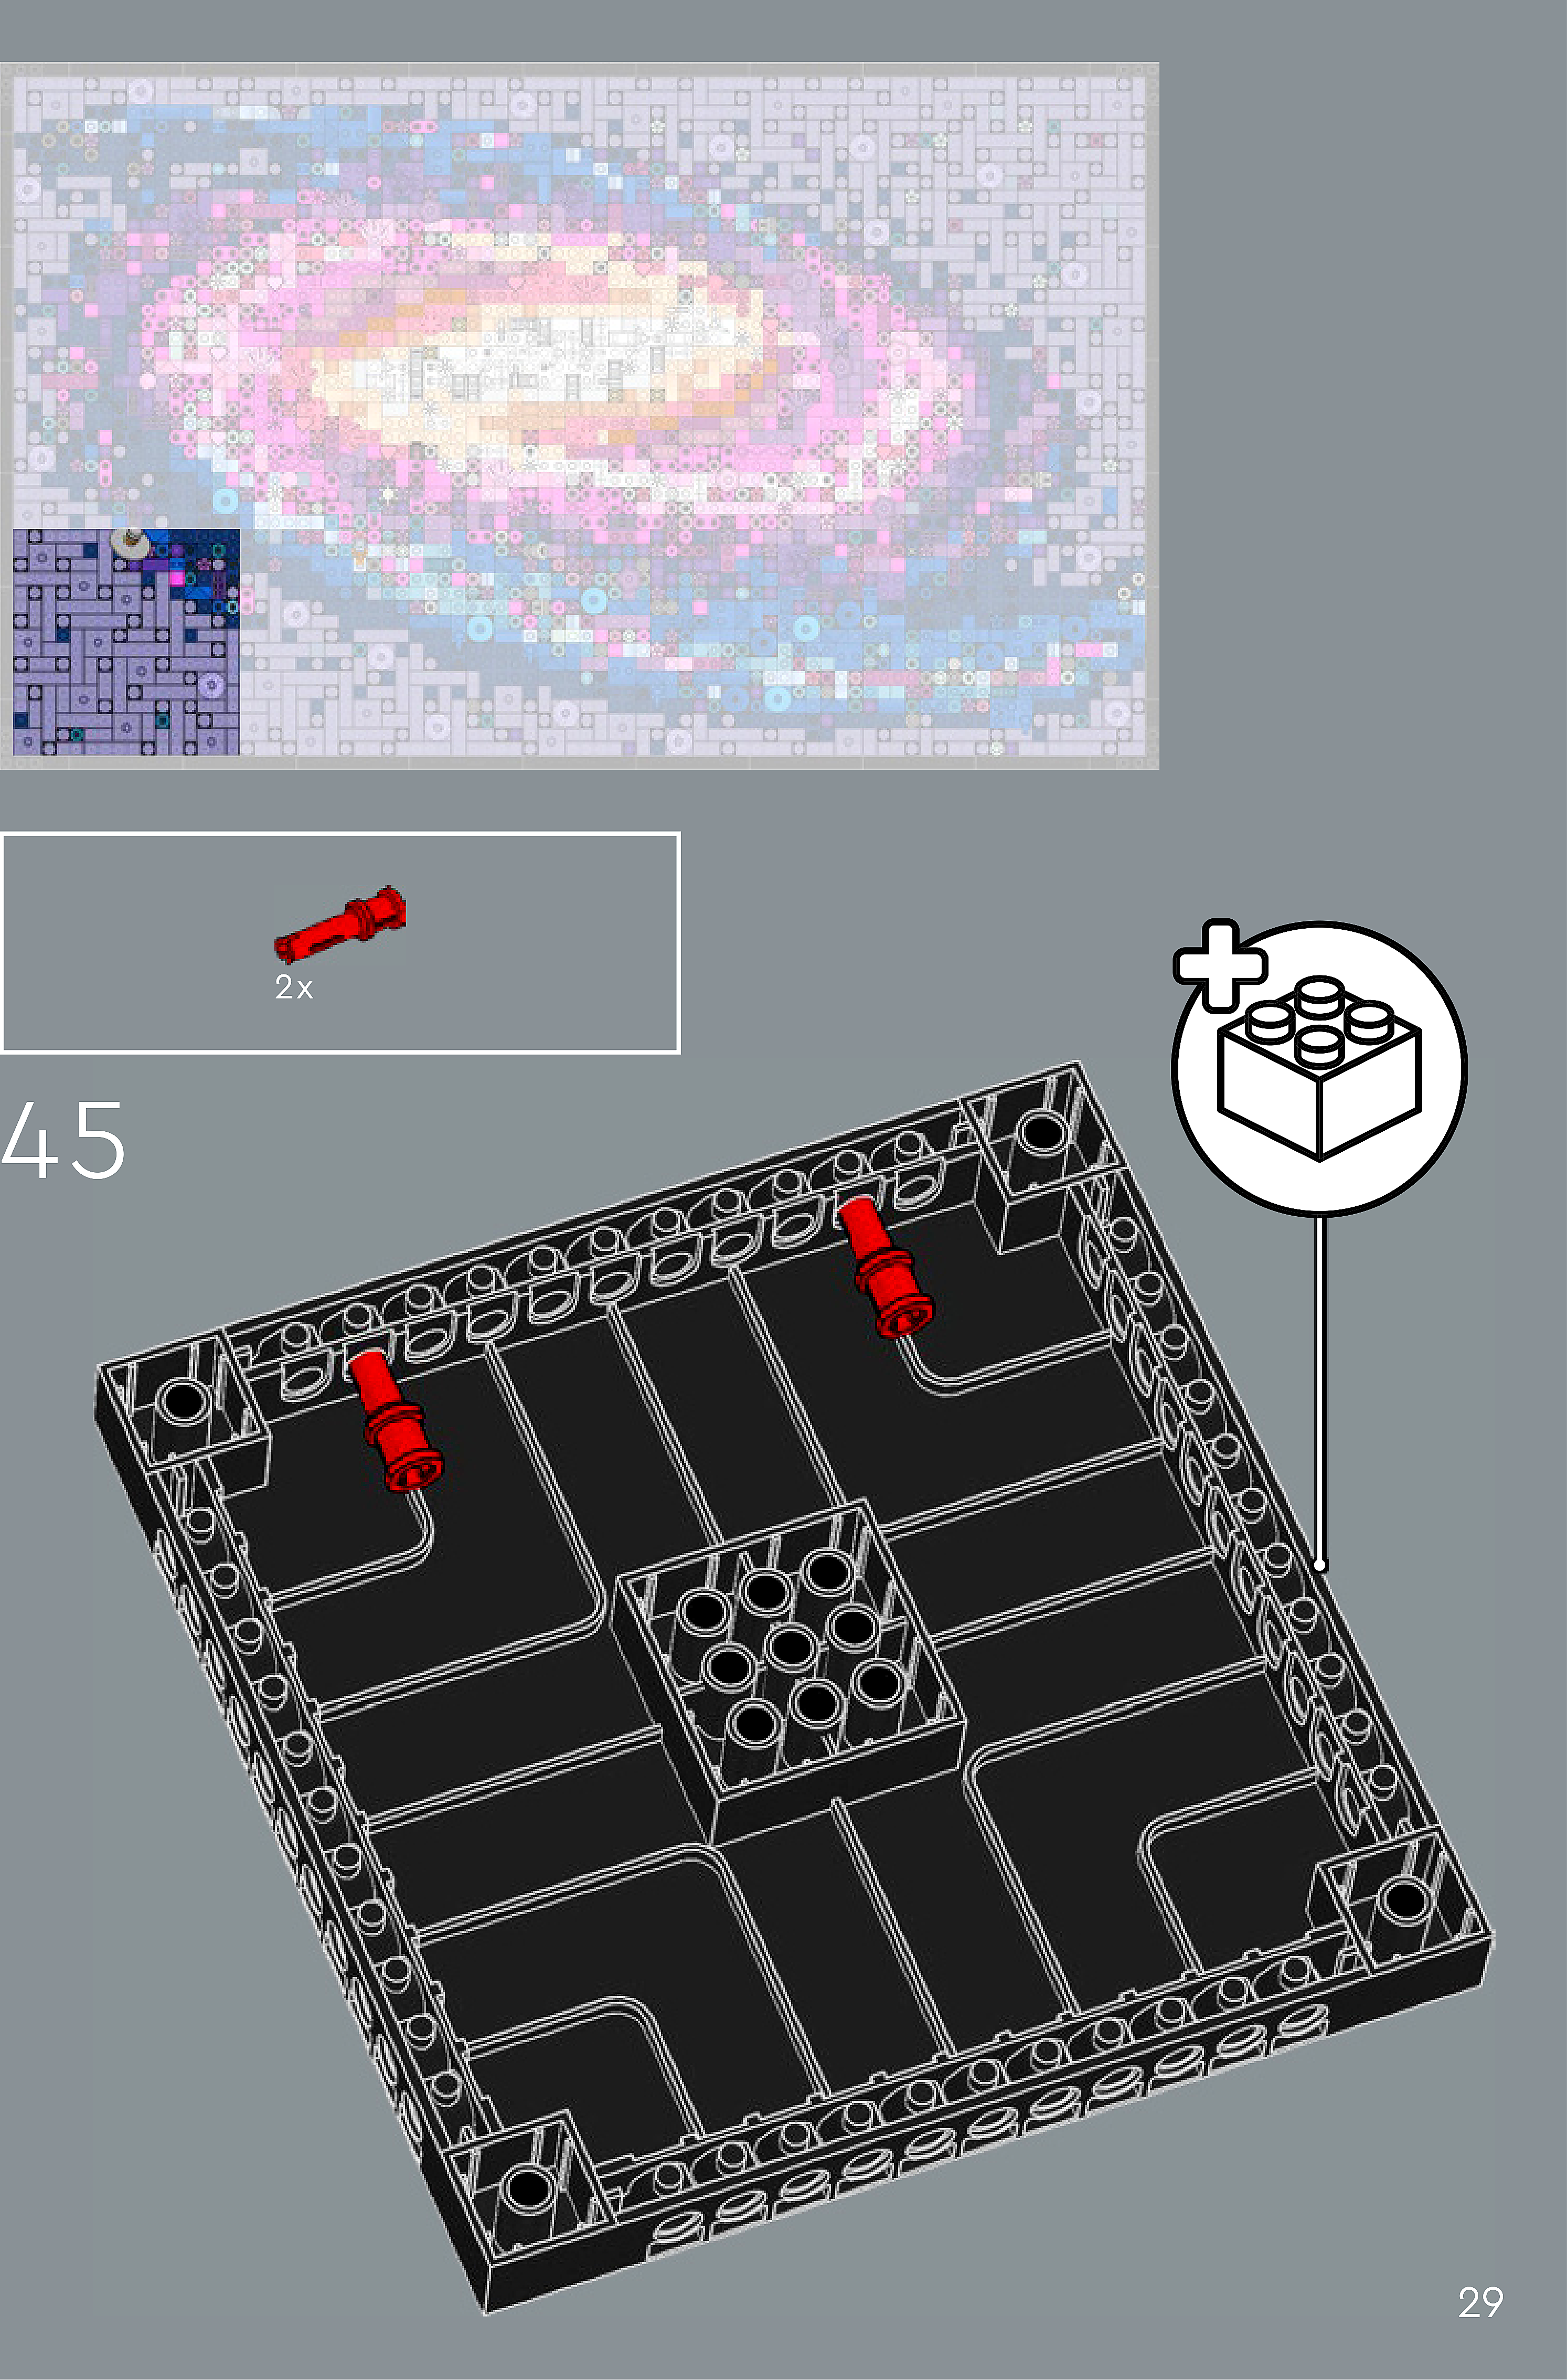
Assembly — page 29

Inset — page 29
Phase 2 — Pieces
What do I do here?
Look at the inset image above. Check that the AI has correctly identified each piece — colour, quantity, and part name. If anything is wrong, edit the table directly. Add any missing pieces using the + row button, or remove incorrect ones with ✕.
When you are satisfied that all pieces are correct, click Save Pieces. This enables Phase 3 to run for this step.
| Qty | Colour | Part name | Part # | |
|---|---|---|---|---|
Phase 3 — Spatial placement
What do I do here?
The AI has described where each piece was placed by comparing the before and after images. Read every description carefully. Check that directions (left, right, front, back) are correct from the builder's perspective, and that stud counts are accurate.
If a description is vague, wrong, or uses the wrong direction — click Edit in that row and correct it. Once every placement description for this step is accurate, click Approve. Approval is required before the accessible prose can be generated.
This is the most important phase — a blind builder will follow these descriptions precisely.
Not yet extracted.
Phase 4 — Accessible prose
What do I do here?
This step is completed by the builder, not the sighted reviewer. The app generates an accessible prose paragraph from the approved Phase 3 descriptions. No action is needed from you here — your work is done once Phase 3 is approved.
Not yet generated. Complete Phase 3 and approve placement first.
Step 46
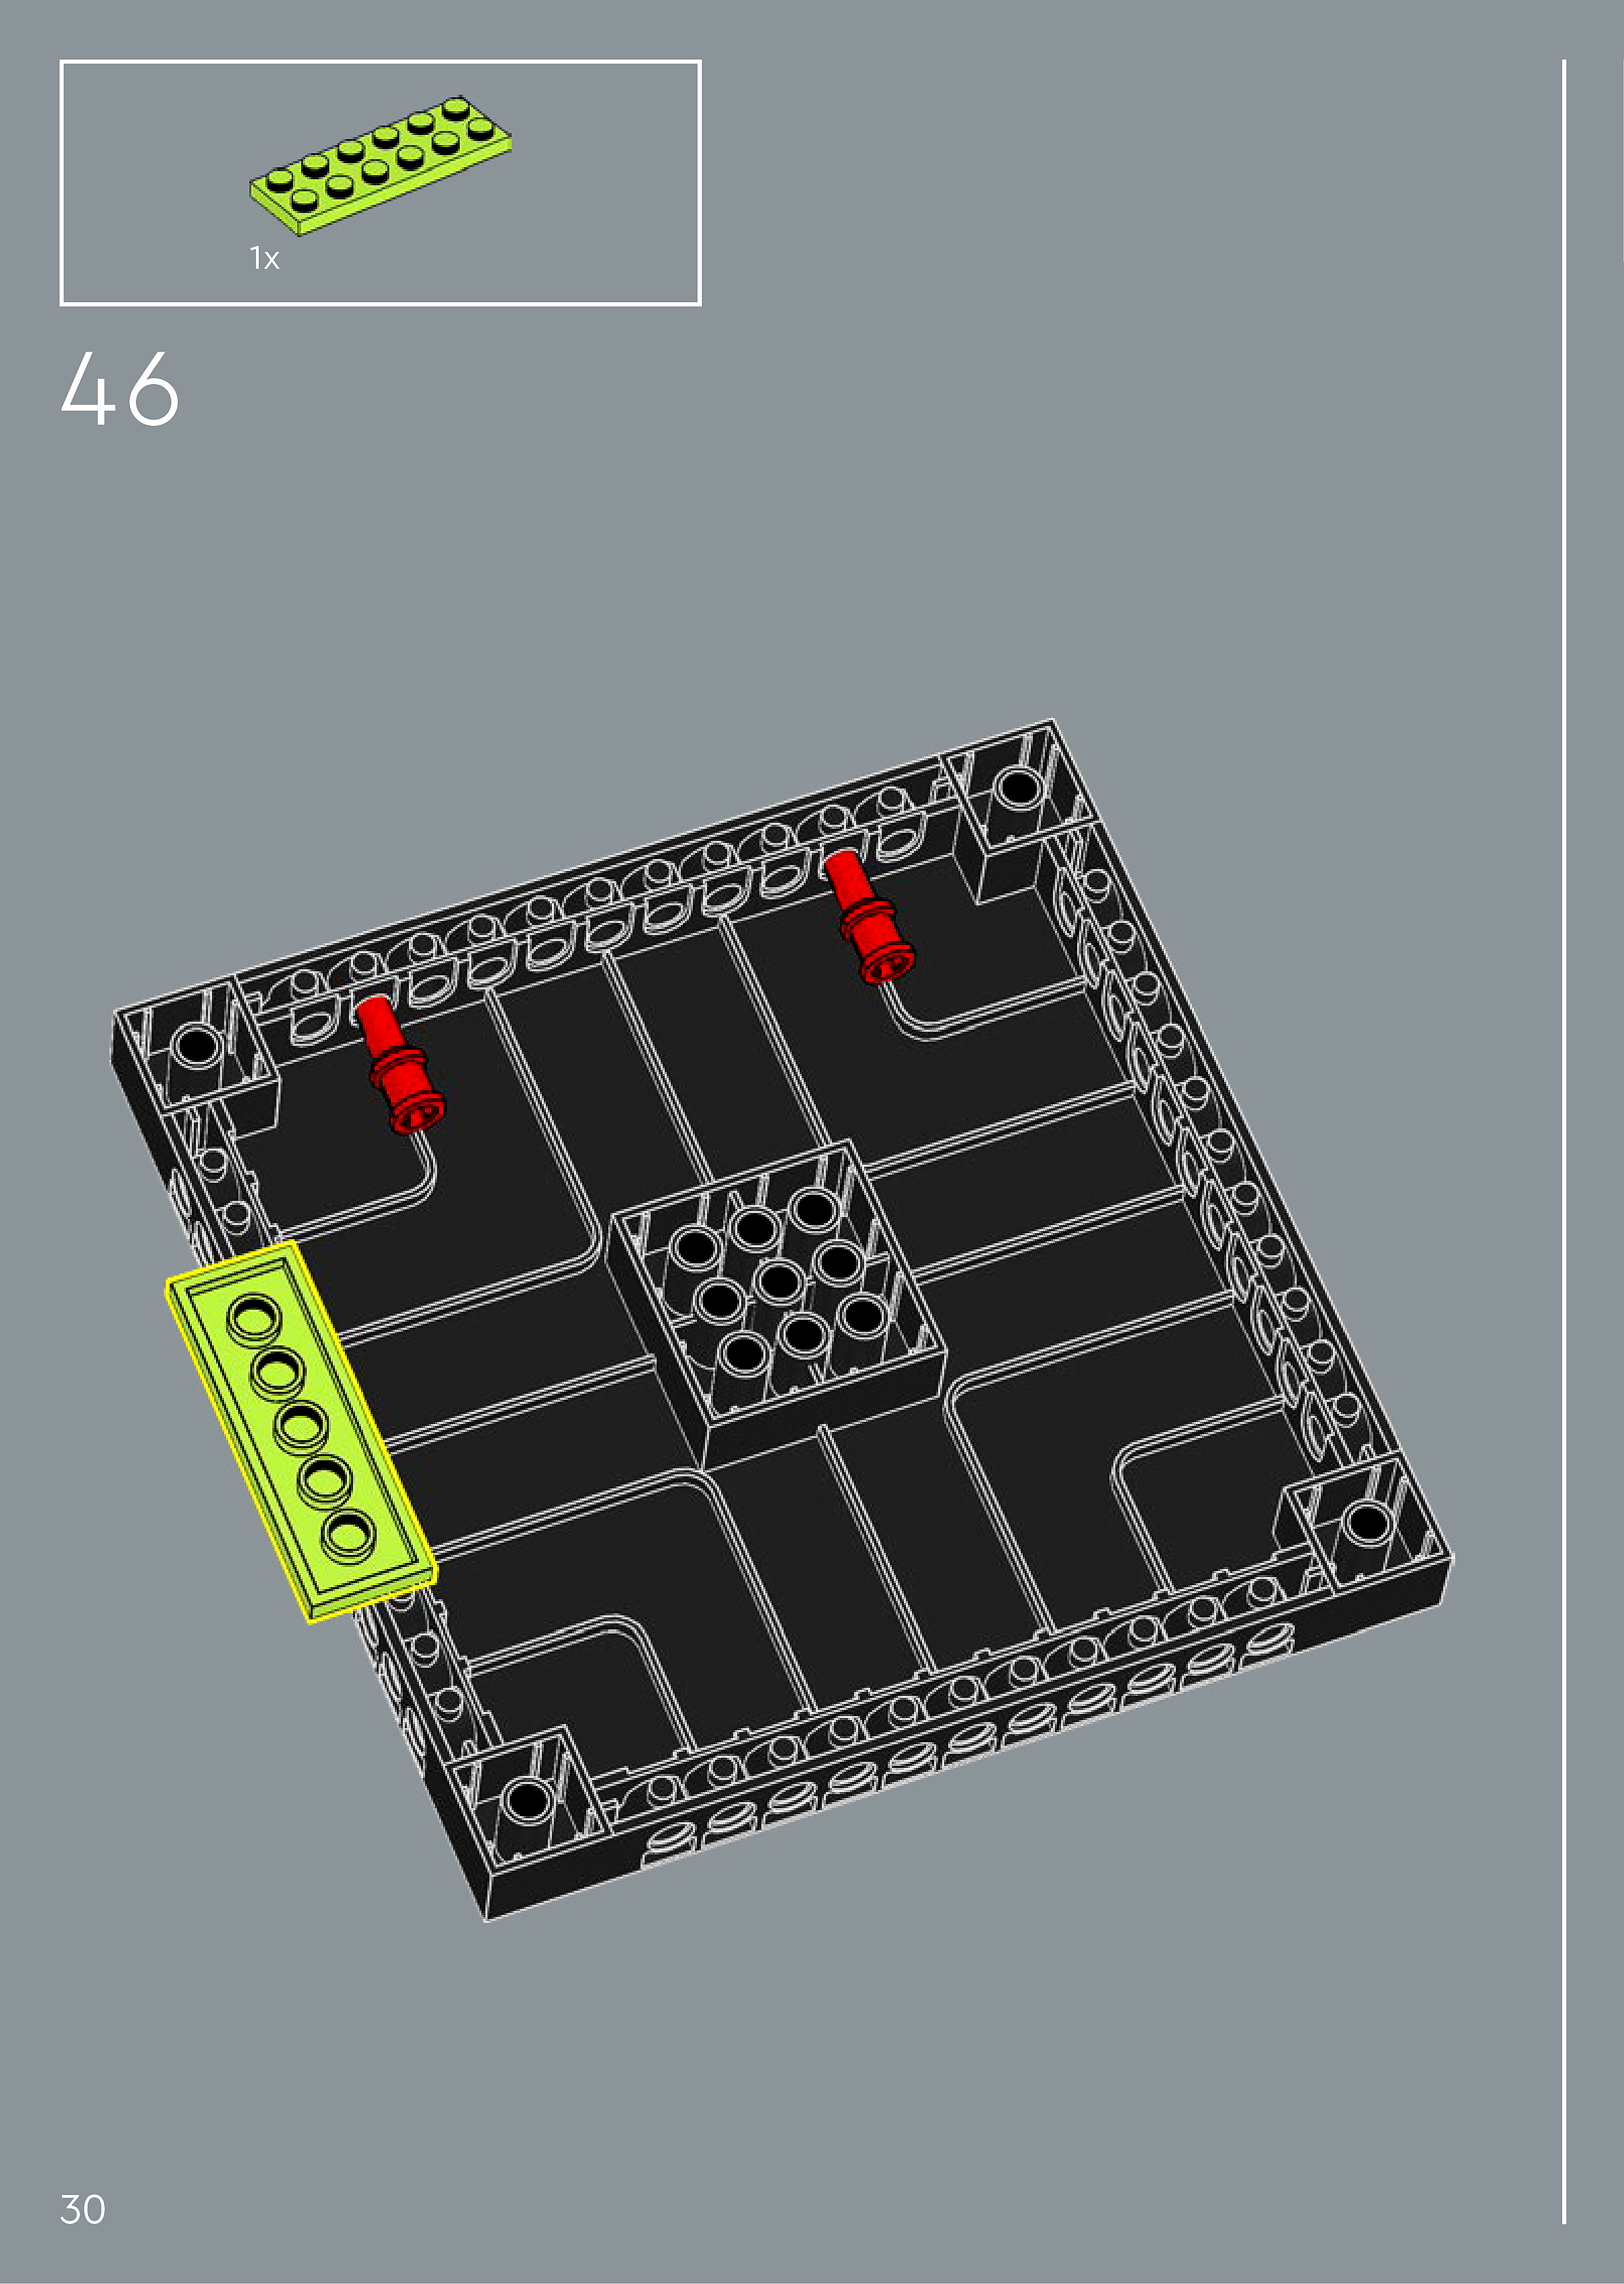
Assembly — page 30
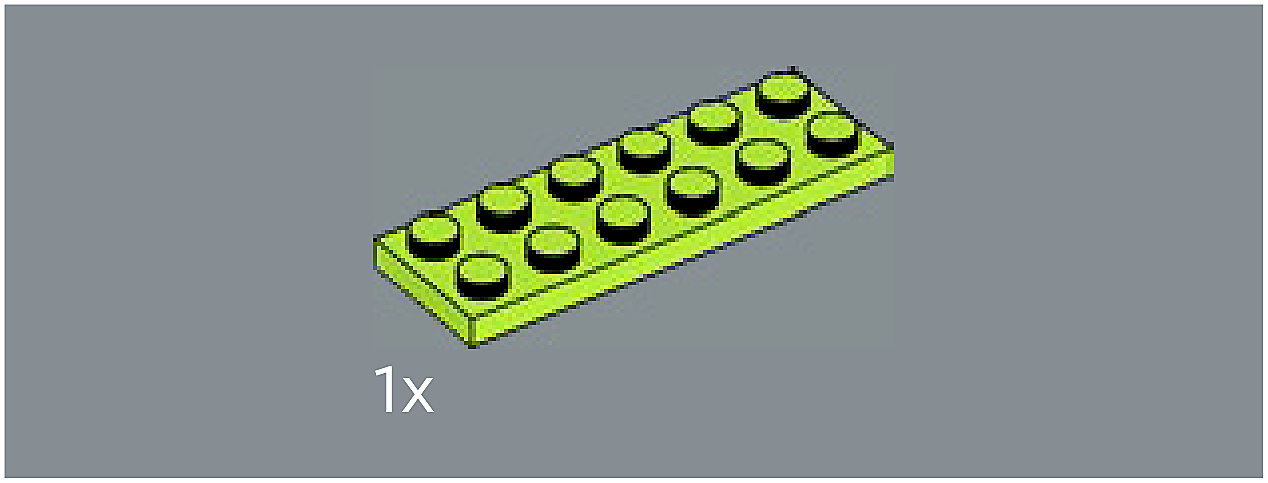
Inset — page 30
Phase 2 — Pieces
What do I do here?
Look at the inset image above. Check that the AI has correctly identified each piece — colour, quantity, and part name. If anything is wrong, edit the table directly. Add any missing pieces using the + row button, or remove incorrect ones with ✕.
When you are satisfied that all pieces are correct, click Save Pieces. This enables Phase 3 to run for this step.
| Qty | Colour | Part name | Part # | |
|---|---|---|---|---|
Phase 3 — Spatial placement
What do I do here?
The AI has described where each piece was placed by comparing the before and after images. Read every description carefully. Check that directions (left, right, front, back) are correct from the builder's perspective, and that stud counts are accurate.
If a description is vague, wrong, or uses the wrong direction — click Edit in that row and correct it. Once every placement description for this step is accurate, click Approve. Approval is required before the accessible prose can be generated.
This is the most important phase — a blind builder will follow these descriptions precisely.
Not yet extracted.
Phase 4 — Accessible prose
What do I do here?
This step is completed by the builder, not the sighted reviewer. The app generates an accessible prose paragraph from the approved Phase 3 descriptions. No action is needed from you here — your work is done once Phase 3 is approved.
Not yet generated. Complete Phase 3 and approve placement first.
Step 47
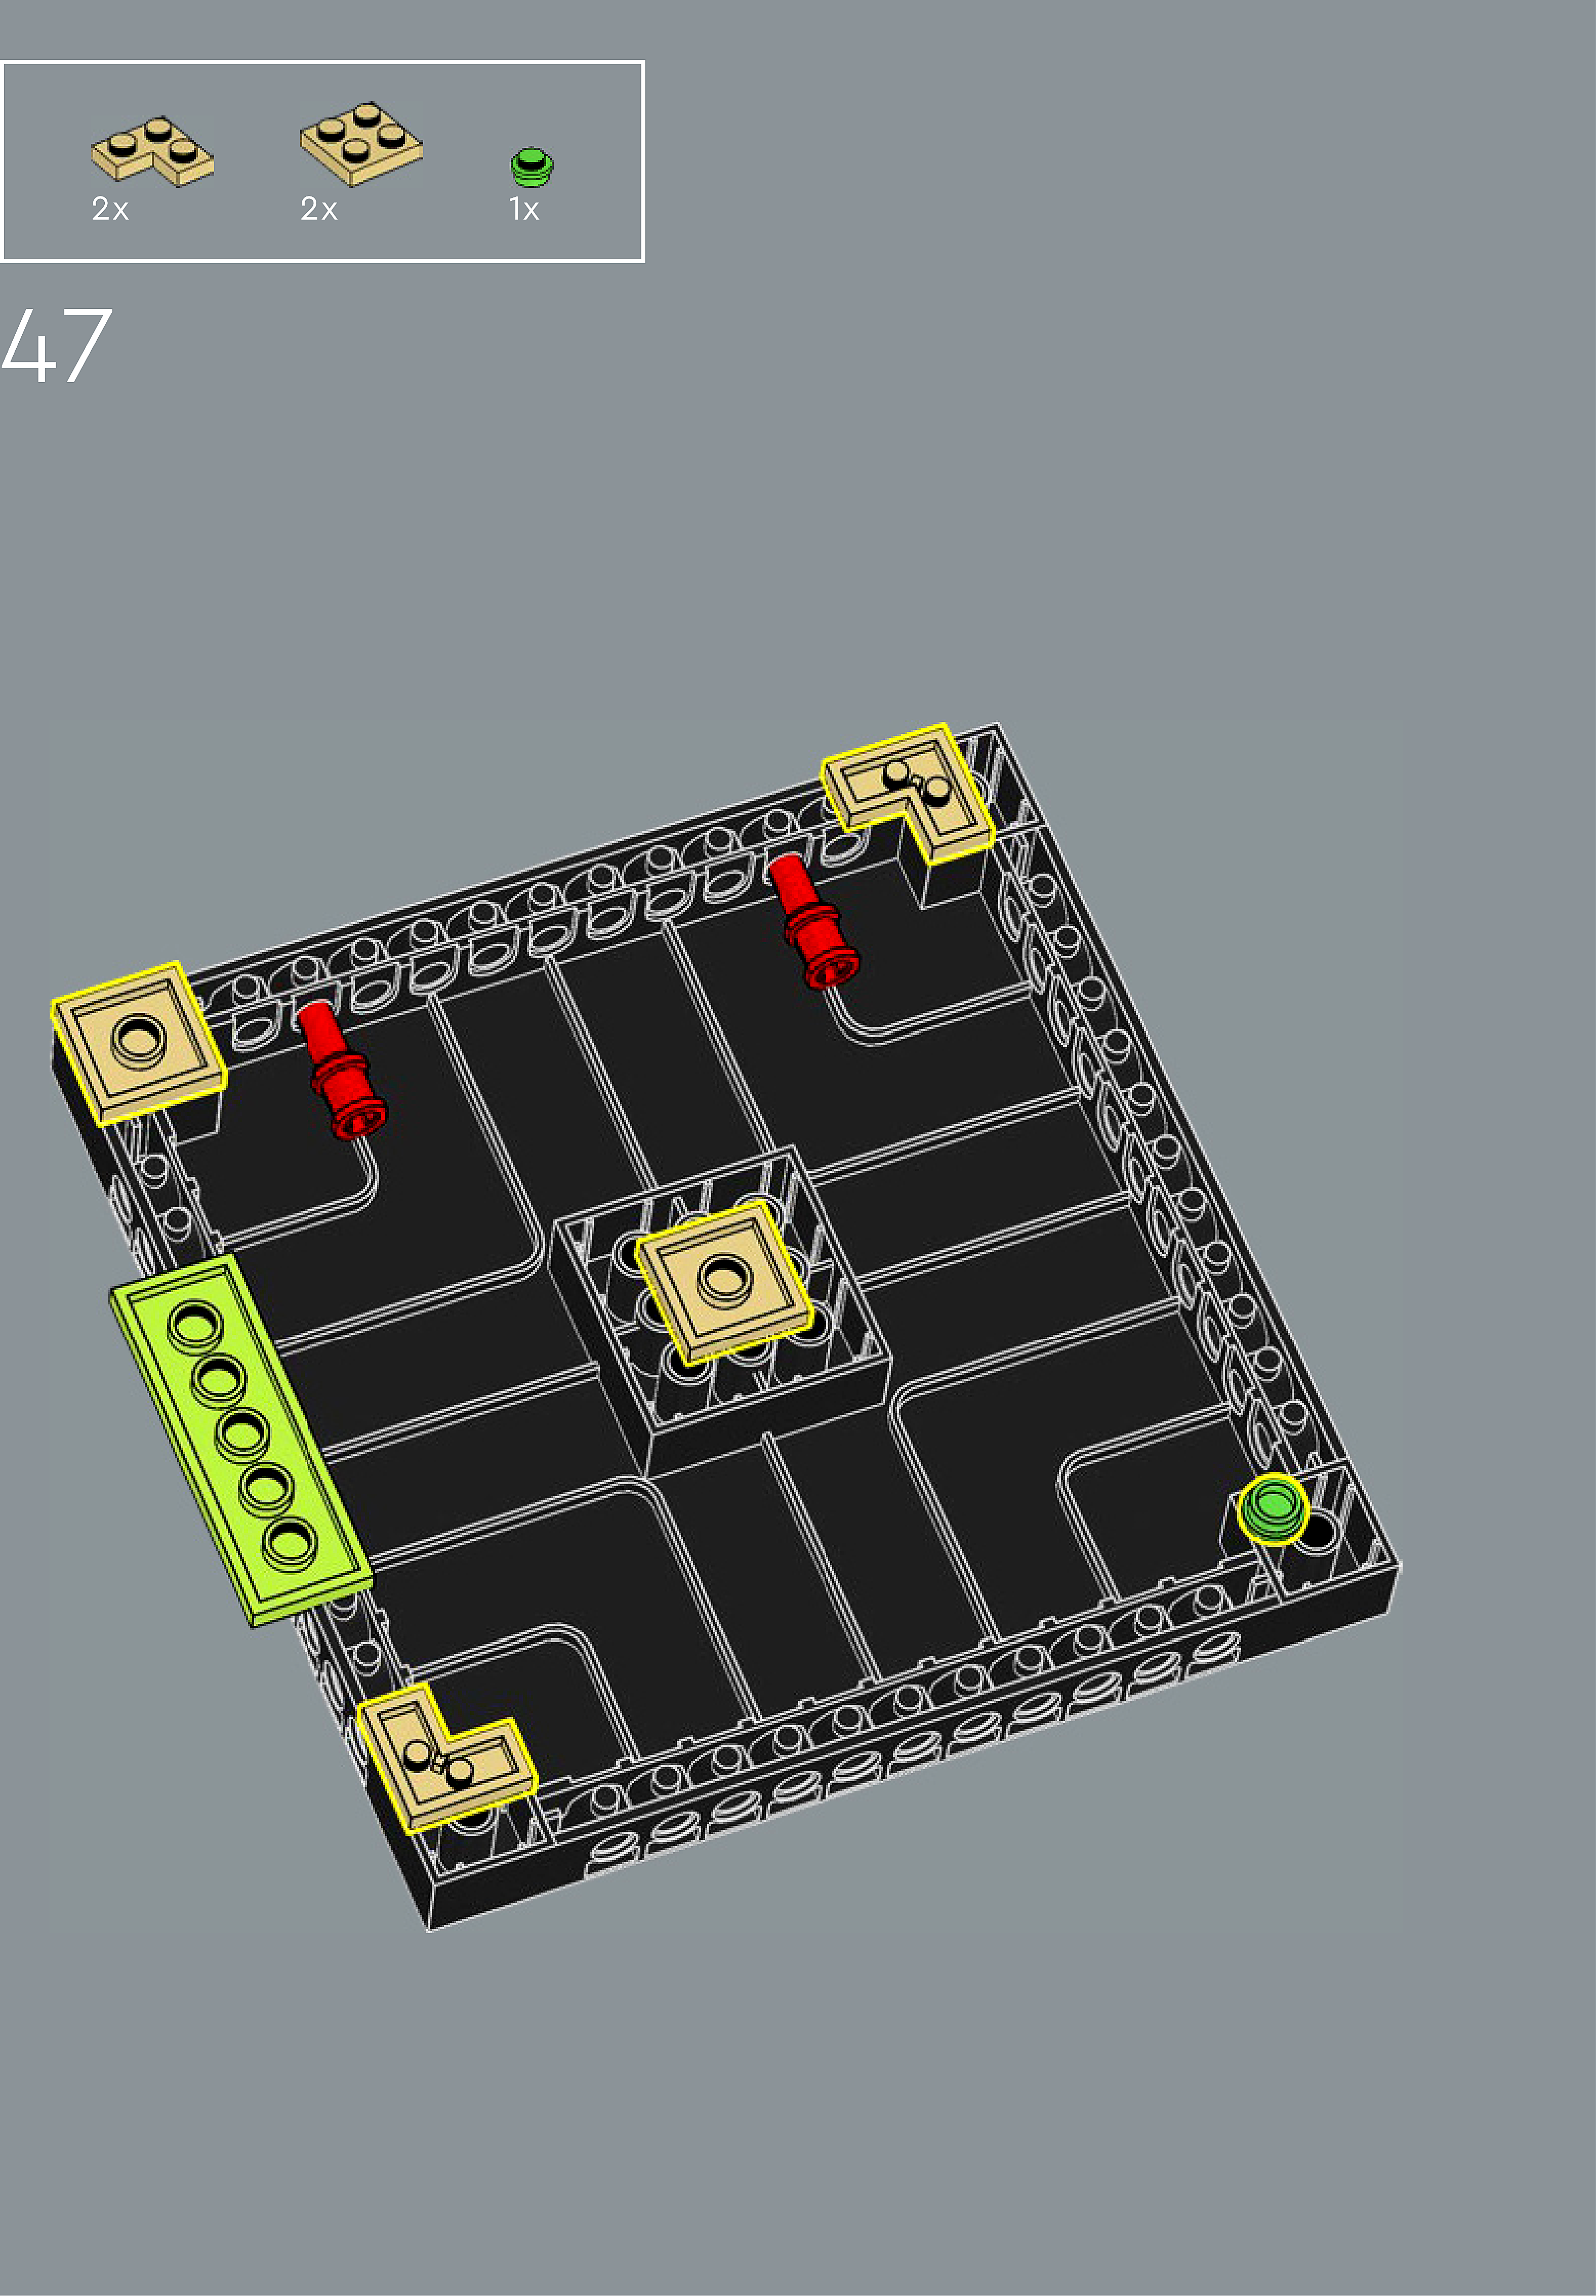
Assembly — page 30
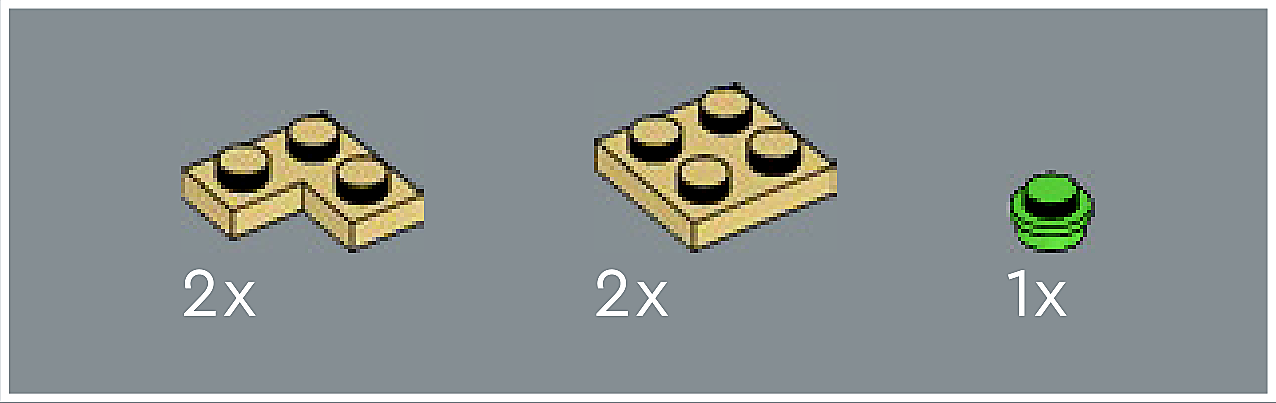
Inset — page 30
Phase 2 — Pieces
What do I do here?
Look at the inset image above. Check that the AI has correctly identified each piece — colour, quantity, and part name. If anything is wrong, edit the table directly. Add any missing pieces using the + row button, or remove incorrect ones with ✕.
When you are satisfied that all pieces are correct, click Save Pieces. This enables Phase 3 to run for this step.
| Qty | Colour | Part name | Part # | |
|---|---|---|---|---|
Phase 3 — Spatial placement
What do I do here?
The AI has described where each piece was placed by comparing the before and after images. Read every description carefully. Check that directions (left, right, front, back) are correct from the builder's perspective, and that stud counts are accurate.
If a description is vague, wrong, or uses the wrong direction — click Edit in that row and correct it. Once every placement description for this step is accurate, click Approve. Approval is required before the accessible prose can be generated.
This is the most important phase — a blind builder will follow these descriptions precisely.
Not yet extracted.
Phase 4 — Accessible prose
What do I do here?
This step is completed by the builder, not the sighted reviewer. The app generates an accessible prose paragraph from the approved Phase 3 descriptions. No action is needed from you here — your work is done once Phase 3 is approved.
Not yet generated. Complete Phase 3 and approve placement first.
Step 48
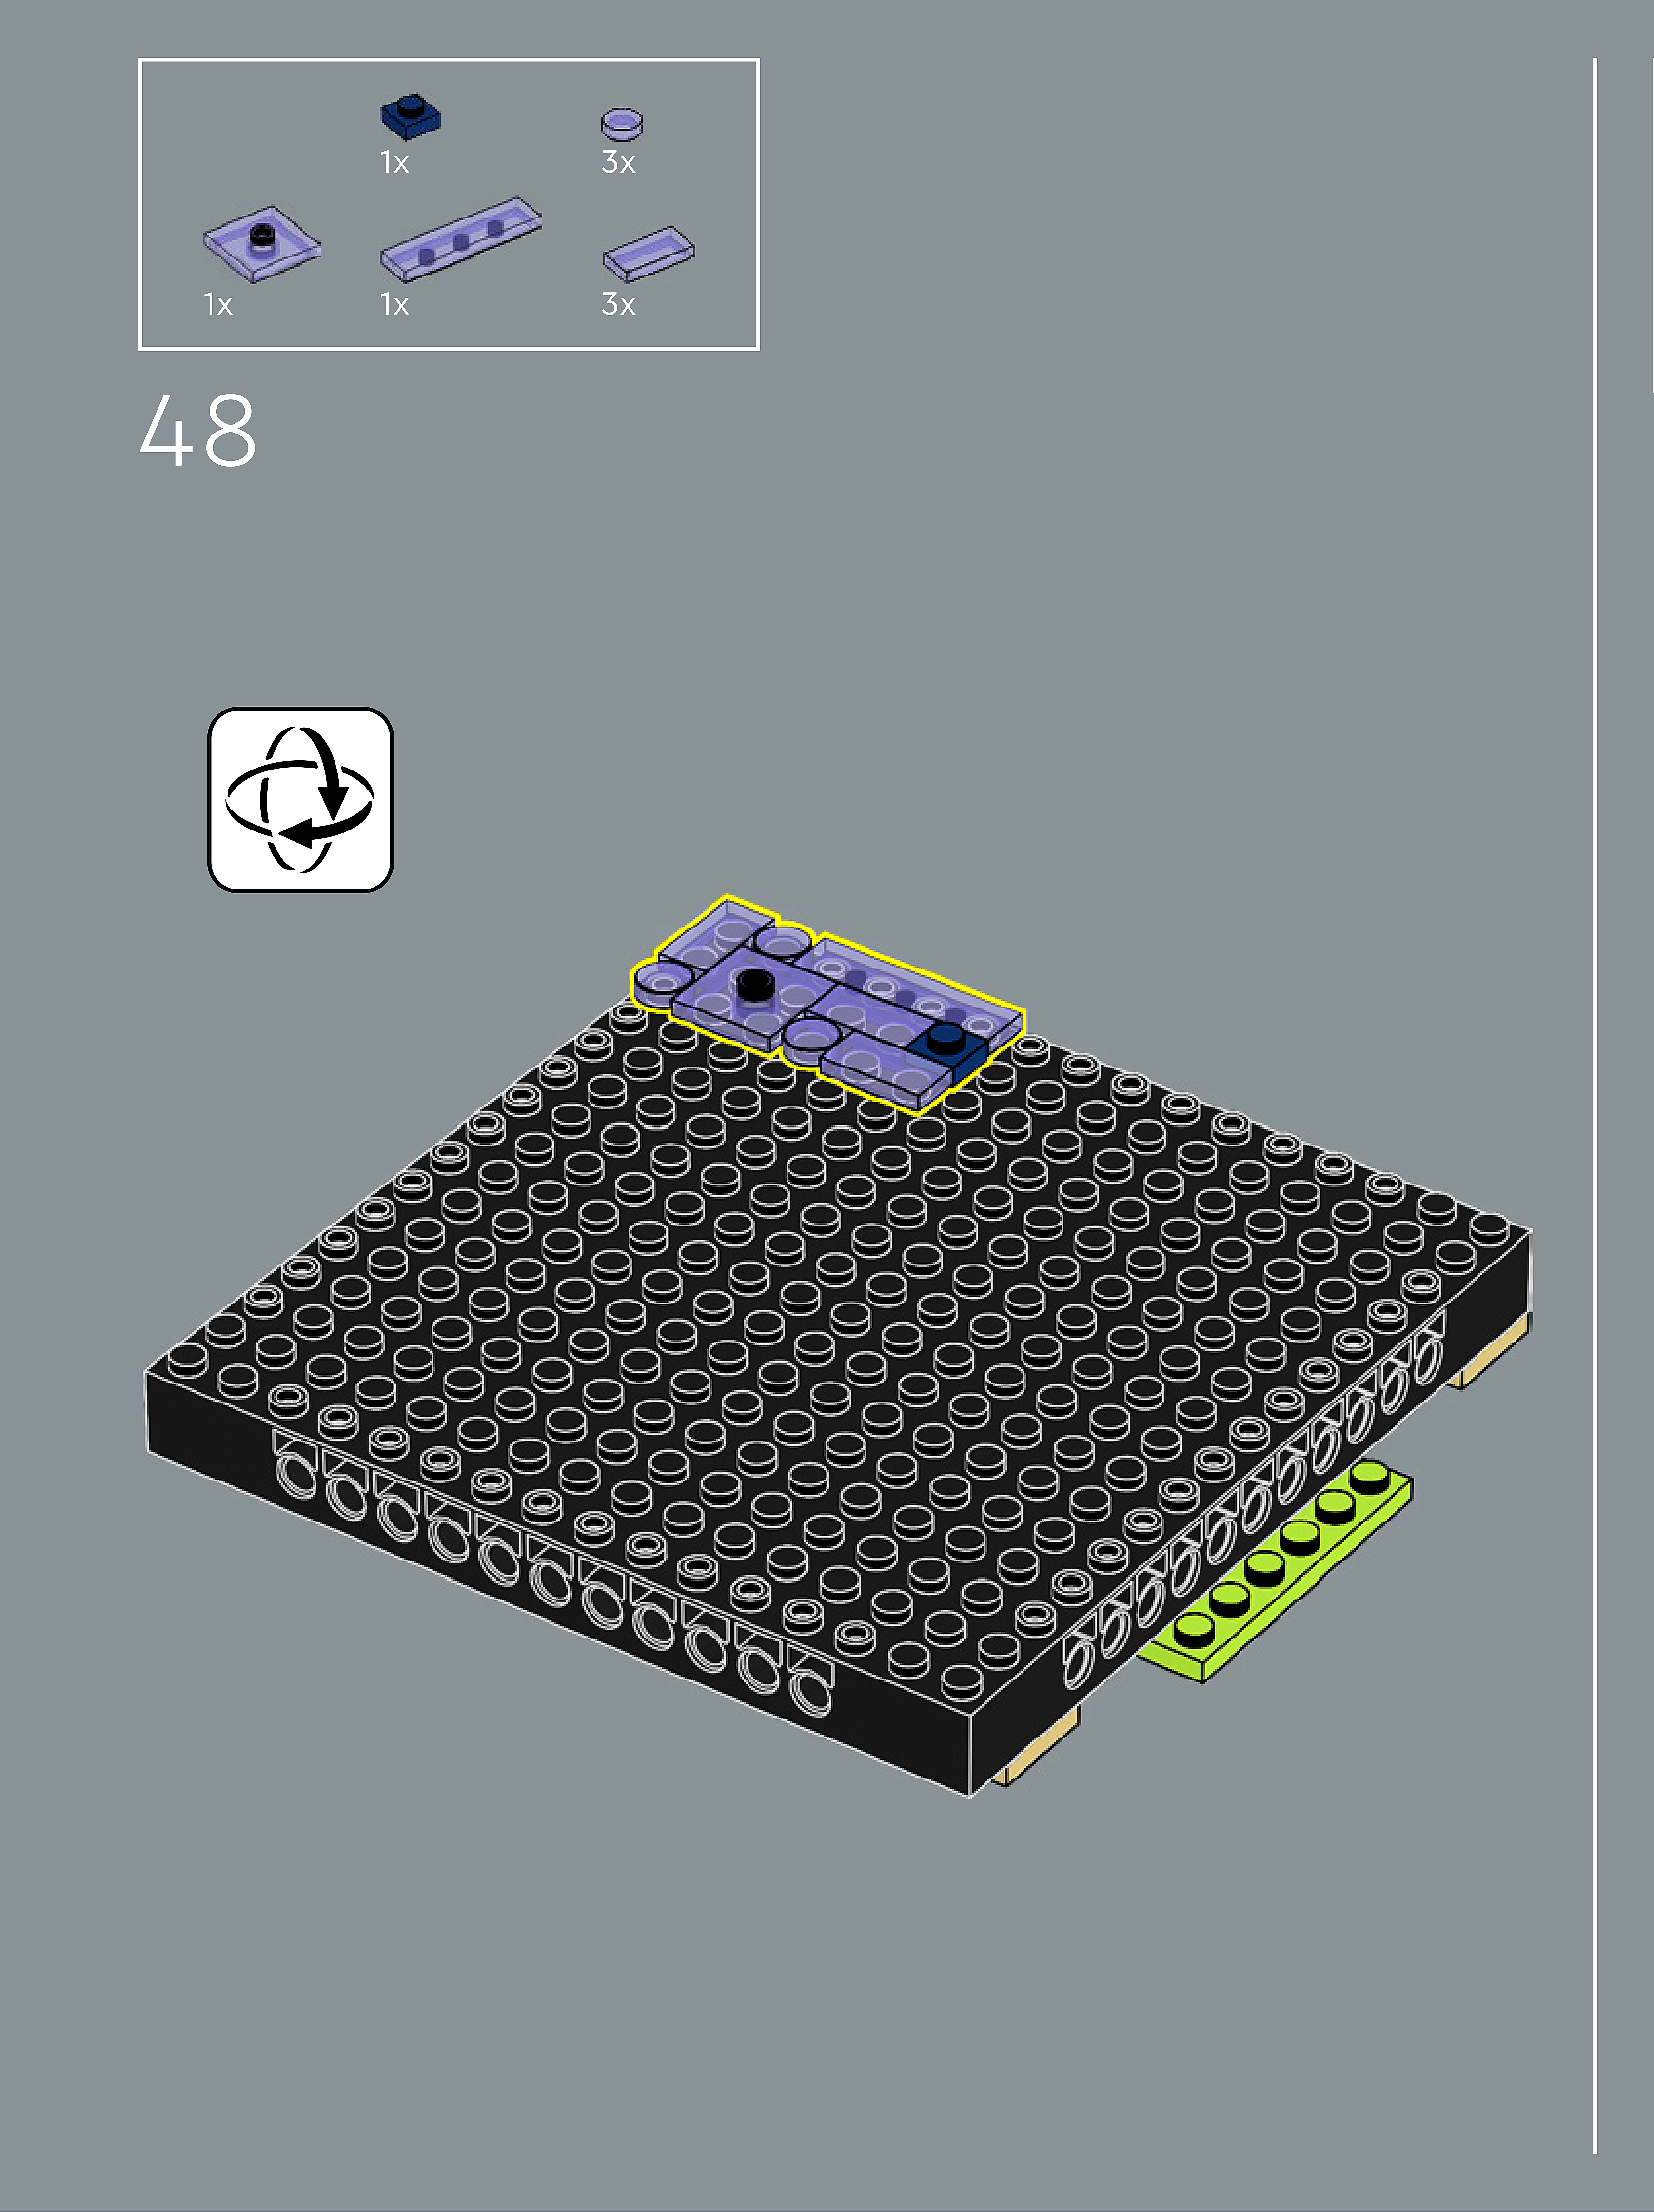
Assembly — page 31
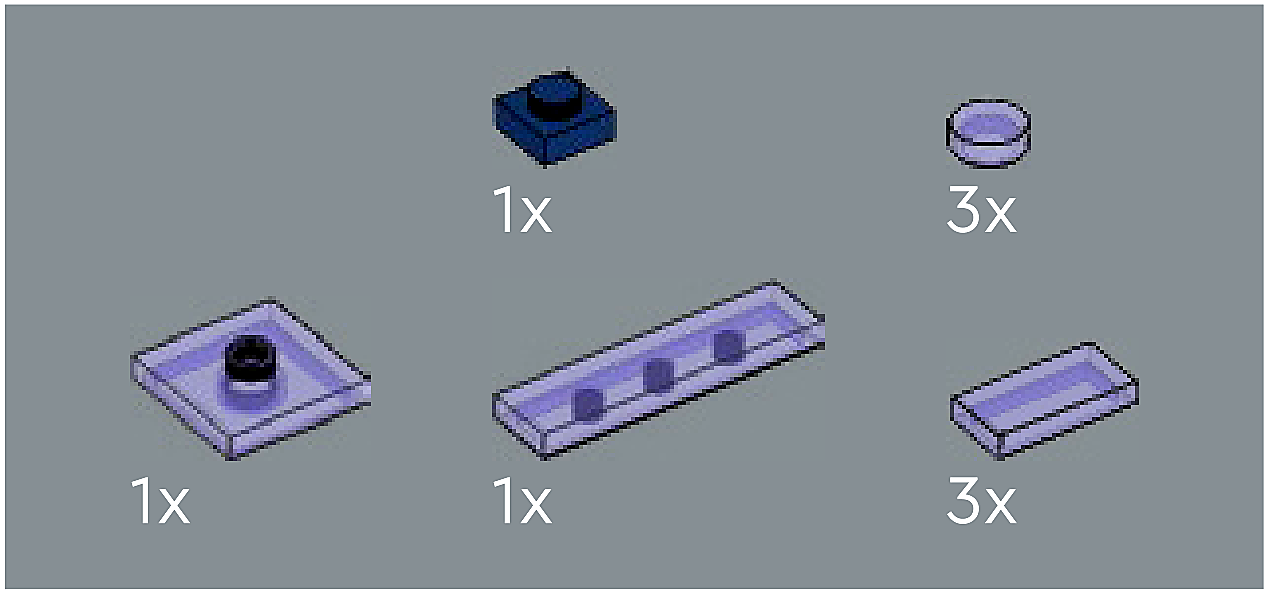
Inset — page 31
Phase 2 — Pieces
What do I do here?
Look at the inset image above. Check that the AI has correctly identified each piece — colour, quantity, and part name. If anything is wrong, edit the table directly. Add any missing pieces using the + row button, or remove incorrect ones with ✕.
When you are satisfied that all pieces are correct, click Save Pieces. This enables Phase 3 to run for this step.
| Qty | Colour | Part name | Part # | |
|---|---|---|---|---|
Phase 3 — Spatial placement
What do I do here?
The AI has described where each piece was placed by comparing the before and after images. Read every description carefully. Check that directions (left, right, front, back) are correct from the builder's perspective, and that stud counts are accurate.
If a description is vague, wrong, or uses the wrong direction — click Edit in that row and correct it. Once every placement description for this step is accurate, click Approve. Approval is required before the accessible prose can be generated.
This is the most important phase — a blind builder will follow these descriptions precisely.
Not yet extracted.
Phase 4 — Accessible prose
What do I do here?
This step is completed by the builder, not the sighted reviewer. The app generates an accessible prose paragraph from the approved Phase 3 descriptions. No action is needed from you here — your work is done once Phase 3 is approved.
Not yet generated. Complete Phase 3 and approve placement first.
Step 49
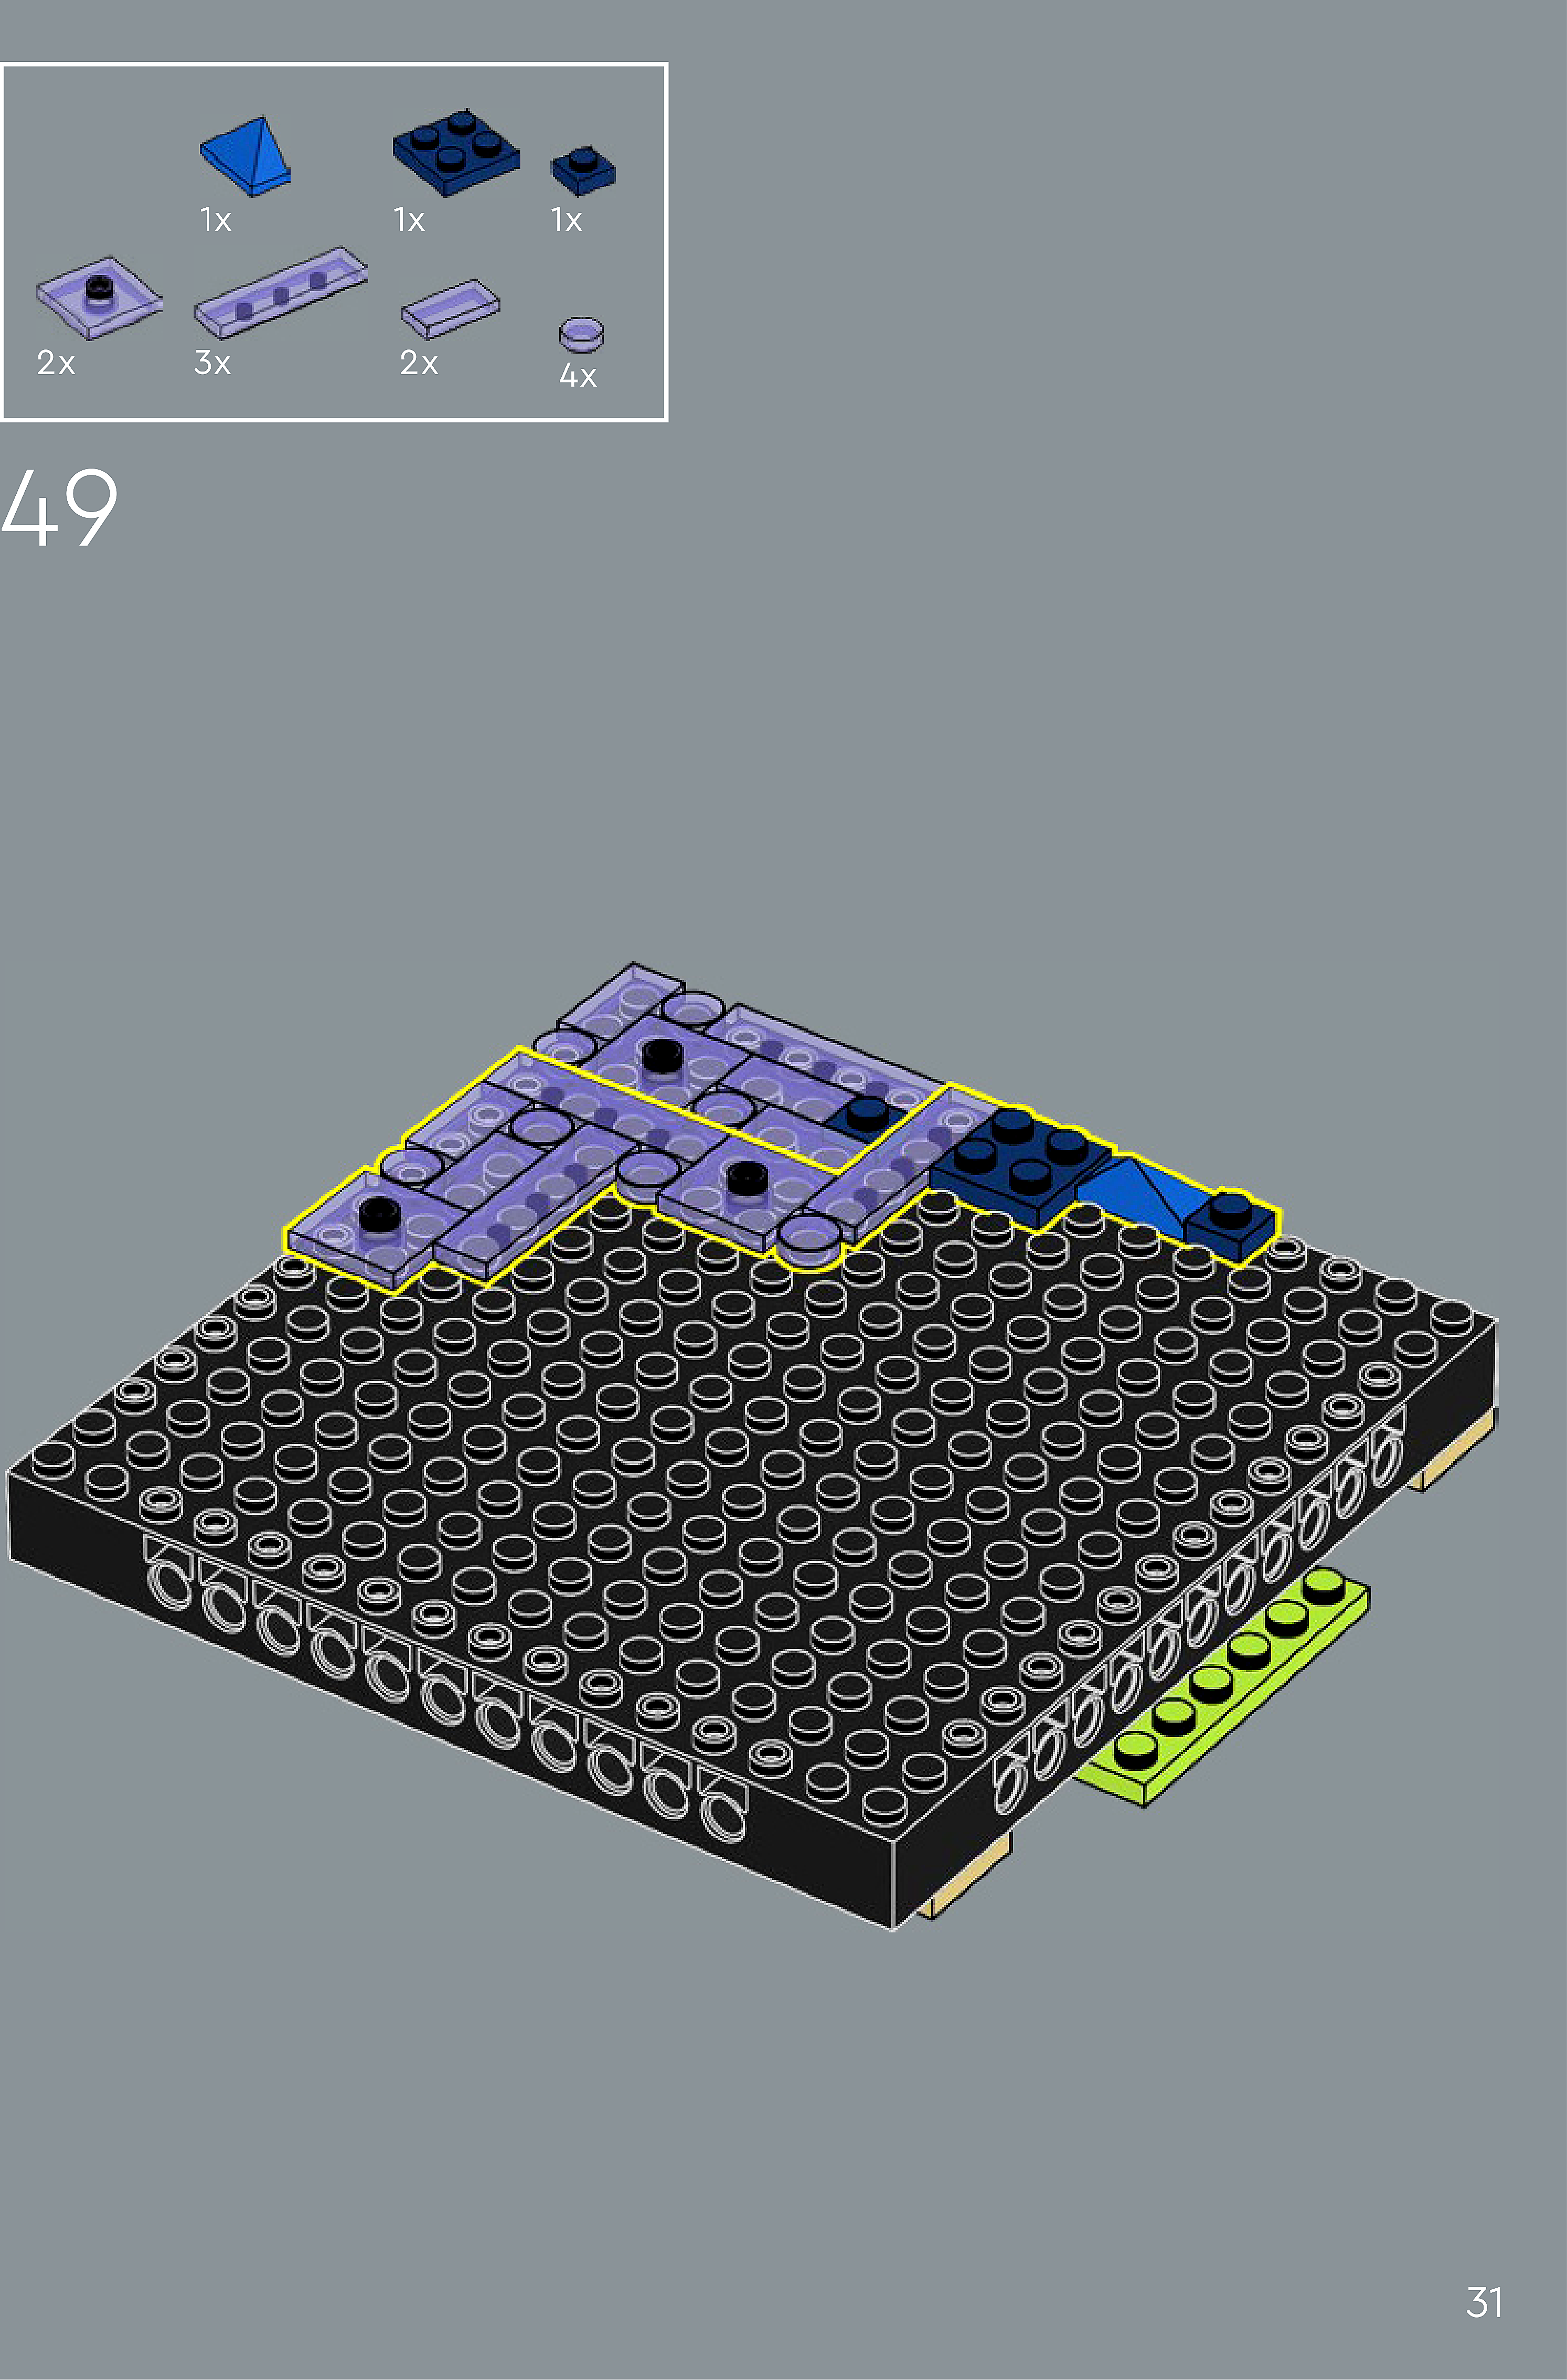
Assembly — page 31
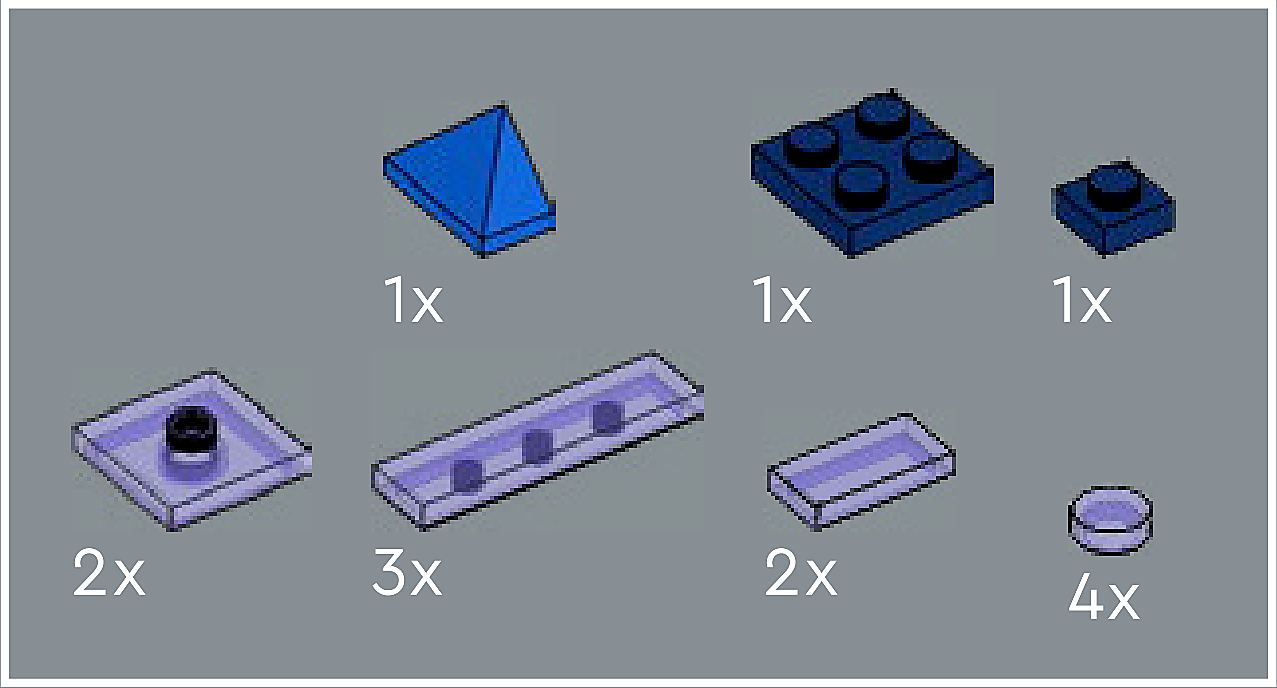
Inset — page 31
Phase 2 — Pieces
What do I do here?
Look at the inset image above. Check that the AI has correctly identified each piece — colour, quantity, and part name. If anything is wrong, edit the table directly. Add any missing pieces using the + row button, or remove incorrect ones with ✕.
When you are satisfied that all pieces are correct, click Save Pieces. This enables Phase 3 to run for this step.
| Qty | Colour | Part name | Part # | |
|---|---|---|---|---|
Phase 3 — Spatial placement
What do I do here?
The AI has described where each piece was placed by comparing the before and after images. Read every description carefully. Check that directions (left, right, front, back) are correct from the builder's perspective, and that stud counts are accurate.
If a description is vague, wrong, or uses the wrong direction — click Edit in that row and correct it. Once every placement description for this step is accurate, click Approve. Approval is required before the accessible prose can be generated.
This is the most important phase — a blind builder will follow these descriptions precisely.
Not yet extracted.
Phase 4 — Accessible prose
What do I do here?
This step is completed by the builder, not the sighted reviewer. The app generates an accessible prose paragraph from the approved Phase 3 descriptions. No action is needed from you here — your work is done once Phase 3 is approved.
Not yet generated. Complete Phase 3 and approve placement first.
Step 50
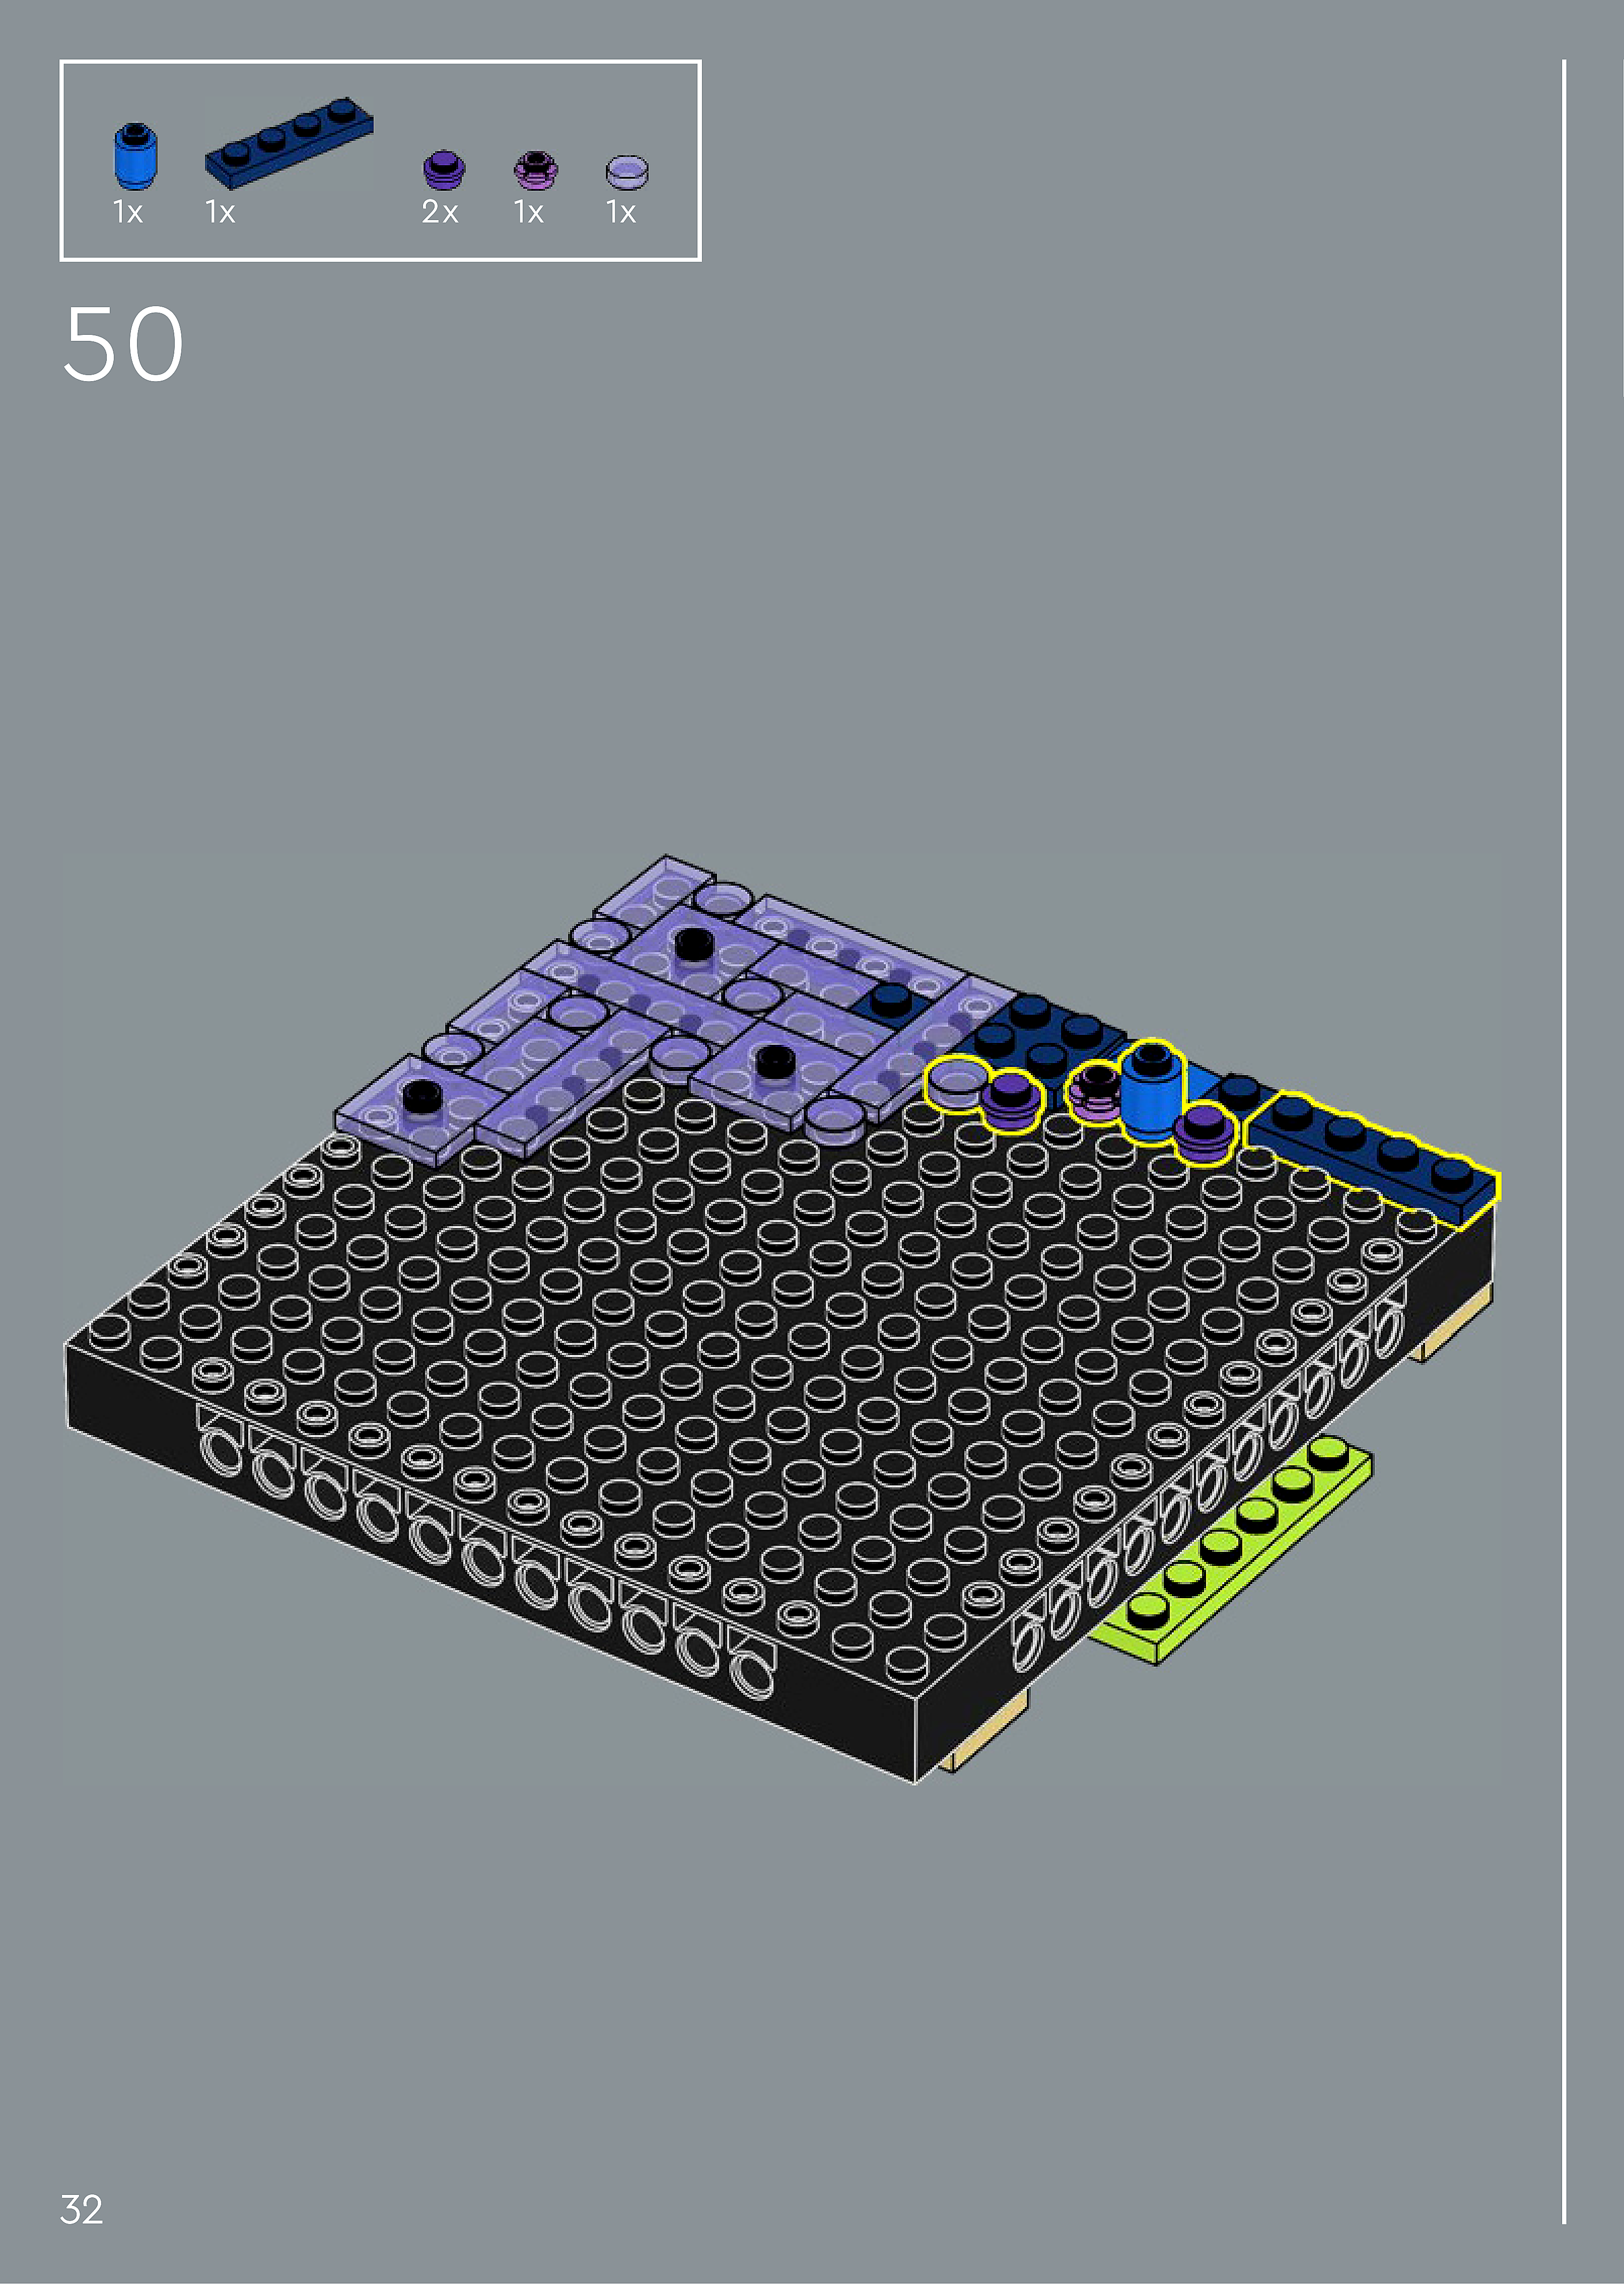
Assembly — page 32
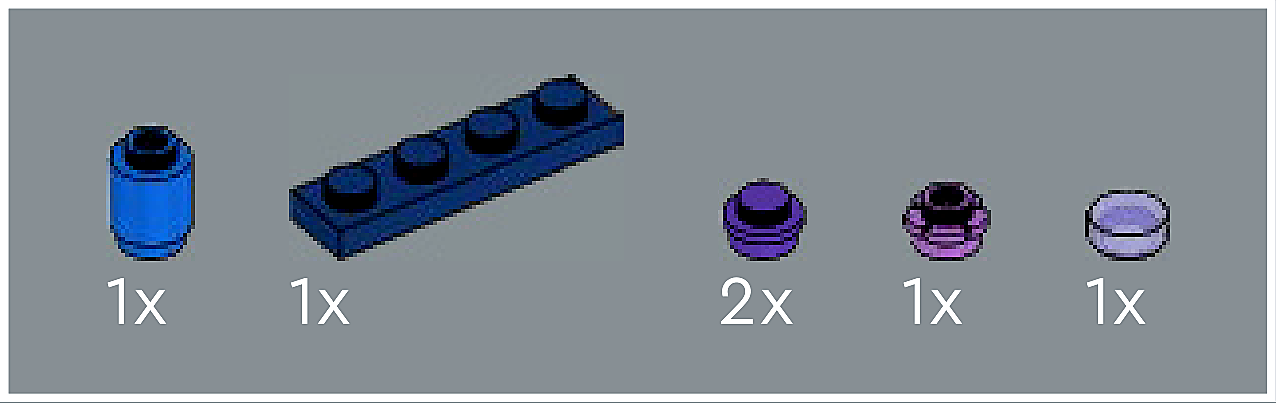
Inset — page 32
Phase 2 — Pieces
What do I do here?
Look at the inset image above. Check that the AI has correctly identified each piece — colour, quantity, and part name. If anything is wrong, edit the table directly. Add any missing pieces using the + row button, or remove incorrect ones with ✕.
When you are satisfied that all pieces are correct, click Save Pieces. This enables Phase 3 to run for this step.
| Qty | Colour | Part name | Part # | |
|---|---|---|---|---|
Phase 3 — Spatial placement
What do I do here?
The AI has described where each piece was placed by comparing the before and after images. Read every description carefully. Check that directions (left, right, front, back) are correct from the builder's perspective, and that stud counts are accurate.
If a description is vague, wrong, or uses the wrong direction — click Edit in that row and correct it. Once every placement description for this step is accurate, click Approve. Approval is required before the accessible prose can be generated.
This is the most important phase — a blind builder will follow these descriptions precisely.
Not yet extracted.
Phase 4 — Accessible prose
What do I do here?
This step is completed by the builder, not the sighted reviewer. The app generates an accessible prose paragraph from the approved Phase 3 descriptions. No action is needed from you here — your work is done once Phase 3 is approved.
Not yet generated. Complete Phase 3 and approve placement first.
Step 51
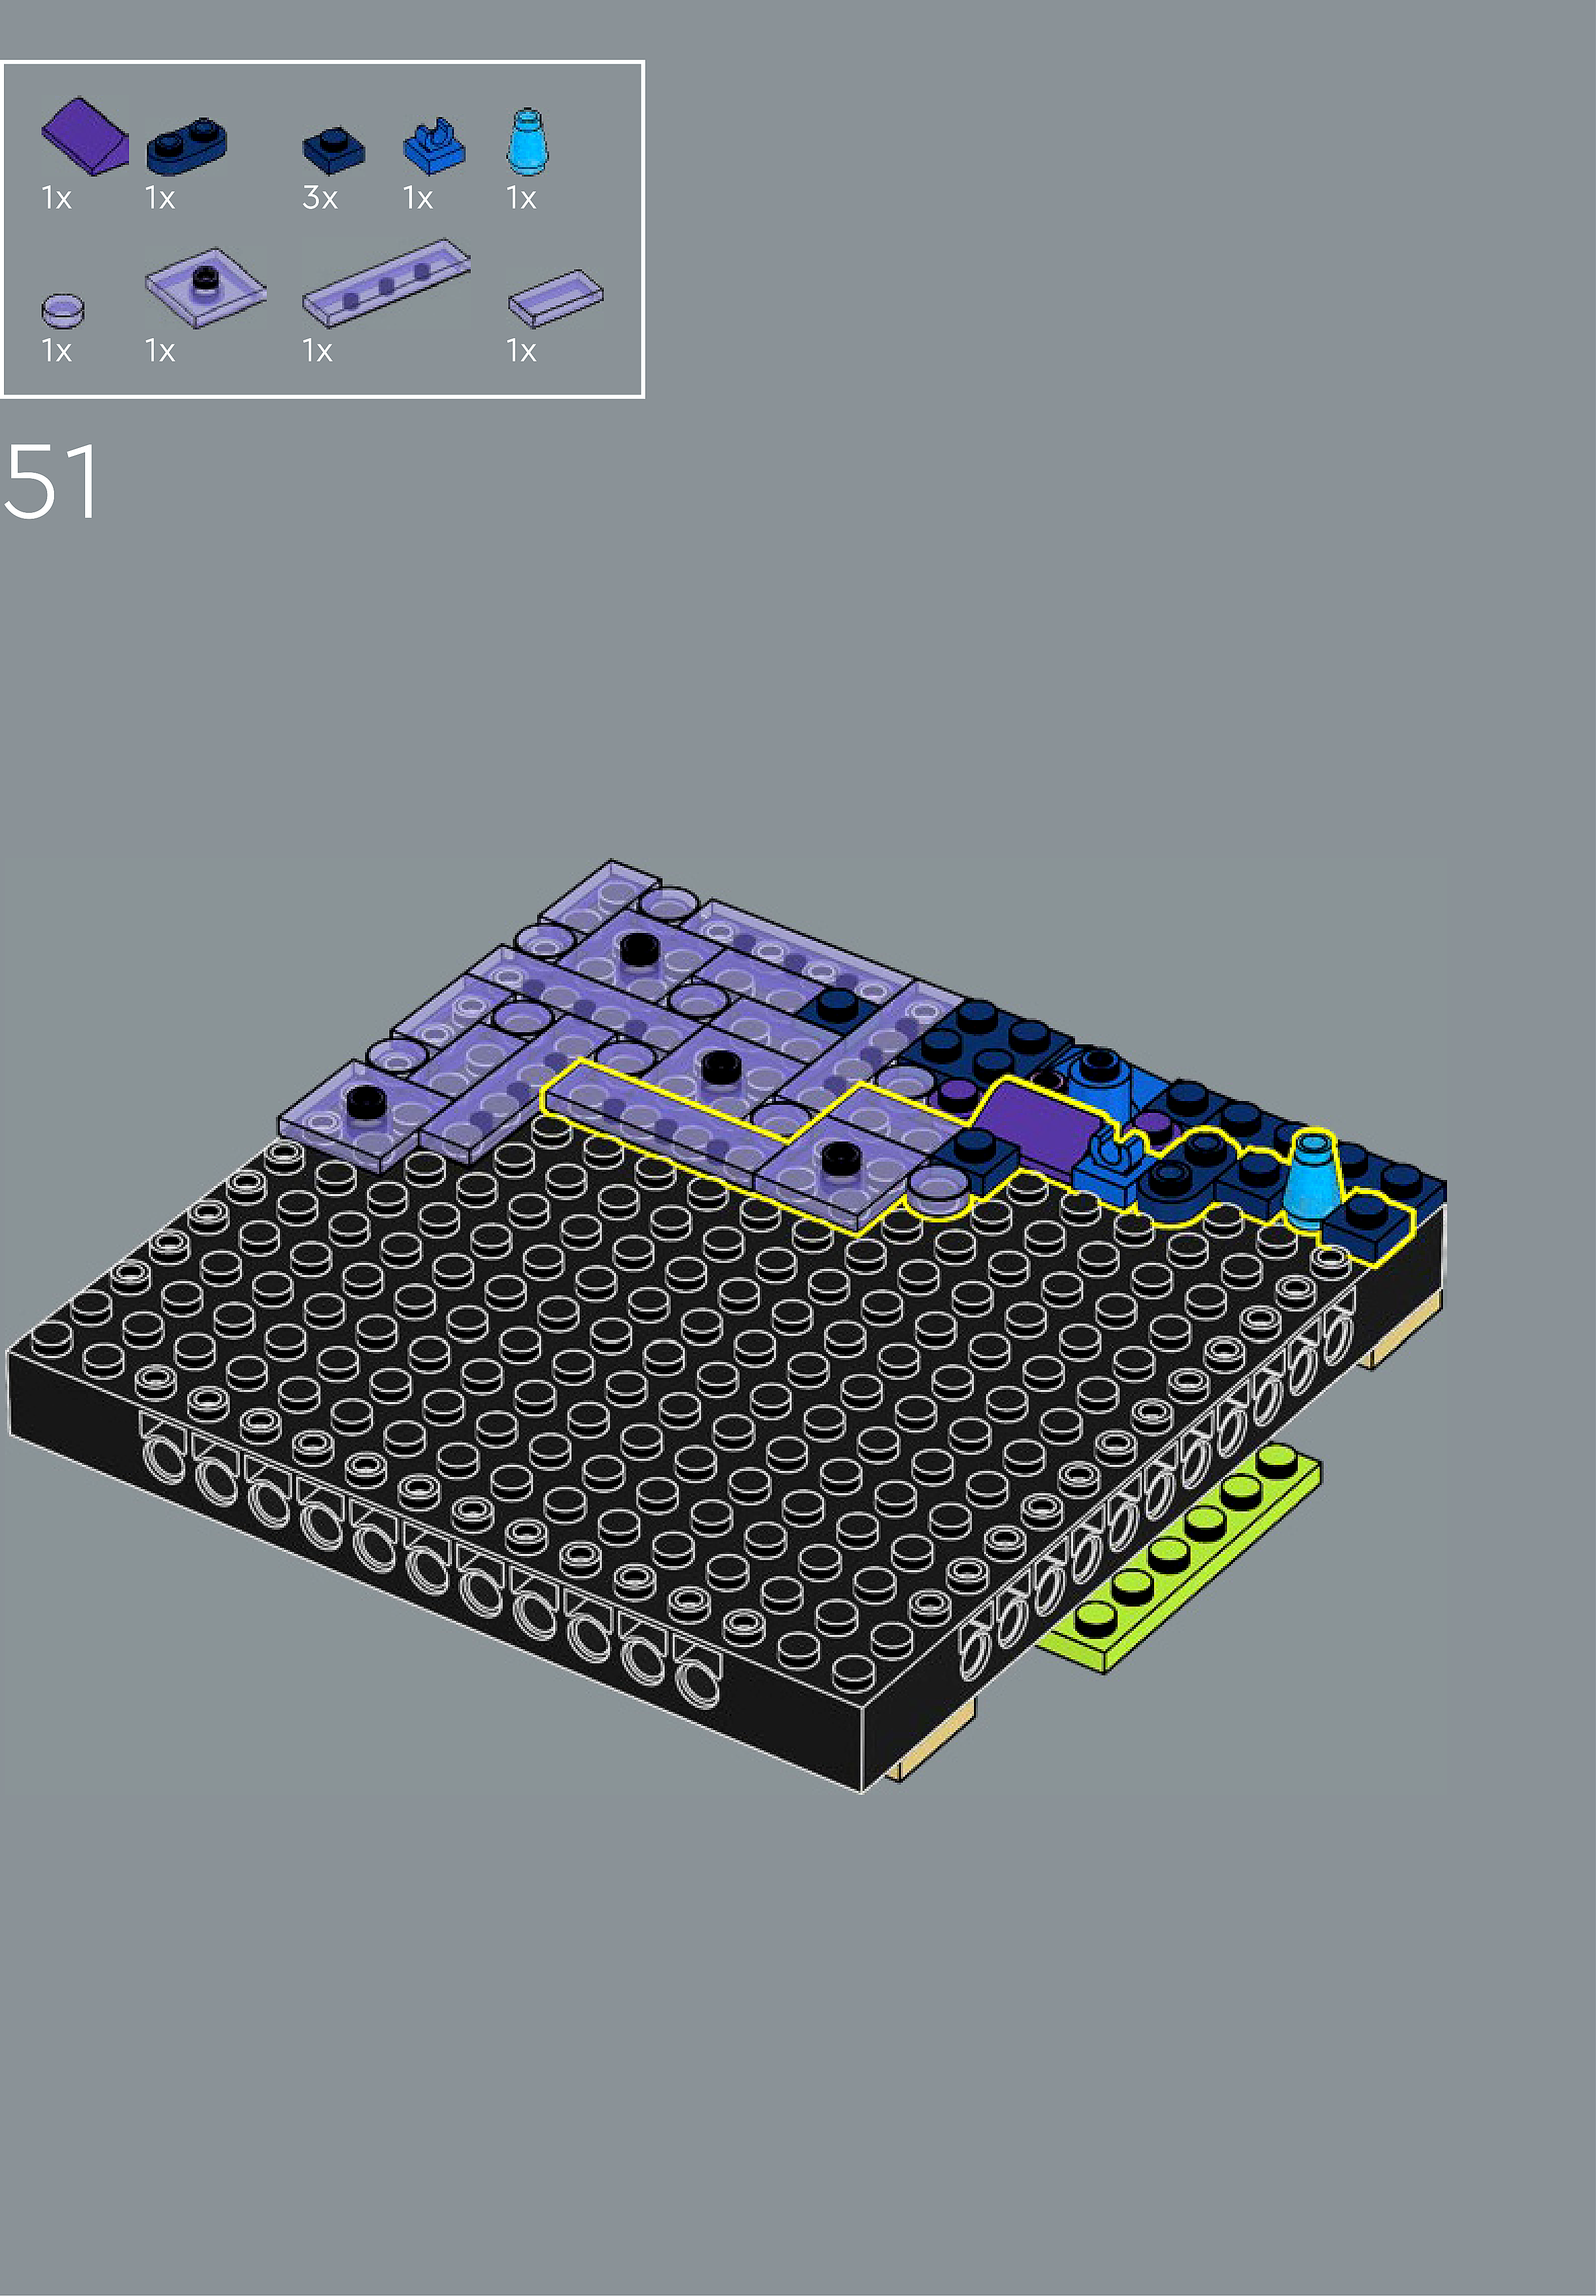
Assembly — page 32
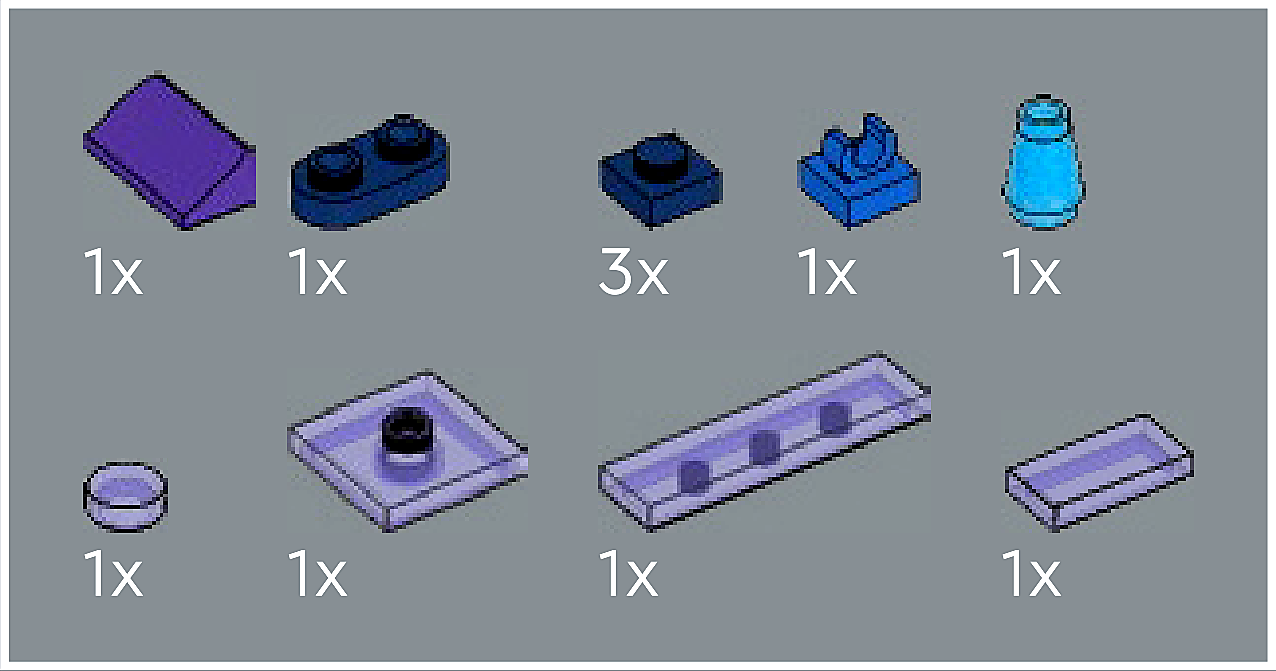
Inset — page 32
Phase 2 — Pieces
What do I do here?
Look at the inset image above. Check that the AI has correctly identified each piece — colour, quantity, and part name. If anything is wrong, edit the table directly. Add any missing pieces using the + row button, or remove incorrect ones with ✕.
When you are satisfied that all pieces are correct, click Save Pieces. This enables Phase 3 to run for this step.
| Qty | Colour | Part name | Part # | |
|---|---|---|---|---|
Phase 3 — Spatial placement
What do I do here?
The AI has described where each piece was placed by comparing the before and after images. Read every description carefully. Check that directions (left, right, front, back) are correct from the builder's perspective, and that stud counts are accurate.
If a description is vague, wrong, or uses the wrong direction — click Edit in that row and correct it. Once every placement description for this step is accurate, click Approve. Approval is required before the accessible prose can be generated.
This is the most important phase — a blind builder will follow these descriptions precisely.
Not yet extracted.
Phase 4 — Accessible prose
What do I do here?
This step is completed by the builder, not the sighted reviewer. The app generates an accessible prose paragraph from the approved Phase 3 descriptions. No action is needed from you here — your work is done once Phase 3 is approved.
Not yet generated. Complete Phase 3 and approve placement first.
Step 52
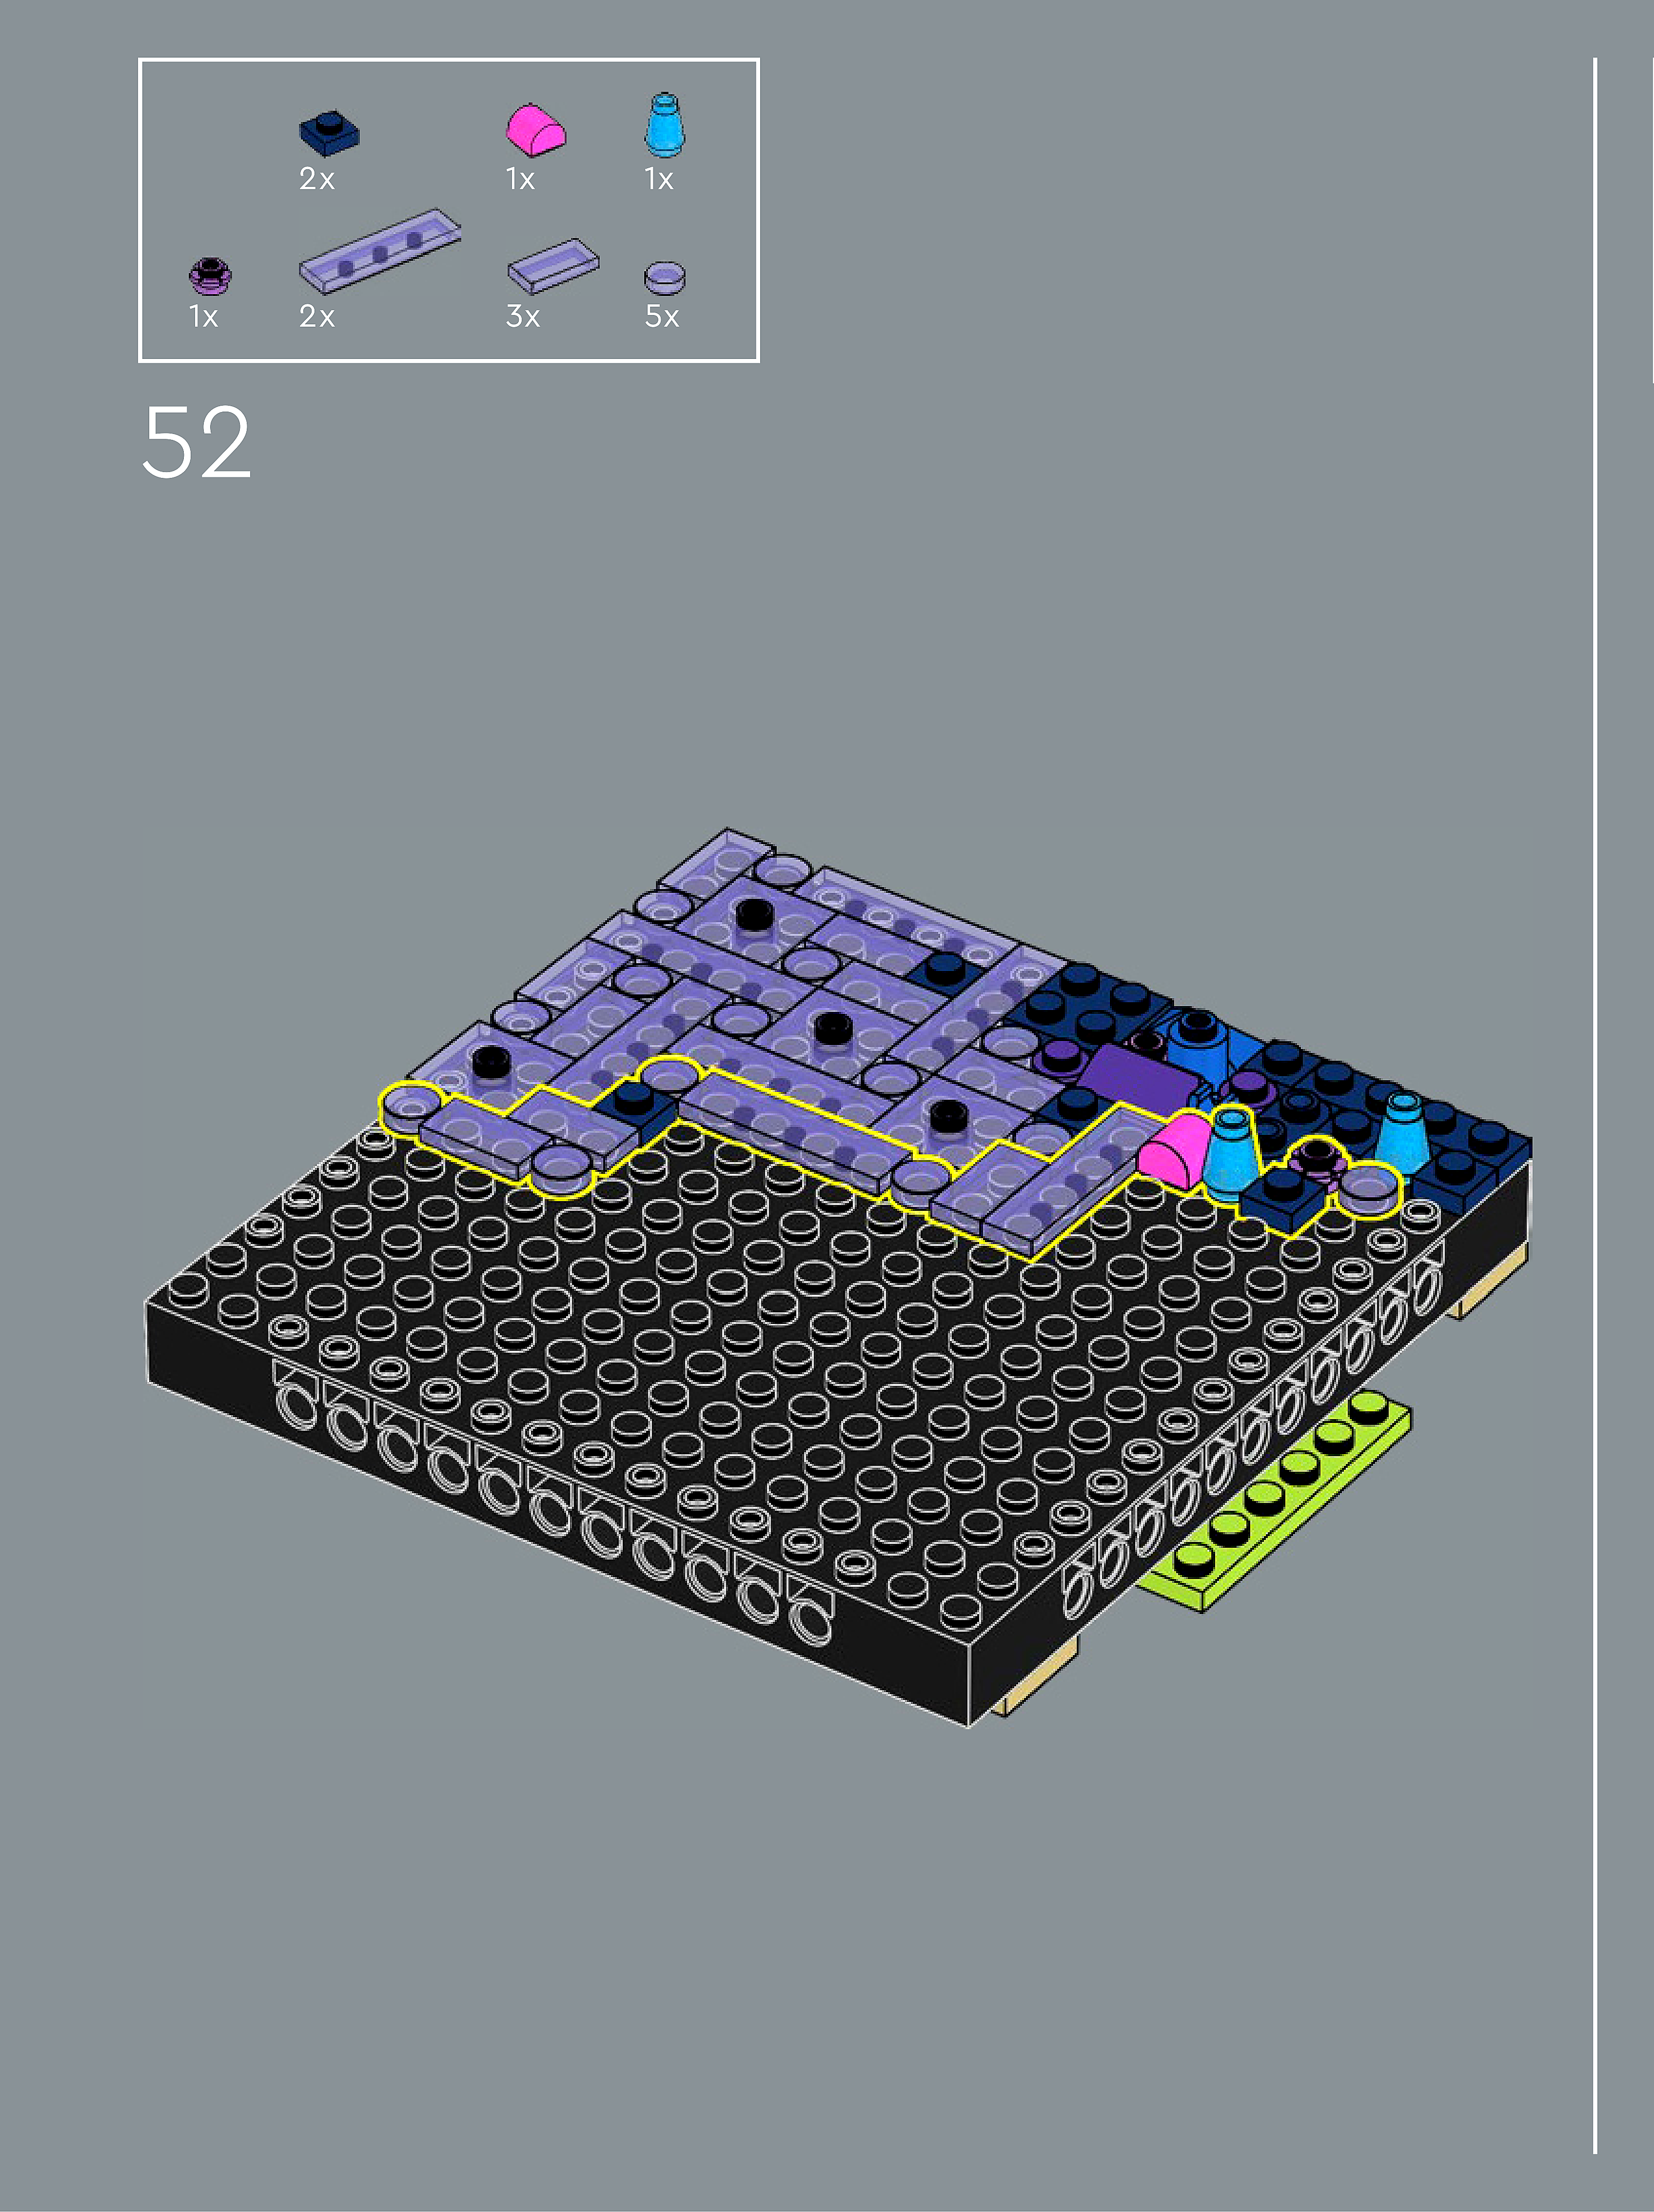
Assembly — page 33
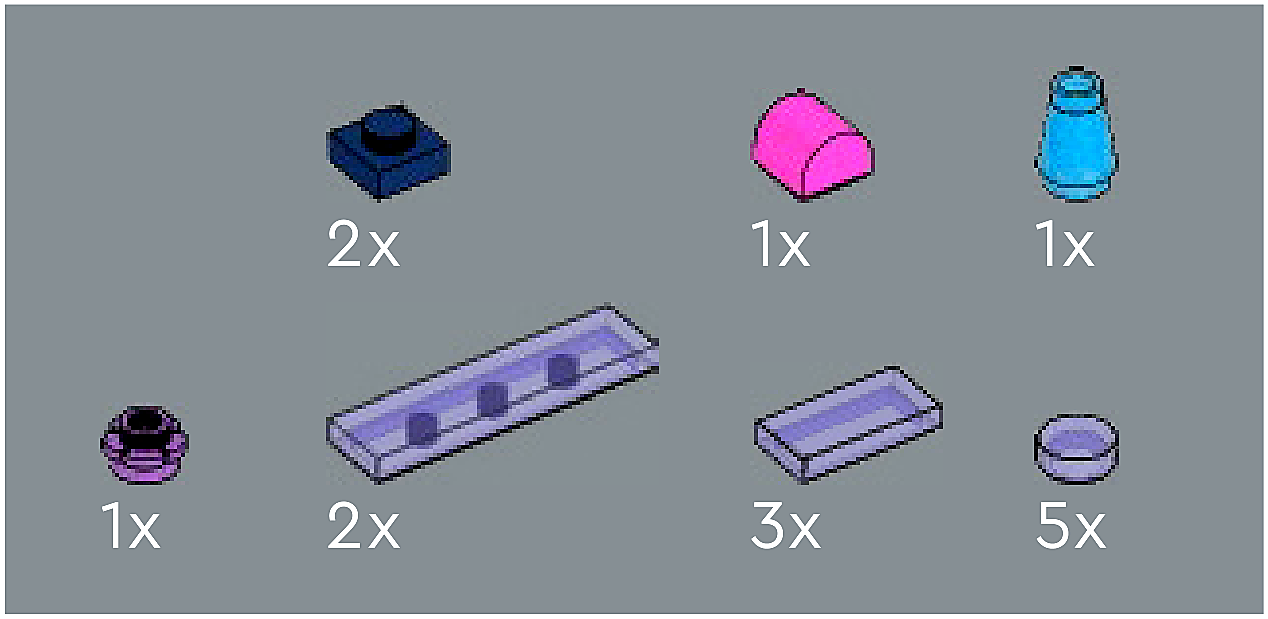
Inset — page 33
Phase 2 — Pieces
What do I do here?
Look at the inset image above. Check that the AI has correctly identified each piece — colour, quantity, and part name. If anything is wrong, edit the table directly. Add any missing pieces using the + row button, or remove incorrect ones with ✕.
When you are satisfied that all pieces are correct, click Save Pieces. This enables Phase 3 to run for this step.
| Qty | Colour | Part name | Part # | |
|---|---|---|---|---|
Phase 3 — Spatial placement
What do I do here?
The AI has described where each piece was placed by comparing the before and after images. Read every description carefully. Check that directions (left, right, front, back) are correct from the builder's perspective, and that stud counts are accurate.
If a description is vague, wrong, or uses the wrong direction — click Edit in that row and correct it. Once every placement description for this step is accurate, click Approve. Approval is required before the accessible prose can be generated.
This is the most important phase — a blind builder will follow these descriptions precisely.
Not yet extracted.
Phase 4 — Accessible prose
What do I do here?
This step is completed by the builder, not the sighted reviewer. The app generates an accessible prose paragraph from the approved Phase 3 descriptions. No action is needed from you here — your work is done once Phase 3 is approved.
Not yet generated. Complete Phase 3 and approve placement first.
Step 53
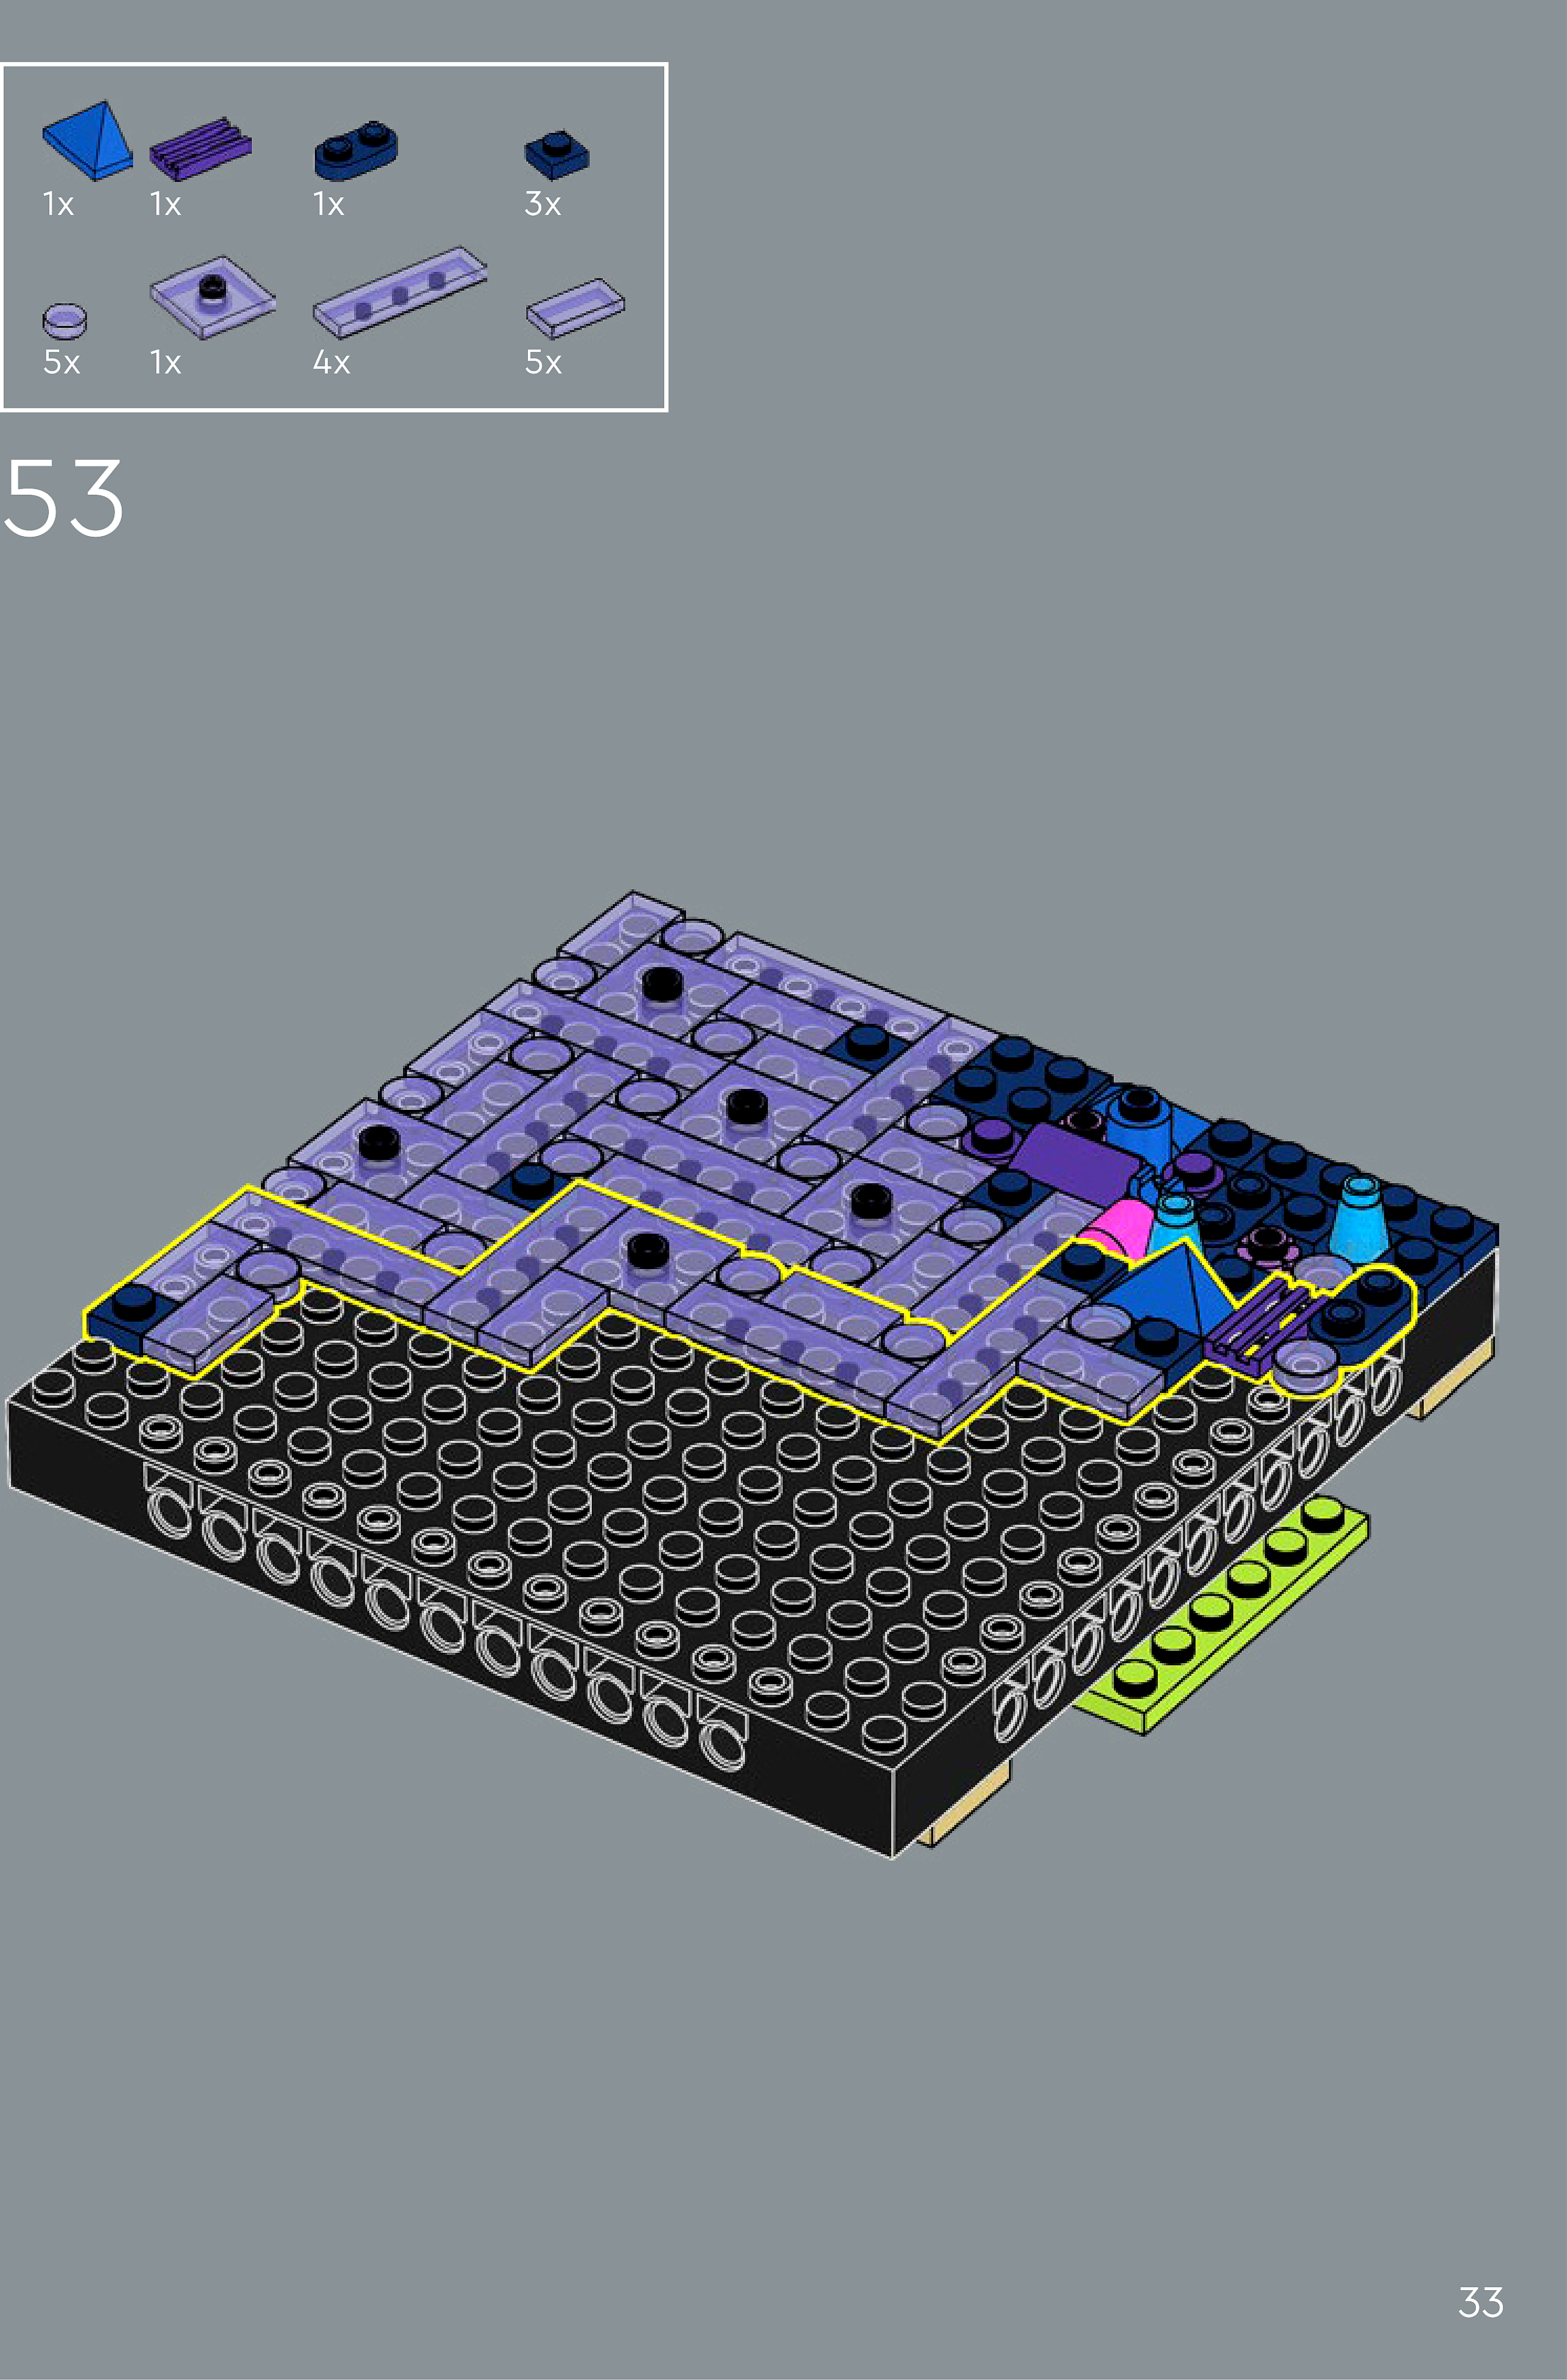
Assembly — page 33
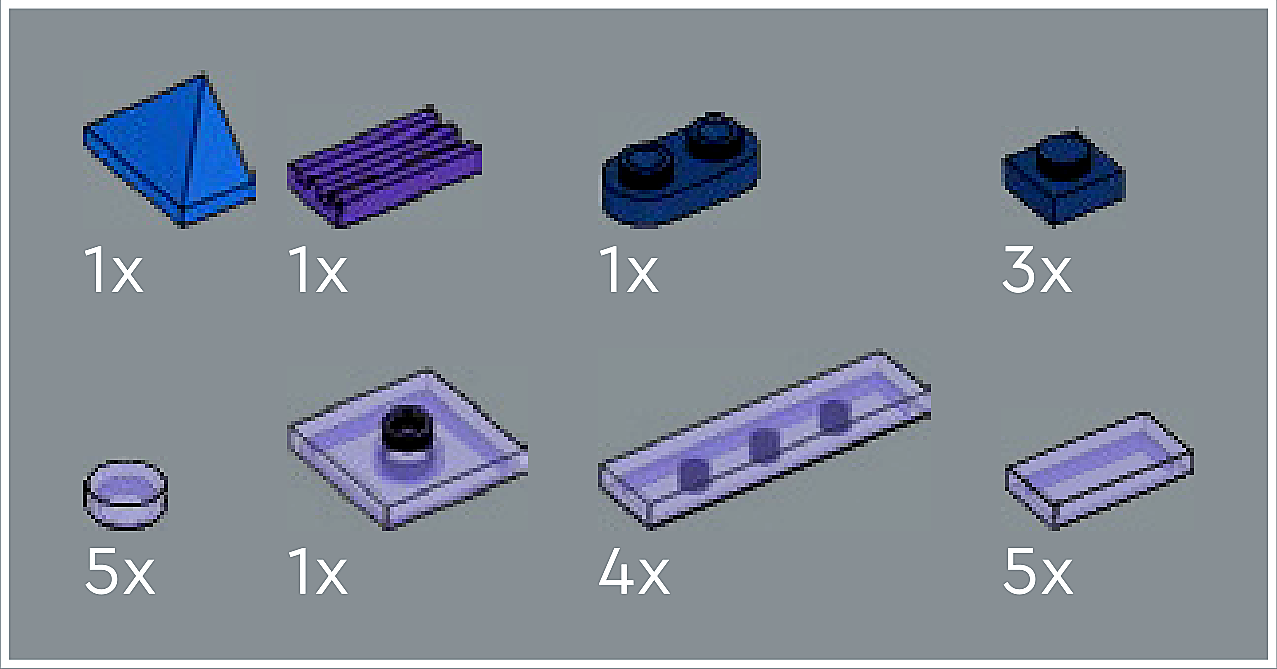
Inset — page 33
Phase 2 — Pieces
What do I do here?
Look at the inset image above. Check that the AI has correctly identified each piece — colour, quantity, and part name. If anything is wrong, edit the table directly. Add any missing pieces using the + row button, or remove incorrect ones with ✕.
When you are satisfied that all pieces are correct, click Save Pieces. This enables Phase 3 to run for this step.
| Qty | Colour | Part name | Part # | |
|---|---|---|---|---|
Phase 3 — Spatial placement
What do I do here?
The AI has described where each piece was placed by comparing the before and after images. Read every description carefully. Check that directions (left, right, front, back) are correct from the builder's perspective, and that stud counts are accurate.
If a description is vague, wrong, or uses the wrong direction — click Edit in that row and correct it. Once every placement description for this step is accurate, click Approve. Approval is required before the accessible prose can be generated.
This is the most important phase — a blind builder will follow these descriptions precisely.
Not yet extracted.
Phase 4 — Accessible prose
What do I do here?
This step is completed by the builder, not the sighted reviewer. The app generates an accessible prose paragraph from the approved Phase 3 descriptions. No action is needed from you here — your work is done once Phase 3 is approved.
Not yet generated. Complete Phase 3 and approve placement first.
Step 54
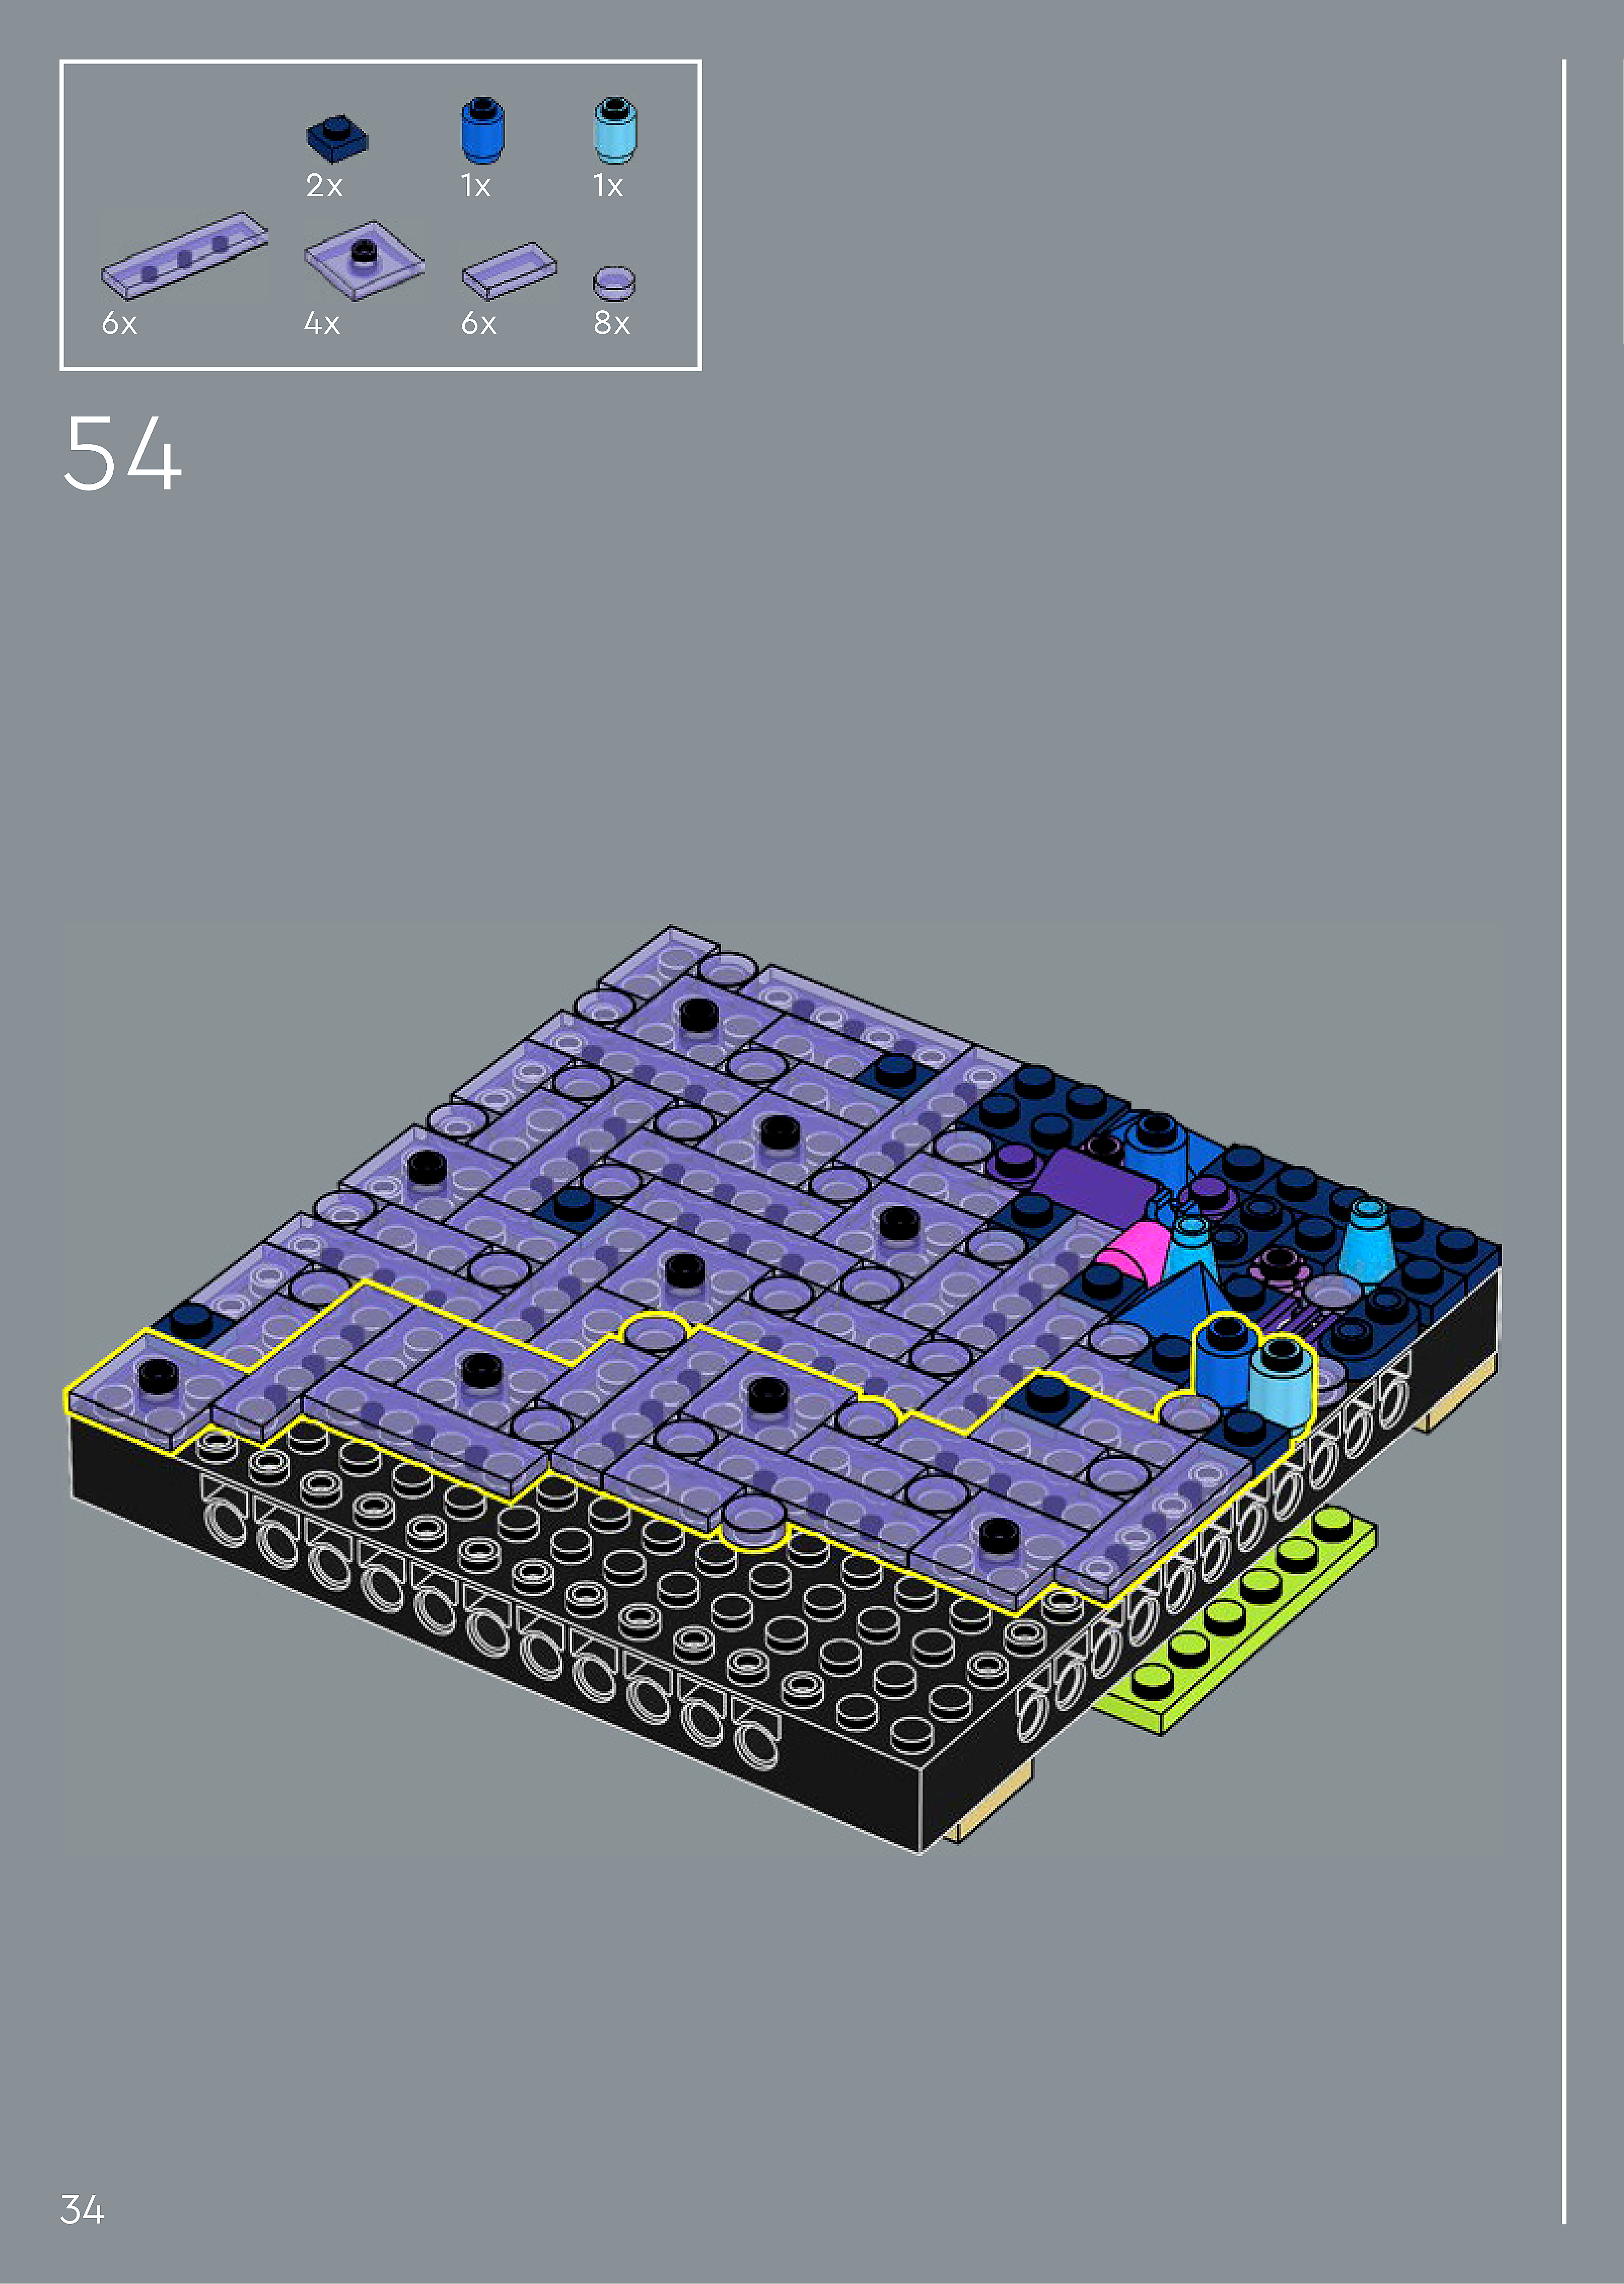
Assembly — page 34
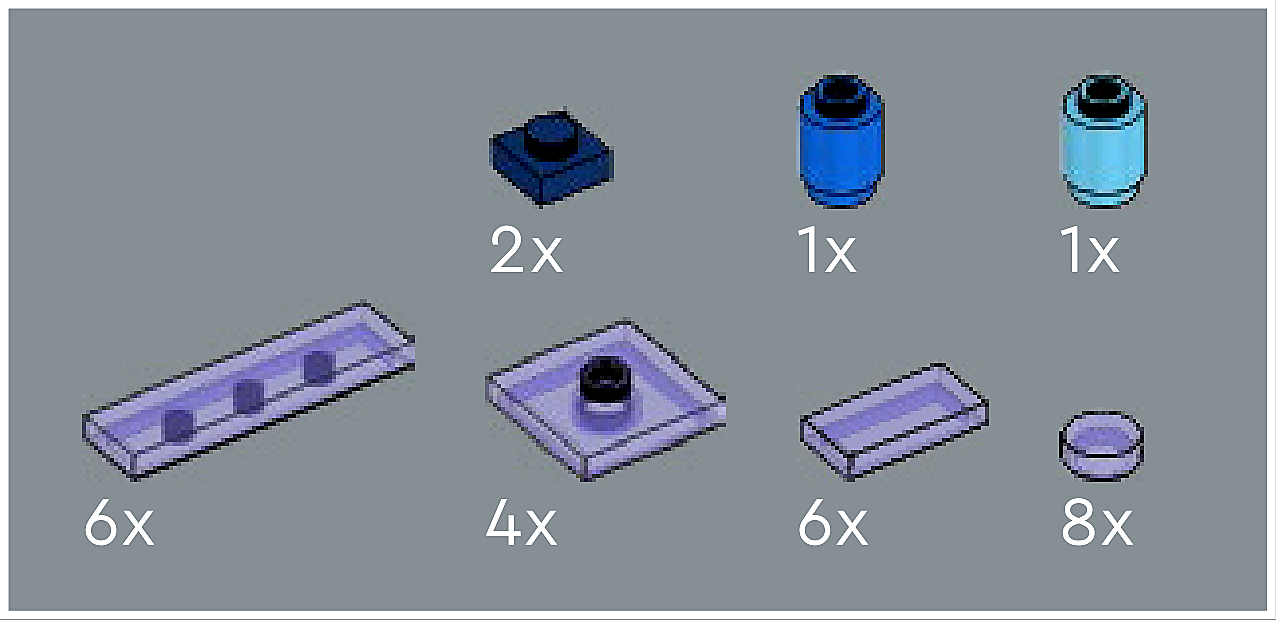
Inset — page 34
Phase 2 — Pieces
What do I do here?
Look at the inset image above. Check that the AI has correctly identified each piece — colour, quantity, and part name. If anything is wrong, edit the table directly. Add any missing pieces using the + row button, or remove incorrect ones with ✕.
When you are satisfied that all pieces are correct, click Save Pieces. This enables Phase 3 to run for this step.
| Qty | Colour | Part name | Part # | |
|---|---|---|---|---|
Phase 3 — Spatial placement
What do I do here?
The AI has described where each piece was placed by comparing the before and after images. Read every description carefully. Check that directions (left, right, front, back) are correct from the builder's perspective, and that stud counts are accurate.
If a description is vague, wrong, or uses the wrong direction — click Edit in that row and correct it. Once every placement description for this step is accurate, click Approve. Approval is required before the accessible prose can be generated.
This is the most important phase — a blind builder will follow these descriptions precisely.
Not yet extracted.
Phase 4 — Accessible prose
What do I do here?
This step is completed by the builder, not the sighted reviewer. The app generates an accessible prose paragraph from the approved Phase 3 descriptions. No action is needed from you here — your work is done once Phase 3 is approved.
Not yet generated. Complete Phase 3 and approve placement first.
Step 55
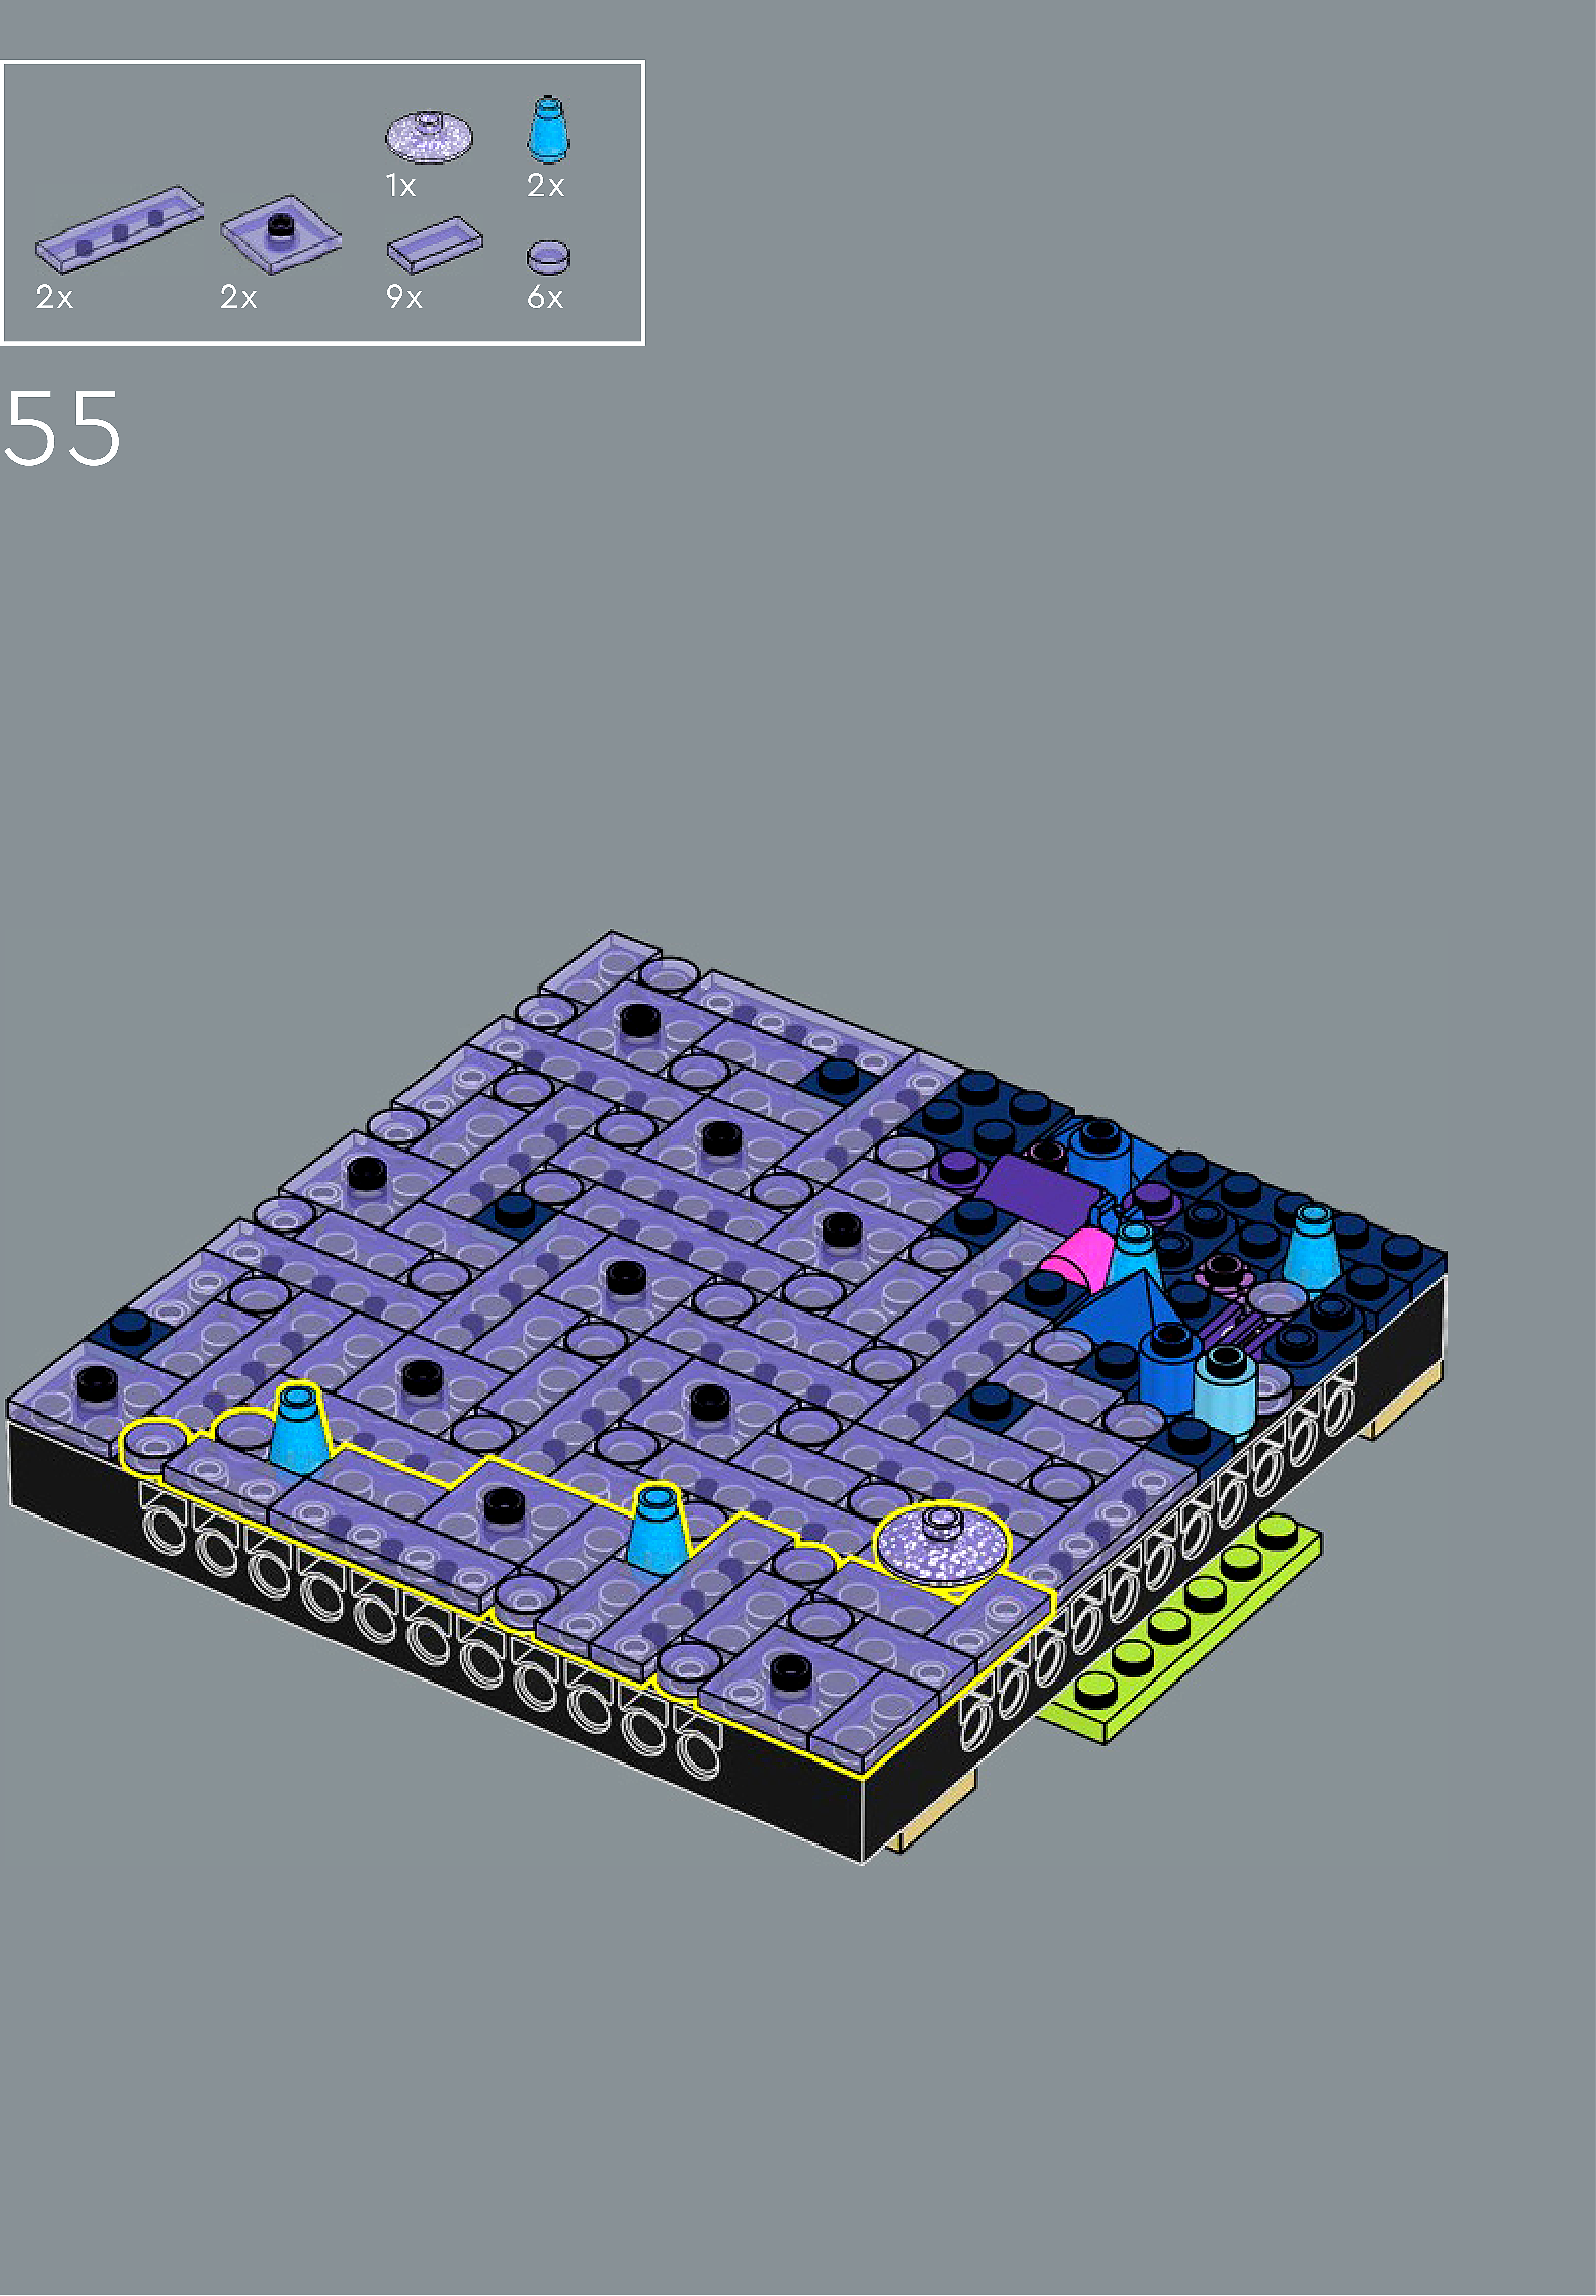
Assembly — page 34
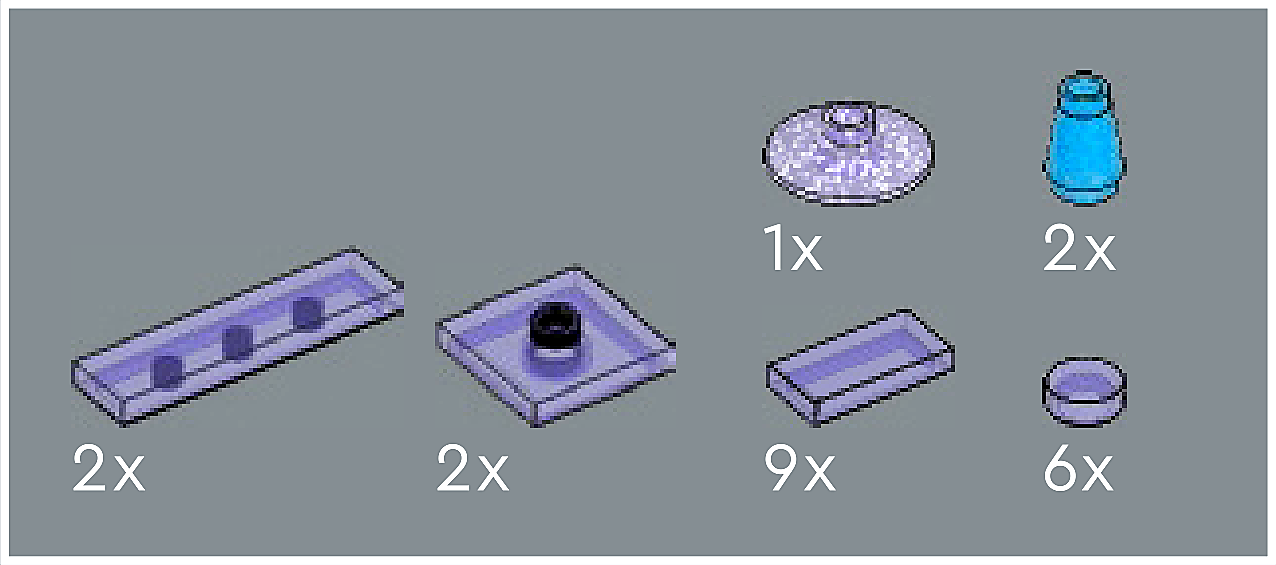
Inset — page 34
Phase 2 — Pieces
What do I do here?
Look at the inset image above. Check that the AI has correctly identified each piece — colour, quantity, and part name. If anything is wrong, edit the table directly. Add any missing pieces using the + row button, or remove incorrect ones with ✕.
When you are satisfied that all pieces are correct, click Save Pieces. This enables Phase 3 to run for this step.
| Qty | Colour | Part name | Part # | |
|---|---|---|---|---|
Phase 3 — Spatial placement
What do I do here?
The AI has described where each piece was placed by comparing the before and after images. Read every description carefully. Check that directions (left, right, front, back) are correct from the builder's perspective, and that stud counts are accurate.
If a description is vague, wrong, or uses the wrong direction — click Edit in that row and correct it. Once every placement description for this step is accurate, click Approve. Approval is required before the accessible prose can be generated.
This is the most important phase — a blind builder will follow these descriptions precisely.
Not yet extracted.
Phase 4 — Accessible prose
What do I do here?
This step is completed by the builder, not the sighted reviewer. The app generates an accessible prose paragraph from the approved Phase 3 descriptions. No action is needed from you here — your work is done once Phase 3 is approved.
Not yet generated. Complete Phase 3 and approve placement first.
Step 56
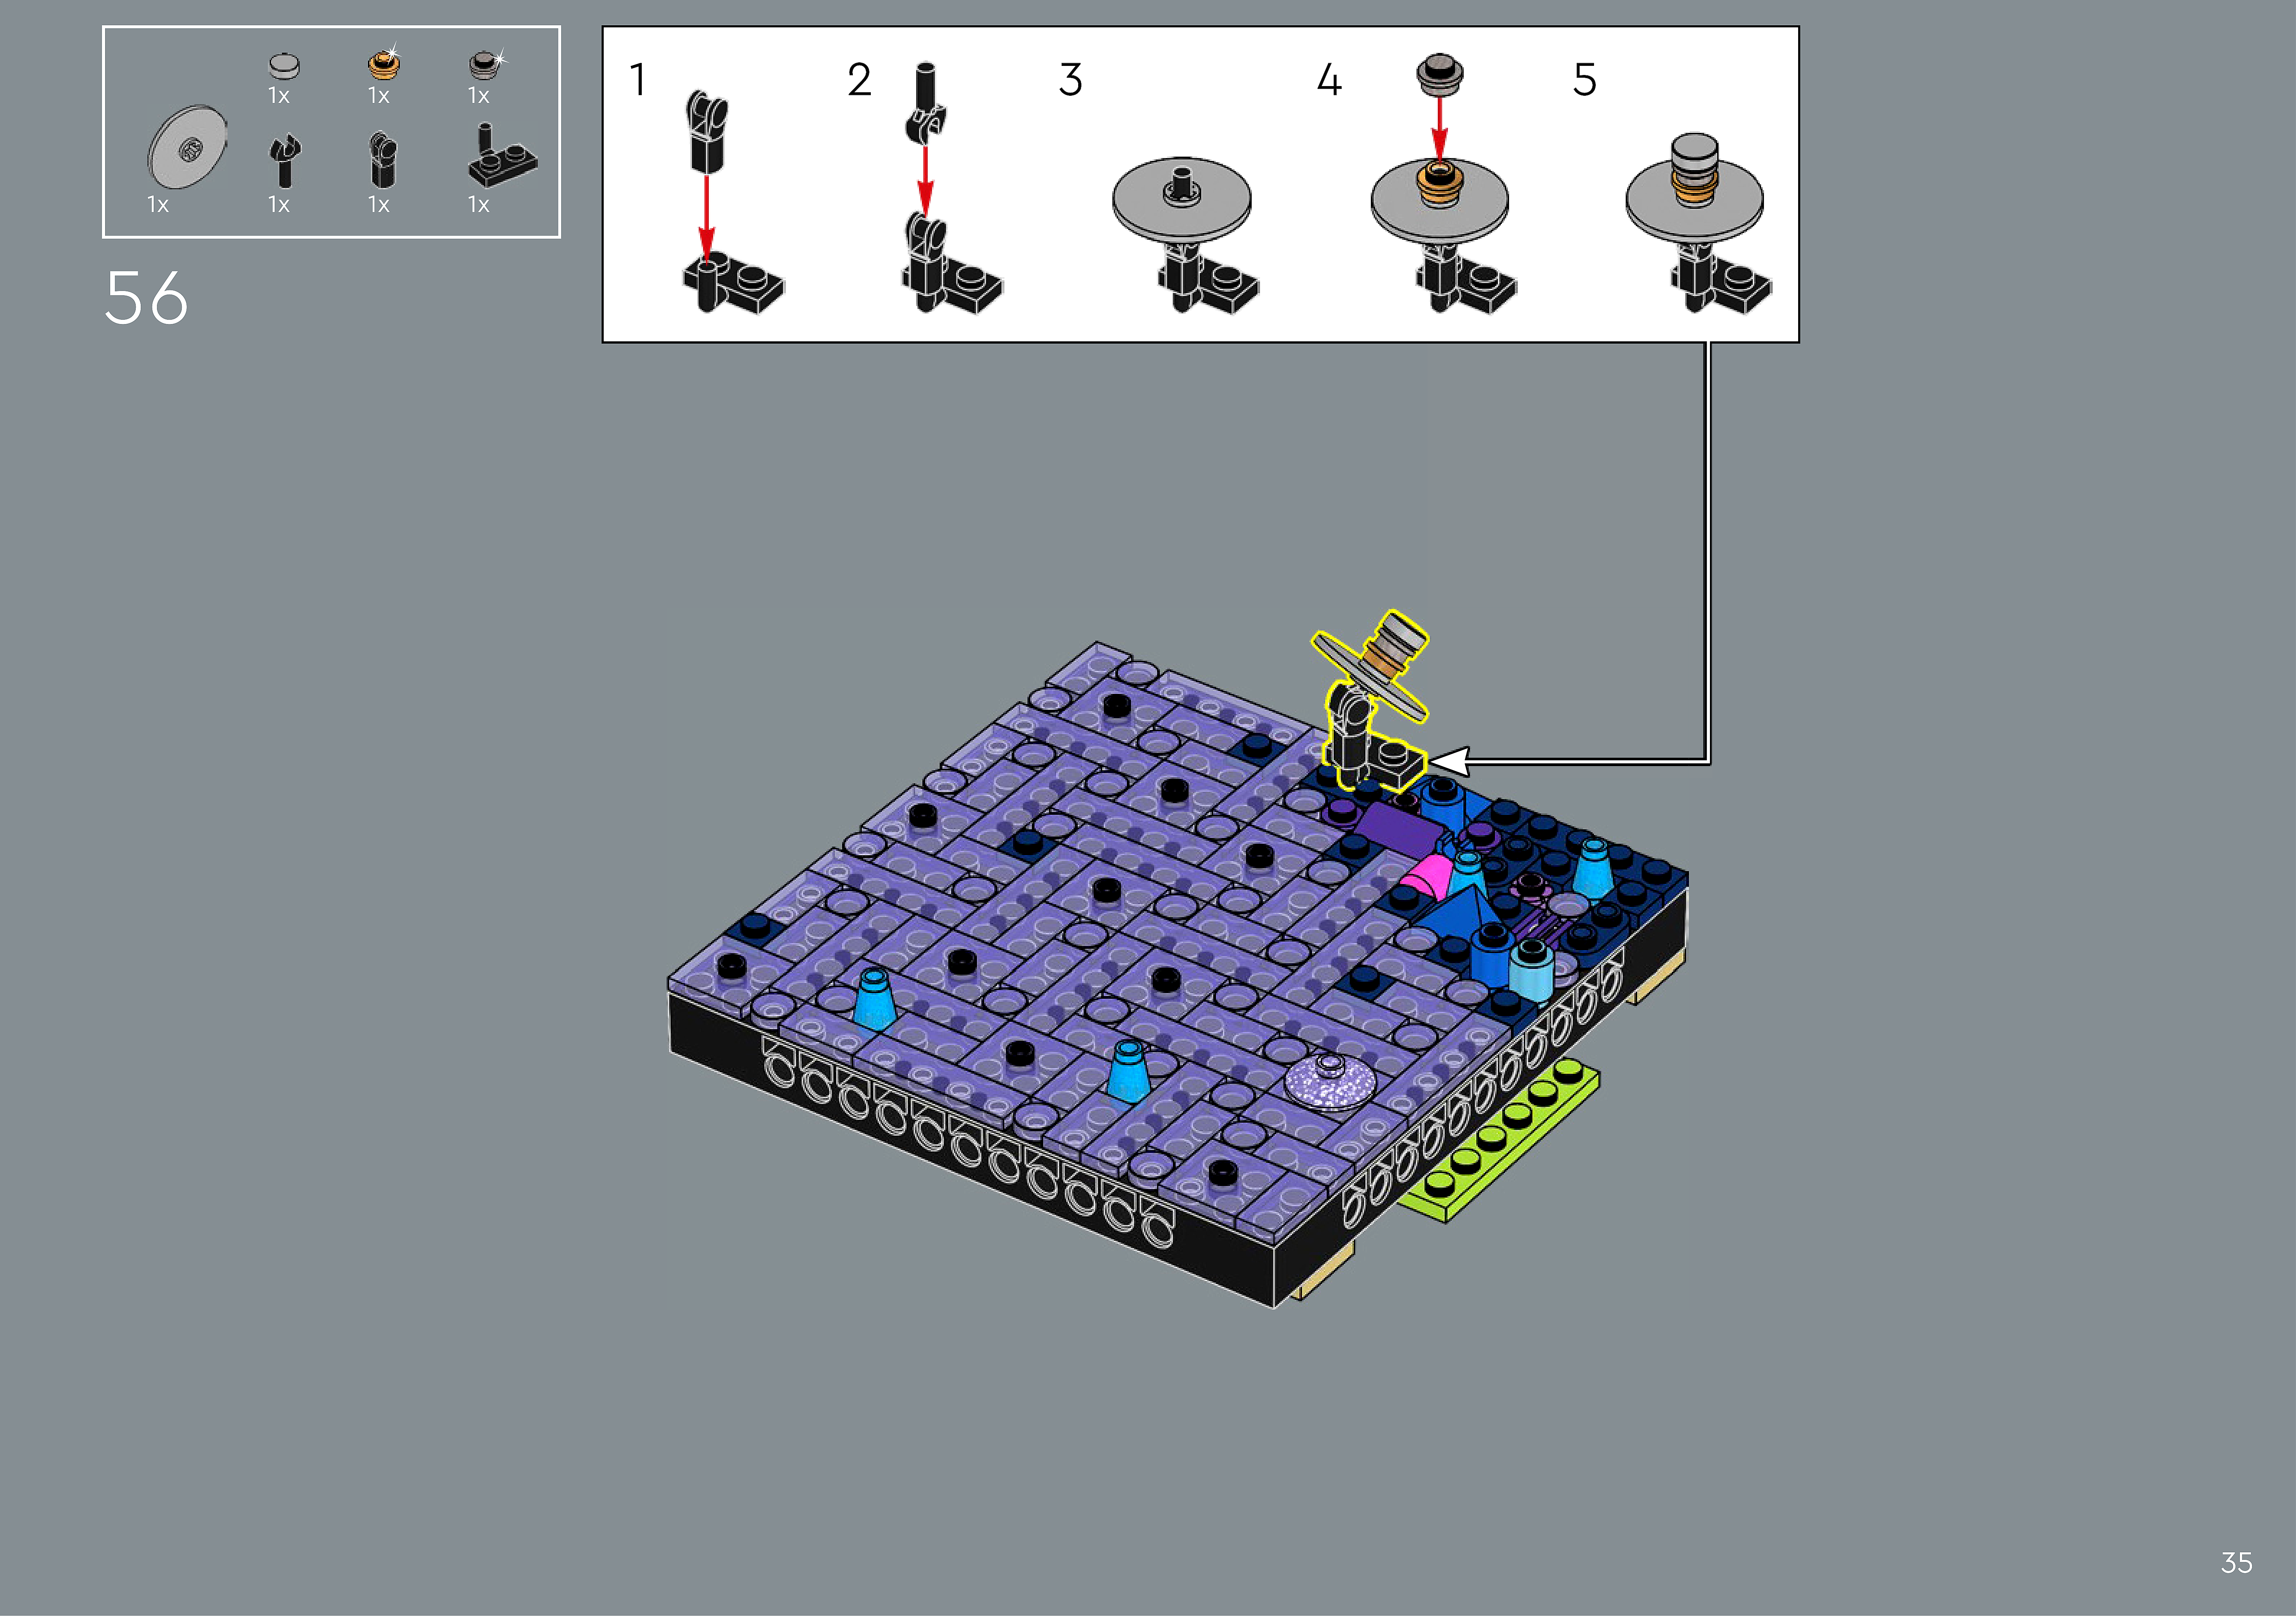
Assembly — page 35
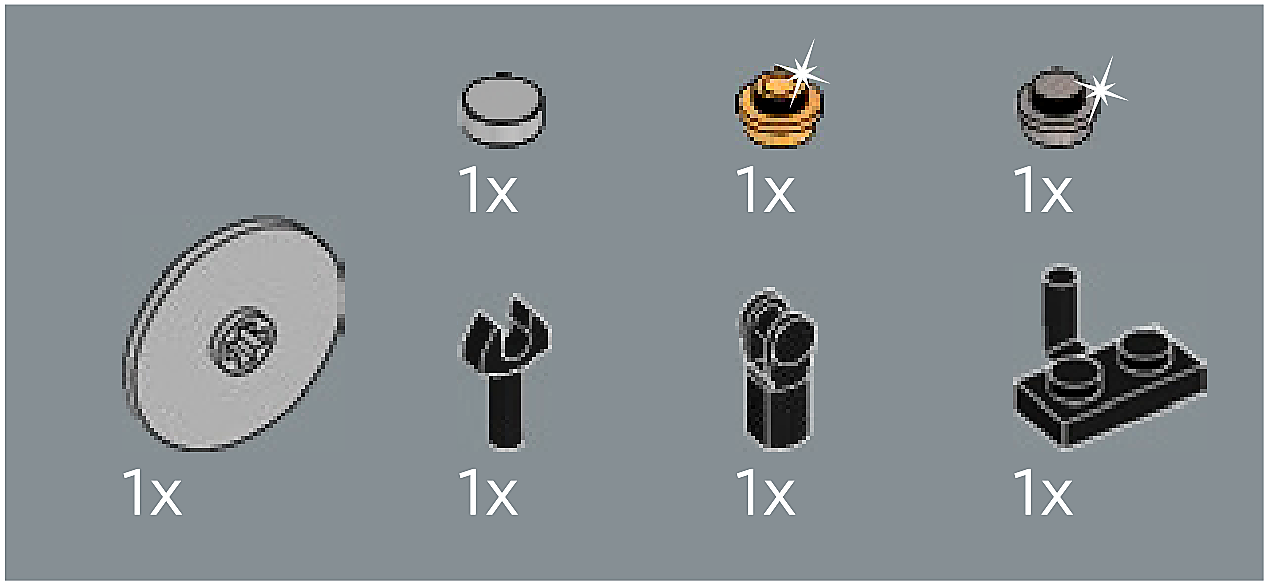
Inset — page 35
Phase 2 — Pieces
What do I do here?
Look at the inset image above. Check that the AI has correctly identified each piece — colour, quantity, and part name. If anything is wrong, edit the table directly. Add any missing pieces using the + row button, or remove incorrect ones with ✕.
When you are satisfied that all pieces are correct, click Save Pieces. This enables Phase 3 to run for this step.
| Qty | Colour | Part name | Part # | |
|---|---|---|---|---|
Phase 3 — Spatial placement
What do I do here?
The AI has described where each piece was placed by comparing the before and after images. Read every description carefully. Check that directions (left, right, front, back) are correct from the builder's perspective, and that stud counts are accurate.
If a description is vague, wrong, or uses the wrong direction — click Edit in that row and correct it. Once every placement description for this step is accurate, click Approve. Approval is required before the accessible prose can be generated.
This is the most important phase — a blind builder will follow these descriptions precisely.
Not yet extracted.
Phase 4 — Accessible prose
What do I do here?
This step is completed by the builder, not the sighted reviewer. The app generates an accessible prose paragraph from the approved Phase 3 descriptions. No action is needed from you here — your work is done once Phase 3 is approved.
Not yet generated. Complete Phase 3 and approve placement first.
Step 57

Assembly — page 36
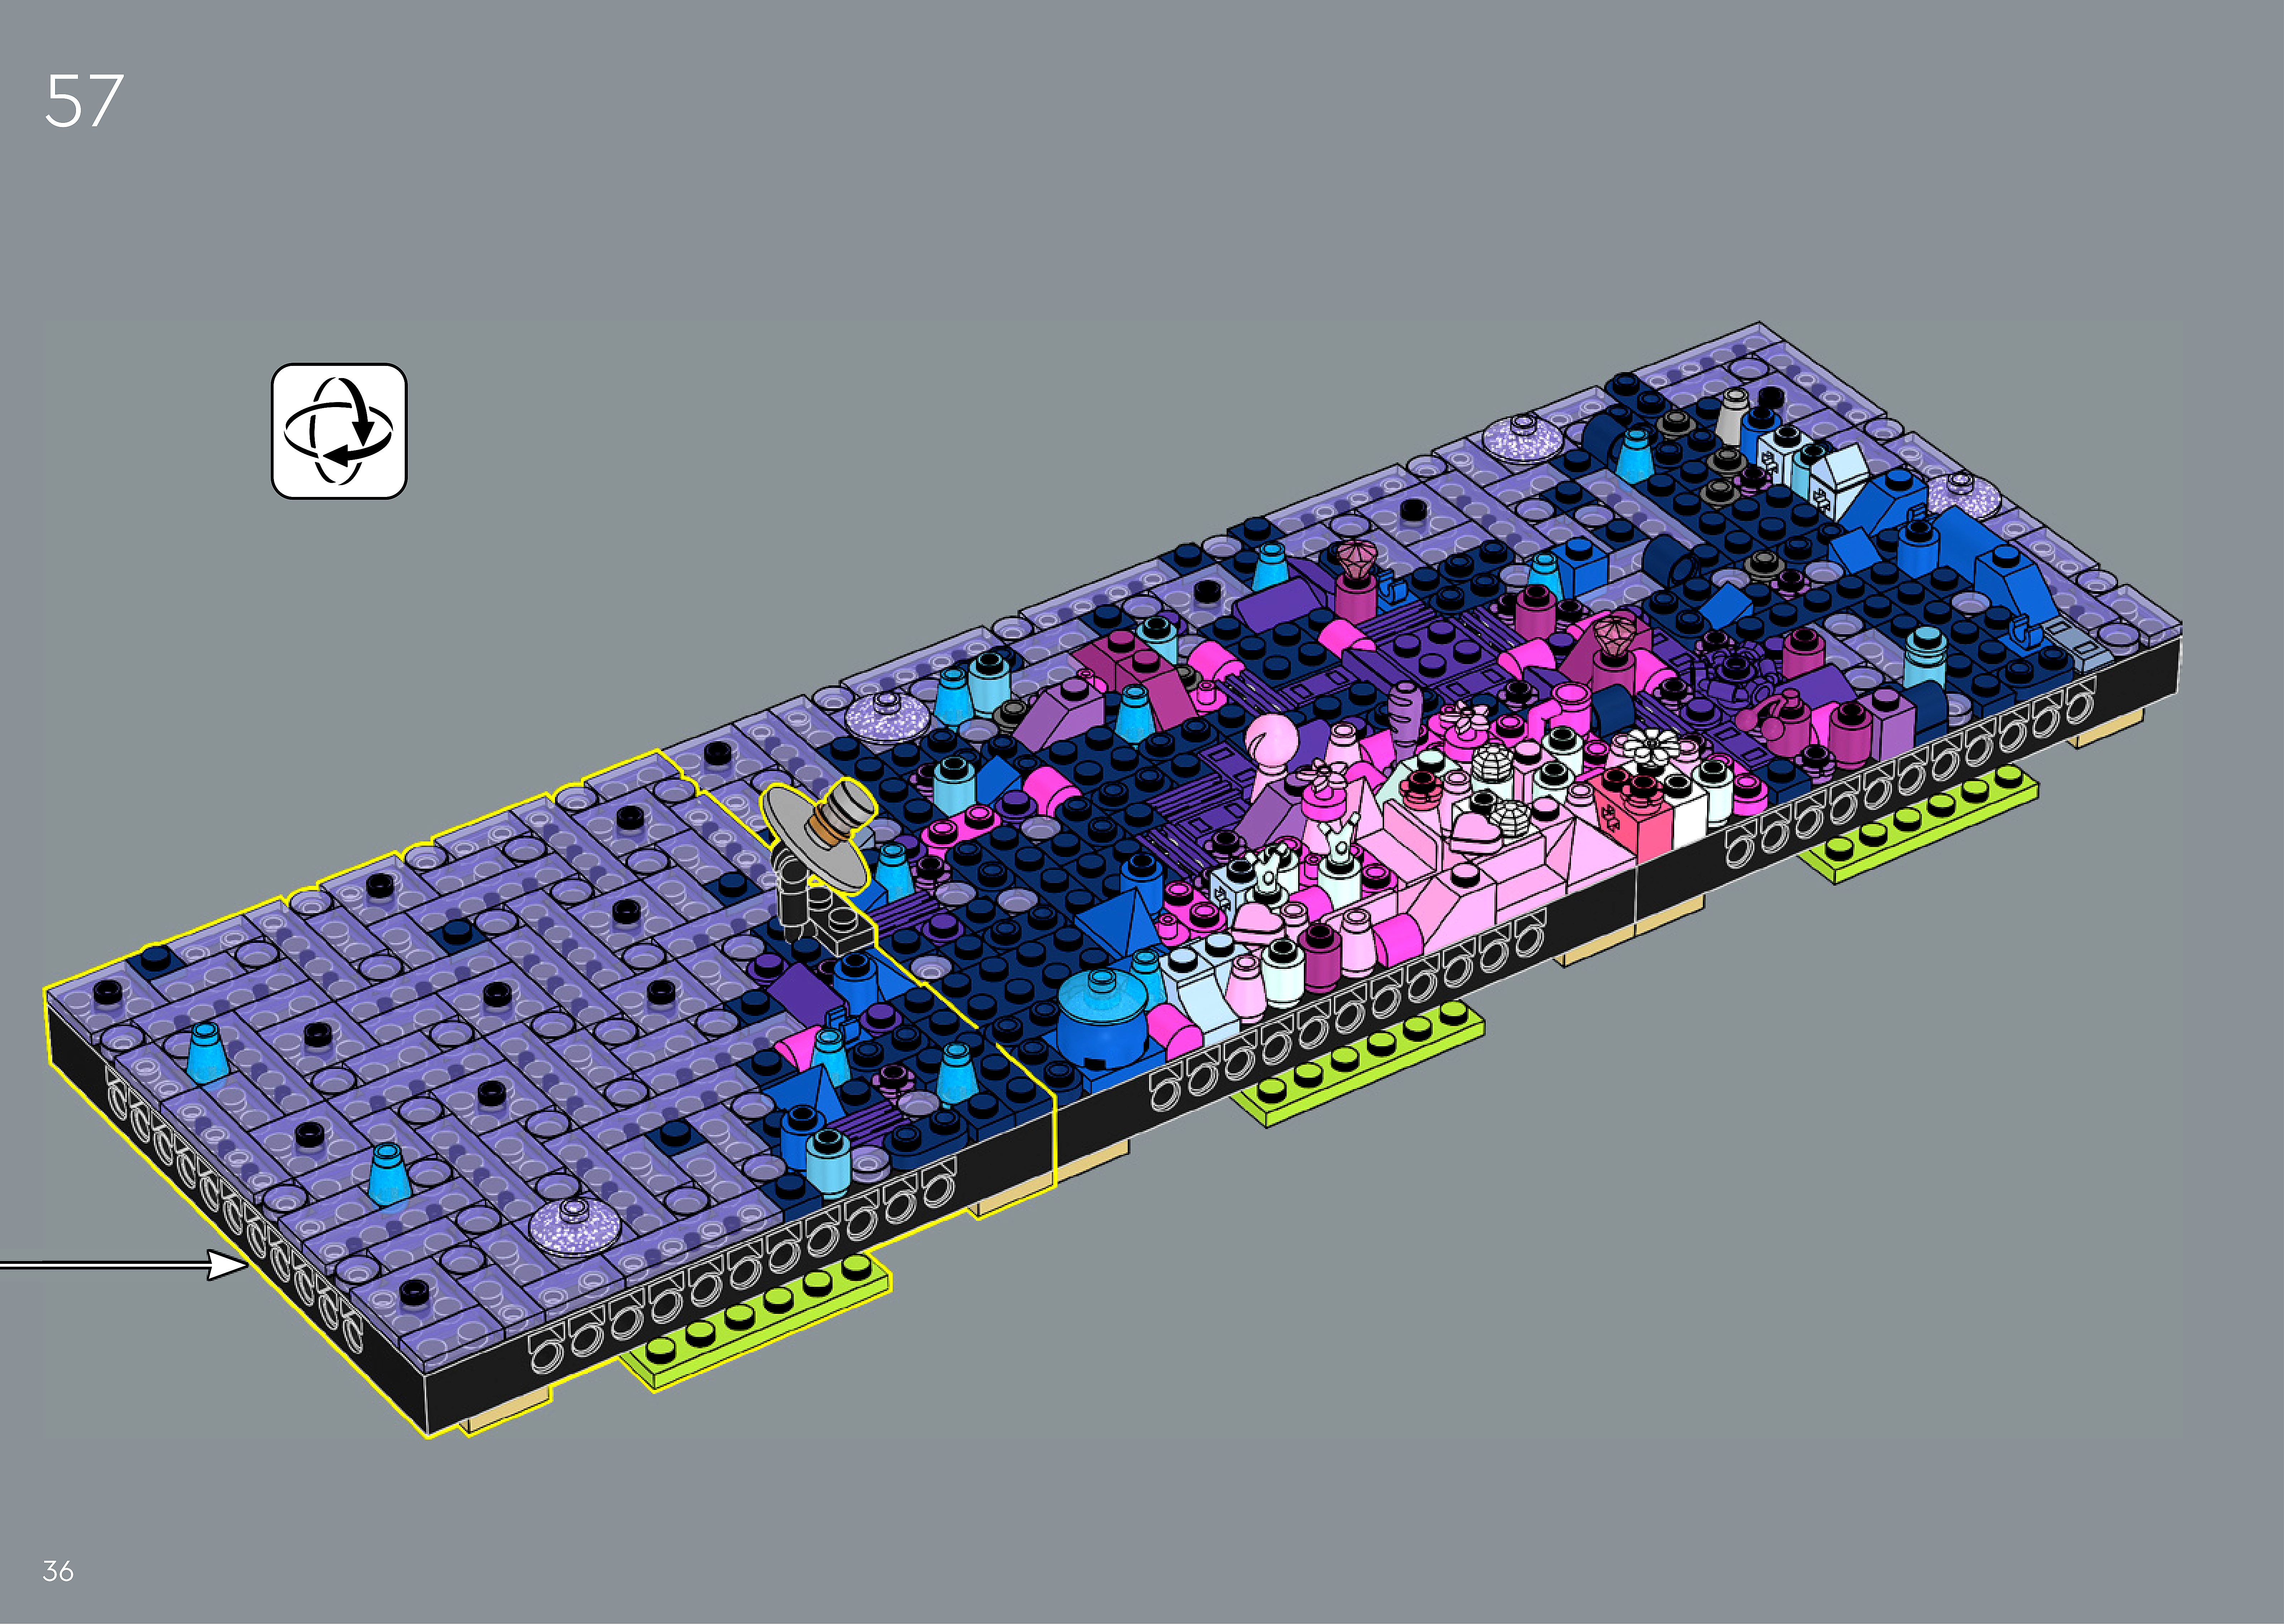
Inset — page 36
Phase 2 — Pieces
What do I do here?
Look at the inset image above. Check that the AI has correctly identified each piece — colour, quantity, and part name. If anything is wrong, edit the table directly. Add any missing pieces using the + row button, or remove incorrect ones with ✕.
When you are satisfied that all pieces are correct, click Save Pieces. This enables Phase 3 to run for this step.
Error: Error code: 400 - {'type': 'error', 'error': {'type': 'invalid_request_error', 'message': 'messages.0.content.0.image.source.base64: image exceeds 10 MB maximum: 12696012 bytes > 10485760 bytes'}, 'request_id': 'req_011CbTXrQiiKJ5XXDvV1yTRc'}
Phase 3 — Spatial placement
What do I do here?
The AI has described where each piece was placed by comparing the before and after images. Read every description carefully. Check that directions (left, right, front, back) are correct from the builder's perspective, and that stud counts are accurate.
If a description is vague, wrong, or uses the wrong direction — click Edit in that row and correct it. Once every placement description for this step is accurate, click Approve. Approval is required before the accessible prose can be generated.
This is the most important phase — a blind builder will follow these descriptions precisely.
Not yet extracted.
Phase 4 — Accessible prose
What do I do here?
This step is completed by the builder, not the sighted reviewer. The app generates an accessible prose paragraph from the approved Phase 3 descriptions. No action is needed from you here — your work is done once Phase 3 is approved.
Not yet generated. Complete Phase 3 and approve placement first.
Step 58
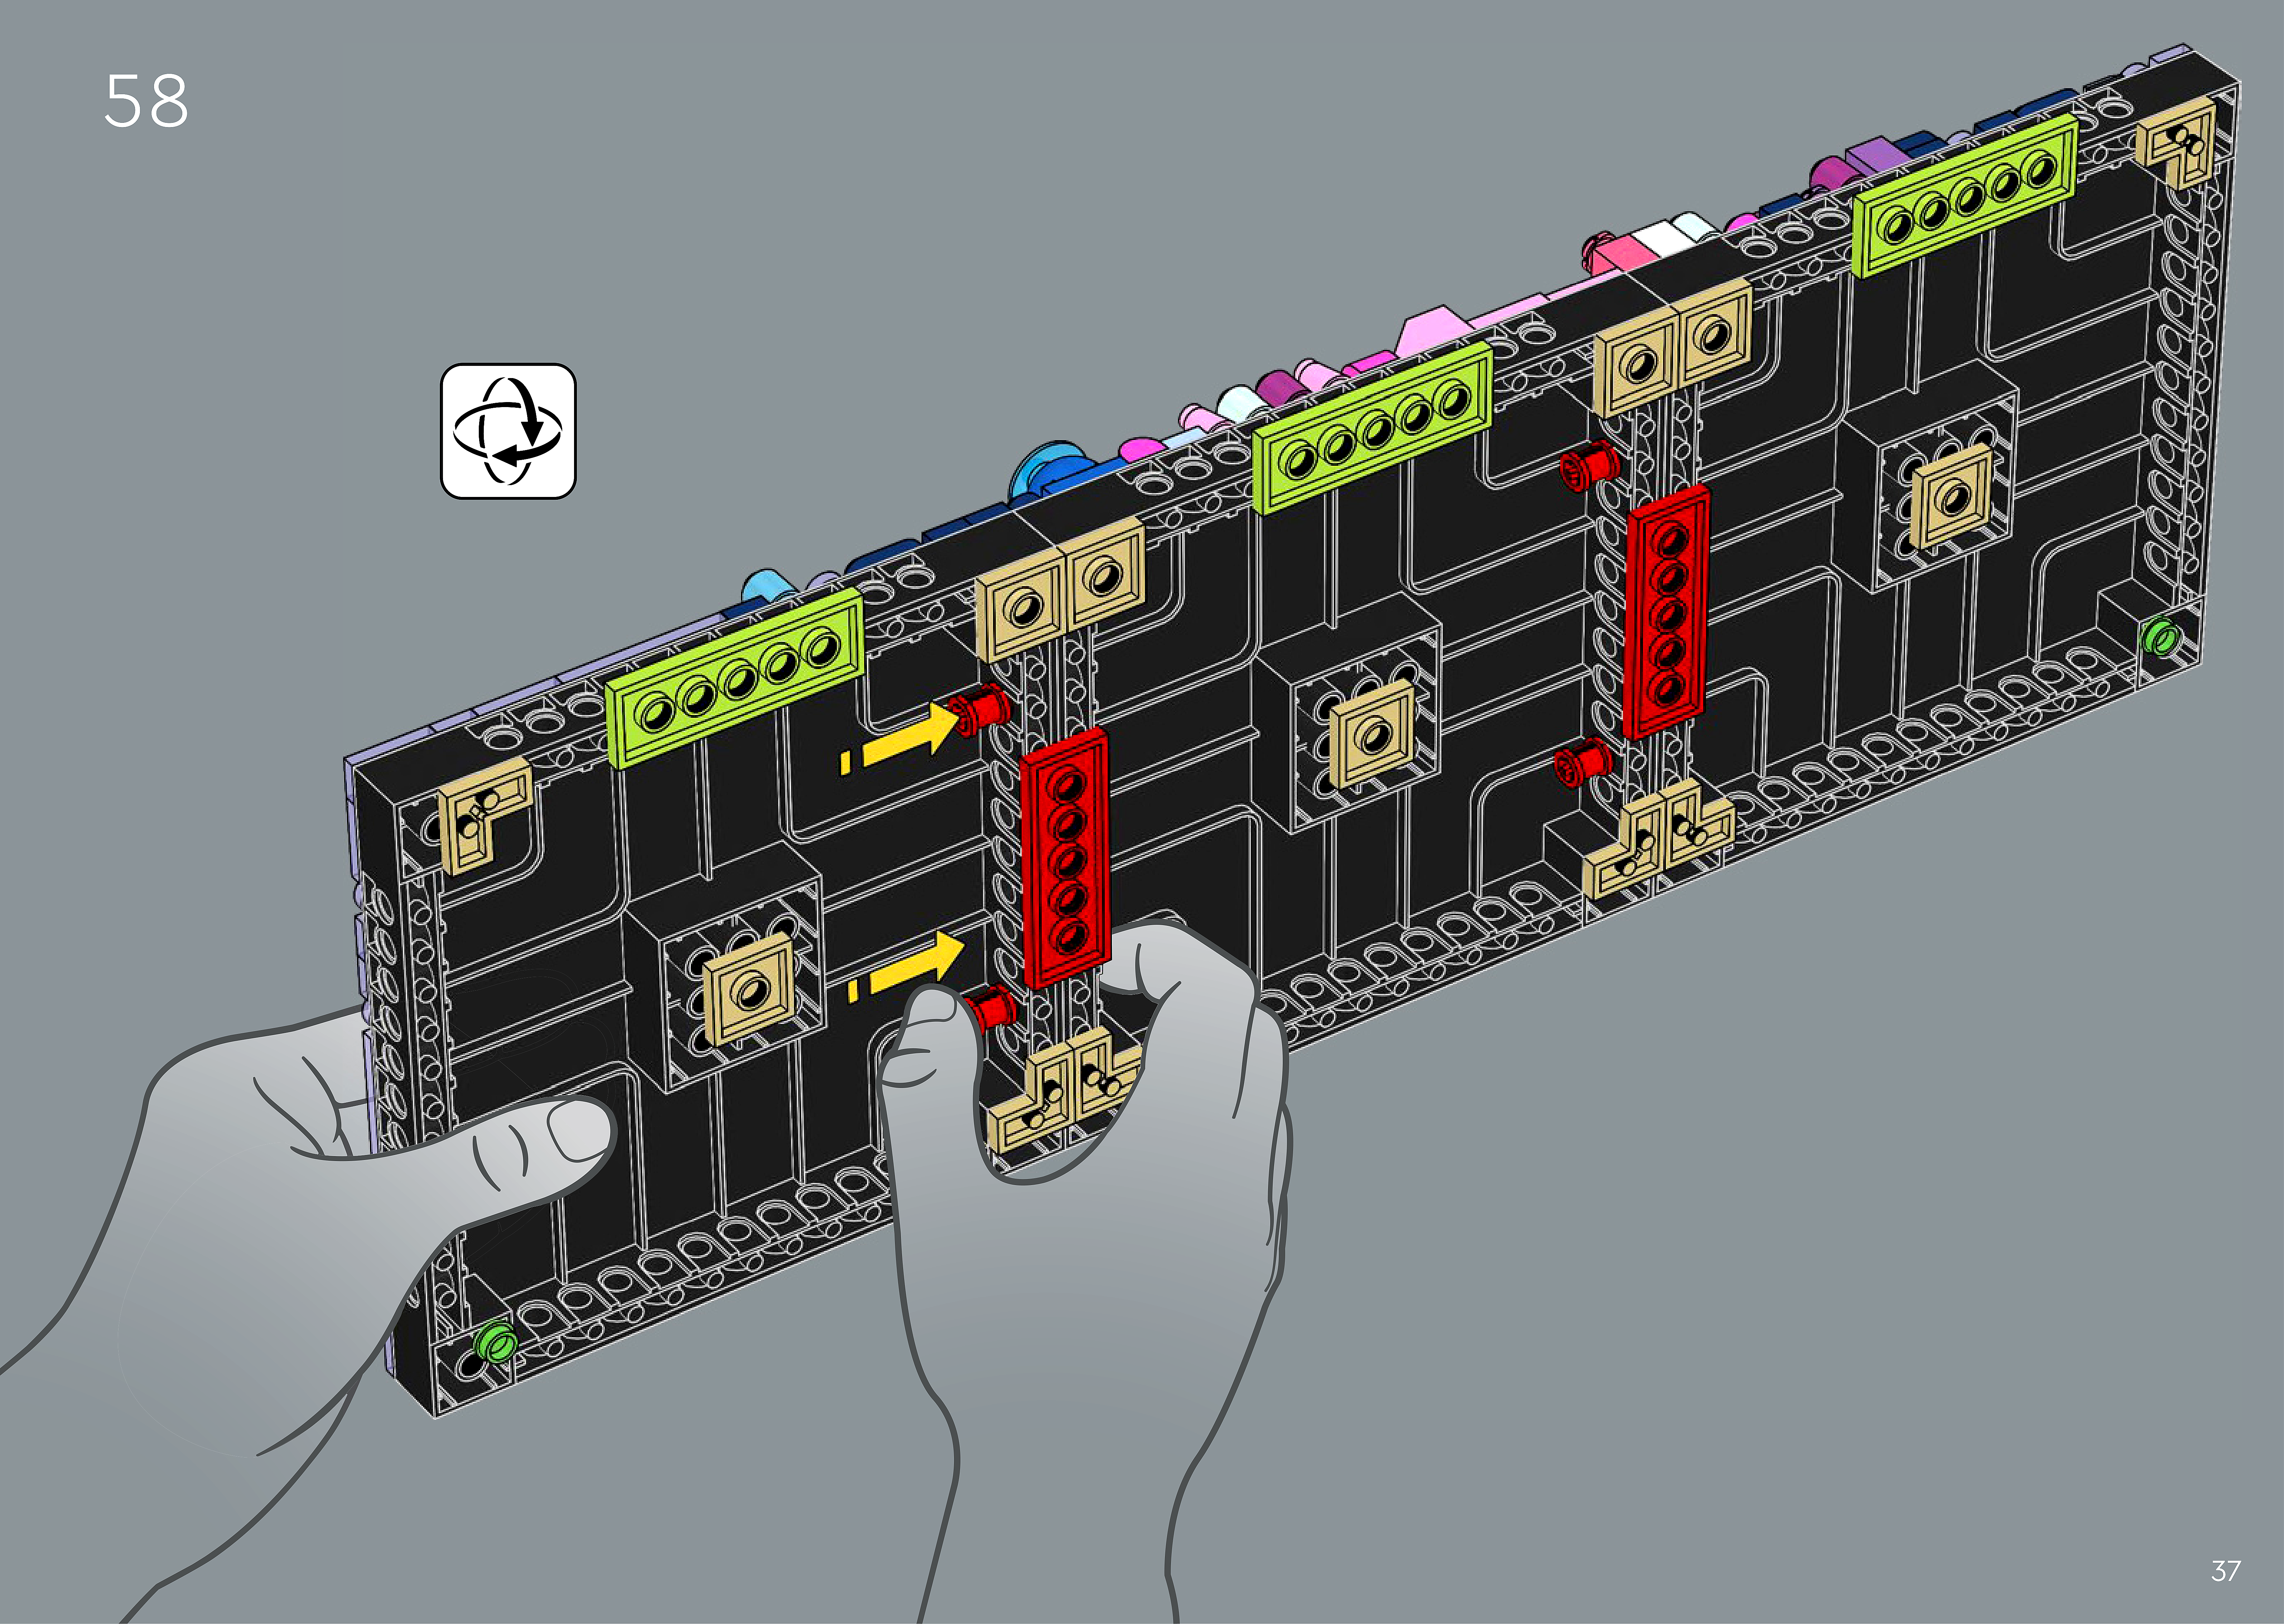
Assembly — page 37

Inset — page 37
Phase 2 — Pieces
What do I do here?
Look at the inset image above. Check that the AI has correctly identified each piece — colour, quantity, and part name. If anything is wrong, edit the table directly. Add any missing pieces using the + row button, or remove incorrect ones with ✕.
When you are satisfied that all pieces are correct, click Save Pieces. This enables Phase 3 to run for this step.
Error: Error code: 400 - {'type': 'error', 'error': {'type': 'invalid_request_error', 'message': 'messages.0.content.0.image.source.base64: image exceeds 10 MB maximum: 11872680 bytes > 10485760 bytes'}, 'request_id': 'req_011CbTXrZFB5ehCwscmpbc1A'}
Phase 3 — Spatial placement
What do I do here?
The AI has described where each piece was placed by comparing the before and after images. Read every description carefully. Check that directions (left, right, front, back) are correct from the builder's perspective, and that stud counts are accurate.
If a description is vague, wrong, or uses the wrong direction — click Edit in that row and correct it. Once every placement description for this step is accurate, click Approve. Approval is required before the accessible prose can be generated.
This is the most important phase — a blind builder will follow these descriptions precisely.
Not yet extracted.
Phase 4 — Accessible prose
What do I do here?
This step is completed by the builder, not the sighted reviewer. The app generates an accessible prose paragraph from the approved Phase 3 descriptions. No action is needed from you here — your work is done once Phase 3 is approved.
Not yet generated. Complete Phase 3 and approve placement first.
Step 59
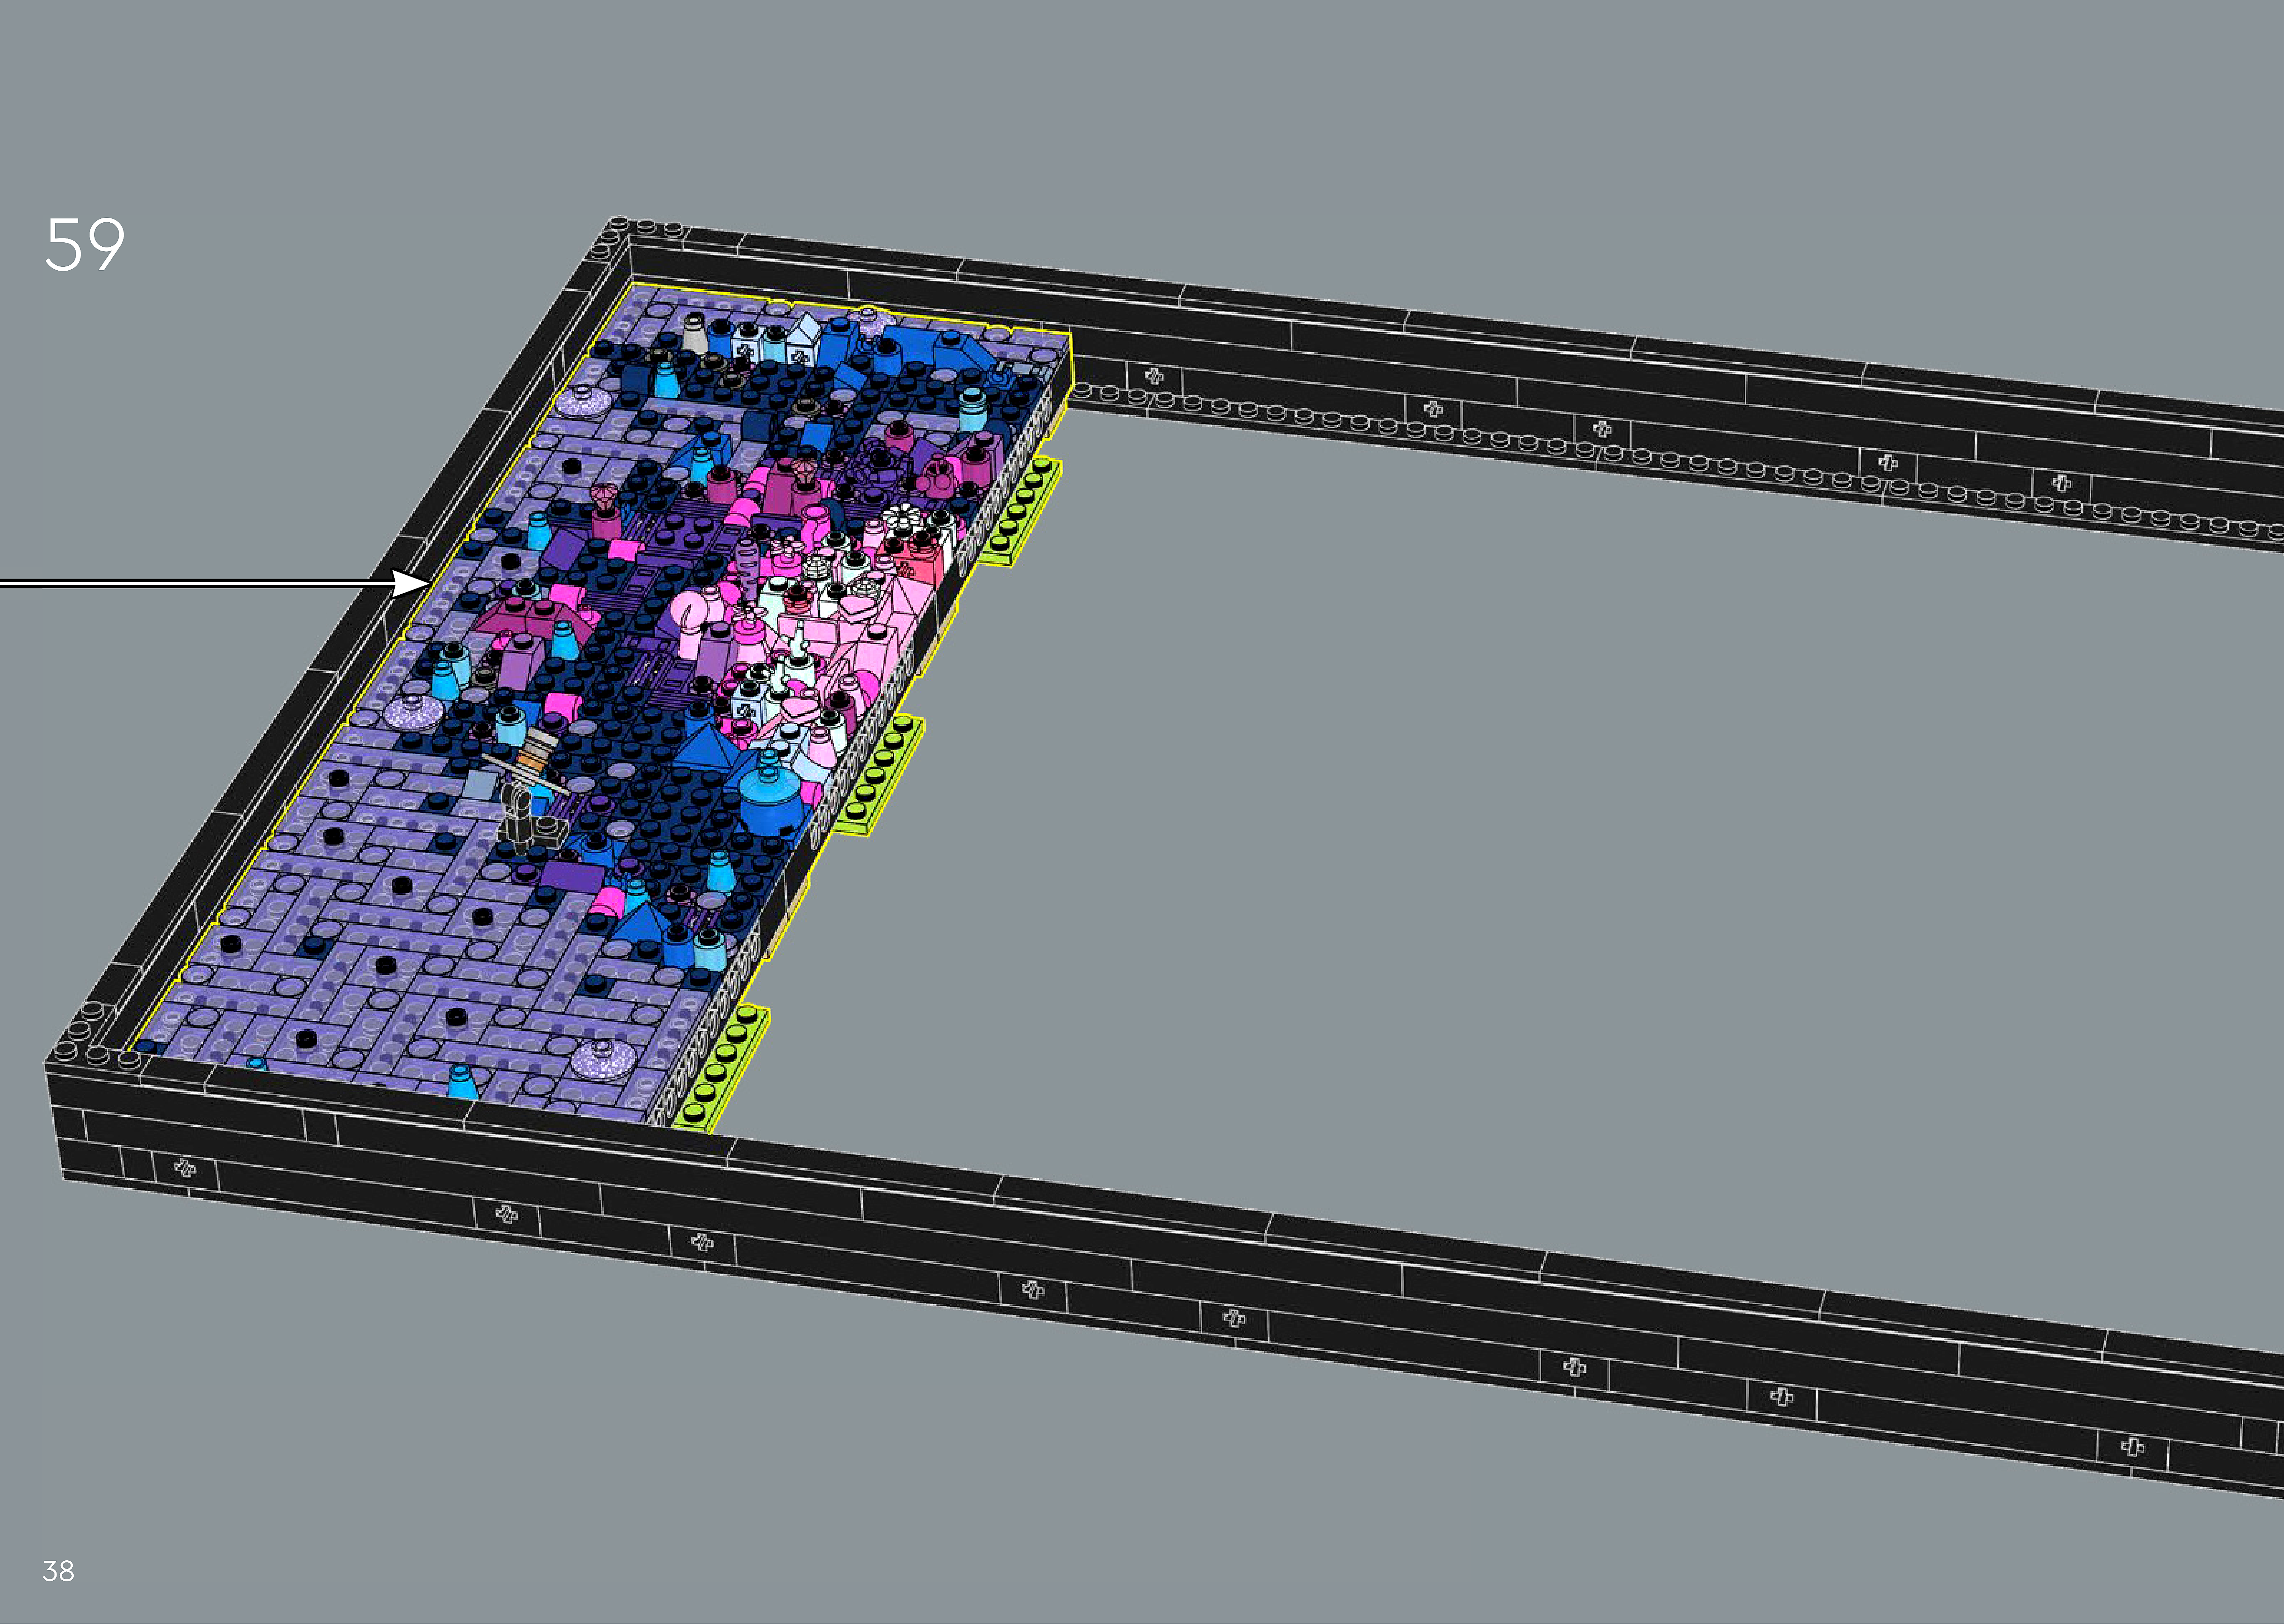
Assembly — page 38

Inset — page 38
Phase 2 — Pieces
What do I do here?
Look at the inset image above. Check that the AI has correctly identified each piece — colour, quantity, and part name. If anything is wrong, edit the table directly. Add any missing pieces using the + row button, or remove incorrect ones with ✕.
When you are satisfied that all pieces are correct, click Save Pieces. This enables Phase 3 to run for this step.
Error: Error code: 400 - {'type': 'error', 'error': {'type': 'invalid_request_error', 'message': 'messages.0.content.0.image.source.base64: image exceeds 10 MB maximum: 11121708 bytes > 10485760 bytes'}, 'request_id': 'req_011CbTXriotvCiGjoLYbgXuT'}
Phase 3 — Spatial placement
What do I do here?
The AI has described where each piece was placed by comparing the before and after images. Read every description carefully. Check that directions (left, right, front, back) are correct from the builder's perspective, and that stud counts are accurate.
If a description is vague, wrong, or uses the wrong direction — click Edit in that row and correct it. Once every placement description for this step is accurate, click Approve. Approval is required before the accessible prose can be generated.
This is the most important phase — a blind builder will follow these descriptions precisely.
Not yet extracted.
Phase 4 — Accessible prose
What do I do here?
This step is completed by the builder, not the sighted reviewer. The app generates an accessible prose paragraph from the approved Phase 3 descriptions. No action is needed from you here — your work is done once Phase 3 is approved.
Not yet generated. Complete Phase 3 and approve placement first.
Step 60
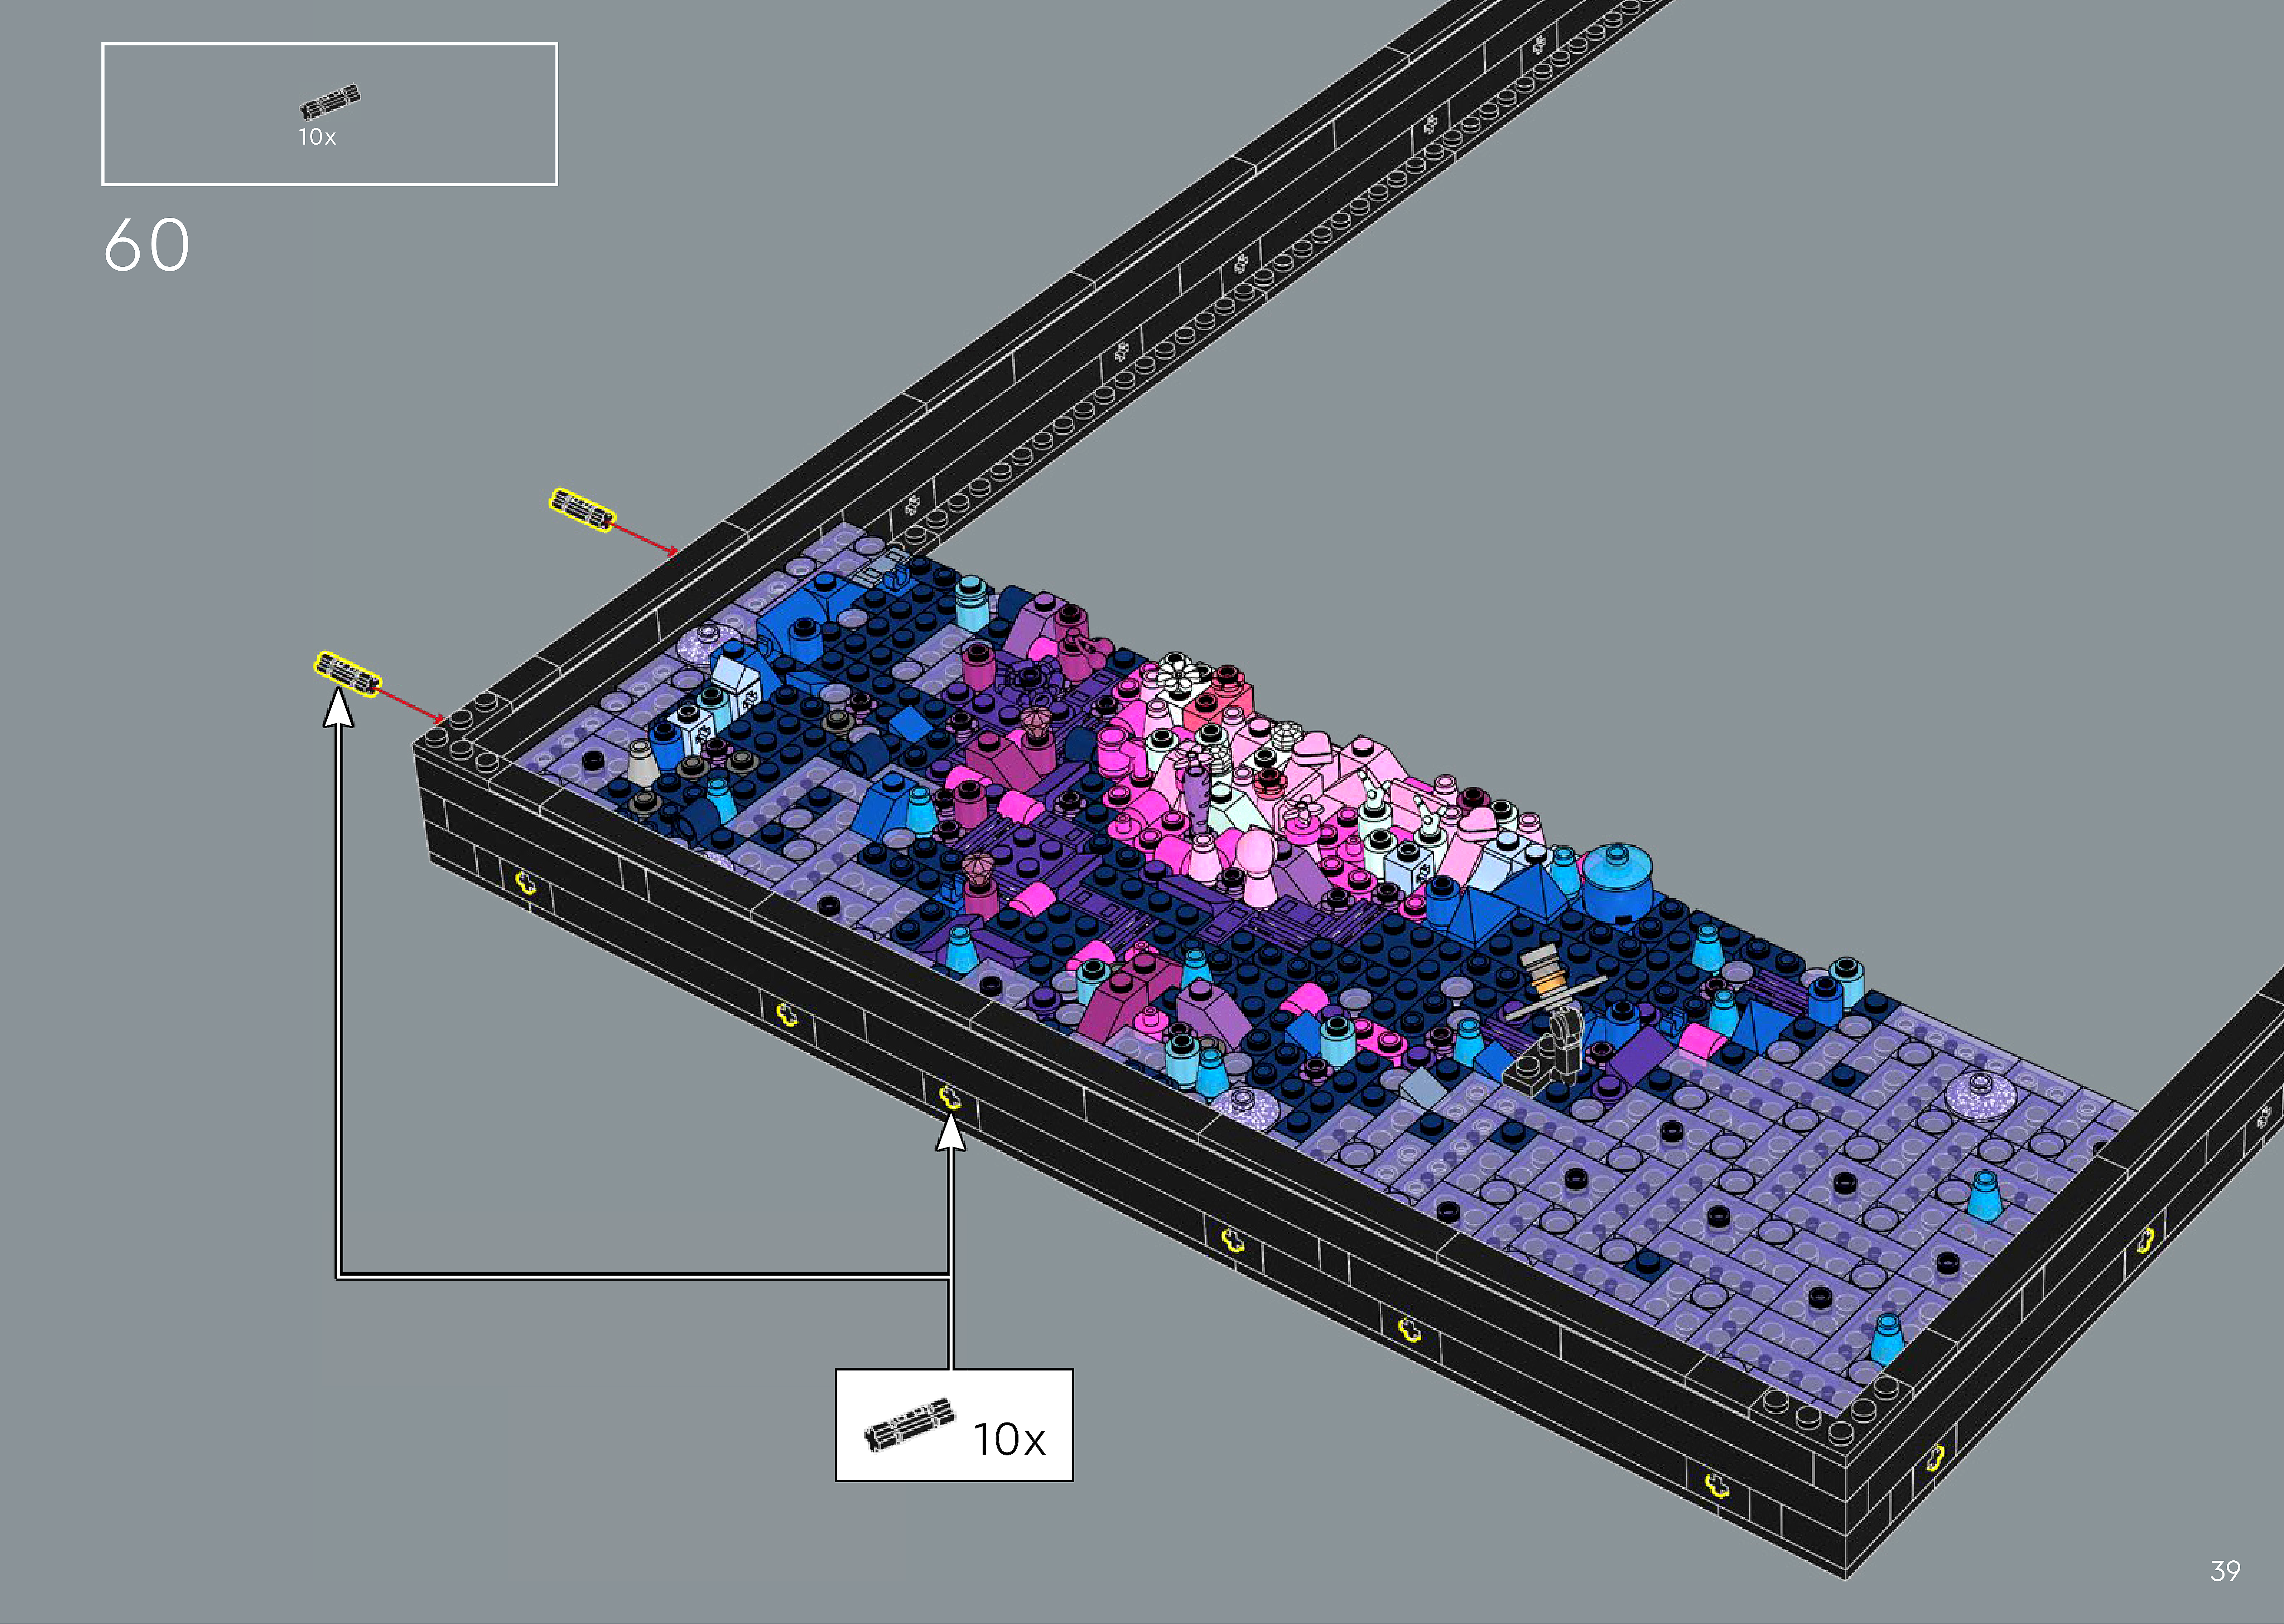
Assembly — page 39

Inset — page 39
Phase 2 — Pieces
What do I do here?
Look at the inset image above. Check that the AI has correctly identified each piece — colour, quantity, and part name. If anything is wrong, edit the table directly. Add any missing pieces using the + row button, or remove incorrect ones with ✕.
When you are satisfied that all pieces are correct, click Save Pieces. This enables Phase 3 to run for this step.
| Qty | Colour | Part name | Part # | |
|---|---|---|---|---|
Phase 3 — Spatial placement
What do I do here?
The AI has described where each piece was placed by comparing the before and after images. Read every description carefully. Check that directions (left, right, front, back) are correct from the builder's perspective, and that stud counts are accurate.
If a description is vague, wrong, or uses the wrong direction — click Edit in that row and correct it. Once every placement description for this step is accurate, click Approve. Approval is required before the accessible prose can be generated.
This is the most important phase — a blind builder will follow these descriptions precisely.
Not yet extracted.
Phase 4 — Accessible prose
What do I do here?
This step is completed by the builder, not the sighted reviewer. The app generates an accessible prose paragraph from the approved Phase 3 descriptions. No action is needed from you here — your work is done once Phase 3 is approved.
Not yet generated. Complete Phase 3 and approve placement first.